Pytorch神经网络实战学习笔记_15 卷积神经网络实现+卷积计算的图解
1 卷积神经网络接口
1.1 卷积接口介绍
- torch.nn.functional.conv1d:实现按照1个维度进行的卷积操作,常用于处理序列数据。
- torch.nn.functional.conv2d:实现按照2个维度进行的卷积操作,常用于处理二维平面图片。
- torch.nn.functional.conv3d:实现按照3个维度进行的卷积操作,常用于处理三维图形数据。
1.2卷积函数的定义
torch.nn.functional.conv2d(input, weight, bias=None, stride=1, padding=0, dilation=1, groups=1)?
- input:输入图像的大小(minibatch,in_channels,H,W),是一个四维tensor
- filters:卷积核的大小(out_channels,in_channe/groups,H,W),是一个四维tensor
- bias:每一个channel的bias,是一个维数等于out_channels的tensor
- stride:一个数或者一个二元组(SH,SW),代表纵向和横向的步长
- padding:一个数或者一个二元组(PH,PW ),代表纵向和横向的填充值
- dilation:一个数,代表卷积核内部每个元素之间间隔元素的数目(不常用,默认为0)
- groups:一个数,代表分组卷积时分的组数,特别的当groups = in_channel时,就是在做逐层卷积(depth-wise conv).
1.2 卷积函数的类实现
class torch.nn.Conv2d(in_channels, out_channels, kennel_size, stride=1, padding=0, dilation=1, groups=1, bias=true)
- in_channels(int) 输入特征图的通道数
- out_channels(int) 输出特征图的通道数
- kenal_size(int or tuple) 卷积核大小
- stride(int or tuple, optional) 卷积核的步长,默认为1
- padding(int or tuple,optional) 输入的每一条边补充0的层数,默认为0
- dilation(int or tuple, optional) 卷积核元素间的距离,默认为1
- groups(int,optional)将原始输入通道划分成的组数,默认为1
- bias(bool,optional) 默认为True,表示输出的bias可学习
1.3 两者区别
torch.nn.Conv2D是一个类,而torch.nn.functional.conv2d是一个函数,在Sequential里面只能放nn.xxx,而nn.functional.xxx是不能放入Sequential里面的。
nn.Module 实现的 layer 是由 class Layer(nn.Module) 定义的特殊类,nn.functional 中的函数是纯函数,由 def function(input) 定义。
nn.functional.xxx 需要自己定义 weight,每次调用时都需要手动传入 weight,而 nn.xxx 则不用。
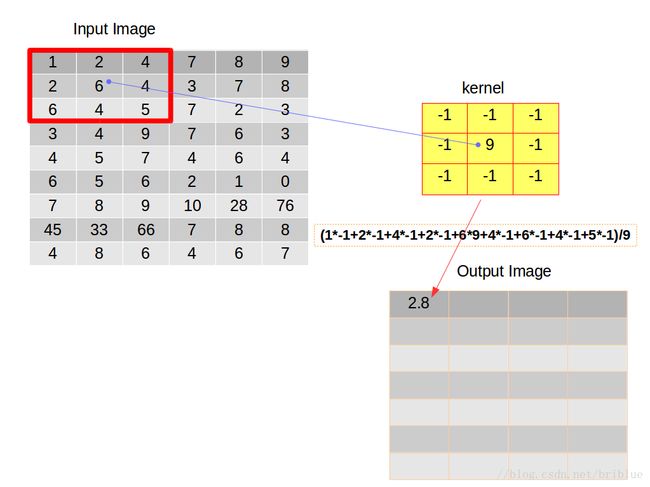
1.4 卷积函数的操作步骤
1.5 卷积操作的类型
1.5.1 窄卷积(vaild卷积)
即生成的特征图比原来的原始图片小。它的步长是可变的。假如,滑动步长为S,原始图片的维度为N1×N1。卷积核的大小为卷积后图像大小为[(N1-N2)/S + 1]。
1.5.2 同卷积(same卷积),
卷积后的图片尺寸与原始的一样大,同卷积的步长是固定的,滑动步长为1。一般操作时都要使用padding操作(在原始图片的外围补0,来确保生成的尺寸不变)。
1.5.3 全卷积(full卷积),也称反卷积,主要用作反卷积网络中,用于图像的恢复与还原。
将原始图片里面的每个像素点都用卷积操作展开。如图7-16所示,白色的块是原始图片,浅色的是卷积核,深色的是正在卷积操作的像素点。在全卷积操作的过程中,同样需要对原有图片进行padding操作,生成的结果会比原有的图片尺寸大。步长固定为1,卷积核的大小为卷积后图像大小为[N1-N2-1]
2 卷积函数的使用
2.1 定义卷积输入变量 — CNN_New.py(第01部分)
import torch

### 1.1 定义输入变量
# [batch,in_channels,in_height,in_width]
# [训练时一个batch的图片数量,图像通道数,图片高度,图片宽度]
input1 = torch.ones([1,1,5,5])
input2 = torch.ones([1,2,5,5])
input3 = torch.ones([1,1,4,4])
2.2 验证卷积的补0规则 — CNN_New.py(第02部分)
### 1.2 验证补0规则
# 设置padding为1,在输入数据上补1排0
padding1 = torch.nn.functional.conv2d(input1,torch.ones([1,1,1,1]),stride=1,padding=1)
print(padding1)
# 设置padding为1,在输入数据上补2行0
padding2 = torch.nn.functional.conv2d(input1,torch.ones([1,1,1,1]),stride=1,padding=(1,2))
print(padding2)
tensor([[[[0., 0., 0., 0., 0., 0., 0.],
[0., 1., 1., 1., 1., 1., 0.],
[0., 1., 1., 1., 1., 1., 0.],
[0., 1., 1., 1., 1., 1., 0.],
[0., 1., 1., 1., 1., 1., 0.],
[0., 1., 1., 1., 1., 1., 0.],
[0., 0., 0., 0., 0., 0., 0.]]]])
tensor([[[[0., 0., 0., 0., 0., 0., 0., 0., 0.],
[0., 0., 1., 1., 1., 1., 1., 0., 0.],
[0., 0., 1., 1., 1., 1., 1., 0., 0.],
[0., 0., 1., 1., 1., 1., 1., 0., 0.],
[0., 0., 1., 1., 1., 1., 1., 0., 0.],
[0., 0., 1., 1., 1., 1., 1., 0., 0.],
[0., 0., 0., 0., 0., 0., 0., 0., 0.]]]])
2.3 卷积核的定义 — CNN_New.py(第03部分)
### 1.3 定义卷积核变量
# [out_channels,in_channels,filter_height,filter_width]
# [卷积核个数,图像通道数,卷积核的高度,卷积核的宽度
filter1 = torch.tensor([-1.0,0,0,-1]).reshape([1,1,2,2]) # 1通道输入和1通道输出的2X2矩阵
filter2 = torch.tensor([-1.0,0,0,-1,-1.0,0,0,-1]).reshape([2,1,2,2])# 1通道输入和2通道输出的2X2矩阵
filter3 = torch.tensor([-1.0,0,0,-1,-1.0,0,0,-1,-1.0,0,0,-1]).reshape([3,1,2,2])# 1通道输入和3通道输出的2X2矩阵
filter4 = torch.tensor([-1.0,0,0,-1,-1.0,0,0,-1,-1.0,0,0,-1,-1.0,0,0,-1]).reshape([2,2,2,2])# 2通道输入和2通道输出的2X2矩阵
filter5 = torch.tensor([-1.0,0,0,-1,-1.0,0,0,-1]).reshape([1,2,2,2]) # 2通道输入和1通道输出的2X2矩阵
2.4 卷积操作与其结果 — CNN_New.py(第04部分)
### 1.4 卷积操作
## 1个通道输入,生成1个特征图(卷积核个数)
pl1 = torch.nn.functional.conv2d(input1,filter1,stride=2,padding=1)
print("p1",pl1)
## 1个通道输入,生成2个特征图(卷积核个数)
pl2 = torch.nn.functional.conv2d(input1,filter2,stride=2,padding=1)
print("p2",pl2)
## 1个通道输入,生成3个特征图(卷积核个数)
pl3 = torch.nn.functional.conv2d(input1,filter3,stride=2,padding=1)
print("p3",pl3)
## 2个通道输入,生成2个特征图(卷积核个数)
pl4 = torch.nn.functional.conv2d(input2,filter4,stride=2,padding=1)
print("p4",pl4)
## 2个通道输入,生成1个特征图(卷积核个数)====》对于卷积核对多通道输入的卷积处理,多通道的结果的叠加
pl5 = torch.nn.functional.conv2d(input2,filter5,stride=2,padding=1)
print("p5",pl5)
## padding不同,生成的结果也不同
pl6 = torch.nn.functional.conv2d(input1,filter1,stride=2,padding=0)
print("p6",pl6)
p1 tensor([[[[-1., -1., -1.],
[-1., -2., -2.],
[-1., -2., -2.]]]])
p2 tensor([[[[-1., -1., -1.],
[-1., -2., -2.],
[-1., -2., -2.]],[[-1., -1., -1.],
[-1., -2., -2.],
[-1., -2., -2.]]]])
p3 tensor([[[[-1., -1., -1.],
[-1., -2., -2.],
[-1., -2., -2.]],[[-1., -1., -1.],
[-1., -2., -2.],
[-1., -2., -2.]],[[-1., -1., -1.],
[-1., -2., -2.],
[-1., -2., -2.]]]])
p4 tensor([[[[-2., -2., -2.],
[-2., -4., -4.],
[-2., -4., -4.]],[[-2., -2., -2.],
[-2., -4., -4.],
[-2., -4., -4.]]]])
p5 tensor([[[[-2., -2., -2.],
[-2., -4., -4.],
[-2., -4., -4.]]]])
p6 tensor([[[[-2., -2.],
[-2., -2.]]]])
Tip:多通道卷积的图解

2.5 代码汇总
import torch

### 1.1 定义输入变量
# [batch,in_channels,in_height,in_width]
# [训练时一个batch的图片数量,图像通道数,图片高度,图片宽度]
input1 = torch.ones([1,1,5,5])
input2 = torch.ones([1,2,5,5])
input3 = torch.ones([1,1,4,4])

### 1.2 验证补0规则
# 设置padding为1,在输入数据上补1排0
padding1 = torch.nn.functional.conv2d(input1,torch.ones([1,1,1,1]),stride=1,padding=1)
print(padding1)
# 设置padding为1,在输入数据上补2行0
padding2 = torch.nn.functional.conv2d(input1,torch.ones([1,1,1,1]),stride=1,padding=(1,2))
print(padding2)

### 1.3 定义卷积核变量
# [out_channels,in_channels,filter_height,filter_width]
# [卷积核个数,图像通道数,卷积核的高度,卷积核的宽度
filter1 = torch.tensor([-1.0,0,0,-1]).reshape([1,1,2,2]) # 1通道输入和1通道输出的2X2矩阵
filter2 = torch.tensor([-1.0,0,0,-1,-1.0,0,0,-1]).reshape([2,1,2,2])# 1通道输入和2通道输出的2X2矩阵
filter3 = torch.tensor([-1.0,0,0,-1,-1.0,0,0,-1,-1.0,0,0,-1]).reshape([3,1,2,2])# 1通道输入和3通道输出的2X2矩阵
filter4 = torch.tensor([-1.0,0,0,-1,-1.0,0,0,-1,-1.0,0,0,-1,-1.0,0,0,-1]).reshape([2,2,2,2])# 2通道输入和2通道输出的2X2矩阵
filter5 = torch.tensor([-1.0,0,0,-1,-1.0,0,0,-1]).reshape([1,2,2,2]) # 2通道输入和1通道输出的2X2矩阵

### 1.4 卷积操作
## 1个通道输入,生成1个特征图(卷积核个数)
pl1 = torch.nn.functional.conv2d(input1,filter1,stride=2,padding=1)
print("p1",pl1)
## 1个通道输入,生成2个特征图(卷积核个数)
pl2 = torch.nn.functional.conv2d(input1,filter2,stride=2,padding=1)
print("p2",pl2)
## 1个通道输入,生成3个特征图(卷积核个数)
pl3 = torch.nn.functional.conv2d(input1,filter3,stride=2,padding=1)
print("p3",pl3)
## 2个通道输入,生成2个特征图(卷积核个数)
pl4 = torch.nn.functional.conv2d(input2,filter4,stride=2,padding=1)
print("p4",pl4)
## 2个通道输入,生成1个特征图(卷积核个数)====》对于卷积核对多通道输入的卷积处理,多通道的结果的叠加
pl5 = torch.nn.functional.conv2d(input2,filter5,stride=2,padding=1)
print("p5",pl5)
## padding不同,生成的结果也不同
pl6 = torch.nn.functional.conv2d(input1,filter1,stride=2,padding=0)
print("p6",pl6)