SharePoint 2010 Claims-Based Authentication(MemberShip Provider)
Create a New SharePoint Application
Instead of screwing with your existing application, let’s create a new one so we can safely play. Open Central Administration (make sure that you are running Internet Explorer as Administrator or you will have permissions problems here) and click the “Manage web applications” link.
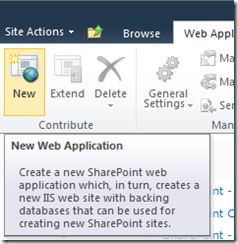
On the resulting screen, click the ribbon toolbar button to create a new web application.
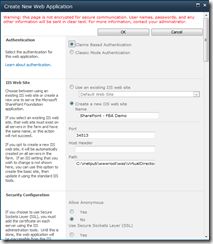
That will pop open a modal window. In that dialog, choose “Claims Based Authentication” for the Authentication type. By default, SharePoint will create a new IIS web site for you. You can leave the default, or you can rename it as I did to “SharePoint – FBA Demo”. What’s important to remember here is the port number being used, either something you choose or something SharePoint defaults to. I accepted the default of “34513”.
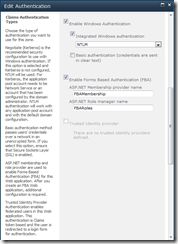
Scroll down a bit, and configure the forms based authentication settings. Check the “Enable Forms Based Authentication” box, and configure the membership provider name as “FBAMembership” and the role provider name as “FBARoles”.
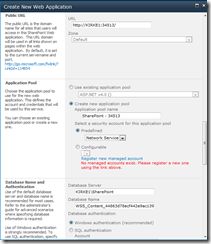
The last thing I configured was to change the identify of the application pool to Network Service.
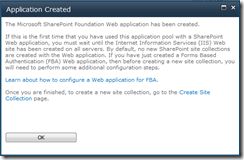
Scroll to the bottom and click OK, and SharePoint will churn for a moment to create a new application for you (it took about a minute and 15 seconds on my machine to complete).
Once complete, you are greeted with the following:
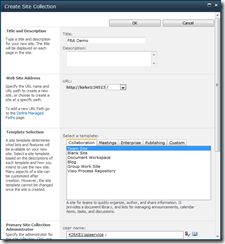
Since you are using Windows authentication in addition to Forms Based Authentication, it’s OK to click the link to create the site collection. I created a new Team site called “FBA Demo”, specifying a Windows account as the primary administrator.
Creating the Membership Store and Adding Users
You have now created a new application, a site collection, and a top-level site. The next step is to configure the new application to use FBA. My friend Ali Mazaheri posted the configuration details on his blog post, “Configuring FBA in SharePoint Server 2010”, but I am sure he won’t mind a second explanation of the settings.
Create the Database
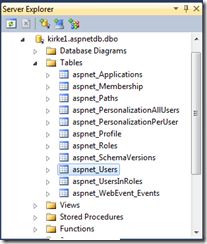
Open the Visual Studio 2010 Command Prompt from the start menu and type “aspnet_regsql”. This will open a new application that lets you create and configure a SQL Server database to use ASP.NET application services. I accepted all defaults and it created a new database called “aspnetdb” with the following table structure.
The next thing you need to do is to add some users to the database to test your solution. The easiest way to do this is by leveraging Visual Studio. Create a new project in Visual Studio 2010 using the “ASP.NET Empty Web Site” project template. Edit the web.config file. There is an empty element, “<connectionStrings/>” that you will edit:
  <connectionStrings>

    <clear/>

    <add name="AspNetSqlProvider"

         connectionString="data source=kirke1; Integrated Security=SSPI;Initial Catalog=aspnetdb;"

         providerName="System.Data.SqlClient" />

  </connectionStrings>
Of course, use your own connection string here :) The next step is to configure a Membership and Role provider. Right above the </system.web> end tag, add the following markup. I am using the names “AspNetSqlMembershipProvider” and “AspNetSqlRoleProvider” here, later when we configure SharePoint I choose the name “FBAMembership” and “FBARoles”. The provider’s name is not important, what is important is the database it points to via the connectionStringName and the applicationName.
1: <membership defaultProvider="AspNetSqlMembershipProvider">
2: <providers>
3: <clear />
4: <add name="AspNetSqlMembershipProvider"
5: connectionStringName="AspNetSqlProvider"
6: applicationName="/"
7: type="System.Web.Security.SqlMembershipProvider, System.Web,
8: Version=2.0.0.0, Culture=neutral, PublicKeyToken=b03f5f7f11d50a3a" />
9: </providers>
10: </membership>
11: <roleManager defaultProvider="AspNetSqlRoleProvider">
12: <providers>
13: <clear/>
14: <add name="AspNetSqlRoleProvider"
15: connectionStringName="AspNetSqlProvider"
16: applicationName="/"
17: description="Stores and retrieves roles data from the local Microsoft SQL Server database"
18: type="System.Web.Security.SqlRoleProvider, System.Web,
19: Version=2.0.0.0, Culture=neutral, PublicKeyToken=b03f5f7f11d50a3a" />
20:
21: </providers>
22: </roleManager>
NOTE: Remove the line break in the 5-part name for the type attribute in lines 7 and 17. These are there only for readability.
What you have done here is told ASP.NET how to authenticate users via membership, and how to authorize them using roles. For more information on ASP.NET membership, see “Introduction to Membership” in the MSDN Library. Since these providers have been configured, we can now use a tool in Visual Studio that will make it easy for us to add users. From the menu bar in Visual Studio select “Website / ASP.NET Configuration” to bring up the Web Site Administration Tool.
Using the Web Site Administration Tool to Add Users
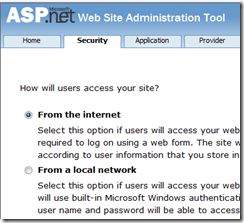
By default, your application is configured to use Windows Authentication, we need to change it to use forms authentication. Click the security tab and choose “From the internet” and save your changes.
Behind the scenes, this makes a change in web.config to set the configuration/system.web/authentication node to “Forms”, telling ASP.NET we will use Forms Based Authentication. ASP.NET will see the providers that we have configured in web.config and use them when authenticating users, adding new users, verifying roles, and other membership-related activities.
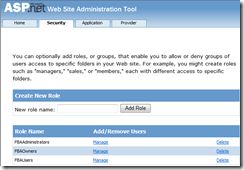
On the security tab, click the “Enable Roles” link. Then click “Create or Manage Roles”. Add a few roles, I chose “FBAAdministrators”, “FBAOwners”, and “FBAUsers”.
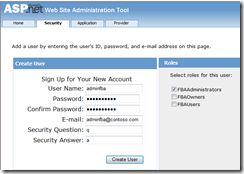
Click the “Create user” link to add a new user to the database. Create a user “adminfba” and assign the user to the “FBAAdministrators” role.
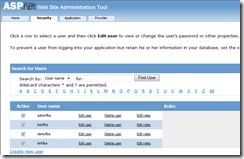
You can create other users and assign them to the various roles. I created a user “demofba” that is in the “FBAOwners” role, and “kirkfba” that is in the “FBAUsers” role.
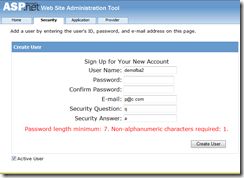
Note that ASP.NET uses default settings for the membership provider for things like required password length, required non-alphanumeric characters, and the password format.
The whole reason that we are going through this is really because the password is not stored in the database as clear text, but rather as a hashed value. This is stored within the aspnet_Membership table, which also contain the salt value used in the hash. Using the Web Site Administration Tool saved us quite a bit of work.
If you are new to ASP.NET Membership, I strongly recommend you watch “Understanding ASP.NET Memberships”. This is a free 23-minute video that explains a lot of this stuff.
Now that we have created the Membership database, we can use the same database for our SharePoint application. We only need to use the same Membership configuration settings that we used in our temporary ASP.NET application.
Granting Access to SQL Server
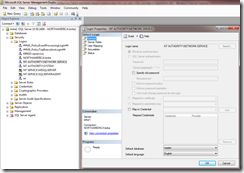
When we created the SharePoint web application, we used the Network Service account for the application pool identity. This is the account that will actually call into SQL Server for authentication and authorization. I used Network Service here for a quick example, but you probably are going to use some other service account in a real environment.
Whatever identity you chose for the application pool needs to have access to SQL Server. Add a login for SQL Server for the account used in the application pool.
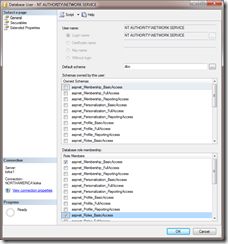
Next, grant permissions to that user by adding them to the appropriate roles. I added the user to the aspnet_Membership_BasicAccess and aspnet_Roles_BasicAccess roles.
Remember to do this, otherwise you will receive errors that the security token service is not activated.
Adding Forms Based Membership Providers to SharePoint
This next section entails 3 basic steps: edit the web.config for your application, edit web.config for Central Administration, and edit web.config for the secure token service application. We will add the same settings that we used above in the temporary ASP.NET application, with some slight variances. We could edit this stuff by hand, but we will show how to use the IIS Manager tool for IIS 7 to make this easier and less error-prone.
Add the Connection Strings
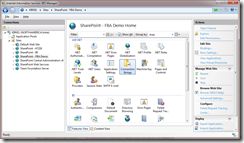
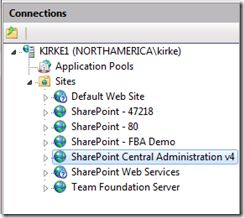
Open the Internet Information Services Manager MMC snap-in. Expand the “Sites” node to reveal the web application we created called “SharePoint – FBA Demo”.
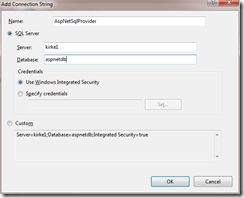
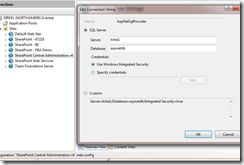
Double-click the Connection Strings feature, and under Actions choose Add. Add a new connection string called AspNetSqlProvider (this is case-sensitive) and click OK.
Behind the scenes, that created a new connection string in the following file:
C:\inetpub\wwwroot\wss\VirtualDirectories\34513\web.config
The new entry will look like this:
1: <connectionStrings>
2: <add name="AspNetSqlProvider"
3: connectionString="data source=kirke1; Integrated Security=SSPI;Initial Catalog=aspnetdb;"
4: providerName="System.Data.SqlClient" />
5: </connectionStrings>
Now, click on the “SharePoint Central Administration v4” node in IIS Manager.
Double-click on Connection Strings and add a new connection string like you did in the previous step, making sure that you are adding the connection string to the Central Administration application this time.
Now, expand the “SharePoint Web Services” node in IIS Manager and choose the “SecurityTokenServiceApplication” node. Double-click on the connection strings feature and add a connection string just like before.
Add Membership and Role Providers
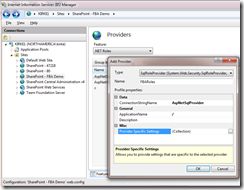
In the IIS Manager, click on the “SharePoint – FBA Demo” node again to reveal the list of features for the web application. Double-click on the “Providers” feature.
Add a new role provider called “FBARoles”. Specify the type as “SqlRoleProvider”, the ApplicationName as “/”, and the connection string name as “AspNetSqlProvider” (available in a drop-down to reduce the likelihood of fat-fingering this).
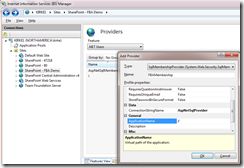
Add a new membership provider called “FBAMembership”. The type is SqlMembershipProvider, connection string name is “AspNetSqlProvider”, and the application name is “/”.
The result looks like this:
<membership defaultProvider="i">

  <providers>

    <add name="i"

          type="Microsoft.SharePoint.Administration.Claims.SPClaimsAuthMembershipProvider, Microsoft.SharePoint, Version=14.0.0.0, Culture=neutral, PublicKeyToken=71e9bce111e9429c" />

    <add name="FBAMembership"

          type="System.Web.Security.SqlMembershipProvider, System.Web, Version=2.0.0.0, Culture=neutral, PublicKeyToken=b03f5f7f11d50a3a"

          applicationName="/"

          connectionStringName="AspNetSqlProvider"

          enablePasswordReset="false"

          enablePasswordRetrieval="false"

          passwordFormat="Clear"

          requiresQuestionAndAnswer="false"

          requiresUniqueEmail="false" />

  </providers>

</membership>

<roleManager defaultProvider="c"

              enabled="true"

              cacheRolesInCookie="false">

  <providers>

    <add name="c"

          type="Microsoft.SharePoint.Administration.Claims.SPClaimsAuthRoleProvider, Microsoft.SharePoint, Version=14.0.0.0, Culture=neutral, PublicKeyToken=71e9bce111e9429c" />

    <add name="FBARoles"

          type="System.Web.Security.SqlRoleProvider, System.Web, Version=2.0.0.0, Culture=neutral, PublicKeyToken=b03f5f7f11d50a3a"

          applicationName="/"

          connectionStringName="AspNetSqlProvider" />

  </providers>

</roleManager>
Click the “SharePoint Central Administration v4” node and make the same edits to its configuration, adding the FBAMembership and FBARoles providers as described above.
Expand the “SharePoint Web Services” node, select the “SecurityTokenServiceApplication” node, and add the FBAMembership and FBARoles providers.
Edit Web.Config for Central Administration
In the previous section, we added configuration for connection string, membership, and roles to our web application. We also need to add these settings for Central Administration so that we can add our forms-based authentication users as site collection owners (among other settings).
We need to make a few small tweaks to the configuration for Central Administration because there isn’t a way (that I could find, anyway) to do this using the MMC console:
- The defaultProvider for the role section must be AspNetWindowsTokenRoleProvider.
- The defaultProvider for the membership section must be our new membership provider, “FBAMembership”.
<roleManager defaultProvider="AspNetWindowsTokenRoleProvider"

              enabled="true">

  <providers>

    <clear />

    <add applicationName="/"

          name="AspNetWindowsTokenRoleProvider"

          type="System.Web.Security.WindowsTokenRoleProvider, System.Web, Version=2.0.0.0, Culture=neutral, PublicKeyToken=b03f5f7f11d50a3a" />

    <add name="FBARoles"

          type="System.Web.Security.SqlRoleProvider, System.Web, Version=2.0.0.0, Culture=neutral, PublicKeyToken=b03f5f7f11d50a3a"

          applicationName="/"

          connectionStringName="AspNetSqlProvider" />

  </providers>

</roleManager>

<membership defaultProvider="FBAMembership">

  <providers>

    <clear />

    <add name="FBAMembership"

          type="System.Web.Security.SqlMembershipProvider, System.Web, Version=2.0.0.0, Culture=neutral, PublicKeyToken=b03f5f7f11d50a3a"

          applicationName="/"

          connectionStringName="AspNetSqlProvider"

          enablePasswordReset="false"

          enablePasswordRetrieval="false"

          passwordFormat="Clear"

          requiresQuestionAndAnswer="false"

          requiresUniqueEmail="false" />

  </providers>

</membership>
While we are editing the web.config for Central Administration, there’s one more thing that we need to be sure to add. We need to enable wildcard searches for our users when using the People Picker control. This section is located under configuration/SharePoint/PeoplePickerWildcards.
    <PeoplePickerWildcards>

      <clear />

      <add key="FBAMembership"

           value="%" />

    </PeoplePickerWildcards>
Edit Web.Config for the Secure Token Service Application
Just like we did with Central Administration, we need to set the default providers for the Secure Token Service Application. Open the web.config file at:
C:\Program Files\Common Files\Microsoft Shared\Web Server Extensions\14\WebServices\SecurityToken\web.config
You will need to add your connectionStrings section and a web.config section. A partial listing showing the configuration that needs to be added:
<membership defaultProvider="FBAMembership">

  <providers>

    <add name="FBAMembership"

          connectionStringName="AspNetSqlProvider"

          applicationName ="/"

          type="System.Web.Security.SqlMembershipProvider, System.Web, Version=2.0.0.0,  Culture=neutral, PublicKeyToken=b03f5f7f11d50a3a" />

  </providers>

</membership>

<roleManager enabled="true"

              defaultProvider="FBARoles">

  <providers>

    <add name="FBARoles"

          connectionStringName="AspNetSqlProvider"

          applicationName="/"

          type="System.Web.Security.SqlRoleProvider, System.Web, Version=2.0.0.0, Culture=neutral, PublicKeyToken=b03f5f7f11d50a3a" />

  </providers>

</roleManager>
Verifying Our Changes
Open SharePoint Central Administration. Under Application Management click “Manage web applications" and click the “SharePoint – FBA Demo” item. That will light up the “User Policy” ribbon toolbar item. Click the User Policy ribbon button.
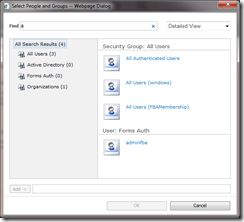
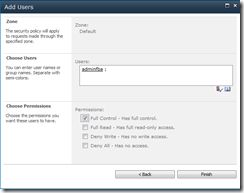
Click Add Users. You are then asked what zone to configure users for, choose “Default” and click Next. In the Choose Users section, you should be able to enter “adminfba” and the name will resolve. Alternatively, you can click the phone book icon to search for users in the address book. Enter “a” and you will see something like the following, showing our Forms Auth user.
Select the adminfba user and give that user full control.
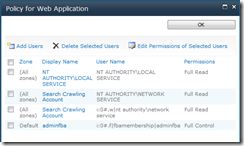
The result in the policy window shows our user with the user name “i:0#.f|fbamembership|adminfba”.
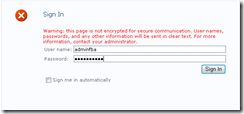
Open up your new web site, you will see the following screen:
Choose Forms Authentication, then sign in as adminfba.
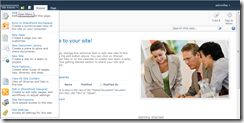
You are now logged into your site as adminfba, with site administrator privileges (note the Site Actions menu contains privileged capabilities).
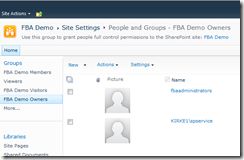
We gave the adminfba user full control of the application, so we can set things like security groups up. You can add the FBAAdministrators group into the “FBA Demo Owners” group as site owners.
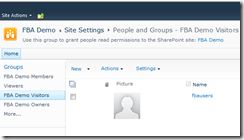
You can also add the FBAUsers group into the “FBA Demo Visitors” group.
Once you have done that, log out and log back in as “kirkfba”, recalling that “kirkfba” is in the FBAUsers role, which we added to the “FBA Demo Visitors” group in SharePoint. As you can see, this user has limited capabilities, such as less capabilities in the “Site Actions” menu.
Wrapping It Up
There is a lot of verbiage and quite a few screen shots in this post. If you think I missed a step or need to elaborate further, please leave a comment! As it turns out, there really is not that much work to this after you walk through it the first time. The steps are:
- Create the database using aspnet_regsql
- Add users and roles using the Web Site Administration Tool
- Add connection strings in the web.config for:
- Your application
- Central Administration
- Secure Token Service Application
- Add membership and role providers for:
- Your application
- Central Administration
- Secure Token Service Application
- Edit web.config for Central Administration
- Set the default provider for roles as AspNetWindowsTokenRoleProvider
- Set the default provider for membership as your new membership provider
- Add the PeoplePickerWildcards entry
- Edit web.config for the Secure Token Service Application
- Set the default provider for roles as your provider
- Set the default provider for membership as your provider
- Add the FBA administration user to Central Administration
- Add FBA roles to SharePoint groups

