细粒度分类 CUB_200_2011 vgg16 (数字图像处理)
细粒度分类 CUB_200_2011 vgg16
1、细粒度分类
2、CNN(卷积神经网络)
3、vgg16网络模型
4、数据集 CUB_200_2011
5、基于卷积神经网络(vgg16网络模型)对数据集CUB_200_2011进行细粒度分类
6、代码
1、细粒度分类
简单理解细粒度分类:识别出一张图片是狗的情况下还需要得知狗的品种;这里识别出是狗就用到粗粒度分类,识别出狗的种类就用到细 粒度分类
细粒度分类的关键:提取有辨识力的特征(类似人眼对狗的品种的分类,提取出狗的最有特点的区域进行品种分类,类比到卷积神经网络,卷积网络提取出自己感兴趣的区域)是提升效果 的关键
目前:使用图像位置标注信息------>数据量大时,标注标签的成本过高
本文提出:1)提出基于图像显著图的图像辨别力区域计算方法
2)使用卷积神经网络(注意力机制)——>不使用位置标签,自动定位到对细粒度分类有帮助的图像区域——>利用计算出的 图像区域完成细粒度分类
2、CNN
一般包括全连接层、卷积层、<激活函数层>、池化层(有平均池化、最大池化两种)有了这些层使得卷积神经网络有了可以拟合各种函数的能力。
1)卷积层
[外链图片转存失败,源站可能有防盗链机制,建议将图片保存下来直接上传(img-GthaaUox-1605449559236)(C:\Users\Lenovo\Desktop\卷积层运算示意图.png)]
通过卷积核(kernel)和原始图像上等同大小的区域进行卷积运算,通过计算得到特征图(与图像等同大小的尺寸的像素点进行对应相乘,再将相乘结果相加得到特征图上的特征值)
卷积核的参数不同提取到的特征不同,一个卷积层可以有多个卷积核,低层的卷积层提取到的是边框、颜色等简单特征;中层提取到低层特征的集合;高层提取到图像的全局特征
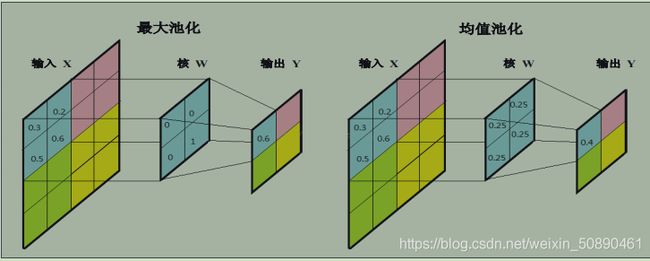
2)池化层(最大池化Max-Pooling)
最大池化:具体操作是将指定区域大小的像素值进行比较,只保留最大的像素值
-
保留特征图中最重要的特征并去除无关的特征。
-
减小特征图 (Feature Map) 的维数,从而减小后续的计算量。
-
减少了模型需要训练的参数量,降低了模型的复杂度,使得模型更为简单些,起到了稀疏模型的作用,提高了模型的泛化能力。
-
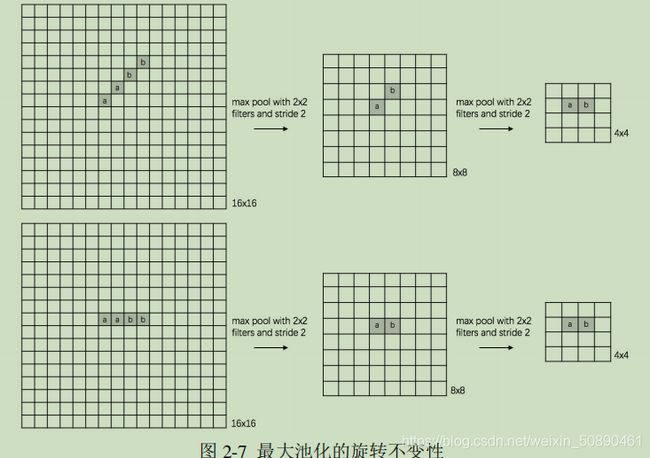
引入了一定的不变性,包括平移不变性、旋转不变性以及尺度不变性。
池化层是对小区域数据(局部区域)进行将维,因此可以同时在水平方向和数值上进行降维(减小特征图尺寸)
3)全连接层
在卷积神经网络中,卷积层和池化层等操作可以看做是将原始图片映射到一个低维的隐层特征空间,而全连接层则起到将学习到的分布式特征表示映射到样本标记空间的作用
4)激活函数层
1、sigmoid
2、tanh
3、ReLu
只保留响应值大于 0 的数值,并将小于等于 0 的响应值置为 0
ReLU 函数的优点在于它会增加前一层网络乃至整个卷积神经网络的非线性特征,同时因为保留了响应为正的值,不会影响到卷积层提取出的特征,当输入比较大时不会存在梯度消失的情况,成功地解决了因梯度消失而造成的卷积神经网络学习收敛慢的问题。并且只需要一个阈值就可以得到神经网络的激活值,不需要复杂度运算,ReLU 主要用在神经网络中的隐藏层作为激活函数。另外数据通常有很多的冗余,而近似程度的最大化地保留数据特征,可以通过一个绝大多数值为 0 的稀疏矩阵来实现。对于 ReLU 而言,神经网络反复迭代训练的过程,实际上相当于在不断试探如何用一个稀疏矩阵表达图像特征,因为数据的稀疏特性的存在,所以这种方法可以在提高训练速度的同时又保证模型的效果。
3、vgg16网络模型
CNN卷积网络模型的一种
4、数据集 CUB_200_2011
下载路径:http://www.vision.caltech.edu/visipedia/CUB-200-2011.html
介绍:Caltech-UCSD Birds-200-2011(CUB-200-2011)是CUB-200数据集的扩展版本,每个类的图像数量大约增加了一倍,并带有新的零件位置注释。有关数据集的详细信息,请参阅下面的技术报告链接。
- 类别数: 200
- 图片数量: 11,788
- 每个图像的批注: 15个部件位置,312个二进制属性,1个边界框
一些相关的数据集是Caltech-256,Oxford Flower数据集和Animals with Attributes。加州理工学院视觉数据集档案库提供了更多数据集。
5、基于卷积神经网络(vgg16网络模型)对数据集CUB_200_2011进行细粒度分类
1)提取图像显著图
卷积 : mi 输入图或第i层特征图,wi第i层所有特征图的权重 都是矩阵——》线性运算
池化 : 保留卷积得到的特征中最有特征的像素值(即卷积得到的特征中的最大响应值)
Relu激活函数:保留数值为正的特征输出值 ——》线性运算
全连接 :输入神经元结点和网络权重相乘求和 ——》线性运算
softmax: n是模型输出类别数 归一化输出 将最终输出变为每一类的概率(仅仅改变数值大小,不改变数值的相对大小)——》线 性运算
通过以上层,得到对图像分类有一定辨识率的模型M
————————————————————————————————————————————————————————————
利用训练好的模型M,输入图像经过一层层的提取特征最终实现细粒度分类
对于图像 i 若是训练集对应标签是c,则输出在类别c上有最大响应。可以求出最大响应对第i层特征图的梯度(利用公式***wi*** =
∂Ec /∂mi)代表从第i层到输出层这一段网络***对第i层特征图的响应*** 响应值的不同代表网络对不同图像区域的重视程度 响应值大的区域对图像的分类帮助大,将其作为显著图输出。
假设第i层特征图mi的尺寸为kxnxn k为通道数,n行n列,我们将k个通道上每个像素点上的值加和求平均,得到第i层最终的显著图。
2)提取图像辨别力区域
大体思路:显著图对图像辨别力区域提取有帮助。特征图中每个像素点对应输入图像中的一定区域,【即特征图中一个像素点的值由输入图像的一定区域决定(特征图与感受野存在对应关系)】,同理 图像辨别力区域对应显著图中的一定区域。
判别力图像区域的整体计算流程:首先将图片送入到已训练好的模型 M 中进行前向传播【,如果是训练集图片,则使用相应的标签并记为 Ck,如果是测试集图片,则选取在最后输出层 c 类中响应值值最高的类别并记为 Ck,】然后利用在类别 Ck 上的响应值输出对每一层的卷积层特征图进行求导,得到与特征图大小相同的梯度图,最后将梯度图在所有通道上同一位置的数值进行平均,得到该输入图像的显著图。计算出不同层上的感受野并在原图上进行剪切,得到最终有判别力的区域
3)分类的总体框架
附图如下:
训练阶段:原始图像训练得到分类模型M——》计算出显著图——》提取出辨别力区域——》用提取到的辨别力区域的图像小块 分类训练出不同尺度的敏感模型
测试阶段:原始图像——》提取小块辨别力图像——》不同卷积层计算出的图像小块送入对应尺度的模型中进行测试——》将多个模型的结果融合得到分类结果
6、代码来了
# 切割数据集CUB_200_2011

import os
import shutil
import sys
import random
import errno

def load_class_names(dataset_path):
    classes = {}

    with open(os.path.join(dataset_path, "classes.txt")) as f:
        for line in f:
            (k, c) = line.split()
            classes[int(k)] = c

    return classes


def load_image_labels(dataset_path):
    labels = {}

    with open(os.path.join(dataset_path, "image_class_labels.txt")) as f:
        for line in f:
            (k, c) = line.split()
            labels[int(k)] = int(c)

    return labels


def load_image_paths(dataset_path, path_prefix=''):
    paths = {}

    with open(os.path.join(dataset_path, 'images.txt')) as f:
        for line in f:
            (k, p) = line.split()
            path = os.path.join(path_prefix, p)
            paths[int(k)] = path

    return paths


def split_each_class(class_names, image_labels, split_train=0.60, split_val=0.20, split_test=0.20):
    splits = {}

    for c in class_names.keys():
        # Find all images with label c
        class_images = [k for k,v in image_labels.items() if v == c]

        # Count images with label c
        class_count = len(class_images)

        # Split 60/20/20 train/val/test
        train_count = round(class_count * split_train)
        val_count = round(class_count * split_val)
        test_count = round(class_count * split_test)

        image_indices = list(range(class_count))
        random.shuffle(image_indices)

        train_indices = image_indices[0:train_count]
        val_indices = image_indices[train_count:train_count+val_count]
        test_indices = image_indices[train_count+val_count:]

        for i in train_indices:
            splits[class_images[i]] = 0
        for i in val_indices:
            splits[class_images[i]] = 1
        for i in test_indices:
            splits[class_images[i]] = 2

    return splits


def copy_by_split(class_splits, image_paths, source_base, destination_base):
    folders = {0: "train", 1: "val", 2: "test"}

    for k,v in class_splits.items():
        old_path = os.path.join(source_base, image_paths[k])
        new_path = os.path.join(destination_base, folders[v], image_paths[k])
        try:
            shutil.copy2(old_path, new_path)
        except IOError as e:
            if e.errno != errno.ENOENT:
                raise
            os.makedirs(os.path.dirname(new_path))
            shutil.copy2(old_path, new_path)


dataset_path = "D:\鸟的数据集\CUB_200_2011\CUB_200_2011"
image_path_prefix = "images"
destination_path = "./data/cub-200-2011"

class_names = load_class_names(dataset_path)
image_labels = load_image_labels(dataset_path)
image_paths = load_image_paths(dataset_path, image_path_prefix)

class_splits = split_each_class(class_names, image_labels, 0.60, 0.20, 0.20)
copy_by_split(class_splits, image_paths, dataset_path, destination_path)
import os
import numpy as np
import keras
from keras import models, layers, optimizers
from keras.applications import vgg16, resnet50
from keras.preprocessing.image import load_img
from keras.preprocessing.image import img_to_array
from keras.preprocessing.image import ImageDataGenerator
from keras.applications.imagenet_utils import decode_predictions
import matplotlib.pyplot as plt

# mode = "train"
mode = "test"

# CUB_200_2011 dataset
train_dir = "./data/cub-200-2011/train"
val_dir = "./data/cub-200-2011/val"
test_dir = "./data/cub-200-2011/test"
classes_count = 200

# Load pre-trained models
image_size = 224

history = None

if mode == "train":
    # VGG16 base
    vgg_model = vgg16.VGG16(weights="imagenet", include_top=False, input_shape=(image_size, image_size, 3))
    base_model = vgg16.VGG16
    trainable_layers = 4

    base_model = base_model(weights="imagenet", include_top=False, input_shape=(image_size, image_size, 3))

    # Freeze all but the last 4 layers
    for layer in base_model.layers[:-trainable_layers]:
        layer.trainable = False

    # Check the trainable status of the individual layers
    for layer in base_model.layers:
        print(layer, layer.trainable)

    # Create our new model
    bird_model = models.Sequential()

    # Add the vgg convolutional base model
    bird_model.add(base_model)

    # Add new layers
    bird_model.add(layers.Flatten())
    bird_model.add(layers.Dense(1024, activation="relu"))
    bird_model.add(layers.Dropout(0.5))
    bird_model.add(layers.Dense(classes_count, activation="softmax"))

    # Show a summary of the model
    bird_model.summary()

    # Set up data generators
    train_datagen = ImageDataGenerator(
        rescale=1./255,
        rotation_range=20,
        width_shift_range=0.2,
        height_shift_range=0.2,
        horizontal_flip=True,
        fill_mode="nearest"
    )

    validation_datagen = ImageDataGenerator(
        rescale=1./255
    )

    train_batchsize = 100
    validation_batchsize = 10

    train_generator = train_datagen.flow_from_directory(
        train_dir,
        target_size=(image_size, image_size),
        batch_size=train_batchsize,
        class_mode="categorical"
    )

    validation_generator = validation_datagen.flow_from_directory(
        val_dir,
        target_size=(image_size, image_size),
        batch_size=validation_batchsize,
        class_mode="categorical",
        shuffle=False
    )

    # Set up early stopping
    early_stop = keras.callbacks.EarlyStopping(
        monitor="val_loss",
        min_delta=0,
        patience=10,
        verbose=0,
        mode="auto"
    )

    # Compile the model
    bird_model.compile(
        loss="categorical_crossentropy",
        optimizer=optimizers.RMSprop(lr=1e-4),
        metrics=["acc"]
    )

    # Train the model
    history = bird_model.fit_generator(
        train_generator,
        callbacks=[early_stop],
        steps_per_epoch=train_generator.samples/train_generator.batch_size,
        epochs=100,
        validation_data=validation_generator,
        validation_steps=validation_generator.samples/validation_batchsize,
        verbose=1
    )

    # Save the model
    bird_model.save("bird_model_vgg16_224_cub-200-2011_last4.h5")

    exit(0)
elif mode == "test":
    bird_model = models.load_model("bird_model_vgg16_224_cub-200-2011_last4.h5")
    bird_model.compile(
        loss="categorical_crossentropy",
        optimizer=optimizers.RMSprop(lr=1e-4),
        metrics=["acc"]
    )

    test_datagen = ImageDataGenerator(
        rescale=1. / 255
    )

    test_batchsize = 10

    test_generator = test_datagen.flow_from_directory(
        test_dir,
        target_size=(image_size, image_size),
        batch_size=test_batchsize,
        class_mode="categorical"
    )

    history = bird_model.evaluate_generator(
        test_generator,
        steps=test_generator.samples / test_generator.batch_size,
        verbose=1
    )

    print(history)

    exit(0)


```python
# Specify paths to data files
dir_data_base = "D:\鸟的数据集\CUB_200_2011\CUB_200_2011"
dir_data_img = "images"
dir_data_seg = "segmentations"
dir_bird_file = "017.Cardinal/Cardinal_0014_17389"
path_to_bird_img = os.path.join(dir_data_base, dir_data_img, dir_bird_file + ".jpg")
path_to_bird_seg = os.path.join(dir_data_base, dir_data_seg, dir_bird_file + ".png")

# Load an image in PIL format
bird_original = load_img(path_to_bird_img, target_size=(224, 224))
plt.imshow(bird_original)
plt.show()

# Convert the PIL image to a numpy array
bird_numpy = img_to_array(bird_original)
plt.imshow(np.uint8(bird_numpy))
plt.show()

# Convert the image into batch format
bird_batch = np.expand_dims(bird_numpy, axis=0)
plt.imshow(np.uint8(bird_batch[0]))
plt.show()

# Prepare the image for the VGG model
bird_processed = vgg16.preprocess_input(bird_batch.copy())

# Get the predicted probabilities for each class
predictions = vgg_model.predict(bird_processed)
label = decode_predictions(predictions)
print(label)
参考文献:
1、基于深度学习的细粒度图像分类研究
2、cv-bird-id


