深蓝学院-视觉SLAM课程-第6讲作业
课程Github地址:https://github.com/wrk666/VSLAM-Course/tree/master
第6讲作业
2. T2
2.1 光流文献综述
文献还没读完,这部分参考博客
2.2 forward-addtive Gauss-Newton 光流的实现
                    // TODO START YOUR CODE HERE (~8 lines)
                    //计算误差
                    double error = GetPixelValue(img1, kp.pt.x + x, kp.pt.y + y)-GetPixelValue(img2, kp.pt.x + x + dx, kp.pt.y + y + dy);
                    Eigen::Vector2d J;  // Jacobian
                    if (inverse == false)
                    {
                        // Forward Jacobian  前向雅可比(因为是离散的,不能用微分,使用中心差分方式来进行求导)
                        J = -1.0 * Eigen::Vector2d(
                                0.5 * (GetPixelValue(img2,kp.pt.x + dx + x + 1, kp.pt.y + dy + y)-GetPixelValue(img2, kp.pt.x + dx + x -1, kp.pt.y + dy + y)),
                                0.5 * (GetPixelValue(img2, kp.pt.x + dx + x, kp.pt.y+ dy + y + 1)- GetPixelValue(img2, kp.pt.x + dx + x, kp.pt.y + dy + y -1))
                                );
                    }
                    else
                    {
                        if(iter == 0 )
                        // Inverse Jacobian
                        // NOTE this J does not change when dx, dy is updated, so we can store it and only compute error
                        //反向模式,使用I1处的梯度替换I2处的梯度,雅可比不随dx,dy的改变而改变,所以不加dx,dy
                        {
                            J = -1.0 * Eigen::Vector2d(
                                    0.5 * (GetPixelValue(img2,kp.pt.x + x + 1, kp.pt.y + y)-
                                           GetPixelValue(img2, kp.pt.x +  x -1, kp.pt.y + y)),
                                    0.5 * (GetPixelValue(img2, kp.pt.x +  x, kp.pt.y + y + 1)-
                                           GetPixelValue(img2, kp.pt.x +  x, kp.pt.y + y -1))
                                    );
                        }
                    }
                    // compute H, b and set cost;
                    b += -error * J;
                    cost += error * error;
                    if(inverse==false || iter==0)  //如果是正向或者是第一次迭代,就需要更新系数矩阵H
                    {
                        H +=  J * J.transpose() ;  //这里的雅可比定义出来是J^T,直接就是向量,求H要得是矩阵,所以得J*J^T
                    }
                    // TODO END YOUR CODE HERE
                }
            // compute update  更新
            // TODO START YOUR CODE HERE (~1 lines)
            Eigen::Vector2d update = H.ldlt().solve(b);  //求解方程H[dx,dy]^T=b
            // TODO END YOUR CODE HERE
2.3 反向法
2.4 推广至金字塔
Listing2
void OpticalFlowMultiLevel(
        const Mat &img1,
        const Mat &img2,
        const vector<KeyPoint> &kp1,
        vector<KeyPoint> &kp2,
        vector<bool> &success,
        bool inverse) {

    // parameters
    int pyramids = 4;  //4层金字塔
    double pyramid_scale = 0.5;  //缩放率为0.5
    double scales[] = {1.0, 0.5, 0.25, 0.125};

    // create pyramids
    vector<Mat> pyr1, pyr2; // image pyramids
    // TODO START YOUR CODE HERE (~8 lines)
    for (int i = 0; i < pyramids; i++) {
        if(i==0)
        {
            pyr1.push_back(img1);
            pyr2.push_back(img2);
        }
        else
        {
            Mat img1_pyr, img2_pyr;
            //自底向上缩放
            cv::resize(pyr1[i-1], img1_pyr, cv::Size(pyr1[i-1].cols * pyramid_scale, pyr1[i-1].rows * pyramid_scale));
            cv::resize(pyr2[i-1], img2_pyr, cv::Size(pyr2[i-1].cols * pyramid_scale, pyr2[i-1].rows * pyramid_scale));
            pyr1.push_back(img1_pyr);
            pyr2.push_back(img2_pyr);
        }
    }
    // TODO END YOUR CODE HERE

    // coarse-to-fine LK tracking in pyramids
    // TODO START YOUR CODE HERE
    vector<KeyPoint> kp1_pyr, kp2_pyr;  //特征点金字塔

//    int tmp_level = pyramids;
    for(auto &kp:kp1)
    {
        auto kp_top = kp;

        kp_top.pt *= scales[pyramids - 1];
        kp1_pyr.push_back(kp_top);
        kp2_pyr.push_back(kp_top);
    }

    for(int level = pyramids-1; level>=0; level--)
    {
        success.clear();
        OpticalFlowSingleLevel(pyr1[level], pyr2[level], kp1_pyr, kp2_pyr, success, inverse);

        if(level>0)
        {
            for(auto &kp: kp1_pyr)  //引用,改变源数据
                kp.pt /= pyramid_scale;
            for(auto &kp: kp2_pyr)
                kp.pt /= pyramid_scale;
        }
    }

    // don't forget to set the results into kp2
    for(auto &kp: kp2_pyr)
        kp2.push_back(kp);
    // TODO END YOUR CODE HERE
}
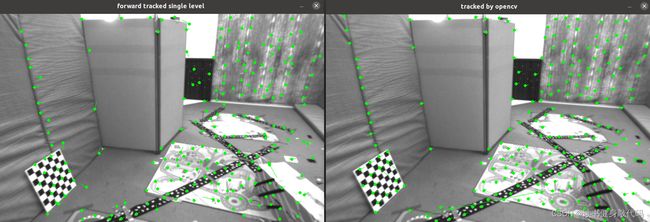
图 2.4 正向金字塔 G-N 光流与 OpenCV 光流对比

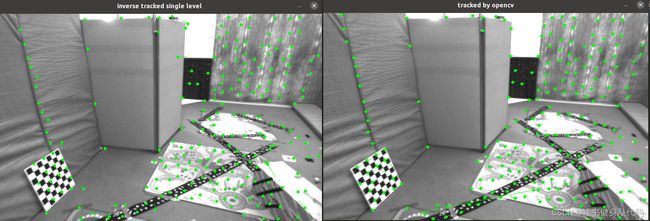
图 2.5 反向金字塔 G-N 光流与 OpenCV 光流对比

2.5 并行化
    vector<int> indexes;
    for (int (i) = 0; (i) < kp1.size(); ++(i))
        indexes.push_back(i);
    std::mutex m;
    std::lock_guard<std::mutex> guard(m);//代替m.lock; m.unlock();
    for_each(execution::par_unseq, indexes.begin(), indexes.end(),
                  [&](auto& i)
                  {
                  //和单层光流一样
                  });
2.6 讨论

图 2.6 8 × 8 和 16 × 16 的窗口对比


图 2.7 \quad 3、 5、 7 层金字塔对比


图 2.7 \quad 0.25, 0.5, 0.75 缩放率对比

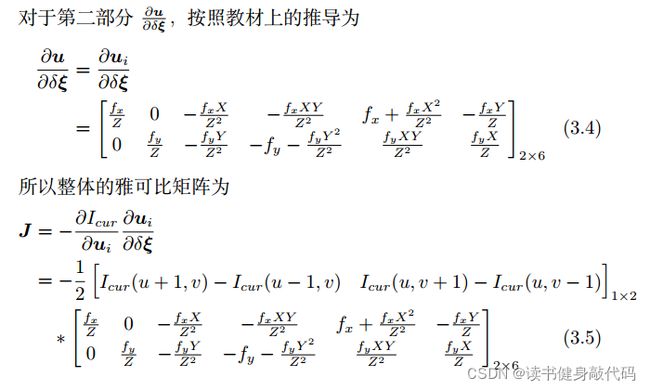
3. 直接法
3.1 单层直接法
之前一直对各种坐标和各种变换莫不太清,这题通过手抄一些代码,差不多弄懂了,总结一下:
借鉴博客
- 世界坐标是相对于每一帧图像处的相机所观测到的3D坐标,一个点的3D坐标会因相机的位姿不同而不同。2D坐标常指像素坐标, K P + t = 1 Z [ u 1 , v 1 , 1 ] T KP+t=\frac{1}{Z}[u_1,v_1,1]^T KP+t=Z1[u1,v1,1]T,去掉了深度信息。
- 从图像中读取的都是通过2D坐标读取的ref的 [ u 1 , v 1 , 1 ] T [u_1,v_1,1]^T [u1,v1,1]T,根据2D坐标读到的是光度值,
- 根据disparity能算得 I r e f I_ref Iref的每个点的深度值,即第一张图片中的相机处观测到的这个点的Z
- 像素的2D坐标结合深度信息,通过针孔相机模型计算出此点的3D坐标 p o i n t r e f point_{ref} pointref
X = ( u − c x ) ∗ Z f x Y = ( v − c y ) Z f y Z = d e p t h X = (u-c_x)*\frac{Z}{f_x} \\ Y = (v-c_y)\frac{Z}{f_y}\\ Z = depth X=(u−cx)∗fxZY=(v−cy)fyZZ=depth
5. 要估计的是 I 1 I_1 I1-> I 2 I_2 I2的变换矩阵 T 21 T_{21} T21,而这个变换是3D坐标的变换,所以
p o i n t c u r = T 21 ∗ p o i n t r e f = [ X ′ Y ′ Z ′ ] T point_{cur}=T{21}*point_{ref} = \begin{bmatrix} X' & Y' & Z' \end{bmatrix}^T pointcur=T21∗pointref=[X′Y′Z′]T
得到 I 2 I_2 I2下的3D坐标
6. 再将 I 2 I_2 I2下的3D坐标变换为像素坐标
u 2 = f x ∗ X ′ Z ′ + c x v 2 = f y ∗ Y ′ Z ′ + c y u_2 = f_x*\frac{X'}{Z'}+c_x \\ v_2 = f_y * \frac{Y'}{Z'}+c_y u2=fx∗Z′X′+cxv2=fy∗Z′Y′+cy
然后判断此时的 u 2 , v 2 u_2,v_2 u2,v2是否越界,若未越界则为good。


核心代码如 Listing4 所示,对第一张图的直接法结果如图 3.1 所示:
Listing4
    for (int iter = 0; iter < iterations; iter++) {
        nGood = 0;
        goodProjection.clear();

        // Define Hessian and bias
        Matrix6d H = Matrix6d::Zero();  // 6x6 Hessian
        Vector6d b = Vector6d::Zero();  // 6x1 bias

        for (size_t i = 0; i < px_ref.size(); i++)
        {

            // compute the projection in the second image
            // TODO START YOUR CODE HERE
            Eigen::Vector3d point_ref = depth_ref[i] * Eigen::Vector3d((px_ref[i][0]-cx)/fx, (px_ref[i][1]-cy)/fy, 1);  //ref中的3D点坐标
            Eigen::Vector3d point_cur = T21 * point_ref;  //ref中的3D点转换到cur中的3D点
            if (point_cur[2] < 0)   // depth invalid
                continue;

            float u = fx * point_cur[0]/point_cur[2] + cx, v = fy * point_cur[1]/point_cur[2] + cy;
            if(u<half_patch_size || u+half_patch_size>img2.cols || v<half_patch_size || v+half_patch_size>img2.rows)  //变换到cur中若越界则不优化
                continue;

            double X = point_cur[0], Y = point_cur[1], Z = point_cur[2], inv_z = 1.0 / Z, inv_z2 = inv_z * inv_z;  //cur中的3D坐标X'Y'Z'
            nGood++;
            goodProjection.push_back(Eigen::Vector2d(u, v));

            // and compute error and jacobian
            for (int x = -half_patch_size; x < half_patch_size; x++)
                for (int y = -half_patch_size; y < half_patch_size; y++)
                {
                    double error =  GetPixelValue(img1, px_ref[i][0]+x, px_ref[i][1]+y) -
                                    GetPixelValue(img2, u+x, v+y);

                    Eigen::Vector2d J_img_pixel;    // image gradients(2*1)  像素梯度,使用cur中的像素坐标和窗口偏移量x,y计算*
                    J_img_pixel<<(1.0 / 2) * (GetPixelValue(img2, u+1+x, v+y)-GetPixelValue(img2, u-1+x, v+y)),
                            (1.0 / 2) * (GetPixelValue(img2, u+x, v+1+y)-GetPixelValue(img2, u+x, v-1+y));

                    Matrix26d J_pixel_xi;   // pixel to \xi in Lie algebra  2*6
                    J_pixel_xi<<fx * inv_z,
                                0,
                                -fx * X * inv_z2,
                                -fx * X * Y * inv_z2,
                                fx + fx * X * X * inv_z2,
                                -fx * Y * inv_z,
                                0,
                                fy * inv_z,
                                -fy * Y * inv_z2,
                                -fy - fy * Y * Y * inv_z2,
                                fy * X * Y * inv_z2,
                                fy * X * inv_z;

                    // total jacobian   应该是1*6的
                    Vector6d J=-1.0 * (J_img_pixel.transpose() * J_pixel_xi).transpose();

                    H += J * J.transpose();
                    b += -error * J;
                    cost += error * error;
                }
            // END YOUR CODE HERE
        }

        // solve update and put it into estimation
        // TODO START YOUR CODE HERE
        Vector6d update = H.ldlt().solve(b);
        T21 = Sophus::SE3d::exp(update) * T21;  //李群更新
        // END YOUR CODE HERE
图 3.1 单层直接法第一张图结果
3.2 多层直接法
- 在缩放图像时,图像内参也需要跟着变化。那么,例如图像缩小一倍,
fx, fy, cx, cy 应该如何变化?
相机内参也应该对应金字塔的层数做与图像对应的缩放,如 Listing5
所示
Listing5
void DirectPoseEstimationMultiLayer(
        const cv::Mat &img1,
        const cv::Mat &img2,
        const VecVector2d &px_ref,
        const vector<double> depth_ref,
        Sophus::SE3d &T21,
        string order
) {

    // parameters  4层2倍金字塔
    int pyramids = 4;
    double pyramid_scale = 0.5;
    double scales[] = {1.0, 0.5, 0.25, 0.125};

    // create pyramids
    vector<cv::Mat> pyr1, pyr2; // image pyramids
    // TODO START YOUR CODE HERE  构建图像金字塔
    for(int i=0; i<pyramids; i++)
    {
        if(i==0)
        {
            pyr1.push_back(img1);
            pyr2.push_back(img2);
        }
        else
        {
            Mat img1_pyr, img2_pyr;
            //自底向上缩放
            cv::resize(pyr1[i-1], img1_pyr, cv::Size(pyr1[i-1].cols * pyramid_scale, pyr1[i-1].rows * pyramid_scale));   //Size(width, height)
            cv::resize(pyr2[i-1], img2_pyr, cv::Size(pyr2[i-1].cols * pyramid_scale, pyr2[i-1].rows * pyramid_scale));
            pyr1.push_back(img1_pyr);
            pyr2.push_back(img2_pyr);
        }
    }

    // END YOUR CODE HERE
    //构建特征点金字塔
    double fxG = fx, fyG = fy, cxG = cx, cyG = cy;  // backup the old values
    for (int level = pyramids - 1; level >= 0; level--) {
        VecVector2d px_ref_pyr; // set the keypoints in this pyramid level
        for (auto &px: px_ref) {
            px_ref_pyr.push_back(scales[level] * px);
        }

        // TODO START YOUR CODE HERE
        // scale fx, fy, cx, cy in different pyramid levels
        fx = fxG * scales[level];
        fy = fyG * scales[level];
        cx = cxG * scales[level];
        cy = cyG * scales[level];
        // END YOUR CODE HERE
        DirectPoseEstimationSingleLayer(pyr1[level], pyr2[level], px_ref_pyr, depth_ref, T21, order);
    }
}
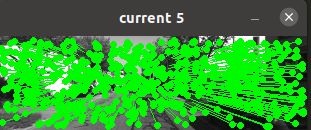
第 5 张图的结果如图 3.2-3.6 所示
图 3.6 估计结果

估计结果有些差别,但在0.5米内,可以接受。
3.3 并行化
使用 for_each 和 execution 进行改进,在遍历 ref 中的特征点处使用
多线程并发,注意在对有序容器进行插入前需要加锁,核心代码如Listing6所示:
Listing6
        // Define Hessian and bias
        Matrix6d H = Matrix6d::Zero();  // 6x6 Hessian
        Vector6d b = Vector6d::Zero();  // 6x1 bias

        vector<int> ref_index;
        for(int i=0;i<px_ref.size();++i)
            ref_index.push_back(i);

        std::mutex m;
        for_each(execution::par_unseq, ref_index.begin(), ref_index.end(),
                 [&](auto& i)
                 {
                     // compute the projection in the second image
                     // TODO START YOUR CODE HERE
                     Eigen::Vector3d point_ref = depth_ref[i] * Eigen::Vector3d((px_ref[i][0]-cx)/fx, (px_ref[i][1]-cy)/fy, 1);  //ref中的3D点坐标
                     Eigen::Vector3d point_cur = T21 * point_ref;  //ref中的3D点转换到cur中的3D点
                     if (point_cur[2] >= 0)   // depth invalid
                     {
                         float u = fx * point_cur[0]/point_cur[2] + cx, v = fy * point_cur[1]/point_cur[2] + cy;
                         if(u>=half_patch_size && u+half_patch_size<=img2.cols && v>=half_patch_size && v+half_patch_size<=img2.rows)  //变换到cur中若越界则不优化
                         {
                             double X = point_cur[0], Y = point_cur[1], Z = point_cur[2], inv_z = 1.0 / Z, inv_z2 = inv_z * inv_z;  //cur中的3D坐标X'Y'Z'
                             nGood++;
                             std::lock_guard<std::mutex> guard(m);//代替m.lock; m.unlock();
                             //记录投影前后的uv坐标
                             goodProjection.push_back(Eigen::Vector2d(u, v));
                             GoodRefIndex.push_back(Eigen::Vector2d(px_ref[i][0],px_ref[i][1]));
选择两张 000001.png 和 000002.png 分别与单进程进行对比,普通单层
和并行化单层运行时间比较如图 3.7-3.8 所示
图 3.8 估计结果 _2


可以看出,并行化之后速度略微有些变慢,具体是什么原因呢?和上一次的作业中一样的问题,实验过后发现先执行一遍普通的,再执行并行化,并行化速度才会变快…
3.4 延伸讨论
4. 使用光流计算视差
使用 LK 光流计算 left 中的 GFTT 特征点在 right 中的对应,根据坐
标的对应关系计算出水平视差,计算视差的核心代码如 Listing7 所示,计
算结果如图 4.1 所示, OpenCV 的光流法之后的视差平均误差为-24.5884。
参考博客中的这个应该是用了直接法,在直接法中提前用了深度图,光流法只是进行特征点匹配,具体来说只是算出left的2D相对运动,根据运动计算出left中的特征点在right中的对应位置,而博客中最后算出了变换矩阵,明显不是光流法,所以结果和我的不同,如果哪位同学做的和我不一样可以和我讨论一下。
Listing7
    //OpenCV
    Mat img2_CV;
    cv::cvtColor(img2, img2_CV, CV_GRAY2BGR);
    for (int i = 0; i < pt2.size(); i++) {
        if (status[i]) {
            cv::circle(img2_CV, pt2[i], 2, cv::Scalar(0, 250, 0), 2);
            cv::line(img2_CV, pt1[i], pt2[i], cv::Scalar(0, 250, 0));
            dis = kp1[i].pt.x - kp2_single[i].pt.x;
            cost.push_back(dis- GetPixelValue(disparity_img, kp1[i].pt.x, kp1[i].pt.y));
        }
    }
    cost_sum = accumulate(cost.begin(), cost.end(), 0.0);  //求和
    cout<<"OpenCV光流平均误差:"<<cost_sum/cost.size()<<endl;
    cost.clear();
开始下一章。


