Python的灵活运用之——100 行代码教你实现光线追踪 !
“Ray Tracing is the Future and Ever Will Be”
英伟达的一位大佬曾经这么说过:「光线追踪是未来,而且将永远是未来。」
光线追踪的原理是非常直观而优雅的,其应用的核心难点在于性能优化。本文将基于光线追踪的基础原理,用 100 行 python 代码实现一个简单的光线追踪渲染器。
基础原理
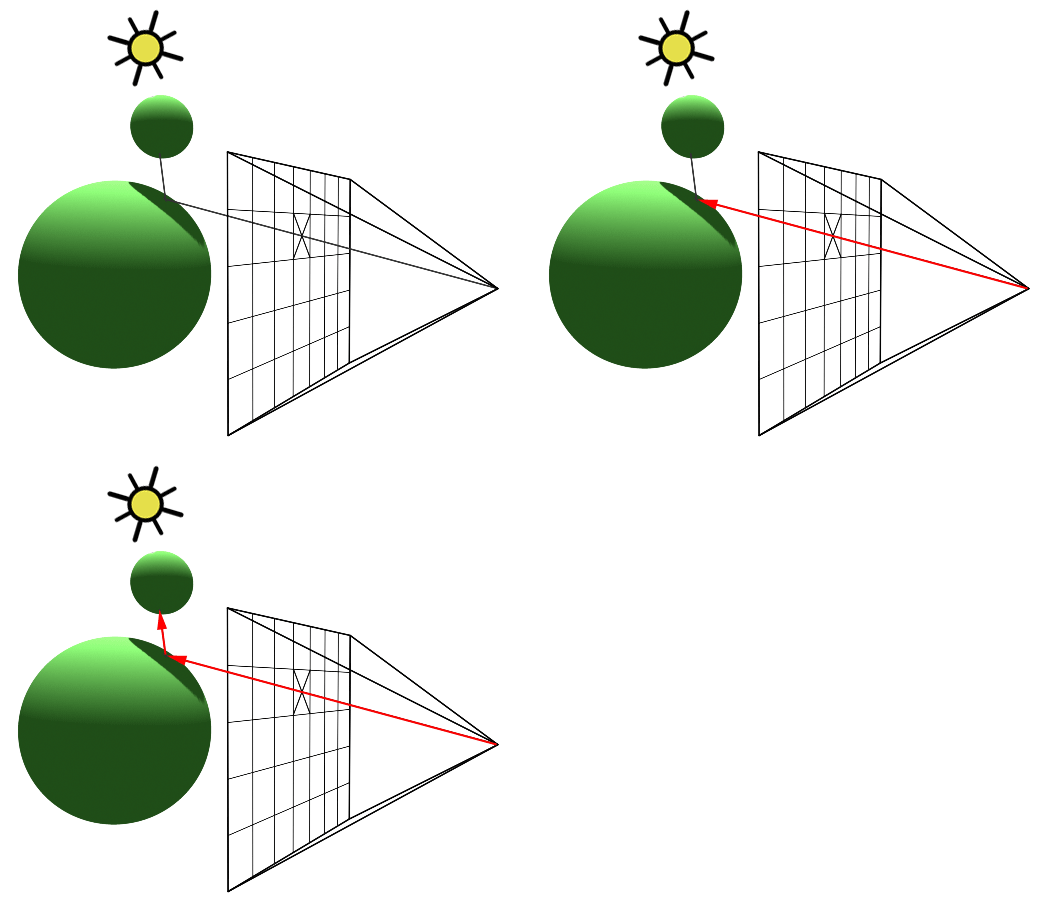
我们看到的物体,是由来自各个方向发射光、反射光、折射光照亮的。而光线的起点,是各种发光源;光线的终点,则是我们的眼睛。一束光由光源出发,经过不同物体的反射、折射,最终射入观察者的眼睛。
由于在几何光学中,光路具有可逆性。我们从观察者的眼睛射出一道虚拟的光线,它经过的路径将与射入观察者眼睛的那道光路径完全一致,方向相反。此时,如果我们在观察者眼前放置一个像素化的「窗口」,由观察者向每个像素发射一道虚拟光线,最终,这些光线都会「返回」到光源中。结合这些光的路径,和相关的物理模型/经验模型,我们可以计算出这个窗口上每一个像素点的颜色值,从而形成我们在计算机屏幕上看到的图像。
场景布置
为了简化代码,我们尽可能将场景简单化,并使用参数方程描述场景中的物体。
scene = [sphere([.75, .1, 1.], .6, [.8, .3, 0.]),           # 球心位置,半径,颜色
         sphere([-.3, .01, .2], .3, [.0, .0, .9]),
         sphere([-2.75, .1, 3.5], .6, [.1, .572, .184]),
         plane([0., -.5, 0.], [0., 1., 0.])]                # 平面上一点的位置,法向量
light_point = np.array([5., 5., -10.])                      # 点光源位置
light_color = np.array([1., 1., 1.])                        # 点光源的颜色值
ambient = 0.05                                              # 环境光
我们在场景里放置三个球和一个平面,并放置了一个白色点光源。
在现实世界中,完全黑暗不可见的场景是很少的。即使是在一个暗室中,点亮一枚微弱的蜡烛,在家具等物品的阴影内,也并不是完全黑暗。这些地方是由光源的光经过多次反射后,近似均匀地投射到各个角落的。为了描述这个复杂的物理现象,我们将其简化为一个较小的常数光照——环境光。现阶段的计算机图形学远无法精确地模拟真实的物理世界,在许多时候(特别是对计算实时性要求较高的时候),我们通常会用一个可接受的简化经验模型来替代相对真实的模型。
生成物品
def get_color(obj, P):
    color = obj['color']
    if not hasattr(color, '__len__'):
        color = color(P)
    return color

def sphere(position, radius, color, reflection=.85, diffuse=1., specular_c=.6, specular_k=50):
    return dict(type='sphere', position=np.array(position), radius=np.array(radius),
                color=np.array(color), reflection=reflection, diffuse=diffuse, specular_c=specular_c, specular_k=specular_k)

def plane(position, normal, color=np.array([1.,1.,1.]), reflection=0.15, diffuse=.75, specular_c=.3, specular_k=50):
    return dict(type='plane', position=np.array(position), normal=np.array(normal),
                color=lambda P: (np.array([1.,1.,1.]) if (int(P[0]*2)%2) == (int(P[2]*2)%2) else (np.array([0.,0.,0.]))),
                reflection=reflection, diffuse=diffuse, specular_c=specular_c, specular_k=specular_k)
我们用 python 的字典对象来描述球和平面的各种参数:位置、半径、法向量、颜色、镜面反射率、漫反射率、高光参数,等。其中一些参数的意义在后面的小节中再进行解释。
其中,我们用了一个匿名函数为平面生成黑白相间的棋盘格纹理。
基础准备
import numpy as np

def normalize(x):
    return x / np.linalg.norm(x)

def get_normal(obj, point):         # 获得物体表面某点处的单位法向量
    if obj['type'] == 'sphere':
        return normalize(point - obj['position'])
    if obj['type'] == 'plane':
        return obj['normal']
我们定义两个简单的函数 normalize 和 get_normal,分别用于将向量归一化,获取物体表面特定点的单位法向量。球面和平面的法向量获取方式相当简单。此处我们引用了 numpy 这个科学计算的库,对此不熟悉的读者可以参考这里进行安装:NumPy 安装教程。
简单的几何学
def intersect(origin, dir, obj):    # 射线与物体的相交测试
    if obj['type'] == 'plane':
        return intersect_plane(origin, dir, obj['position'], obj['normal'])
    elif obj['type'] == 'sphere':
        return intersect_sphere(origin, dir, obj['position'], obj['radius'])
接下来是第一个关键点——相交测试。当我们发射光线时,需要检测光线(射线)与物体的第一个交点,并基于交点坐标进行后续的光线反射、折射计算和颜色计算。这里用 if 语句实现伪多态。
射线与平面的交点:
def intersect_plane(origin, dir, point, normal):    # 射线与平面的相交测试
    dn = np.dot(dir, normal)
    if np.abs(dn) < 1e-6:   # 射线与平面几乎平行
        return np.inf       # 交点为无穷远处
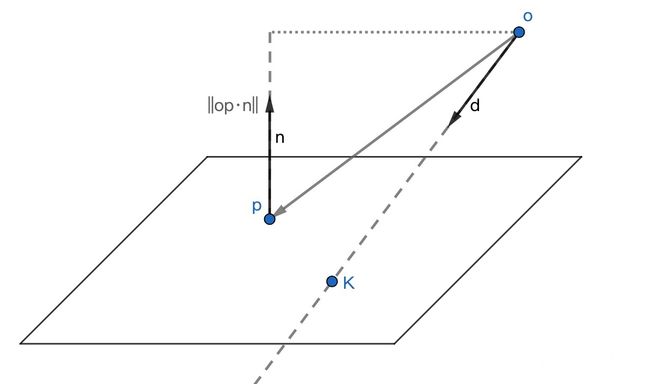
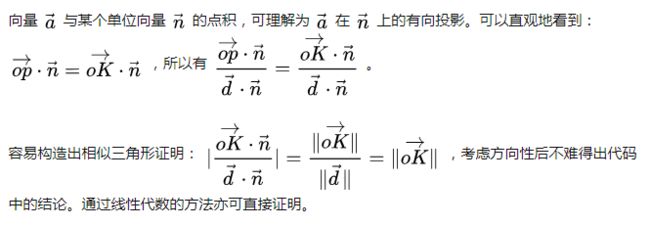
    d = np.dot(point - origin, normal) / dn         # 交点与射线原点的距离(相似三角形原理)
    return d if d>0 else np.inf     # 负数表示射线射向平面的反方向
前四行很容易理解,当射线的方向向量与平面法向量垂直时,无交点。为了照顾浮点数,垂直判定为点积的绝对值小于一个小量。
射线与球的交点:
def intersect_sphere(origin, dir, center, radius):  # 射线与球的相交测试
    OC = center - origin
    if (np.linalg.norm(OC) < radius) or (np.dot(OC, dir) < 0):
        return np.inf
    l = np.linalg.norm(np.dot(OC, dir))
    m_square = np.linalg.norm(OC) * np.linalg.norm(OC) - l * l
    q_square = radius*radius - m_square
    return (l - np.sqrt(q_square)) if q_square >= 0 else np.inf
球与射线的关系大致可以分为下图中的三种:
前四行代码对应了图中 (B) (C) 两种情况。情况 (A) 可根据勾股定理计算出l-q的长度,即第一个交点和射线原点的距离。
主逻辑代码
w, h = 400, 300     # 屏幕宽高
O = np.array([0., 0.35, -1.])   # 摄像机位置
Q = np.array([0., 0., 0.])      # 摄像机指向
img = np.zeros((h, w, 3))
r = float(w) / h
S = (-1., -1. / r + .25, 1., 1. / r + .25)

for i, x in enumerate(np.linspace(S[0], S[2], w)):
    print("%.2f" % (i / float(w) * 100), "%")
    for j, y in enumerate(np.linspace(S[1], S[3], h)):
        Q[:2] = (x, y)
        img[h - j - 1, i, :] = intersect_color(O, normalize(Q - O), 1)

plt.imsave('test.png', img)
计算机图形学中,常用「摄像机」指代观察者的眼睛。主逻辑代码很简单,遍历 400x300 大小的屏幕像素,从摄像机位置向每个像素射出一条射线,并根据 intersect_color 函数计算出该点像素的颜色,最终把它们储存为一张图片。
核心代码
def intersect_color(origin, dir, intensity):
    min_distance = np.inf
    for i, obj in enumerate(scene):
        current_distance = intersect(origin, dir, obj)
        if current_distance < min_distance:
            min_distance, obj_index = current_distance, i   # 记录最近的交点距离和对应的物体
    if (min_distance == np.inf) or (intensity < 0.01):
        return np.array([0., 0., 0.])

    obj = scene[obj_index]
    P = origin + dir * min_distance     # 交点坐标
    color = get_color(obj, P)
    N = get_normal(obj, P)                  # 交点处单位法向量
    PL = normalize(light_point - P)
    PO = normalize(origin - P)

    c = color

    return np.clip(c, 0, 1)
intersect_color 函数就是我们实现光线追踪的核心代码了。代码开始,我们对射线和场景中的物体逐一做相交测试,找出距离最近的交点,若不存在,则返回无穷远点。其中 intensity 参数是用于停止光追迭代,后续部分再行解释。
中间一段代码计算了一些以后需要用到的参数,如:与射线相交的第一个物体对象、交点坐标、交点处物体的颜色、交点处物体的单位法向量、交点指向光源的单位向量、交点指向摄像机的单位向量。这些参数在后续的光照模型中会用到。
返回值用了 clip 函数将返回的颜色值钳位在 0 到 1 之间,避免颜色值溢出。
我们首先简单地取物体的颜色作为返回值,最终生成的图片如下。
可以看到我们已经成功在场景中放置了三个物体。这里呈现的是物体自身的颜色,未受任何光照影响。接下来我们修改代码为——环境光作用于物体。
c = ambient * color
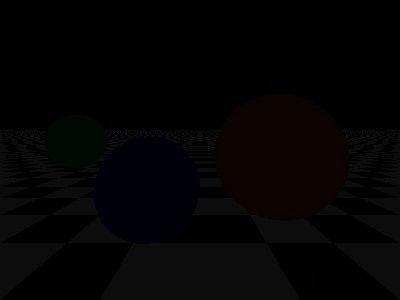
呈现效果如下:
此时画面几乎是全黑的,只能隐约看到一些图案,这是因为环境光十分微弱。
兰伯特模型
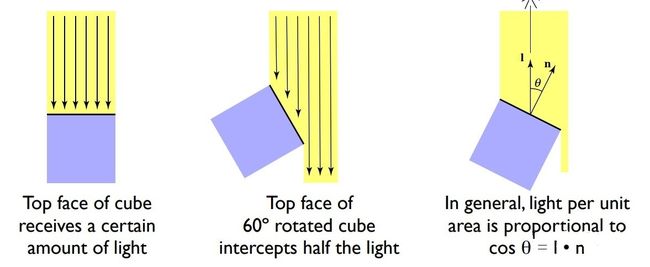
兰伯特光照模型描述了物体的漫反射特性,其计算方式如下:
由于单位向量的点积等于向量夹角的余弦值,所以该光照模型又被叫做兰伯特余弦定理。上图从光通量的角度解释了兰伯特模型的物理原理。
c += obj['diffuse'] * max(np.dot(N, PL), 0) * color * light_color
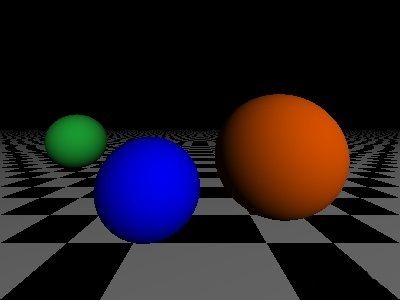
将兰伯特漫反射计算的值叠加到 c 上,我们得到:
此时已经基本可以看出是立体的球了。
阴影
神说要有光,就有了光。自此之后光与暗就分隔了。
有了光照,就要有阴影。所谓阴影,就是光不能直接照到的地方。换句话说,在这个地方不能直接看到光源。我们可以从该点向光源发射一条射线,如果通行无阻,那么这个点就可以被光源照到;如果射线「中途」碰到了某个物体(交点距离小于该点与光源的距离),那么这个点就无法被光源直接照到。
由于我们认为环境光充斥于整个空间,所以阴影只作用于漫反射:
    c = ambient * color

    l = [intersect(P + N * .0001, PL, obj_shadow_test)
            for i, obj_shadow_test in enumerate(scene) if i != obj_index]       # 阴影测试
    if not (l and min(l) < np.linalg.norm(light_point - P)):
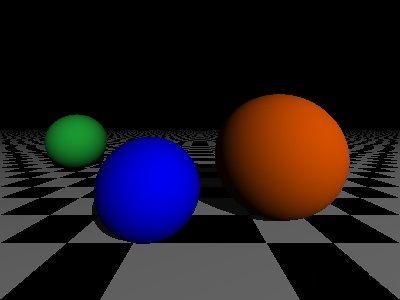
        c += obj['diffuse'] * max(np.dot(N, PL), 0) * color * light_color
可以看到蓝色和橙色的球已经产生了明显的阴影,阴影处也隐约可见棋盘格纹理。
高光:微表面假设与 Blinn-Phong 模型
现实生活中,物体被光源照亮时,往往会在某些地方形成一个亮斑,也叫高光。高光的形成原因比较复杂,但我们可以用一个简化的模型来阐释。
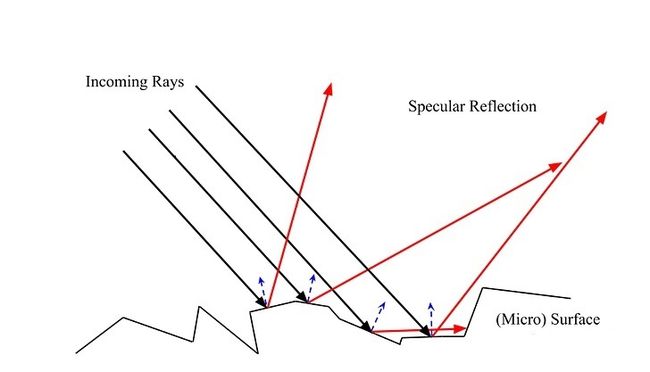
我们认为,现实中的物体都不是绝对光滑的。看似光滑的一个表面上,分布着许多微小的表面,这些微表面可以近似看作一个个小镜面。微表面的法向量,相对于宏观表面的法向量有一个扰动值,这个扰动值往往服从一定的分布。大体规律是:扰动量越大,概率越低。
如果我们假设有一个理想的镜面平面和一个点光源,我们观察这个平面,会发现平面上只有一个点 K 被光源照亮。因为光的反射严格遵循反射定律。此时如果引入微表面的假设,可以知道,其他点附近的微表面在法向扰动的情况下,也有一定概率将光反射到我们眼中。距离点 K 越近,这个概率就越大。因此,我们可以看到一个中间亮四周逐渐变暗的光斑,而不是一个孤立的光点。这个光斑就是高光。
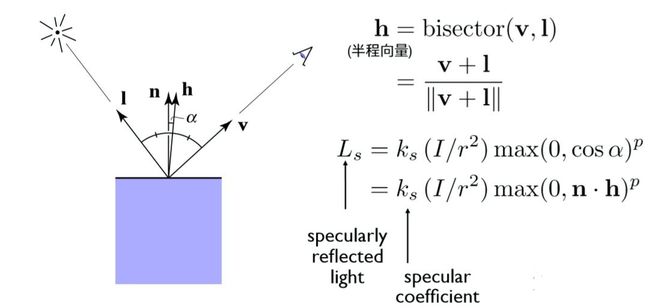
1975 年,学者 Bui Tuong Phong 提出了用于计算高光的 Phong 模型。
随后不久,Phong 模型被改进为 Blinn-Phong 模型。Blinn-Phong 模型引进了「半角向量」的概念,简化了计算,因此被许多电子游戏所使用。Blinn-Phong 模型是经验模型,并没有严格的物理公式推导,但已经可以较好地模拟真实的高光。
我们将高光项加入代码:
    l = [intersect(P + N * .0001, PL, obj_shadow_test)
            for i, obj_shadow_test in enumerate(scene) if i != obj_index]       # 阴影测试
    if not (l and min(l) < np.linalg.norm(light_point - P)):
        c += obj['diffuse'] * max(np.dot(N, PL), 0) * color * light_color
        c += obj['specular_c'] * max(np.dot(N, normalize(PL + PO)), 0) ** obj['specular_k'] * light_color
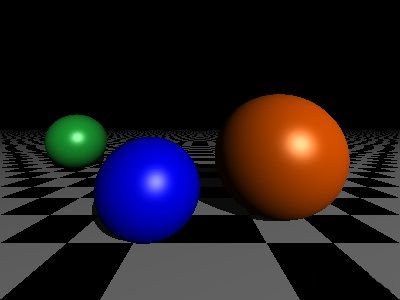
可以看到,此时的真实感已经得到了较大的提升。
光线追踪
光线追踪的核心原理,就是追踪摄像机向每个像素点发射的光线路径,并对每个折射、反射点进行颜色计算。可以用递归的思想来描述这个过程:
//   伪代码
IntersectColor(vBeginPoint, vDirection)
{
    Determine IntersectPoint;
    Color = ambient color;
    for each light
        Color += local shading term;
    if(surface is reflective)
        color += reflect Coefficient * IntersectColor(IntersecPoint, Reflect Ray);
    else if ( surface is refractive)
        color += refract Coefficient * IntersectColor(IntersecPoint, Refract Ray);
    return color;
}
由于我们暂时只考虑反射,不考虑折射,因此只需要添加两行代码如下:
    l = [intersect(P + N * .0001, PL, obj_shadow_test)
            for i, obj_shadow_test in enumerate(scene) if i != obj_index]       # 阴影测试
    if not (l and min(l) < np.linalg.norm(light_point - P)):
        c += obj['diffuse'] * max(np.dot(N, PL), 0) * color * light_color
        c += obj['specular_c'] * max(np.dot(N, normalize(PL + PO)), 0) ** obj['specular_k'] * light_color

    reflect_ray = dir - 2 * np.dot(dir, N) * N      # 计算反射光线
    c += obj['reflection'] * intersect_color(P + N * .0001, reflect_ray, obj['reflection'] * intensity)

    return np.clip(c, 0, 1)
每次反射,我们都将光线强度乘以反射系数(表征反射光线的衰减),并在函数开始时判断当光线强度弱于 0.01 时结束递归。
    if (min_distance == np.inf) or (intensity < 0.01):
        return np.array([0., 0., 0.])
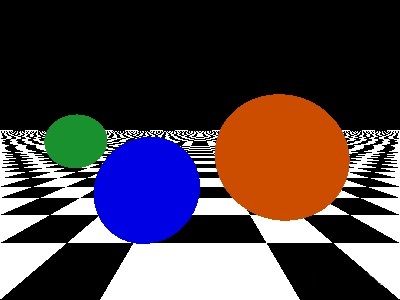
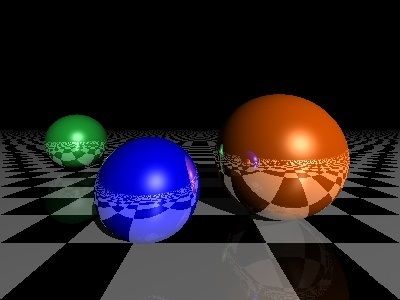
最终运行效果:
可以看到,物体表面可以反射出其他物体的影像了,甚至在橙色球上还可以观察到多次反射的现象。
最后,我们将几张中间过程的图片放到一起,进行对比。
全部代码如下,算上空行刚好 100 行。
import numpy as np
import matplotlib.pyplot as plt

def normalize(x):
    return x / np.linalg.norm(x)

def intersect(origin, dir, obj):    # 射线与物体的相交测试
    if obj['type'] == 'plane':
        return intersect_plane(origin, dir, obj['position'], obj['normal'])
    elif obj['type'] == 'sphere':
        return intersect_sphere(origin, dir, obj['position'], obj['radius'])

def intersect_plane(origin, dir, point, normal):    # 射线与平面的相交测试
    dn = np.dot(dir, normal)
    if np.abs(dn) < 1e-6:   # 射线与平面几乎平行
        return np.inf       # 交点为无穷远处
    d = np.dot(point - origin, normal) / dn         # 交点与射线原点的距离(相似三角形原理)
    return d if d>0 else np.inf     # 负数表示射线射向平面的反方向

def intersect_sphere(origin, dir, center, radius):  # 射线与球的相交测试
    OC = center - origin
    if (np.linalg.norm(OC) < radius) or (np.dot(OC, dir) < 0):
        return np.inf
    l = np.linalg.norm(np.dot(OC, dir))
    m_square = np.linalg.norm(OC) * np.linalg.norm(OC) - l * l
    q_square = radius*radius - m_square
    return (l - np.sqrt(q_square)) if q_square >= 0 else np.inf

def get_normal(obj, point):         # 获得物体表面某点处的单位法向量
    if obj['type'] == 'sphere':
        return normalize(point - obj['position'])
    if obj['type'] == 'plane':
        return obj['normal']

def get_color(obj, M):
    color = obj['color']
    if not hasattr(color, '__len__'):
        color = color(M)
    return color

def sphere(position, radius, color, reflection=.85, diffuse=1., specular_c=.6, specular_k=50):
    return dict(type='sphere', position=np.array(position), radius=np.array(radius),
                color=np.array(color), reflection=reflection, diffuse=diffuse, specular_c=specular_c, specular_k=specular_k)

def plane(position, normal, color=np.array([1.,1.,1.]), reflection=0.15, diffuse=.75, specular_c=.3, specular_k=50):
    return dict(type='plane', position=np.array(position), normal=np.array(normal),
                color=lambda M: (np.array([1.,1.,1.]) if (int(M[0]*2)%2) == (int(M[2]*2)%2) else (np.array([0.,0.,0.]))),
                reflection=reflection, diffuse=diffuse, specular_c=specular_c, specular_k=specular_k)

scene = [sphere([.75, .1, 1.], .6, [.8, .3, 0.]),           # 球心位置,半径,颜色
         sphere([-.3, .01, .2], .3, [.0, .0, .9]),
         sphere([-2.75, .1, 3.5], .6, [.1, .572, .184]),
         plane([0., -.5, 0.], [0., 1., 0.])]                # 平面上一点的位置,法向量
light_point = np.array([5., 5., -10.])                      # 点光源位置
light_color = np.array([1., 1., 1.])                        # 点光源的颜色值
ambient = 0.05                                              # 环境光

def intersect_color(origin, dir, intensity):
    min_distance = np.inf
    for i, obj in enumerate(scene):
        current_distance = intersect(origin, dir, obj)
        if current_distance < min_distance:
            min_distance, obj_index = current_distance, i   # 记录最近的交点距离和对应的物体
    if (min_distance == np.inf) or (intensity < 0.01):
        return np.array([0., 0., 0.])

    obj = scene[obj_index]
    P = origin + dir * min_distance     # 交点坐标
    color = get_color(obj, P)
    N = get_normal(obj, P)                  # 交点处单位法向量
    PL = normalize(light_point - P)
    PO = normalize(origin - P)

    c = ambient * color

    l = [intersect(P + N * .0001, PL, obj_shadow_test)
            for i, obj_shadow_test in enumerate(scene) if i != obj_index]       # 阴影测试
    if not (l and min(l) < np.linalg.norm(light_point - P)):
        c += obj['diffuse'] * max(np.dot(N, PL), 0) * color * light_color
        c += obj['specular_c'] * max(np.dot(N, normalize(PL + PO)), 0) ** obj['specular_k'] * light_color

    reflect_ray = dir - 2 * np.dot(dir, N) * N  # 计算反射光线
    c += obj['reflection'] * intersect_color(P + N * .0001, reflect_ray, obj['reflection'] * intensity)

    return np.clip(c, 0, 1)

w, h = 400, 300     # 屏幕宽高
O = np.array([0., 0.35, -1.])   # 摄像机位置
Q = np.array([0., 0., 0.])      # 摄像机指向
img = np.zeros((h, w, 3))
r = float(w) / h
S = (-1., -1. / r + .25, 1., 1. / r + .25)

for i, x in enumerate(np.linspace(S[0], S[2], w)):
    print("%.2f" % (i / float(w) * 100), "%")
    for j, y in enumerate(np.linspace(S[1], S[3], h)):
        Q[:2] = (x, y)
        img[h - j - 1, i, :] = intersect_color(O, normalize(Q - O), 1)

plt.imsave('test.png', img)
为了保存图片,我们用了 matplotlib 库,可以在这里安装:[Installation Guide - Matplotlib 3.4.0 documentation] 。
以上就是今天的内容了,如果有帮助的话记得转发、点赞哦,欢迎大家在评论区交流,想了解更多Python实用技巧及学习资料可以私信小编哦!
