代码混淆之class-winter
代码混淆之class-winter
- 代码混淆之class-winter
- 功能与特性
- 加密
- 加密参数
- 解密(启动)
- 解密参数
- 巧用loader.path
郑重声明
class-winter 是本人在学习完 class-final(v1.1.9) 后,仿照class-final进行编写的,部分思路与class-final一致
功能与特性
- 支持war(普通war+可执行war)加密
- 支持jar(普通jar+可执行jar)加密
- 支持xml加密(掩耳盗铃版)
加密
-
方式一:通过maven插件自动加密。
<plugin>
    <groupId>com.idea-aedigroupId>
    <artifactId>class-winter-maven-pluginartifactId>
    <version>2.6.4version>

    <configuration>

        <includePrefix>加密范围includePrefix>


    configuration>
    <executions>
        <execution>
            <phase>packagephase>
            <goals>
                <goal>class-wintergoal>
            goals>
        execution>
    executions>
plugin>
注:不必担心信息泄漏问题,使用此方式生成混淆的jar包时,会擦除pom.xml中关于class-winter-plugin的信息。
-
方式二:通过 class-winter-core.jar 主动加密。
java -jar class-winter-core-2.6.4.jar originJarOrWar=${要加密的项目.jar或.war包} includePrefix=${加密范围} [k3=v3 k4=v4 ...]
# 对于复杂的参数值,可以使用引号引起来
# linux
java -jar class-winter-core-2.6.4.jar k1='v1' k2='v2'
# windows
java -jar class-winter-core-2.6.4.jar k1="v1" k2="v2"
加密参数
| 参数 | 是否必填 | 说明 | 示例 |
| originJarOrWar | 是 | 指定要加密的jar/war文件 注:当使用maven插件进行自动加密时,无此参数。 |
originJarOrWar=/my-project.jar |
| includePrefix | 是 | 通过前缀匹配的形式定位要加密的class 注:多个通过逗号分割。 |
includePrefix=com includePrefix=com,org |
| excludePrefix | 否 | 通过前缀匹配的形式排除class,不对其加密 注:多个通过逗号分割。 注:excludePrefix优先级高于includePrefix。 |
excludePrefix=com.example.service,com.example.util.StrUtil.class |
| includeXmlPrefix | 否 | 通过打出来的包中条目的entryName前缀匹配的形式定位要加密的xml 注:多个通过逗号分割。 注:如果您打出来的加密包是准备作为一个lib包提供给第三方使用的,那么请不要使用此参数,因为解密时是不会解密项目所依赖的lib包中的xml的。 |
includeXmlPrefix=BOOT-INF/classes/ includeXmlPrefix=BOOT-INF/classes/com/demo/mapper/,BOOT-INF/classes/com/demo/dao/ |
| excludeXmlPrefix | 否 | 通过打出来的包中条目的entryName前缀匹配的形式排除xml,不对其加密 注:多个通过逗号分割。 |
excludeXmlPrefix=BOOT-INF/classes/com/demo/mapper/ excludeXmlPrefix=BOOT-INF/classes/com/demo/mapper/,BOOT-INF/classes/com/demo/dao/UserDao.xml |
| toCleanXmlChildElementName | 否 | 加密xml中的哪些一级元素 注:默认值为resultMap,sql,insert,update,delete,select 注:多个通过逗号分割。 |
toCleanXmlChildElementName=select,delete,resultMap |
| finalName | 否 | 指定加密后生成的jar包名 注:若finalName与加密的包一致,那么生成的加密后的包会覆盖原来的包。 |
finalName=mine-project |
| password | 否 | 主动指定密码 注:密码不能包含空格和逗号。 |
password=123456 |
| includeLibs | 否 | 指定将lib包也纳入加密范围内 注:多个通过逗号分割。 注:lib中的class是否会被加密,还得由includePrefix和excludePrefix决定。 |
includeLibs=a.jar,b.jar |
| alreadyProtectedLibs | 否 | 指明项目所依赖的lib中,哪些lib本身就已经是被class-winter加密了的 注:多个通过逗号分割。 注:主要用于处理第三方提供的由class-winter加密了的依赖包的场景。 注:若lib需要密码,那么需要在指定lib的同时通过冒号接上密码。 注:如果lib有密码,那么密码不能包含逗号。 |
alreadyProtectedLibs=a.jar,b.jar alreadyProtectedLibs=a.jar,b.jar:pwd123 alreadyProtectedLibs=a.jar:pwd1,b.jar:pwd2 |
| supportFile | 否 | 指定一个加密辅助jar文件(或jar文件所在的目录) 注:当为目录时,该目录(含子孙目录)下的所有jar都会被作采集作为辅助文件。 注:主要用于解决因ClassNotFound导致的加密失败问题。 |
supportFile=/abc.jar supportFile=/libs |
| jvmArgCheck | 否 | 设置当启动混淆包时,必须要有的jvm参数 注:多个通过逗号分割。 注:大小写不敏感。 如:通过设置-XX:+DisableAttachMechanism防止运行时dump class,以提高安全性。 |
jvmArgCheck=-XX:+DisableAttachMechanism,-Xms2048M |
| tips | 否 | 指定提示语。 注:当直接使用加密后的jar/war时,用到了加密了的类后,会先System.err.println输出此tips,然后System.exit退出程序。 |
windows示例:tips="请不要直接使用混淆后的jar/war" linux示例:tips='请不要直接使用混淆后的jar/war' |
| debug | 否 | 是否开启debug模式 | debug=true |
解密(启动)
通过-javaagent指定代理进行解密启动。
-
jar解密(启动)
# 假设your-project-encrypted.jar是由class-winter加密后的包,那么你可以这么启动 java -javaagent:/your-project-encrypted.jar -jar /your-project-encrypted.jar # 也可以用class-winter-core-2.6.4.jar # java -javaagent:/class-winter-core-2.6.4.jar -jar /your-project-encrypted.jar # 或者指定参数 # java -javaagent:/your-project-encrypted.jar=debug=true,password=pwd12345 -jar /your-project-encrypted.jar # 参数可以引起来(linux) # java -javaagent:/your-project-encrypted.jar='debug=true,password=pwd12345' -jar /your-project-encrypted.jar # 参数可以引起来(windows) # java -javaagent:/your-project-encrypted.jar="debug=true,password=pwd12345" -jar /your-project-encrypted.jar -
war解密(启动)
以Tomcat9为例
-
linux方式一
编辑tomcat/bin/catalina.sh文件,在最上面加上
# 如果你有参数, 那么 -javaagent:/class-winter-core-2.6.4.jar=k1=v1,k2=v2 CATALINA_OPTS="$CATALINA_OPTS -javaagent:/class-winter-core-2.6.4.jar=debug=true"; export CATALINA_OPTS; -
linux方式二
在tomcat/bin目录下创建setenv.sh文件,并写上
# 如果你有参数, 那么 -javaagent:/class-winter-core-2.6.4.jar=k1=v1,k2=v2 JAVA_OPTS="$JAVA_OPTS -javaagent:/class-winter-core-2.6.4.jar=debug=true"; export JAVA_OPTS; -
windows方式一
编辑tomcat/bin/catalina.bat文件,在@echo off后加上catalina参数
rem 如果你有参数, 那么 -javaagent:D:/class-winter-core-2.6.4.jar=k1=v1,k2=v2 set CATALINA_OPTS="-javaagent:D:/class-winter-core-2.6.4.jar" -
windows方式二
在tomcat/bin目录下创建setenv.bat文件,并写上
rem 如果你有参数, 那么 -javaagent:D:/class-winter-core-2.6.4.jar=k1=v1,k2=v2
set JAVA_OPTS="-javaagent:D:/class-winter-core-2.6.4.jar"
-
解密参数
| 参数 | 是否必填 | 说明 | 示例 |
| password | 否 | 指定解密密码 | password=pwd123 |
| passwordFromFile | 否 | 从指定文件中读取文本作为解密密码(注:此参数由2.4.0版本开始支持) | passwordFromFile=/my-pwd-file.txt |
| passwordFromShell | 否 | 执行shell文件中的代码,并以其返货值作为解密密码(注:此参数由2.4.0版本开始支持) | passwordFromShell=/my-pwd-file.shell |
| skipProjectPathPrefix | 否 | 是否跳过指定前缀的项目路径(当class-winter解密逻辑试图解析那些进入premain但是非class-winter加密项目时,会因为获取印章失败Obtain project seal fail而停止,此时如果确认这个项目没有加密文件的话,可以使用此参数跳过) | skipProjectPathPrefix=/D:/apache-tomcat-9.0.71/bin/ 多个通过___符号拼接:skipProjectPathPrefix=/D:/apache-tomcat-9.0.71/bin/___/D:/jd/classpath/lib/ |
| debug | 否 | 是否开启debug模式 | debug=true |
巧用loader.path
-
需求描述
已加密的包,如何提供给客户使用?
- 方案一:class-winter加密时,使用
alreadyProtectedLibs参数,但是要求客户的项目也需要使用class-winter加密(,哪怕客户的项目什么也不需要加密,也要求客户有使用class-winter这个动作) - 方案二:-Dloader.path与class-winter结合使用
- 方案一:class-winter加密时,使用
-
-Dloader.path方案实现
-
假设客户依赖了我们的加密包
-
客户使用maven插件,打包时将项目代码和依赖的lib分开
完整pom示例:
<project xmlns="http://maven.apache.org/POM/4.0.0" xmlns:xsi="http://www.w3.org/2001/XMLSchema-instance"
         xsi:schemaLocation="http://maven.apache.org/POM/4.0.0 https://maven.apache.org/xsd/maven-4.0.0.xsd">
    <modelVersion>4.0.0modelVersion>
    <parent>
        <groupId>org.springframework.bootgroupId>
        <artifactId>spring-boot-starter-parentartifactId>
        <version>2.6.4version>
        <relativePath/>
    parent>
    <groupId>com.examplegroupId>
    <artifactId>demoartifactId>
    <version>0.0.1-SNAPSHOTversion>
    <name>demoname>
    <description>Demo project for Spring Bootdescription>
    <properties>
        <java.version>1.8java.version>
    properties>
    <dependencies>
        <dependency>
            <groupId>org.springframework.bootgroupId>
            <artifactId>spring-boot-starter-webartifactId>
        dependency>

        <dependency>
            <groupId>org.projectlombokgroupId>
            <artifactId>lombokartifactId>
            <optional>trueoptional>
        dependency>
        <dependency>
            <groupId>org.springframework.bootgroupId>
            <artifactId>spring-boot-starter-testartifactId>
            <scope>testscope>
        dependency>

        <dependency>
            <groupId>com.demogroupId>
            <artifactId>encrypted-lib-no-pwdartifactId>
            <scope>systemscope>
            <version>1.0.0version>
            <systemPath>${pom.basedir}/src/main/resources/lib/encrypted-lib-no-pwd-1.0.0.jarsystemPath>
        dependency>
    dependencies>

    <build>
        <plugins>
            <plugin>
                <groupId>org.springframework.bootgroupId>
                <artifactId>spring-boot-maven-pluginartifactId>
                <configuration>

                    <mainClass>com.ideaaedi.demo.DemoApplicationmainClass>

                    <includeSystemScope>trueincludeSystemScope>
                    <fork>truefork>

                    <layout>ZIPlayout>
                    <includes>
                        <include>
                            <groupId>nothinggroupId>
                            <artifactId>nothingartifactId>
                        include>
                    includes>
                configuration>
                <executions>
                    <execution>
                        <goals>
                            <goal>repackagegoal>
                        goals>
                    execution>
                executions>
            plugin>


            <plugin>
                <groupId>org.apache.maven.pluginsgroupId>
                <artifactId>maven-dependency-pluginartifactId>
                <version>3.2.0version>
                <executions>
                    <execution>
                        <id>copy-dependenciesid>
                        <phase>prepare-packagephase>
                        <goals>
                            <goal>copy-dependenciesgoal>
                        goals>
                        <configuration>
                            <outputDirectory>${project.build.directory}/liboutputDirectory>
                            <overWriteReleases>falseoverWriteReleases>
                            <overWriteSnapshots>falseoverWriteSnapshots>
                            <overWriteIfNewer>trueoverWriteIfNewer>
                            <includeScope>compileincludeScope>
                        configuration>
                    execution>
                executions>
            plugin>
        plugins>
    build>

project>
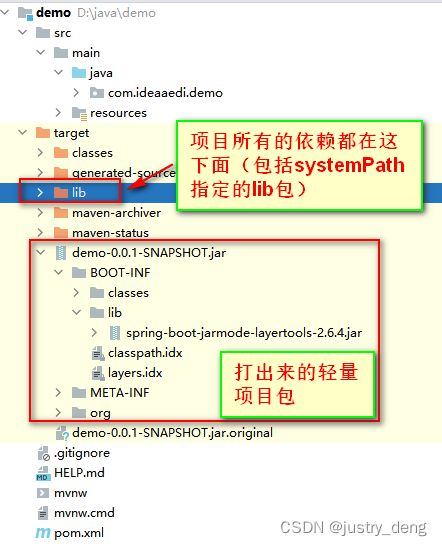
打出来的包:
-
客户可以这样启动项目
java -Dloader.path=./lib/ -javaagent:./{class-winter.jar} -jar {客户项目.jar}
-
^_^ 本文已经被收录进《程序员成长笔记》 ,笔者JustryDeng


