(一)Darknet YOLO 目标检测----命令代码
目录
Part 1:编译测试(实验环境:Ubuntu16.04)
Part 2:Training YOLO on VOC
Part 3:Darknet Yolo v3 & v2 Neural Networks for object detection
Part 1:编译测试(实验环境:Ubuntu16.04)
1.下载代码
git clone https://github.com/pjreddie/darknet2.修改Makefile文件
GPU=1
CUDNN=1
OPENCV=1
3.编译代码
cd darknet
make
4.测试单张图像代码
./darknet detector test cfg/coco.data cfg/yolov3.cfg yolov3.weights data/dog.jpg5.可以更改检测阈值
./darknet detect cfg/yolov3.cfg yolov3.weights data/dog.jpg -thresh 06.检测视频代码
./darknet detector demo cfg/coco.data cfg/yolov3.cfg yolov3.weights Part 2:Training YOLO on VOC
1.将VOC数据集VOCdevkit文件夹放入scripts/文件夹下
2.执行 voc_label.py
程序执行完毕会生成如下txt.文件
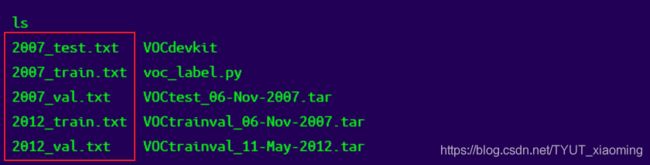
多个文件的合并可用cat命令
cat 2007_train.txt 2007_val.txt 2012_train.txt 2012_val.txt > train.txt在VOCdevkit的2007和2012对应文件夹下会生成label文件夹
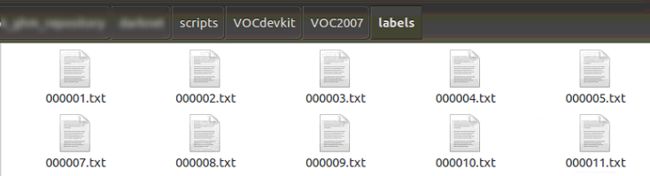
label格式如下

3.修改cfg/voc.data
 classes= 20
 train  = /train.txt
 valid  = 2007_test.txt
 names = data/voc.names
 backup = backup
4.修改 cfg/yolov3-voc.cfg
训练和测试时个别参数值不同
[net]
# Testing
batch=1
subdivisions=1
# Training
# batch=64
# subdivisions=16
# 如果内存不够大,将batch分割为subdivisions个子batch,每个子batch的大小为batch/subdivisions:16/32/64
5.开始训练
./darknet detector train cfg/voc.data cfg/yolov3-voc.cfg darknet53.conv.74Note: If during training you see nan values for avg (loss) field - then training goes wrong, but if nan is in some other lines - then training goes well.
6.程序中断之后继续训练
./darknet detector train cfg/voc.data cfg/yolov3-voc.cfg backup/yolov3-voc.backup

或者

./darknet detector train cfg/voc.data cfg/yolov3-voc.cfg /backup/yolov3-voc_1000.weights
7.测试单张图像
./darknet detector test cfg/voc.data cfg/yolov3-voc.cfg weights/yolov3.weights data/dog.jpgPart 3:Darknet Yolo v3 & v2 Neural Networks for object detection
以下项目是:AlexeyAB改的新的darknet
https://www.cnblogs.com/pprp/p/10204480.html
1.输出图像中目标的坐标
./darknet detector test cfg/coco.data cfg/yolov3.cfg yolov3.weights -ext_output ./data/dog.jpg
2.输出视频中目标的坐标
./darknet detector demo cfg/coco.data cfg/yolov3.cfg yolov3.weights -ext_output test1.mp4 
3.保存视频测试结果
./darknet detector demo cfg/coco.data cfg/yolov3.cfg yolov3.weights test1.mp4 -out_filename res.avi4.使用指定的GPU测试
./darknet detector demo cfg/coco.data cfg/yolov3-tiny.cfg yolov3-tiny.weights -i 1 test.mp45. 检测视频代码
./darknet detector demo cfg/coco.data cfg/yolov3.cfg yolov3.weights 6. 使用本地摄像头检测(-c 后面的数字代表摄像头的编号)
./darknet detector demo cfg/coco.data cfg/yolov3.cfg yolov3.weights -c 07.使用net-videocam进行检测
./darknet detector demo cfg/coco.data cfg/yolov3.cfg yolov3.weights http://192.168.0.80:8080/video?dummy=param.mjpg8.检测多张图像data/train.txt(txt存放图像路径)并将检测结果存于result.json文件
./darknet detector test cfg/coco.data cfg/yolov3.cfg yolov3.weights -ext_output -dont_show -out result.json < data/train.txt9.检测多张图像data/train.txt(txt存放图像路径)并将检测结果存于result.txt文件
./darknet detector test cfg/coco.data cfg/yolov3.cfg yolov3.weights -dont_show -ext_output < data/train.txt > result.txt10.伪标记 - 处理图像列表data / new_train.txt并以Yolo训练格式保存每个图像的检测结果作为标签
./darknet detector test cfg/coco.data cfg/yolov3.cfg yolov3.weights -thresh 0.25 -dont_show -save_labels < data/new_train.txt提取darknet前部卷积层(基础网络)
./darknet partial cfg/darknet19_448.cfg darknet19_448.weights darknet19_448.conv.23 23./darknet partial cfg/yolov3-coco.cfg yolov.weights darknet53.conv.74 74
74表示提取yolov3前74层,从而得到darknet53.conv.74作为网络初始化的初始模型计算数据集的anchor
./darknet detector calc_anchors data/obj.data -num_of_clusters 9 -width 416 -height 416绘制loss
./darknet detector train cfg/voc.data cfg/yolo.cfg -dont_show -mjpeg_port 8090 -map(to see the mAP & Loss-chart during training on remote server without GUI, use command darknet.exe detector train data/obj.data yolo-obj.cfg yolov4.conv.137 -dont_show -mjpeg_port 8090 -map then open URL http://ip-address:8090 in Chrome/Firefox browser)
-mjpeg_port 8090在浏览器查看
11. train with multi-GPU:
(1)首先在一个GPU上训练1000次
./darknet detector train cfg/voc.data cfg/yolov3-voc.cfg darknet53.conv.74(2)然后停止,使用训练了1000次的模型在多个GPU(最多4个GPU)上继续训练
./darknet detector train cfg/voc.data cfg/yolov3-voc.cfg /backup/yolov3-voc_1000.weights -gpus 0,1,2,3对于小数据集降低学习率有用,对于4个GPU设置:learning_rate = 0.00025(即learning_rate = 0.001 / GPU), 在这种情况下,cfg文件中的burn_in =和max_batches =也会增加4倍。即使用burn_in = 4000而不是1000。如果设置了policy = steps,则对于steps步骤相同
12.输出MAP
mAP@IoU=50:
./darknet detector map cfg/voc.data cfg/yolov3-voc.cfg backup/yolov3-voc_30000.weights -iou_thresh 0.5

AP(针对每个类):precision-recall曲线下的面积。具体计算过程是:将模型预测结果按照置信度降序排列,给定11个不同的recall[0, 0.1, ..., 0.9, 1.0],计算11个recall对应的precision的平均值即为AP。
MAP(针对所有的类):取所有类别的AP平均值就是mAP
具体地,对于每张图片,检测模型输出多个预测框(常常远超真实框的个数),我们使用IoU(Intersection Over Union,交并比)来标记预测框是否为预测正确。标记完成后,随着预测框的增多,召回率总会提升,在不同的召回率水平下对准确率做平均,即得到AP,最后再对所有类别按其所占比例做平均,即得到mAP。
13.Tips
(1)通常对于每个类(至少2000张图像)迭代2000次足够,但总共不超过4000次迭代。
(2)当看到平均损失0.xxxxxx avg在多次迭代时不再减少时,应该停止训练。 (对于小型模型和简单数据集)最终的平均损失为0.05,对于大型模型和困难数据集可以为3.0
To get weights from Early Stopping Point:
2.1. At first, in your file obj.data you must specify the path to the validation dataset valid = valid.txt (format of valid.txt as in train.txt), and if you haven't validation images, just copy data\train.txt to data\valid.txt.
2.2 If training is stopped after 9000 iterations, to validate some of previous weights use this commands:
(If you use another GitHub repository, then use darknet.exe detector recall... instead of darknet.exe detector map...)
darknet.exe detector map data/obj.data yolo-obj.cfg backup\yolo-obj_7000.weightsdarknet.exe detector map data/obj.data yolo-obj.cfg backup\yolo-obj_8000.weightsdarknet.exe detector map data/obj.data yolo-obj.cfg backup\yolo-obj_9000.weights
And comapre last output lines for each weights (7000, 8000, 9000):
Choose weights-file with the highest mAP (mean average precision) or IoU (intersect over union)
For example, bigger mAP gives weights yolo-obj_8000.weights - then use this weights for detection.
14.How to improve object detection:
- set flag
random=1in your.cfg-file - it will increase precision by training Yolo for different resolutions - desirable that your training dataset include images with non-labeled objects that you do not want to detect - negative samples without bounded box (empty
.txtfiles) - use as many images of negative samples as there are images with objects(使用负样本图像训练,希望您的训练数据集包括非标记的对象,您不希望检测的阴性样本没有绑定框(空。txt文件)-使用的图像的阴性样本与有对象的图像一样多)重要 - for training with a large number of objects in each image, add the parameter
max=200or higher value in the last[yolo]-layer or[region]-layer in your cfg-file (the global maximum number of objects that can be detected by YoloV3 is0,0615234375*(width*height)where are width and height are parameters from[net]section in cfg-file)(每个图像中有大量物体需要检测可以增加max参数) - 训练小目标 for training for small objects (smaller than 16x16 after the image is resized to 416x416) - set
layers = 23instead of https://github.com/AlexeyAB/darknet/blob/6f718c257815a984253346bba8fb7aa756c55090/cfg/yolov4.cfg#L895 setstride=4instead of https://github.com/AlexeyAB/darknet/blob/6f718c257815a984253346bba8fb7aa756c55090/cfg/yolov4.cfg#L892 and setstride=4instead of https://github.com/AlexeyAB/darknet/blob/6f718c257815a984253346bba8fb7aa756c55090/cfg/yolov4.cfg#L98 - 训练小目标+大目标
for training for both small and large objects use modified models:
- Full-model: 5 yolo layers: https://raw.githubusercontent.com/AlexeyAB/darknet/master/cfg/yolov3_5l.cfg
- Tiny-model: 3 yolo layers: https://raw.githubusercontent.com/AlexeyAB/darknet/master/cfg/yolov4-tiny-3l.cfg
- YOLOv4: 3 yolo layers: https://raw.githubusercontent.com/AlexeyAB/darknet/master/cfg/yolov4-custom.cfg
-
如果将模型训练为将左右对象区分为单独的类(左侧/右侧、道路标志上的左/右转弯,…),则要禁用翻转数据增强,请在此处添加flip=0:If you train the model to distinguish Left and Right objects as separate classes (left/right hand, left/right-turn on road signs, ...) then for disabling flip data augmentation - add
flip=0here: https://github.com/AlexeyAB/darknet/blob/3d2d0a7c98dbc8923d9ff705b81ff4f7940ea6ff/cfg/yolov3.cfg#L17 -
每个:对象的模型、侧面、倾斜、比例、每个30度的转弯和倾斜角度-从神经网络的内部角度来看,这些都是不同的对象。因此,你想要检测的对象越多,就应该使用越复杂的网络模型。
-
to make the detected bounded boxes more accurate, you can add 3 parameters
ignore_thresh = .9 iou_normalizer=0.5 iou_loss=giouto each[yolo]layer and train, it will increase [email protected], but decrease [email protected]. -
Only if you are an expert in neural detection networks - recalculate anchors for your dataset for
widthandheightfrom cfg-file:darknet.exe detector calc_anchors data/obj.data -num_of_clusters 9 -width 416 -height 416then set the same 9anchorsin each of 3[yolo]-layers in your cfg-file. But you should change indexes of anchorsmasks=for each [yolo]-layer, so for YOLOv4 the 1st-[yolo]-layer has anchors smaller than 30x30, 2nd smaller than 60x60, 3rd remaining, and vice versa for YOLOv3. Also you should change thefilters=(classes + 5)*before each [yolo]-layer. If many of the calculated anchors do not fit under the appropriate layers - then just try using all the default anchors.