NumPy学习记录 part1
这里简单记录一下最近学习NumPy的一些收获及碰到的一些问题
NumPy的介绍
NumPy,Numerical Python的缩写,是主要用于科学计算的开源的Python库,可以让你用非常简单的方式来处理「数组」和「矩阵」的运算,有以下特点:
- 高效的多维数组对象
- 支持复杂的函数(广播)
- 可以集成到C/C++代码中
- 实用的线性代数、傅立叶变换、随机数等函数
NumPy是SciPy Stack中的一部分,其前身是Numeric。SciPy是2001年推出来的,当时还非常依赖Numeric,到2005年时,SciPy的开发者开始重写Numeric最后在2006年正式推出了NumPy。
NumPy的安装
官网是强烈推荐使用scientific Python distribution,如跨平台的 Anaconda 。这是因为用于科学计算的Python发行版除了包含Python本身外,还提供了很多常用的库和工具。
Anaconda不仅仅是一个Python发行版,还是a package manager, an environment manager, a Python/R data science distribution…
官网称其为The Most Trusted Distribution for Data Science
通过官网下载安装包来安装Anaconda:Installing on macOS — Anaconda documentation,要注意Python2和Python3是有不同的安装包。
Verify installation
conda list: Display a list of installed packages and their versions.python: Runs the Python shell and include “Anaconda”.anaconda-navigator: Open Anaconda Navigator.
创建环境
Create a new environment named py3, install Python 3.5:
conda create —name py3 python=3.5
激活环境
conda activate py3
deactivate环境
conda deactivate
使用NumPy时的问题
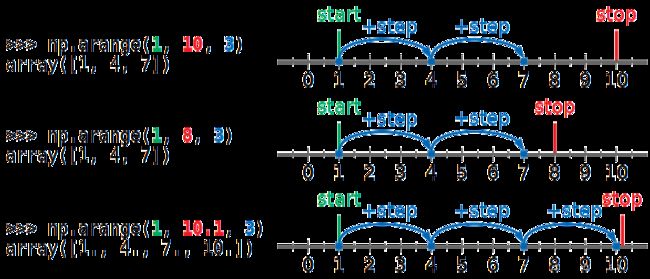
1. numpy.arange()
Numpy.arange()是通过指定数组的起点、终点和步长来定义一个数组的,其中终点的值是必须的。
numpy.arange([start, ]stop, [step, ], dtype=None) -> numpy.ndarray
下面这个图解释的很清晰明了:
详情可以参考:NumPy arange(): How to Use np.arange() – Real Python
2. numpy.reshape()
reshape是把一个已有的数组改变形状,得到一个新的数组。
numpy.reshape(a, newshape, order=‘C’)
当reshape的参数中存在-1时,则表明newshape的形状的某一个参数未知,根据已知数组和已知的形状参数来分配即可。
比如np.reshape(a, (3,-1)),如果a的形状是6,那么新数组的形状是(3, 2)
参考:python - What does -1 mean in numpy reshape? - Stack Overflow
3. axis
Numpy中的轴是指行和列的方向,与我们所知的坐标轴很相似。axis=0指沿着行的方向「折叠」;axis=1指沿着列的方向「折叠」。

这里有点绕,看个例子:
np_array_2d = np.arange(0, 6).reshape([2,3])
[[0 1 2]
 [3 4 5]]

np.sum(np_array_2d, axis = 0) #沿着行的方向折叠
array([3, 5, 7])

np.sum(np_array_2d, axis = 1) #沿着列的方向折叠
array([3, 12])
参考:https://www.sharpsightlabs.com/blog/numpy-axes-explained/
4. numpy.diff()
沿给定的轴来递归的计算数组中的差值,out[I] = a[I+1] - a[I]。
numpy.diff(a, n=1, axis=-1, prepend=
5. numpy.linspace()
按照指定的间隔来等分[start, stop]
numpy.linspace(start, stop, num=50, endpoint=True, retstep=False, dtype=None, axis=0)
参考:https://docs.scipy.org/doc/numpy/reference/generated/numpy.linspace.html
6. numpy.nditer
numpy.nditer提供了许多灵活的方法来系统地访问一个或多个数组的所有元素。有很多的参数可供选择,如flags, op_flags, order等,在迭代时用到it.finished做判断。
我目前还不太理解。
具体可以参考 迭代数组 — NumPy v1.16 Manual和官网介绍numpy.nditer — NumPy v1.17 Manual
7. np.loadtxt()处理strptime()问题
通过np.loadtxt来load外部文件时,如果该文件包含日期数据,那是会报错的,因为NumPy会尝试把string类型的日期数据转换为float类型。
因此,需要在使用np.loadtxt时根据日期的类型来做一个转换:
def datestr2num(s):
	return datetime.datetime.strptime(s, “%d-%m-%Y”).date(). weekday()
此时,有可能遇到这个错误:strptime() argument 1 must be str, not bytes
这是因为,在打开文件时是以二进制文件打开的,所以s是一个bytestring,此时需要将其decode成string,如果日期的格式正好的好,直接用ASCII就行:
return datetime.datetime.strptime(s.decode(‘ascii’), “%d-%m-%Y”).date().
参考:python - time.strptime() - argument 0 must be str, not bytes - Stack Overflow
如何在运行一段脚本后让Python继续运行?
有时在terminal中,运行完.py脚本后,就退出了python程序,此时就不能继续使用之前的函数、参数了。但有时又想在原来的基础上,再做一些计算并实时查看结果,于是就设法法Keep Python Open After Running a Script。
方法很简单,就是在运行脚本时加一个 -i 选项,python -i foo.py
参考:Keep Python Open After Running a Script
Note
此次学习NumPy主要是快速浏览了下NumPy : Beginner’s Guide - Third Edition。
在书本后面的内容中,基本都是数学知识了,需要重新学习了,Math |Khan Academy