【图像分类】mmclassification 安装、准备数据、训练、可视化
文章目录
- 一、环境配置
-
- 1.1 安装 conda
- 1.2 安装cuda
- 1.3 安装 pytorch
- 1.4 工程准备
- 二、数据准备
- 三、模型修改
- 四、模型训练
- 五、模型效果可视化
- 六、如何分别计算每个类别的精确率和召回率

MMclassification 是一个分类工具库,这篇文章是简单记录一下如何用该工具库来训练自己的分类模型,包括数据准备,模型修改,模型训练,模型测试等等。
MMclassification链接:https://github.com/open-mmlab/mmclassification
安装:https://mmclassification.readthedocs.io/en/latest/install.html
训练:https://mmclassification.readthedocs.io/en/latest/getting_started.html
一、环境配置
- 配置 /etc/apt/sources.list 为阿里云的源
- 配置 /etc/resolv.conf 为 nameserver 114.114.114.114
sudo apt install software-properties-common -y
sudo add-apt-repository ppa:deadsnakes/ppa
sudo apt update && sudo apt upgrade -y
1.1 安装 conda
apt-get install libgl1-mesa-glx libegl1-mesa libxrandr2 libxrandr2 libxss1 libxcursor1 libxcomposite1 libasound2 libxi6 libxtst6
wget https://repo.continuum.io/archive/Anaconda3-2020.11-Linux-x86_64.sh

source ~/.bashrc # source路径生效

(base) root@k8s-master-133:/home/y# conda -V
conda 4.9.2

# 配置python
conda create -n mmcls python=3.8 -y
conda activate mmcls
1.2 安装cuda
https://blog.csdn.net/zhouchen1998/article/details/107778087
https://developer.nvidia.com/cuda-10.2-download-archive
wget https://developer.download.nvidia.com/compute/cuda/10.2/Prod/local_installers/cuda_10.2.89_440.33.01_linux.run
sudo sh cuda_10.2.89_440.33.01_linux.run
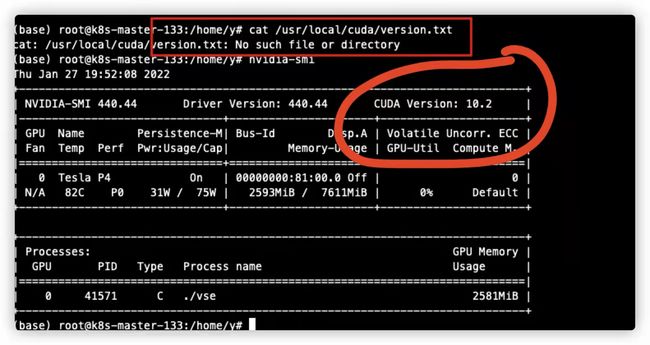
最后只要nvidia-smi能看到就ok了
1.3 安装 pytorch
conda install pytorch==1.10.1 torchvision==0.11.2 cudatoolkit=cuda版本 -c pytorch
1.4 工程准备
cd mmclassification(把给你的文件夹名字改成mmclassification,然后进入文件夹)
pip install -e .
二、数据准备
MMclassification 支持 ImageNet 和 cifar 两种数据格式,我们以 ImageNet 为例来看看数据结构:
|- imagenet
|    |- classmap.txt
|    |- train
|    |	 |- cls1
|    |	 |- cls2
|    |	 |- cls3
|    |	 |- ...
|    |- train.txt
|    |- val
|    |	 |- images
|    |- val.txt
假设我们要训练一个猫狗二分类模型,则需要组织的形式如下:
|- dog_cat_dataset
|    |- classmap.txt
|    |- train
|    |	 |- dog
|    |	 |- cat
|    |- train.txt
|    |- val
|    |	 |- images
|    |- val.txt
其中,classmap.txt 中的内容如下:
dog 0
cat 1
三、模型修改
假设使用 resnet18 来训练,则我们需要修改的内容主要集中在 config 文件里边,修改后的config文件 resnet18_b32x8_dog_cat_cls.py 如下:
- 修改类别:将 1000 类改为 2 类
- 修改数据路径:data
- 如果数据前处理需要修改的话,也可以在config里边修改
- 因为config是最高级的,所以在这里修改后会覆盖模型从mmcls库中读出来的参数
_base_ = [
    '../_base_/models/resnet18.py', '../_base_/datasets/imagenet_bs32.py',
    '../_base_/schedules/imagenet_bs256.py', '../_base_/default_runtime.py'
]
model = dict(
    head=dict(
        type='LinearClsHead',
        num_classes=2,
        in_channels=512,
        loss=dict(type='CrossEntropyLoss', loss_weight=1.0),
        topk=(1, ),
    ))

data = dict(
    samples_per_gpu=32,
    workers_per_gpu=1,
    train=dict(
        data_prefix='data/dog_cat_dataset/train',
        ann_file='data/dog_cat_dataset/train.txt',
        classes='data/dog_cat_dataset/classmap.txt'),
    val=dict(
        data_prefix='data/dog_cat_dataset/val',
        ann_file='data/dog_cat_dataset/val.txt',
        classes='data/dog_cat_dataset/classmap.txt'),
    test=dict(
        # replace `data/val` with `data/test` for standard test
        data_prefix='data/dog_cat_dataset/val',
        ann_file='data/dog_cat_dataset/val.txt',
        classes='data/dog_cat_dataset/classmap.txt'))
evaluation = dict(interval=1, metric='accuracy', metric_options={'topk': (1, )})
四、模型训练
python tools/train.py configs/resnet/resnet18_b32x8_dog_cat_cls.py
五、模型效果可视化
python tools/test.py configs/resnet/resnet18_b32x8_dog_cat_cls.py ./models/epoch_99.pth --out result.pkl --show-dir output_cls
使用 gradcam 可视化:
python tools/visualizations/vis_cam.py visual_img/4.jpg configs/resnet/resnet18_b32x8_door.py  ./models/epoch_99.pth --s
ave-path visual_path/4.jpg
六、如何分别计算每个类别的精确率和召回率
先进行测试,得到 result.pkl 文件,然后运行下面的程序即可:
python tools/cal_precision.py configs/resnet/resnet18_b32x8_imagenet.py
import mmcv
import argparse
from mmcls.datasets import build_dataset
from mmcls.core.evaluation import calculate_confusion_matrix
from sklearn.metrics import confusion_matrix

def parse_args():
    parser = argparse.ArgumentParser(description='calculate precision and recall for each class')
    parser.add_argument('config', help='test config file path')
    args = parser.parse_args()
    return args

def main():
    args = parse_args()
    cfg = mmcv.Config.fromfile(args.config)
    dataset = build_dataset(cfg.data.test)
    pred = mmcv.load("./result.pkl")['pred_label']
    matrix = confusion_matrix(pred, dataset.get_gt_labels())
    print('confusion_matrix:', matrix)
    cat_recall = matrix[0,0]/(matrix[0,0]+matrix[1,0])
    dog_recall = matrix[1,1]/(matrix[0,1]+matrix[1,1])
    cat_precision = matrix[0,0]/sum(matrix[0])
    dog_precision = matrix[1,1]/sum(matrix[1])
    print(' cat_precision:{} \n dog_precison:{} \n cat_recall:{} \n dog_recall:{}'.format(cat_precision, dog_precison, cat_recall, dog_recall))

if __name__ == '__main__':
    main()

