How to run a (Tomcat)Java application server on a Azure virtual machine
With Windows Azure, you can use a virtual machine to provide server capabilities. As an example, a virtual machine running on Windows Azure can be configured to host a Java application server, such as Apache Tomcat. On completing this guide, you will have an understanding of how to create a virtual machine running on Windows Azure and configure it to run a Java application server.
You will learn:
- How to create a virtual machine that has a JDK already installed.
- How to remotely log in to your virtual machine.
- How to install a Java application server on your virtual machine.
- How to create an endpoint for your virtual machine.
- How to open a port in the firewall for your application server.
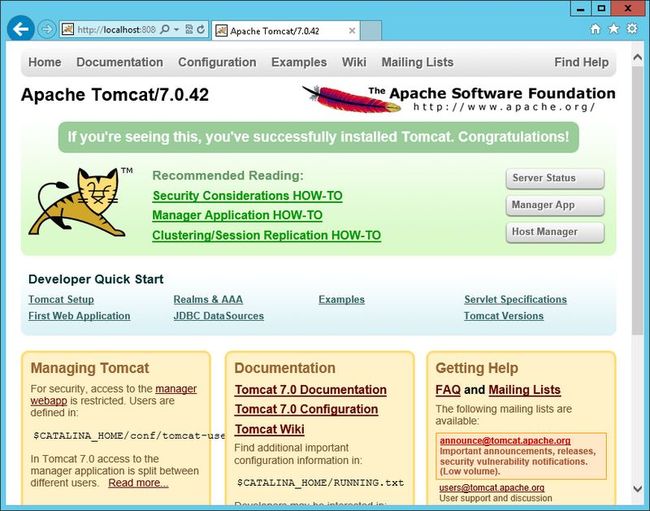
For purposes of this tutorial, an Apache Tomcat application server will be installed on a virtual machine. The completed installation will result in a Tomcat installation such as the following.
To complete this tutorial, you need a Windows Azure account. You can activate your MSDN subscriber benefits or sign up for a free trial.
To create a virtual machine
- Log in to the Windows Azure Management Portal.
- Click New, click Compute, click Virtual machine, and then click From Gallery.
- In the Virtual machine image select dialog, select JDK 7 (Preview) Windows Server 2012. Note that JDK 6 (Preview) Windows Server 2012 is available in case you have legacy applications that are not yet ready to run in JDK 7.
- Click Next.
- In the Virtual machine configuration dialog:
- Specify a name for the virtual machine.
- Specify the size to use for the virtual machine.
- Enter a name for the administrator in the User Name field. Remember this name and the password you will enter next, you will use them when you remotely log in to the virtual machine.
- Enter a password in the New password field, and re-enter it in the Confirm field. This is the Administrator account password.
- Click Next.
- In the next Virtual machine configuration dialog:
- For Cloud service, use the default Create a new cloud service.
- The value for Cloud service DNS name must be unique across cloudapp.net. If needed, modify this value so that Windows Azure indicates it is unique.
- Specify a region, affinity group, or virtual network. For purposes of this tutorial, specify a region such as West US.
- For Storage Account, select Use an automatically generated storage account.
- For Availability Set, select (None).
- Click Next.
- In the final Virtual machine configuration dialog:
- Accept the default endpoint entries.
- Click Complete.
To remotely log in to your virtual machine
- Log on to the Management Portal.
- Click Virtual machines.
- Click the name of the virtual machine that you want to log in to.
- Click Connect.
- Respond to the prompts as needed to connect to the virtual machine. When prompted for the administrator name and password, use the values that you provided when you created the virtual machine.
To install a Java application server on your virtual machine
You can copy a Java application server to your virtual machine, or install a Java application server through an installer.
For purposes of this tutorial, Tomcat will be installed.
- While logged on to your virtual machine, open a browser session to http://tomcat.apache.org/download-70.cgi.
- Double-click the link for 32-bit/64-bit Windows Service Installer. Using this technique, Tomcat will be installed as a Windows service.
- When prompted, choose to run the installer.
- Within the Apache Tomcat Setup wizard, follow the prompts to install Tomcat. For purposes of this tutorial, accepting the defaults is fine. When you reach the Completing the Apache Tomcat Setup Wizard dialog, you can optionally check Run Apache Tomcat, to have Tomcat started now. Click Finish to complete the Tomcat setup process.
To start Tomcat
If you did not choose to run Tomcat in the Completing the Apache Tomcat Setup Wizard dialog, start it by opening a command prompt on your virtual machine and running net start Tomcat7.
You should now see Tomcat running if you run the virtual machine's browser and open http://localhost:8080.
To see Tomcat running from external machines, you'll need to create an endpoint and open a port.
To create an endpoint for your virtual machine
- Log in to the Management Portal.
- Click Virtual machines.
- Click the name of the virtual machine that is running your Java application server.
- Click Endpoints.
- Click Add.
- In the Add endpoint dialog, ensure Add standalone endpoint is checked and then click Next.
- In the New endpoint details dialog:
- Specify a name for the endpoint; for example, HttpIn.
- Specify TCP for the protocol.
- Specify 80 for the public port.
- Specify 8080 for the private port.
- Click the Complete button to close the dialog. Your endpoint will now be created.
To open a port in the firewall for your virtual machine
- Log in to your virtual machine.
- Click Windows Start.
- Click Control Panel.
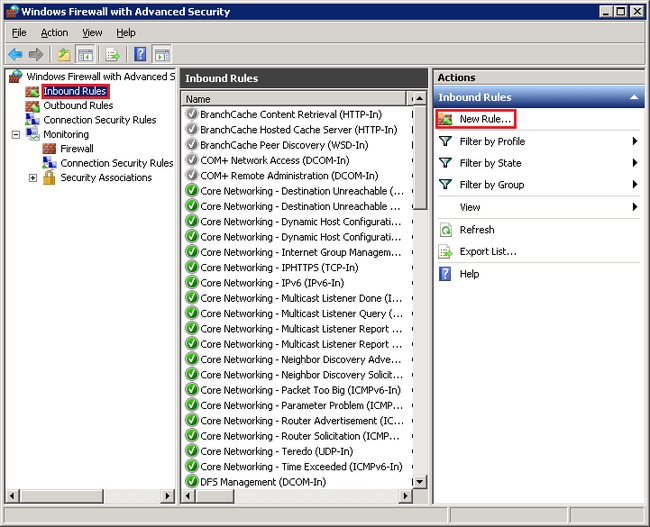
- Click System and Security, click Windows Firewall, and then click Advanced Settings.
- Click Inbound Rules and then click New Rule.
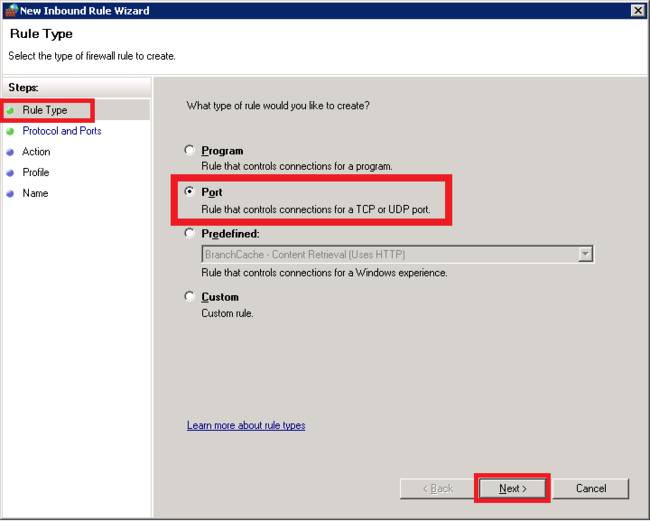
- For the new rule, select Port for the Rule type and then click Next.
- Select TCP for the protocol and specify 8080 for the port, and then click Next.
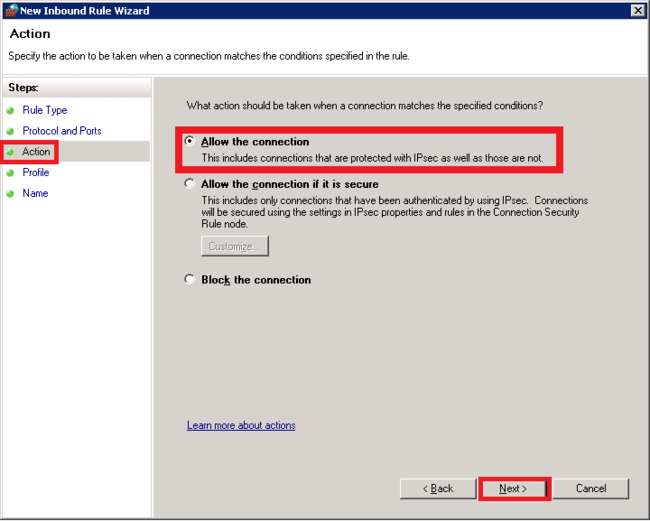
- Choose Allow the connection and then click Next.
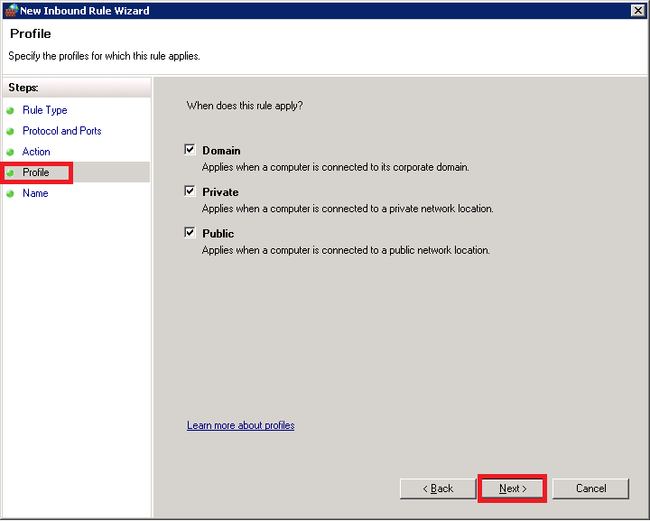
- Ensure Domain, Private, and Public are checked for the profile and then click Next.
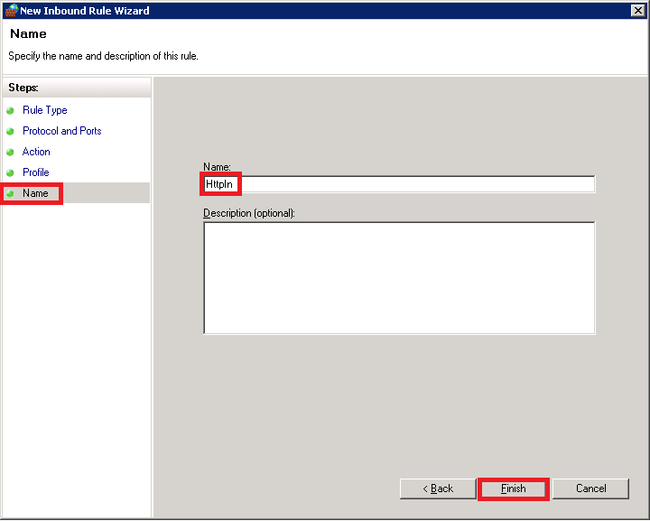
- Specify a name for the rule, such as HttpIn (the rule name is not required to match the endpoint name, however), and then click Finish.
At this point, your Tomcat web site should now be viewable from an external browser, using a URL of the form http://your_DNS_name.cloudapp.net, where your_DNS_name is the DNS name you specified when you created the virtual machine.
Application lifecycle considerations
- You could create your own application web archive (WAR) and add it to the webapps folder. For example, create a basic Java Service Page (JSP) dynamic web project and export it as a WAR file, copy the WAR to the Apache Tomcat webapps folder on the virtual machine, then run it in a browser.
-
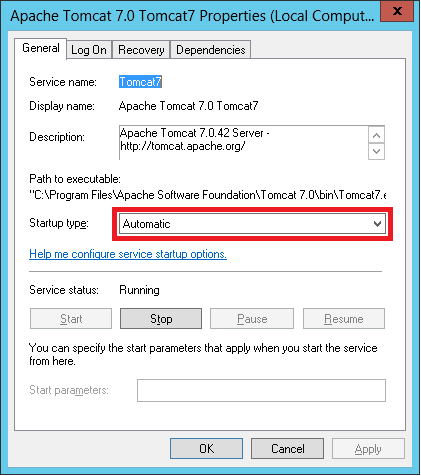
By default when the Tomcat service is installed, it will be set to start manually. You can switch it to start automatically by using the Services snap-in. Start the Services snap-in by clicking Windows Start, Administrative Tools, and then Services. To set Tomcat to start automatically, double-click the Apache Tomcat service in the Services snap-in and set Startup type to Automatic, as shown in the following.
The benefit of having Tomcat start automatically is it will start again if the virtual machine is rebooted (for example, after software updates that require a reboot are installed).
Next steps
- Learn about other services, such as Windows Azure Storage, service bus, SQL Database, and more that you may want to include with your Java applications, by viewing the information available at http://www.windowsazure.com/en-us/develop/java/.
