GaitSet源代码解读(一)
代码解析
目前训练和测试(在单卡和多卡)已经跑通,正在尝试阅读代码,有问题大家可以一起讨论。
注释如果有不对的地方,还望大家斧正!
数据集 :
CASIA-B
项目总体架构如下:
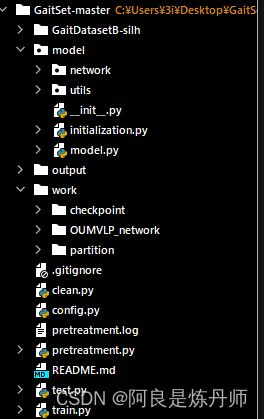
首先,让我们从train.py文件开始看
注意:这个cache参数,默认为True,如果为True,则初始化数据加载时,一次性加载所有训练样本数据
import numpy as np

from model.initialization import initialization
from config import conf
import argparse #命令行参数解析包
import cv2


def boolean_string(s):#判断数据类型是否为bool
    if s.upper() not in {'FALSE', 'TRUE'}:
        raise ValueError('Not a valid boolean string')
    return s.upper() == 'TRUE'

# image = cv2.imread('/mach_2T/shares/wanglei/datasets/CASIA-64/CASIA/005/bg-01/018/005-bg-01-018-001.png')
# print(image)
# print()
# print(image.shape)
# w = np.reshape(image,[64,64,-1])[:,:,0]
# print(w.shape)
# print(w)

parser = argparse.ArgumentParser(description='Train')
parser.add_argument('--cache', default=True, type=boolean_string,
                    help='cache: if set as TRUE all the training data will be loaded at once'
                         ' before the training start. Default: TRUE')# cache=True 立即加载所有训练数据
opt = parser.parse_args()

m = initialization(conf, train=opt.cache)[0] # 返回initialization的第一个返回值m,m即model


print("Training START")
m.fit()
print("Training COMPLETE")
接下来点击initialization初始化函数,进入model文件夹下的initialization.py文件
# -*- coding: utf-8 -*-
# @Author  : admin
# @Time    : 2018/11/15
import os
from copy import deepcopy #深拷贝

import numpy as np

from .utils import load_data #加载数据集
from .model import Model # 模型


# 数据加载初始化  加载配置文件参数
# return ndarray
def initialize_data(config, train=False, test=False):
    # 这里的train和test代表的是否使用cache
    print("Initializing data source...")
    # 得到Dateset对象
    train_source, test_source = load_data(**config['data'], cache=(train or test)) # *标识符接收任何多余位置参数的元组,**标识符接收任何多余关键字参数的新字典
    if train:
        print("Loading training data...")
        train_source.load_all_data()
    if test:
        print("Loading test data...")
        test_source.load_all_data()
    print("Data initialization complete.")
    return train_source, test_source

# 模型参数初始化,加载配置文件参数
def initialize_model(config, train_source, test_source):
    print("Initializing model...")
    data_config = config['data']
    model_config = config['model']
    model_param = deepcopy(model_config)
    model_param['train_source'] = train_source
    model_param['test_source'] = test_source
    model_param['train_pid_num'] = data_config['pid_num']
    batch_size = int(np.prod(model_config['batch_size'])) # np.prod 计算所有元素的乘积
    model_param['save_name'] = '_'.join(map(str,[
        model_config['model_name'],
        data_config['dataset'],
        data_config['pid_num'],
        data_config['pid_shuffle'],
        model_config['hidden_dim'],
        model_config['margin'],
        batch_size,
        model_config['hard_or_full_trip'],
        model_config['frame_num'],
    ]))

    m = Model(**model_param)
    print("Model initialization complete.")
    return m, model_param['save_name']


def initialization(config, train=False, test=False):
    print("Initialzing...")
    WORK_PATH = config['WORK_PATH']
    os.chdir(WORK_PATH)# os.chdir() 方法用于改变当前工作目录到指定的路径。
    os.environ["CUDA_VISIBLE_DEVICES"] = config["CUDA_VISIBLE_DEVICES"]
    train_source, test_source = initialize_data(config, train, test)
    print('train:',len(train_source))
    print("test",len(test_source))
    return initialize_model(config, train_source, test_source)
从这个文件看,可能一开始一头雾水,不慌,先看一下配置文件config.py
conf = {
    "WORK_PATH": "/home/wanglei/project/gaitset/work",
    "CUDA_VISIBLE_DEVICES": "2",
    "data": {
        'dataset_path': "/mach_2T/shares/wanglei/datasets/CASIA-64/CASIA",
        'resolution': '64', #分辨率 数据集分辨率为64*64
        'dataset': 'CASIA-B',
        # In CASIA-B, data of subject #5 is incomplete.
        # Thus, we ignore it in training.
        # For more detail, please refer to
        # function: utils.data_loader.load_data
        'pid_num': 73, # # LT划分方式 74用于训练(In CASIA-B, data of subject #5 is incomplete.),其余的用于测试
        'pid_shuffle': False, # 是否进行随机的划分数据集,如果为False,那么直接选取1-74为训练集,剩余的为测试集
    },
    "model": {
        'hidden_dim': 256,
        'lr': 1e-4,
        'hard_or_full_trip': 'full',
        'batch_size': (8, 16), #p=8是八个人,k=16是16个视频,每个视频取30帧图片,每个角度一个视频.avi
        'restore_iter': 0,
        'total_iter': 80000,
        'margin': 0.2,
        'num_workers': 16,
        'frame_num': 30,
        'model_name': 'GaitSet',
    },
}
阅读过配置文件后,再看initialization.py的initialization函数,WORK_PATH为work文件夹路径,CUDA_VISIBLE_DEVICES为指定显卡编号,接下来到了initialize_data,让我们进入这个函数,然后阅读到load_data,继续,让我们进入这个函数 这样,就跳转到了model文件夹下utils文件夹下data_loader.py
import os
import os.path as osp

import numpy as np

from .data_set import DataSet


def load_data(dataset_path, resolution, dataset, pid_num, pid_shuffle, cache=True):
    seq_dir = list()# 存放的一个样本的路径地址(因为GaitSet中一个样本是一个轮廓剪影的集合),存放轮廓序列的地址,
    # 如:/mach_2T/shares/wanglei/datasets/CASIA-64/CASIA/001
    view = list()# 存放样本的视角标签,即000,018,...,180,注意这里存放的是和上面样本对应的视角信息
    seq_type = list()# 存放样本的序列标记信息,即bg-01,和上面一样对应于每个样本
    label = list()# 存放的是样本的ID信息,与每个样本分别对应

    for _label in sorted(list(os.listdir(dataset_path))): # 遍历人物ID标签
        # In CASIA-B, data of subject #5 is incomplete.
        # Thus, we ignore it in training.
        if dataset == 'CASIA-B' and _label == '005':
            continue
        label_path = osp.join(dataset_path, _label)
        for _seq_type in sorted(list(os.listdir(label_path))):# 遍历人物的轮廓序列类型
            seq_type_path = osp.join(label_path, _seq_type)
            for _view in sorted(list(os.listdir(seq_type_path))):# 遍历轮廓序列的视角
                _seq_dir = osp.join(seq_type_path, _view)
                seqs = os.listdir(_seq_dir)# 遍历出所有的轮廓剪影
                if len(seqs) > 0:
                    seq_dir.append([_seq_dir])
                    label.append(_label)
                    seq_type.append(_seq_type)
                    view.append(_view)
    # 保存成npy
    pid_fname = osp.join('partition', '{}_{}_{}.npy'.format(
        dataset, pid_num, pid_shuffle))
    # print("pid fname",pid_fname)
    # print(osp.exists(pid_fname))
    if not osp.exists(pid_fname): #如果pid_fname不存在
        pid_list = sorted(list(set(label)))
        if pid_shuffle:
            np.random.shuffle(pid_list)  # 是否对数据集进行随机的划分,注意的是第5个元素被忽略了
        pid_list = [pid_list[0:pid_num], pid_list[pid_num:]] #划分
        print('执行划分\n')
        print(pid_list)
        os.makedirs('partition', exist_ok=True) # 新建文件夹
        np.save(pid_fname, pid_list)
        # 存放训练集测试集的划分,包括训练集和测试集的人物ID号,第一部分是训练集,第二部分是测试集

    pid_list = np.load(pid_fname,allow_pickle=True)
    train_list = pid_list[0]
    test_list = pid_list[1]
    print('\n',train_list)
    print('\n', test_list)
    train_source = DataSet(
        # 存放训练集样本的路径地址 如/mach_2T/shares/wanglei/datasets/CASIA-64/CASIA/067/nm-06/072
        [seq_dir[i] for i, l in enumerate(label) if l in train_list],
        # 存放的是训练集样本的标签 如001
        [label[i] for i, l in enumerate(label) if l in train_list],
        # 训练集样本的序列类型 如:bg-01之类
        [seq_type[i] for i, l in enumerate(label) if l in train_list],
        # 训练集样本对应的视角信息 如180
        [view[i] for i, l in enumerate(label) if l in train_list],
        #是否立即加载所有训练数据  图片像素
        cache, resolution)
    #打印  训练集样本地址 label
    print('训练集样本地址',[view[i] for i, l in enumerate(label) if l in train_list])
    print('样本数',len(label))
    test_source = DataSet(
        # 存放测试集样本的路径地址
        [seq_dir[i] for i, l in enumerate(label) if l in test_list],
        # 存放的是测试集样本的标签
        [label[i] for i, l in enumerate(label) if l in test_list],
        # 测试集样本的序列类型 如:bg-01之类
        [seq_type[i] for i, l in enumerate(label) if l in test_list],
        # 测试集样本对应的视角信息
        [view[i] for i, l in enumerate(label) if l in test_list],
        #是否立即加载所有测试数据  图片像素
        cache, resolution)

    return train_source, test_source
data_loader阅读到DataSet,进入,跳转到data_set.py文件
import torch.utils.data as tordata
import numpy as np
import os.path as osp
import os
import pickle
import cv2 #处理图像数据
import xarray as xr


class DataSet(tordata.Dataset):
    def __init__(self, seq_dir, label, seq_type, view, cache, resolution):
        self.seq_dir = seq_dir
        print('seq_dir',self.seq_dir[0])
        self.view = view
        self.seq_type = seq_type
        self.label = label
        self.cache = cache
        self.resolution = int(resolution)
        self.cut_padding = int(float(resolution)/64*10) # 10
        self.data_size = len(self.label) # 数据集样本个数
        self.data = [None] * self.data_size
        self.frame_set = [None] * self.data_size

        self.label_set = set(self.label) # 去重 ,保存所有的人物标签
        self.seq_type_set = set(self.seq_type) # 去重,保存最终的种类(bg-01。。。)
        self.view_set = set(self.view) # 视角种类
        _ = np.zeros((len(self.label_set),
                      len(self.seq_type_set),
                      len(self.view_set))).astype('int')
        _ -= 1 # 如果有些轮廓序列缺失,那么其在index_dict中用-1表示其不存在
        self.index_dict = xr.DataArray( # DataArray可实现基于标签的快速索引和对齐。
            _,
            coords={'label': sorted(list(self.label_set)),
                    'seq_type': sorted(list(self.seq_type_set)),
                    'view': sorted(list(self.view_set))},
            dims=['label', 'seq_type', 'view'])
        # 用来存储每个样本的对应的下标信息,将其对应到这个三维数组中去

        print("数据集样本个数",self.data_size)

        for i in range(self.data_size):
            _label = self.label[i]
            _seq_type = self.seq_type[i]
            _view = self.view[i]
            self.index_dict.loc[_label, _seq_type, _view] = i
            # print(self.index_dict.loc[_label, _seq_type, _view])
            # print("****************")
            # 将所有的样本的下标信息(在self.label,self.seq_type,self.view中的下标信息进行保存)进行保存

    def load_all_data(self):
        for i in range(self.data_size):
            self.load_data(i)

    def load_data(self, index):
        return self.__getitem__(index)

    def __loader__(self, path):
        """
                一个样本的大小为
                `帧数 * 64 * 64`,然后进行了一个裁剪,对宽度进行了裁剪,处理后的大小为
                `帧数 * 64 * 44`
        """
        return self.img2xarray(path)[:, :, self.cut_padding:-self.cut_padding].astype('float32') / 255.0

    def __getitem__(self, index):
        # pose sequence sampling
        # 不使用cache的情况下,直接返回index下标的数据
        if not self.cache:
            # 加载index样本的所有的轮廓剪影图片,例如,_path:/mach_2T/shares/wanglei/datasets/CASIA-64/CASIA/075/bg-01/000
            data = [self.__loader__(_path) for _path in self.seq_dir[index]]
            # 取出对应的帧序号组成集合
            frame_set = [set(feature.coords['frame'].values.tolist()) for feature in data]
            # 返回集合交集  例如 以下帧编号取交集
            # print('之前',frame_set)
            frame_set = list(set.intersection(*frame_set))# set.intersection取交集
            # print('之后',frame_set)
            # 之前[{0, 1, 2, 3, 4, 5, 6, 7, 8, 9, 10, 11, 12, 13, 14, 15, 16, 17, 18, 19, 20, 21, 22, 23, 24, 25, 26, 27,
            #     28, 29, 30, 31, 32, 33, 34, 35, 36, 37, 38, 39, 40, 41, 42, 43, 44, 45, 46, 47, 48, 49, 50, 51, 52, 53,
            #     54, 55, 56, 57, 58, 59}]
            # 之后[
            #     0, 1, 2, 3, 4, 5, 6, 7, 8, 9, 10, 11, 12, 13, 14, 15, 16, 17, 18, 19, 20, 21, 22, 23, 24, 25, 26,
            #     27, 28, 29, 30, 31, 32, 33, 34, 35, 36, 37, 38, 39, 40, 41, 42, 43, 44, 45, 46, 47, 48, 49, 50, 51, 52, 53, 54, 55, 56, 57, 58, 59]
        elif self.data[index] is None: # 如果index数据之前没有读取过,就将其加载到self.data中进行缓存,下次用到直接读取,不用重新从磁盘中进行读取
            data = [self.__loader__(_path) for _path in self.seq_dir[index]]
            frame_set = [set(feature.coords['frame'].values.tolist()) for feature in data]
            frame_set = list(set.intersection(*frame_set))
            self.data[index] = data
            self.frame_set[index] = frame_set
        else:
            data = self.data[index]
            frame_set = self.frame_set[index]
        # TODO 打印data的大小,以及真正的帧的大小
        # print("data的大小为:", len(data))
        # print("123123123123123",data[0].shape,type(data[0]))
        # print("frameset",len(frame_set))
        # print('frameset[8]',self.frame_set[8])
        # 返回 data[0]格式[帧编号,64,44]  frame_set就是对应index(样本编号)的帧编号集合  data[0]的第一个维度=len(frame_set)
        #data大小为1,也就是说data只有data[0],data=[(帧数,64,44)]
        return data, frame_set, self.view[index], self.seq_type[index], self.label[index],
        #返回一个data,data是一个list,list中有一个(帧数,64,44)维的张量,也就是一个样本编号index对应的文件夹下所有图片轮廓的数值表示

    def img2xarray(self, flie_path):
        imgs = sorted(list(os.listdir(flie_path)))
        # print(flie_path)
        # print(imgs)
        # 读取指定路径下的所有轮廓剪影,并且将其缩放到64*64*3大小,[:, :, 0]最后切片取出为一个矩阵64*64
        # imread 读入图像,返回图像的高度宽度和channel eg.(64,64,3)  [self.resolution, self.resolution, -1],最后的-1表示自动计算,缩放长宽为64后,channel应该为多少,计算后得3(感觉这是多此一举,先往后看)
        frame_list = [np.reshape(cv2.imread(osp.join(flie_path, _img_path)), [self.resolution, self.resolution, -1])[:, :, 0] for _img_path in imgs if osp.isfile(osp.join(flie_path, _img_path))]
        num_list = list(range(len(frame_list)))
        # print("帧编号",num_list)
        data_dict = xr.DataArray(
            frame_list,
            coords={'frame': num_list},
            dims=['frame', 'img_y', 'img_x'],# 帧编号,帧高,帧宽
        )
        # print("data_dict",data_dict.shape)
        return data_dict

    def __len__(self):
        return len(self.label)
至此,可以返回到initialization.py文件,到initialization函数的最后一行,跳转到initialize_model函数,这个就是加载配置文件,最后到Model,下一篇文章继续训练过程的解析