IOS Core Animation Advanced Techniques的学习笔记(五)
第六章:Specialized Layers
| 类别 |
用途 |
| CAEmitterLayer |
用于实现基于Core Animation粒子发射系统。发射器层对象控制粒子的生成和起源 |
| CAGradientLayer |
用于绘制一个颜色渐变填充图层的形状(所有圆角矩形边界内的部分) |
| CAEAGLLayer/CAOpenGLLayer |
用于设置需要使用OpenGL ES(iOS)或OpenGL(OS X)绘制的内容与内容储备。 |
| CAReplicatorLayer |
当你想自动生成一个或多个子层的拷贝。复制器为你生成拷贝并使用你指定的属性值以修改复制品的外观和属性。 |
| CAScrollLayer |
用于管理由多个子区域组成的大的可滚动区域 |
| CAShaperLayer |
用于绘制三次贝塞尔曲线。CAShaperLayer对绘制基于路径的形状非常有帮助。因为CAShaperLayer总是生成一个最新的路径。而如果将路径画在图层储备中,一旦图层被缩放,形状就变形了。 |
| CATextLayer |
用于渲染一个无格式或属性文本字符 |
| CATransformLayer |
用于渲染一个真3D的图层层级。而不是由其他图层类实现的2D图层层级。 |
| QCCompositionLayer |
用于渲染一个Quartz组件元素(仅在OS X中有效) |
源码在这里下载:http://www.informit.com/title/9780133440751
@interface ViewController ()
@property (nonatomic, weak) IBOutlet UIView *containerView;
@end
@implementation ViewController
- (void)viewDidLoad
{
[super viewDidLoad];
//create path
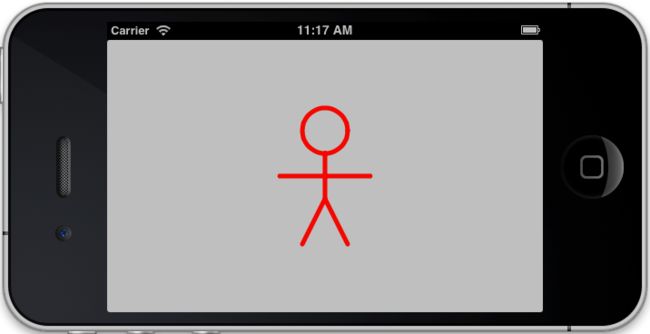
UIBezierPath *path = [[UIBezierPath alloc] init];
[path moveToPoint:CGPointMake(175, 100)];
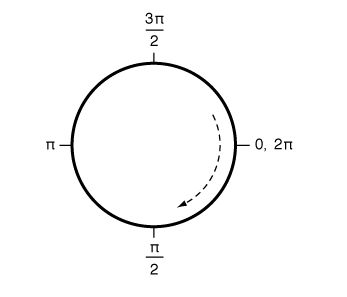
[path addArcWithCenter:CGPointMake(150, 100) radius:25 startAngle:0 endAngle:2*M_PI clockwise:YES];
[path moveToPoint:CGPointMake(150, 125)];
[path addLineToPoint:CGPointMake(150, 175)];
[path addLineToPoint:CGPointMake(125, 225)];
[path moveToPoint:CGPointMake(150, 175)];
[path addLineToPoint:CGPointMake(175, 225)];
[path moveToPoint:CGPointMake(100, 150)];
[path addLineToPoint:CGPointMake(200, 150)];
//create shape layer
CAShapeLayer *shapeLayer = [CAShapeLayer layer];
shapeLayer.strokeColor = [UIColor redColor].CGColor;
shapeLayer.fillColor = [UIColor clearColor].CGColor;
shapeLayer.lineWidth = 5;
shapeLayer.lineJoin = kCALineJoinRound;
shapeLayer.lineCap = kCALineCapRound;
shapeLayer.path = path.CGPath;
//add it to our view
[self.containerView.layer addSublayer:shapeLayer];
}
@end
@property CGColorRef strokeColor@property CGColorRef fillColor3. 填充规则
@property(copy) NSString *fillRule- (void)viewDidLoad
{
[super viewDidLoad];
//create path
UIBezierPath *path = [[UIBezierPath alloc] init];
[path moveToPoint:CGPointMake(200, 150)];
[path addArcWithCenter:CGPointMake(150, 150) radius:50 startAngle:0 endAngle:2*M_PI clockwise:YES];
[path moveToPoint:CGPointMake(250, 150)];
[path addArcWithCenter:CGPointMake(150, 150) radius:100 startAngle:0 endAngle:2*M_PI clockwise:YES];
//create shape layer
CAShapeLayer *shapeLayer = [CAShapeLayer layer];
shapeLayer.strokeColor = [UIColor redColor].CGColor;
shapeLayer.fillColor = [UIColor blueColor].CGColor;
shapeLayer.fillRule = kCAFillRuleNonZero;
//shapeLayer.fillRule = kCAFillRuleEvenOdd;
shapeLayer.lineWidth = 5;
shapeLayer.lineJoin = kCALineJoinBevel;
shapeLayer.lineCap = kCALineCapRound;
shapeLayer.path = path.CGPath;
//add it to our view
[self.containerView.layer addSublayer:shapeLayer];
}

再修改
- (void)viewDidLoad
{
    [super viewDidLoad];

    //create path
    UIBezierPath *path = [[UIBezierPath alloc] init];
    [path moveToPoint:CGPointMake(200, 150)];
    [path addArcWithCenter:CGPointMake(150, 150) radius:50 startAngle:0 endAngle:2*M_PI clockwise:YES];
    [path moveToPoint:CGPointMake(250, 150)];
    [path addArcWithCenter:CGPointMake(150, 150) radius:100 startAngle:0 endAngle:-2*M_PI clockwise:NO];

    //create shape layer
    CAShapeLayer *shapeLayer = [CAShapeLayer layer];
    shapeLayer.strokeColor = [UIColor redColor].CGColor;
    shapeLayer.fillColor = [UIColor blueColor].CGColor;
    shapeLayer.fillRule = kCAFillRuleNonZero;
    //shapeLayer.fillRule = kCAFillRuleEvenOdd;

    shapeLayer.lineWidth = 5;
    shapeLayer.lineJoin = kCALineJoinBevel;
    shapeLayer.lineCap = kCALineCapRound;
    shapeLayer.path = path.CGPath;

    //add it to our view
    [self.containerView.layer addSublayer:shapeLayer];
}

kCAFillRuleEvenOdd的情况
修改代码- (void)viewDidLoad
{
[super viewDidLoad];
//create path
UIBezierPath *path = [[UIBezierPath alloc] init];
[path moveToPoint:CGPointMake(200, 150)];
[path addArcWithCenter:CGPointMake(150, 150) radius:50 startAngle:0 endAngle:2*M_PI clockwise:YES];
[path moveToPoint:CGPointMake(250, 150)];
[path addArcWithCenter:CGPointMake(150, 150) radius:100 startAngle:0 endAngle:2*M_PI clockwise:YES];
//create shape layer
CAShapeLayer *shapeLayer = [CAShapeLayer layer];
shapeLayer.strokeColor = [UIColor redColor].CGColor;
shapeLayer.fillColor = [UIColor blueColor].CGColor;
//shapeLayer.fillRule = kCAFillRuleNonZero;
shapeLayer.fillRule = kCAFillRuleEvenOdd;
shapeLayer.lineWidth = 5;
shapeLayer.lineJoin = kCALineJoinBevel;
shapeLayer.lineCap = kCALineCapRound;
shapeLayer.path = path.CGPath;
//add it to our view
[self.containerView.layer addSublayer:shapeLayer];
}

- (void)viewDidLoad
{
    [super viewDidLoad];

    //create path
    UIBezierPath *path = [[UIBezierPath alloc] init];
    [path moveToPoint:CGPointMake(200, 150)];
    [path addArcWithCenter:CGPointMake(150, 150) radius:50 startAngle:0 endAngle:2*M_PI clockwise:YES];
    [path moveToPoint:CGPointMake(250, 150)];
    [path addArcWithCenter:CGPointMake(150, 150) radius:100 startAngle:0 endAngle:-2*M_PI clockwise:NO];

    //create shape layer
    CAShapeLayer *shapeLayer = [CAShapeLayer layer];
    shapeLayer.strokeColor = [UIColor redColor].CGColor;
    shapeLayer.fillColor = [UIColor blueColor].CGColor;
    //shapeLayer.fillRule = kCAFillRuleNonZero;
    shapeLayer.fillRule = kCAFillRuleEvenOdd;

    shapeLayer.lineWidth = 5;
    shapeLayer.lineJoin = kCALineJoinBevel;
    shapeLayer.lineCap = kCALineCapRound;
    shapeLayer.path = path.CGPath;

    //add it to our view
    [self.containerView.layer addSublayer:shapeLayer];
}
继续为了看清奇偶的效果,画3个同方向圆圈
- (void)viewDidLoad
{
    [super viewDidLoad];

    //create path
    UIBezierPath *path = [[UIBezierPath alloc] init];
    [path moveToPoint:CGPointMake(200, 150)];
    [path addArcWithCenter:CGPointMake(150, 150) radius:50 startAngle:0 endAngle:2*M_PI clockwise:YES];
    [path moveToPoint:CGPointMake(250, 150)];
    [path addArcWithCenter:CGPointMake(150, 150) radius:100 startAngle:0 endAngle:2*M_PI clockwise:YES];
    [path moveToPoint:CGPointMake(300, 150)];
    [path addArcWithCenter:CGPointMake(150, 150) radius:150 startAngle:0 endAngle:2*M_PI clockwise:YES];

    //create shape layer
    CAShapeLayer *shapeLayer = [CAShapeLayer layer];
    shapeLayer.strokeColor = [UIColor redColor].CGColor;
    shapeLayer.fillColor = [UIColor blueColor].CGColor;
    //shapeLayer.fillRule = kCAFillRuleNonZero;
    shapeLayer.fillRule = kCAFillRuleEvenOdd;

    shapeLayer.lineWidth = 5;
    shapeLayer.lineJoin = kCALineJoinBevel;
    shapeLayer.lineCap = kCALineCapRound;
    shapeLayer.path = path.CGPath;

    //add it to our view
    [self.containerView.layer addSublayer:shapeLayer];
}


@property(copy) NSString *lineCap
@property(copy) NSString *lineJoin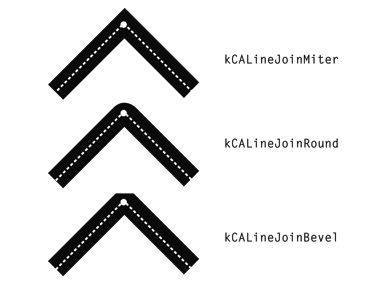
@property CGFloat lineWidth7. 线型模板
@property(copy) NSArray *lineDashPattern@property CGFloat lineDashPhase- (void)viewDidLoad
{
[super viewDidLoad];
//create path
UIBezierPath *path = [[UIBezierPath alloc] init];
[path moveToPoint:CGPointMake(175, 100)];
[path addArcWithCenter:CGPointMake(150, 100) radius:25 startAngle:0 endAngle:2*M_PI clockwise:YES];
[path moveToPoint:CGPointMake(150, 125)];
[path addLineToPoint:CGPointMake(150, 175)];
[path addLineToPoint:CGPointMake(125, 225)];
[path moveToPoint:CGPointMake(150, 175)];
[path addLineToPoint:CGPointMake(175, 225)];
[path moveToPoint:CGPointMake(100, 150)];
[path addLineToPoint:CGPointMake(200, 150)];
//create shape layer
CAShapeLayer *shapeLayer = [CAShapeLayer layer];
shapeLayer.strokeColor = [UIColor redColor].CGColor;
shapeLayer.fillColor = [UIColor clearColor].CGColor;
shapeLayer.lineWidth = 5;
shapeLayer.lineDashPattern = [NSArray arrayWithObjects:[NSNumber numberWithInt:20], [NSNumber numberWithInt:10], [NSNumber numberWithInt:10], [NSNumber numberWithInt:2], nil];
//shapeLayer.lineDashPhase = 15;
shapeLayer.lineJoin = kCALineJoinBevel;
//shapeLayer.lineCap = kCALineCapRound;
// shapeLayer.strokeStart = 0.1;
// shapeLayer.strokeEnd = 0.6;
shapeLayer.path = path.CGPath;
//add it to our view
[self.containerView.layer addSublayer:shapeLayer];
}
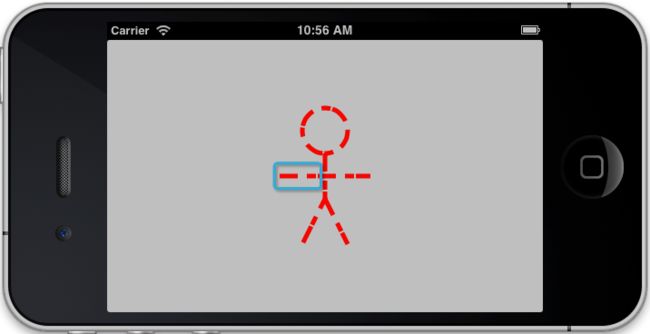
再修改 lineDashPhase值=15

9. 最大斜接长度。
@property CGFloat miterLimit斜接长度指的是在两条线交汇处内角和外角之间的距离。

只有lineJoin属性为kCALineJoinMiter时miterLimit才有效
边角的角度越小,斜接长度就会越大。
为了避免斜接长度过长,我们可以使用 miterLimit 属性。
如果斜接长度超过 miterLimit 的值,边角会以 lineJoin的 "bevel"即kCALineJoinBevel类型来显示

@property CGFloat strokeStart
@property CGFloat strokeEnd
都是0.0~1.0的取值范围
- (void)viewDidLoad
{
    [super viewDidLoad];

    //create path
    UIBezierPath *path = [[UIBezierPath alloc] init];
    [path moveToPoint:CGPointMake(175, 100)];
    [path addArcWithCenter:CGPointMake(150, 100) radius:25 startAngle:0 endAngle:2*M_PI clockwise:YES];
    [path moveToPoint:CGPointMake(150, 125)];
    [path addLineToPoint:CGPointMake(150, 175)];
    [path addLineToPoint:CGPointMake(125, 225)];
    [path moveToPoint:CGPointMake(150, 175)];
    [path addLineToPoint:CGPointMake(175, 225)];
    [path moveToPoint:CGPointMake(100, 150)];
    [path addLineToPoint:CGPointMake(200, 150)];

    //create shape layer
    CAShapeLayer *shapeLayer = [CAShapeLayer layer];
    shapeLayer.strokeColor = [UIColor redColor].CGColor;
    shapeLayer.fillColor = [UIColor clearColor].CGColor;

    shapeLayer.lineWidth = 5;
    //shapeLayer.lineDashPattern = [NSArray arrayWithObjects:[NSNumber numberWithInt:20], [NSNumber numberWithInt:10], [NSNumber numberWithInt:10], [NSNumber numberWithInt:2], nil];
    //shapeLayer.lineDashPhase = 15;
    shapeLayer.lineJoin = kCALineJoinBevel;
    shapeLayer.lineCap = kCALineCapRound;
    shapeLayer.strokeStart = 0.1;
    shapeLayer.strokeEnd = 0.6;
    shapeLayer.path = path.CGPath;

    //add it to our view
    [self.containerView.layer addSublayer:shapeLayer];
}

+ (UIBezierPath *)bezierPathWithRect:(CGRect)rect2. 矩形内切椭圆
+ (UIBezierPath *)bezierPathWithOvalInRect:(CGRect)rect3. 圆角矩形
+ (UIBezierPath *)bezierPathWithRoundedRect:(CGRect)rect cornerRadius:(CGFloat)cornerRadius4. 可设置的圆角矩形
+ (UIBezierPath *)bezierPathWithRoundedRect:(CGRect)rect byRoundingCorners:(UIRectCorner)corners cornerRadii:(CGSize)cornerRadiicorners有以下几种类型:
UIRectCornerTopLeft,
UIRectCornerTopRight,
UIRectCornerBottomLeft,
UIRectCornerBottomRight,
UIRectCornerAllCorners
cornerRadii表示的是四个圆角拼成的椭圆的长、短半径尺寸。
+ (UIBezierPath *)bezierPathWithArcCenter:(CGPoint)center radius:(CGFloat)radius startAngle:(CGFloat)startAngle endAngle:(CGFloat)endAngle clockwise:(BOOL)clockwise
- (void)addArcWithCenter:(CGPoint)center radius:(CGFloat)radius startAngle:(CGFloat)startAngle endAngle:(CGFloat)endAngle clockwise:(BOOL)clockwise
- (void)moveToPoint:(CGPoint)point- (void)addLineToPoint:(CGPoint)point- (void)addCurveToPoint:(CGPoint)endPoint controlPoint1:(CGPoint)controlPoint1 controlPoint2:(CGPoint)controlPoint2
- (void)addQuadCurveToPoint:(CGPoint)endPoint controlPoint:(CGPoint)controlPoint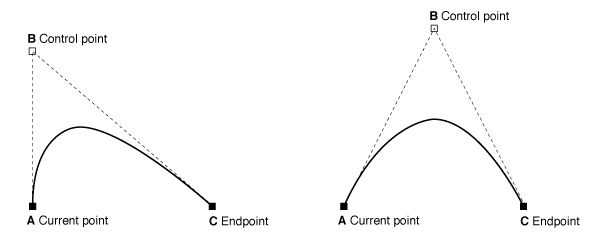
@property(nonatomic) CGFloat lineWidth
@property(nonatomic) CGLineCap lineCapStyle@property(nonatomic) CGLineJoin lineJoinStyle- (void)setLineDash:(const CGFloat *)pattern count:(NSInteger)count phase:(CGFloat)phasepattern:C类型的线型数据。如:CGFloat dashStyle[] = { 1.0f, 2.0f };
count:pattern中的数据个数
phase: 开始画线型的起始位置
@interface ViewController ()

@property (nonatomic, weak) IBOutlet UIView *labelView;

@end

@implementation ViewController

- (void)viewDidLoad
{
    [super viewDidLoad];

    //create a text layer
    CATextLayer *textLayer = [CATextLayer layer];
    textLayer.frame = self.labelView.bounds;
    [self.labelView.layer addSublayer:textLayer];

    //uncomment the line below to fix pixelation on Retina screens
    //textLayer.contentsScale = [UIScreen mainScreen].scale;

    //set text attributes
    textLayer.foregroundColor = [UIColor blackColor].CGColor;
    textLayer.alignmentMode = kCAAlignmentJustified;
    //textLayer.contentsScale = 1;
    textLayer.wrapped = YES;

    //choose a font
    UIFont *font = [UIFont systemFontOfSize:15];

    //set layer font
    CFStringRef fontName = (__bridge CFStringRef)font.fontName;
    CGFontRef fontRef = CGFontCreateWithFontName(fontName);
    textLayer.font = fontRef;
    textLayer.fontSize = font.pointSize;
    CGFontRelease(fontRef);

    //choose some text
    NSString *text = @"Lorem ipsum dolor sit amet, consectetur adipiscing \
    elit. Quisque massa arcu, eleifend vel varius in, facilisis pulvinar \
    leo. Nunc quis nunc at mauris pharetra condimentum ut ac neque. Nunc \
    elementum, libero ut porttitor dictum, diam odio congue lacus, vel \
    fringilla sapien diam at purus. Etiam suscipit pretium nunc sit amet \
    lobortis";

    //set layer text
    textLayer.string = text;
}

@end

仔细看文字周围很模糊,解决这个问题需要设置contentsScale

CATextLayer also renders much faster than UILabel. It’s a little-known fact that on iOS6 and earlier,UILabel actually uses WebKit to do its text drawing, which carries a significant performance overhead when you are drawing a lot of text.CATextLayer uses Core Text and is significantlyfaster.
@interface ViewController ()
{
    CGPoint startPoint;

    CATransformLayer *s_Cube;

    float pix, piy;
}

@property (nonatomic, weak) IBOutlet UIView *containerView;

@end

@implementation ViewController

- (CALayer *)faceWithTransform:(CATransform3D)transform
{
    //create cube face layer
    CALayer *face = [CALayer layer];
    face.frame = CGRectMake(-50, -50, 100, 100);

    //apply a random color
    CGFloat red = (rand() / (double)INT_MAX);
    CGFloat green = (rand() / (double)INT_MAX);
    CGFloat blue = (rand() / (double)INT_MAX);
    face.backgroundColor = [UIColor colorWithRed:red
                                           green:green
                                            blue:blue
                                           alpha:1.0].CGColor;

    //apply the transform and return
    face.transform = transform;
    return face;
}

- (CALayer *)cubeWithTransform:(CATransform3D)transform
{
    //create cube layer
    CATransformLayer *cube = [CATransformLayer layer];

    //add cube face 1
    CATransform3D ct = CATransform3DMakeTranslation(0, 0, 50);
    [cube addSublayer:[self faceWithTransform:ct]];

    //add cube face 2
    ct = CATransform3DMakeTranslation(50, 0, 0);
    ct = CATransform3DRotate(ct, M_PI_2, 0, 1, 0);
    [cube addSublayer:[self faceWithTransform:ct]];

    //add cube face 3
    ct = CATransform3DMakeTranslation(0, -50, 0);
    ct = CATransform3DRotate(ct, M_PI_2, 1, 0, 0);
    [cube addSublayer:[self faceWithTransform:ct]];

    //add cube face 4
    ct = CATransform3DMakeTranslation(0, 50, 0);
    ct = CATransform3DRotate(ct, -M_PI_2, 1, 0, 0);
    [cube addSublayer:[self faceWithTransform:ct]];

    //add cube face 5
    ct = CATransform3DMakeTranslation(-50, 0, 0);
    ct = CATransform3DRotate(ct, -M_PI_2, 0, 1, 0);
    [cube addSublayer:[self faceWithTransform:ct]];

    //add cube face 6
    ct = CATransform3DMakeTranslation(0, 0, -50);
    ct = CATransform3DRotate(ct, M_PI, 0, 1, 0);
    [cube addSublayer:[self faceWithTransform:ct]];

    //center the cube layer within the container
    CGSize containerSize = self.containerView.bounds.size;
    cube.position = CGPointMake(containerSize.width / 2.0,
                                containerSize.height / 2.0);

    //apply the transform and return
    cube.transform = transform;
    return cube;
}

- (void)viewDidLoad
{
    [super viewDidLoad];

    //set up the perspective transform
    CATransform3D pt = CATransform3DIdentity;
    pt.m34 = -1.0 / 500.0;
    self.containerView.layer.sublayerTransform = pt;

    //set up the transform for cube 1 and add it
    CATransform3D c1t = CATransform3DIdentity;
    c1t = CATransform3DTranslate(c1t, -100, 0, 0);
    CALayer *cube1 = [self cubeWithTransform:c1t];
    s_Cube = (CATransformLayer *)cube1;
    [self.containerView.layer addSublayer:cube1];

    //set up the transform for cube 2 and add it
    CATransform3D c2t = CATransform3DIdentity;
    c2t = CATransform3DTranslate(c2t, 100, 0, 0);
    c2t = CATransform3DRotate(c2t, -M_PI_4, 1, 0, 0);
    c2t = CATransform3DRotate(c2t, -M_PI_4, 0, 1, 0);
    CALayer *cube2 = [self cubeWithTransform:c2t];
    [self.containerView.layer addSublayer:cube2];
}

- (void)touchesBegan:(NSSet *)touches withEvent:(UIEvent *)event
{
    UITouch *touch = [touches anyObject];

    startPoint = [touch locationInView:self.view];
}

- (void)touchesMoved:(NSSet *)touches withEvent:(UIEvent *)event
{
    UITouch *touch = [touches anyObject];

    CGPoint currentPosition = [touch locationInView:self.view];

    CGFloat deltaX = startPoint.x - currentPosition.x;

    CGFloat deltaY = startPoint.y - currentPosition.y;

    CATransform3D c1t = CATransform3DIdentity;
    c1t = CATransform3DTranslate(c1t, -100, 0, 0);
    c1t = CATransform3DRotate(c1t, pix+M_PI_2*deltaY/100, 1, 0, 0);
    c1t = CATransform3DRotate(c1t, piy-M_PI_2*deltaX/100, 0, 1, 0);

    s_Cube.transform = c1t;
}

- (void)touchesEnded:(NSSet *)touches withEvent:(UIEvent *)event
{
    UITouch *touch = [touches anyObject];

    CGPoint currentPosition = [touch locationInView:self.view];

    CGFloat deltaX = startPoint.x - currentPosition.x;

    CGFloat deltaY = startPoint.y - currentPosition.y;

    pix = M_PI_2*deltaY/100;
    piy = -M_PI_2*deltaX/100;
}

@end
interface ViewController ()
@property (nonatomic, weak) IBOutlet UIView *containerView;
@end
@implementation ViewController
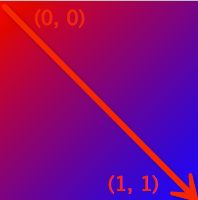
- (void)viewDidLoad
{
[super viewDidLoad];
//create gradient layer and add it to our container view
CAGradientLayer *gradientLayer = [CAGradientLayer layer];
gradientLayer.frame = self.containerView.bounds;
[self.containerView.layer addSublayer:gradientLayer];
//set gradient colors
gradientLayer.colors = @[(__bridge id)[UIColor redColor].CGColor,
(__bridge id)[UIColor blueColor].CGColor];
//set gradient start and end points
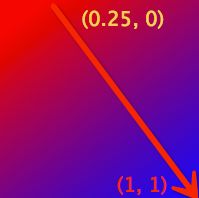
gradientLayer.startPoint = CGPointMake(0, 0);
gradientLayer.endPoint = CGPointMake(1, 1);
}
@end

CAGradientLayer的属性设置
@property(copy) NSString *type即线性梯度变化
@property(copy) NSArray *colors3. 位置参数
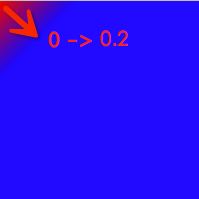
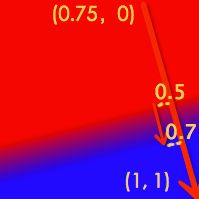
@property(copy) NSArray *locations修改例子6.6, 增加
gradientLayer.locations = @[[NSNumber numberWithFloat:0.0], [NSNumber numberWithFloat:0.2]];
gradientLayer.locations = @[[NSNumber numberWithFloat:0.5], [NSNumber numberWithFloat:0.7]];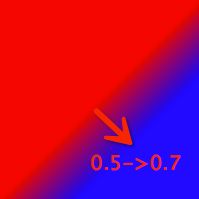
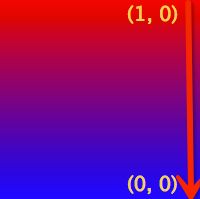
@property CGPoint startPoint, endPoint;gradientLayer.startPoint 分别设为 CGPointMake(0, 0);


- (void)viewDidLoad
{
    [super viewDidLoad];

    //create gradient layer and add it to our container view
    CAGradientLayer *gradientLayer = [CAGradientLayer layer];
    gradientLayer.frame = self.containerView.bounds;
    [self.containerView.layer addSublayer:gradientLayer];

    //set gradient colors
    gradientLayer.colors = @[(__bridge id)[UIColor redColor].CGColor,
                             (__bridge id)[UIColor blueColor].CGColor];

    gradientLayer.locations = @[[NSNumber numberWithFloat:0.5], [NSNumber numberWithFloat:0.7]];

    //set gradient start and end points
    gradientLayer.startPoint = CGPointMake(0.75, 0.0);
    gradientLayer.endPoint = CGPointMake(1.0, 1.0);
}

@interface ViewController ()

@property (nonatomic, weak) IBOutlet UIView *containerView;

@end

@implementation ViewController

- (void)viewDidLoad
{
    [super viewDidLoad];

    //create a replicator layer and add it to our view
    CAReplicatorLayer *replicator = [CAReplicatorLayer layer];
    replicator.frame = self.containerView.bounds;
    [self.containerView.layer addSublayer:replicator];

    //configure the replicator
    replicator.instanceCount = 20;

    //apply a transform for each instance
    CATransform3D transform = CATransform3DIdentity;
    transform = CATransform3DTranslate(transform, 0, -10, 0);
    transform = CATransform3DRotate(transform, M_PI / 10.0, 0, 0, 1);
    transform = CATransform3DTranslate(transform, 0, 10, 0);
    replicator.instanceTransform = transform;

    //apply a color shift for each instance
    replicator.instanceBlueOffset = -0.1;
    replicator.instanceGreenOffset = -0.1;

    //create a sublayer and place it inside the replicator
    CALayer *layer = [CALayer layer];
    layer.frame = CGRectMake(137.5f, 25.0f, 25.0f, 25.0f);
    layer.backgroundColor = [UIColor whiteColor].CGColor;
    [replicator addSublayer:layer];
}

@end
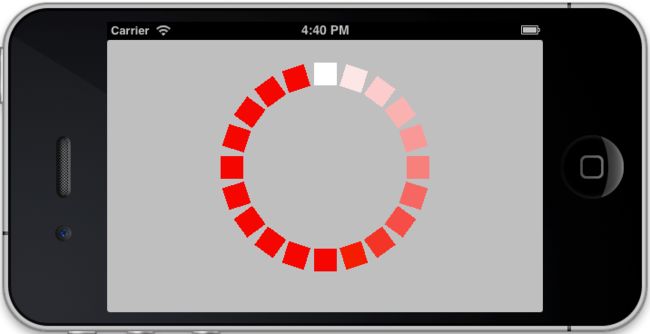
CAReplicatorLayer应用最多的可能是倒影了,下面的链接是个很好的图片倒影例子