osgEarth例子学习-feature_elevation.earth
例子学习第一天
今天是2019年2.26,接下来的一段时间开始研究关于在osgEarth中地形整(压平)的事儿,最后的应用就是开路,在osgEarth地球的表面,比如山上能自动生成道路之类的。
首先看下例子的效果介绍

还是很酷炫的,羡慕啊,开始干吧。
好久没摸oe了,只能一点一点来,在vs2010中随便选了个例子cpp,这里选择的是

但是里面有好多用不上的代码(应该吧),先注销掉。上面一堆包含都没管,菜鸟一只,也分辨不出来,啥Handler都留着,没管。
#include
#include
#include
#include
#include
#include
#include
#include
#include
#include
#include
#include
#include
#include
#include
#include
#include

using namespace osgEarth;
using namespace osgEarth::Util;
using namespace osgEarth::Util::Controls;
using namespace osgEarth::Annotation;

static MapNode*       s_mapNode     = 0L;
static LabelControl*  s_posLabel    = 0L;
static LabelControl*  s_vdaLabel    = 0L;
static LabelControl*  s_mslLabel    = 0L;
static LabelControl*  s_haeLabel    = 0L;
static LabelControl*  s_egm96Label  = 0L;
static LabelControl*  s_mapLabel    = 0L;
static LabelControl*  s_resLabel    = 0L;
static PlaceNode*     s_marker      = 0L;


// An event handler that will print out the elevation at the clicked point
struct QueryElevationHandler : public osgGA::GUIEventHandler
{
    QueryElevationHandler()
        : _mouseDown( false ),
          _terrain  ( s_mapNode->getTerrain() ),
          _query    ( s_mapNode->getMap() )
    {
        _map = s_mapNode->getMap();
        _query.setMaxTilesToCache(10);
        _query.setFallBackOnNoData( false );
        _path.push_back( s_mapNode->getTerrainEngine() );
    }

    void update( float x, float y, osgViewer::View* view )
    {
        bool yes = false;

        // look under the mouse:
        osg::Vec3d world;
        osgUtil::LineSegmentIntersector::Intersections hits;
        if ( view->computeIntersections(x, y, hits) )
        {
            world = hits.begin()->getWorldIntersectPoint();

            // convert to map coords:
            GeoPoint mapPoint;
            mapPoint.fromWorld( _terrain->getSRS(), world );

            // do an elevation query:
            double query_resolution = 0; // max.
            double out_hamsl        = 0.0;
            double out_resolution   = 0.0;

            bool ok = _query.getElevation(
                mapPoint,
                out_hamsl,
                query_resolution,
                &out_resolution );

            if ( ok )
            {
                // convert to geodetic to get the HAE:
                mapPoint.z() = out_hamsl;
                GeoPoint mapPointGeodetic( s_mapNode->getMapSRS()->getGeodeticSRS(), mapPoint );

                static LatLongFormatter s_f;

                s_posLabel->setText( Stringify()
                    << std::fixed << std::setprecision(2)
                    << s_f.format(mapPointGeodetic.y(), true)
                    << ", "
                    << s_f.format(mapPointGeodetic.x(), false) );

                s_mslLabel->setText( Stringify() << out_hamsl );
                s_haeLabel->setText( Stringify() << mapPointGeodetic.z() );
                s_resLabel->setText( Stringify() << out_resolution );

                double egm96z = mapPoint.z();

                VerticalDatum::transform(
                    mapPointGeodetic.getSRS()->getVerticalDatum(),
                    VerticalDatum::get("egm96"),
                    mapPointGeodetic.y(),
                    mapPointGeodetic.x(),
                    egm96z);

                s_egm96Label->setText(Stringify() << egm96z);

                yes = true;
            }

            // finally, get a normal ISECT HAE point.
            GeoPoint isectPoint;
            isectPoint.fromWorld( _terrain->getSRS()->getGeodeticSRS(), world );
            s_mapLabel->setText( Stringify() << isectPoint.alt() );

            // and move the marker.
            s_marker->setPosition(mapPoint);
        }

        if (!yes)
        {
            s_posLabel->setText( "-" );
            s_mslLabel->setText( "-" );
            s_haeLabel->setText( "-" );
            s_resLabel->setText( "-" );
            s_egm96Label->setText("-");
        }
    }

    bool handle( const osgGA::GUIEventAdapter& ea, osgGA::GUIActionAdapter& aa )
    {
        if (ea.getEventType() == ea.DOUBLECLICK &&
            ea.getButton() == ea.LEFT_MOUSE_BUTTON)
        {
            osgViewer::View* view = static_cast(aa.asView());
            update( ea.getX(), ea.getY(), view );
            return true;
        }

        return false;
    }

    const Map*       _map;
    const Terrain*   _terrain;
    bool             _mouseDown;
    ElevationQuery   _query;
    osg::NodePath    _path;
};


int main(int argc, char** argv)
{
    osg::ArgumentParser arguments(&argc,argv);

    osgViewer::Viewer viewer(arguments);

    s_mapNode = 0L;
    osg::Node* earthFile = MapNodeHelper().load(arguments, &viewer);
    if (earthFile)
        s_mapNode = MapNode::get(earthFile);

    if ( !s_mapNode )
    {
        OE_WARN << "Unable to load earth file." << std::endl;
        return -1;
    }

    osg::Group* root = new osg::Group();
    viewer.setSceneData( root );

    // install the programmable manipulator.
    viewer.setCameraManipulator( new osgEarth::Util::EarthManipulator() );

    // The MapNode will render the Map object in the scene graph.
    root->addChild( earthFile );


    // An event handler that will respond to mouse clicks:
    viewer.addEventHandler( new QueryElevationHandler() );

    // add some stock OSG handlers:
    viewer.addEventHandler(new osgViewer::StatsHandler());
    viewer.addEventHandler(new osgViewer::WindowSizeHandler());
    viewer.addEventHandler(new osgGA::StateSetManipulator(viewer.getCamera()->getOrCreateStateSet()));

    return viewer.run();
}
然后再看一眼 feature_elevation.earth文件,用的是Nodepad++打开的。英文不太好,把所有的英文都翻译了中文。
这里要注意,添加地图的时候,精度低的要在前面,精度高的放下面,不然会遮挡掉。
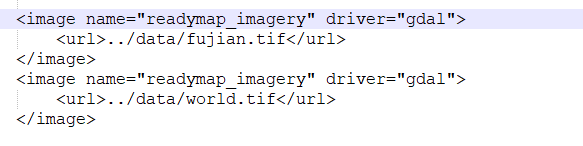
这里福建省的在上,全球图在下就只会显示全球图了,如下

就完全看不到福建,反之调换顺序,结果如下

福建出来啦!图是在91卫图下的,有水印,拿来做实验哈哈。总之福建出来了。
还有一点,tif格式的图用的驱动器用gdal就行,驱动器是来决定如何解析图片的(应该hah)
现在很好奇,高程是怎么显示出来的,继续下载了福建省的高程数据,感觉着福建这地图太丑了,影响体验,先不显示它了!把名称➕个1,让编译器找不着,就不显示了哈哈

earth文件中添加地图的下一个就是添加高程,感觉有戏,从这里入手试试

就很奇怪,我下载的高程数据类型咋还是tif呢。。有点困惑
加载试试。把数据拷到path下的data,把名字改成英文 fujian_elevation.tif,把驱动器改成gdal

运行测试!可是,,有一种,,不详滴预感,,
果然,啥起伏都没,失败了

另想办法。
突然发现我url的斜杆写反了。。改回来之后测试还是不行~

从别人那儿拷一个能用的DEM试试,据说这种方法思路没问题,就是如果追求效率需要导入arcgis操作一番,建立索引。
等待dem中…
拿到了dem之后试了一下,是可以的,然后再回头测试,发现直接下载的tif应该是可以用的,只是下载的精度不够高,太不明显了。以下都用拷来的DEM来进行测试。
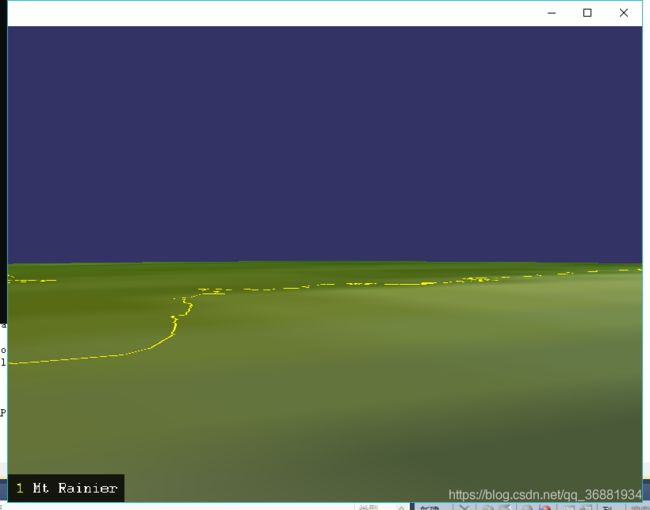
效果图如下

金线是边界,淮河流域边界,下面是拉近之后的图
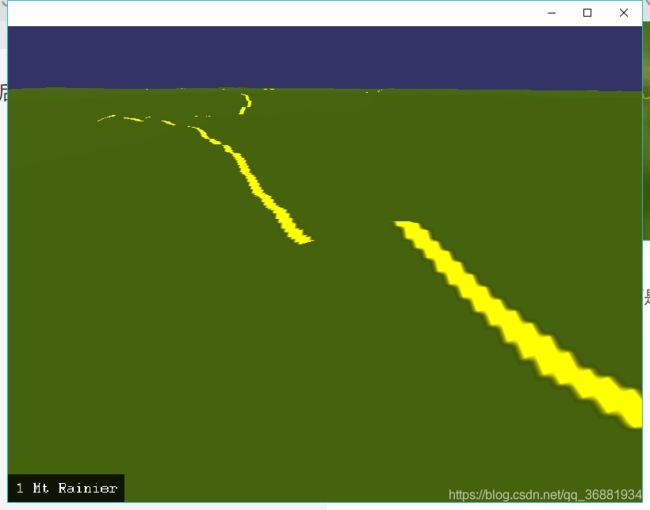
底图精度太低,糊了吧唧的看不清,按W切换成格网就能看到了,如下

第一步成功!!!地形加载上啦!!
然后思考如何做出例子的那种下陷平台的效果。第一个想法,用arcgis弄一个线状要素shp,给加上一个高程值,然后就行了,因为手头刚好有淮河的边界,于是在arcgis进行一番操作,加载上之后,悲剧了
因为加了LOD,在拉近到差不多的地方开始加载金线时,控制台被
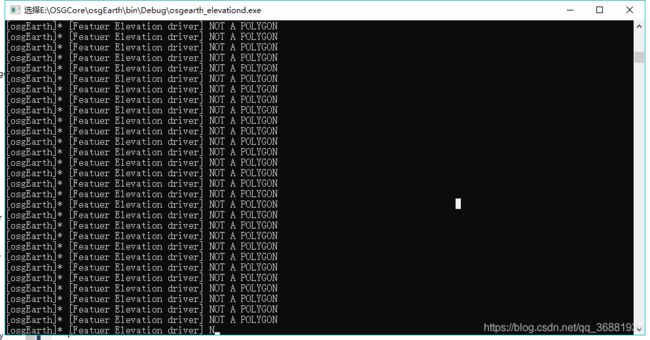
刷屏了,是如下的语句
![]()
没有深究,应该是feature_elevation驱动器不支持线状要素吧~那就
换成面!
又找了整个淮河流域的面进行测试,之前毫无经验,虽然是gis专业,但是对投影,地理坐标系一知半解,找到面状shp就直接糊上去用了,运行起来,毫无区别,按F变成窗口之后,发现控制台有提示,如下

Specified profile does not match feature profile, ignoring specified profile.
谷歌翻译为:
指定的配置文件与功能配置文件不匹配,忽略指定的配置文件。
思考了半天,指定的配置文件应该就是输入的那个shp,功能配置文件嘛。。往上看了一眼,发现有一行之前看不懂忽略了的代码:

本着多一事不如少一事的端正思想,直接把这行代码注释,果然!
还是不行
这回跳出的提示是

No profile specified; falling back on feature profile.
谷歌翻译:
未指定个人资料; 回到功能配置文件。
好嘛,还是不行,绕不过去了,盘它!
通过“南水之源”大大的详解文章(下附链接)
https://www.cnblogs.com/lyggqm/p/6371583.html?utm_source=itdadao&utm_medium=referral
其中对于标签的解释是:
global-geodetic
这时候应该能明白这个标签的作用是指定一下来源数据的地理坐标系,遂打开好久好久不用的arcmap10.2,把shp文件丢进去,读取之后打开属性一看

管它是个啥,反正这玩意儿不是WGS84!改!
这时候才发现好多知识点缺失了,咋改啊。。百度大法走起!
搜索一番,找到了办法,本文中具体额外知识点会另起文章介绍,本文篇幅有限不再赘述。
总之,改了投影之后的数据长这样:

本来shp只是个平面,啥也没有,我添加了一个字段“Z”,数值使用默认值0,然后转化成3D数据集,想用这个大榔头把地形砸扁,具体操作另说!
这时候用这个加进去,发现控制台一片祥和,啥错也没报,然而地球上也一片祥和,啥起伏都没
又失败了。。
死马当活马医,把LOD注释掉,可能我没有拖到正确的缩放级别,电脑性能也慢了点,错了变化也说不定。
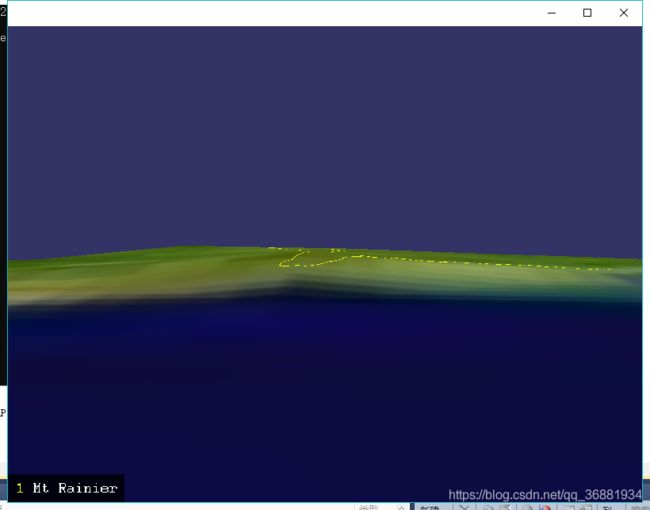
出现了!蜜汁突起!!可是这又是什么鬼啊。。我定的高程是0,该给我凹下去啊!!!
这时感谢师兄提点,弄个小一点的面试试,用arcgis扣一个小矩形。
听起来很美好,结果又触及了知识盲区。。扣啥。。好像之前学过,可是怎么做来着。。。
百度大法之后得到解决。

在一个地形起伏最大的地方扣了一个方块,扣的时候把投影设置为WGS84,起名“test5.shp”,看到这,大家应该想到啥了吧!配角是不配拥有姓名的!所以!!咱们的主角test5要来了!!!
加进去之后。。。
果然。。

啊!这美丽的竖线!!这美丽的断崖!!!
按下W键

啊!!!!!!!这美丽的绿色瀑布!!!!!!!!!!
改个格式加把火,用标签,在南水大大的贴之中,是这样解释的:
把画边框的代码复制一遍,改下数据源:

启动!!


终于把这一方天地给砸扁了 !
收工撒花~
第一天的工作结束,明天还有什么等着我的~