【算法思考】Pytorch Align Corners 用法总结
目录
- 前言
- 需要align_corners参数的接口
- 参数分析
前言
Pytorch的许多接口都需要提供align_corners=True/False。为了更好的使用pytorch提供的接口,有必要了解这个参数所表示的具体含义。下面我们会通过图形化的方式展示。
需要align_corners参数的接口
Pytorch 中使用 align_corners的接口如下所示:
class torch.ao.nn.quantized.functional.interpolate(input, size=none, scale_factor=none, mode='nearest', align_corners=none)
torch.nn.functional.affine_grid(theta, size, align_corners=none)
torch.nn.functional.grid_sample(input, grid, mode='bilinear', padding_mode='zeros', align_corners=none)
torch.nn.functional.interpolate(input, size=none, scale_factor=none, mode='nearest', align_corners=none, recompute_scale_factor=none, antialias=false)
torch.nn.functional.upsample(input, size=none, scale_factor=none, mode='nearest', align_corners=none)
nn.functional.interpolate(..., mode='bilinear', align_corners=true)
...
如上所示,大部分使用align_corners的接口都和采样/插值有关。
参数分析
我们来截取 interpolate 的 align_corners 的文档来分析。文章对两种模式的区别描述和模糊,但是不妨碍我们提取一些有用信息。
align_corners (bool, optional) – Geometrically, we consider the pixels of the input and output as squares rather than points. If set to True, the input and output tensors are aligned by the center points of their corner pixels, preserving the values at the corner pixels. If set to False, the input and output tensors are aligned by the corner points of their corner pixels, and the interpolation uses edge value padding for out-of-boundary values, making this operation independent of input size when scale_factor is kept the same. This only has an effect when mode is ‘bilinear’. Default: False
注意,文本中的第一句话"the pixels of the input and output as squares rather than points", 这句话是什么意思呢?
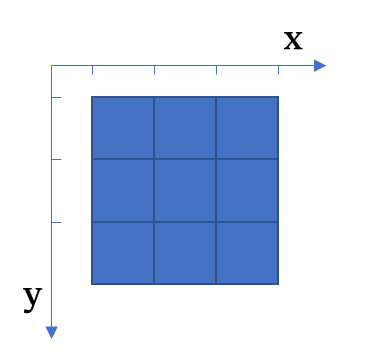
比如我们有一张图片,图片的分辨率是3x3. 如果我们把像素看成点的话图像会变成离散的,我们只有9个点,使用图像位置的时候我们只能用整数索引。由于在插值或者采样的过程中,我们使用的图像位置多是浮点数,这个时候我们就不能把图像当成离散的点了,应该当成一个个方块拼接在一起,这样在长宽进行采样的时候,可以映射到具体的位置上。如下所示:

当成方块的话,我们可以在图像所表示的矩形内的任意浮点数位置取值。
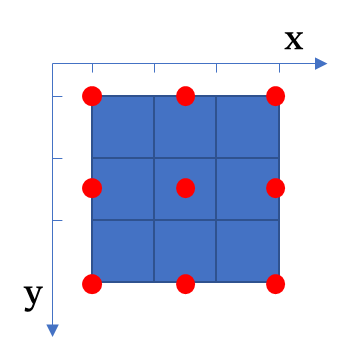
但是这样也引入了另一个问题,就是原始图像3x3分辨率的9个像素值应该分配到方块的哪个位置? 根据以往的经验,我们可以很简单想到把每个方块的中心设置为9个像素值,如下所示:

从图中,可以明显看到这种分配方式是比较合理的。这样在插值的时候,我们就可以得到9个归一化浮点坐标下的像素点位置和其对应灰度值,方便后续的插值计算。对于这种方法,对应align_corners=False。因为我们的像素点没有落到矩形的角落上。
除了以上的方法还有别的方法吗?其实显然也是有其他方法的。比如我们可以将角落的像素点的值赋值给坐标范围的起点和终点。如下所示:

这种方式对应的参数设置为align_corners=True。这种模式下,我们的像素点落到了矩形的角落上。
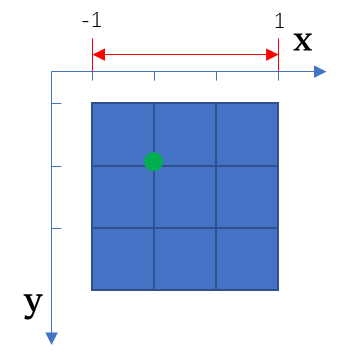
通常,pytorch会规定归一化的坐标的范围为[-1,1], 如下所示:

因此我们可以通过程序验证我们的解释,我们取[-1/3, -1/3](绿色的位置)这个点,利用bilinear方法计算插值结果。
import torch
import torch.nn.functional as F

data = torch.Tensor([[1, 2, 3], [2, 3, 4], [3, 4, 5]])
data = data.view(1, 1, 3, -1)

index = torch.Tensor([-1/3, -1/3])
index = index.view(1, 1, 1, 2)

out = F.grid_sample(data, index, mode='bilinear', align_corners=True)
print('align_corners=True ', out)
out = F.grid_sample(data, index, mode='bilinear', align_corners=False)
print('align_corners=False', out)
输出结果为:
align_corners=True  tensor([[[[2.3333]]]])
align_corners=False tensor([[[[2.0000]]]])
以上程序的结果,可以证明我们的解释是正确的。