原文链接
翻译版链接
Jupyter Notebook
Jupyther notebook ,也就是一般说的 Ipython notebook,是一个可以把代码、图像、注释、公式和作图集于一处,从而实现可读性分析的一种灵活的工具。
Jupyter延伸性很好,支持多种编程语言,可以很轻松地安装在个人电脑或者任何服务器上 —— 只要有ssh或者http接入就可以。最棒的一点是,它完全免费。
Jupyter 界面
默认情况下,Jupyter Notebook 使用Python内核,这就是为什么它原名 IPython Notebook。Jupyter notebook是Jupyter项目的产物——Jupyter这个名字是它要服务的三种语言的缩写:Julia,Python和R,这个名字与“木星(jupiter)”谐音。
1、快捷键
Jupyter在顶部菜单提供了一个快捷键列表:Help > Keyboard Shortcuts 。每次更新Jupyter的时候,一定要看看这个列表,因为不断地有新的快捷键加进来。另外一个方法是使用Cmd + Shift + P( Linux 和 Windows下Ctrl + Shift + P亦可)调出命令面板。这个对话框可以让你通过名称来运行任何命令——当你不知道某个操作的快捷键,或者那个操作没有快捷键的时候尤其有用。这个功能与苹果电脑上的Spotlight搜索很像,一旦开始使用,你会欲罢不能。
几个快捷键:
Esc + F 在代码中查找、替换,忽略输出。
Esc + O 在cell和输出结果间切换。
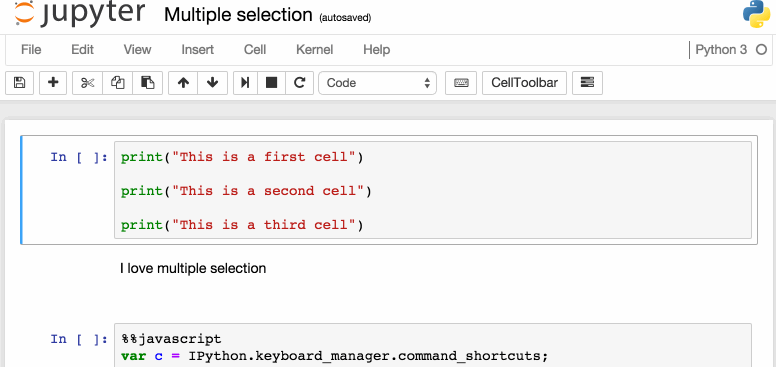
选择多个cell:
Shift + J 或 Shift + Down 选择下一个cell。
Shift + K 或 Shift + Up 选择上一个cell。
一旦选定cell,可以批量删除/拷贝/剪切/粘贴/运行。当你需要移动notebook的一部分时这个很有用。
Shift + M 合并cell.
2、变量的完美显示
有一点已经众所周知。把变量名称或没有定义输出结果的语句放在cell的最后一行,无需print语句,Jupyter也会显示变量值。当使用Pandas DataFrames时这一点尤其有用,因为输出结果为整齐的表格。
鲜为人知的是,你可以通过修改内核选项ast_note_interactivity,使得Jupyter对独占一行的所有变量或者语句都自动显示,这样你就可以马上看到多个语句的运行结果了。
In [1]:fromIPython.core.interactiveshellimportInteractiveShell InteractiveShell.ast_node_interactivity ="all"In [2]:frompydatasetimportdata quakes = data('quakes') quakes.head() quakes.tail()Out[2]: lat long depth mag stations1-20.42181.625624.8412-20.62181.036504.2153-26.00184.10425.4434-17.97181.666264.1195-20.42181.966494.011Out[2]: lat long depth mag stations996-25.93179.544704.422997-12.28167.062484.735998-20.13184.202444.534999-17.40187.80404.5141000-21.59170.561656.0119
如果你想在各种情形下(Notebook和Console)Jupyter都同样处理,用下面的几行简单的命令创建文件~/.ipython/profile_default/ipython_config.py即可实现:
c = get_config()# Run all nodes interactivelyc.InteractiveShell.ast_node_interactivity ="all"
3、轻松链接到文档
在Help 菜单下,你可以找到常见库的在线文档链接,包括Numpy,Pandas,Scipy和Matplotlib等。
另外,在库、方法或变量的前面打上?,即可打开相关语法的帮助文档。
In[3]: ?str.replace()
Docstring: S.replace(old,new[, count]) -> str Return a copyofSwithall occurrencesofsubstring old replaced bynew. If the optional argument count is given, only the first count occurrences are replaced. Type: method_descriptor
4、 在notebook里作图
在notebook里作图,有多个选择:
matplotlib(事实标准),可通过%matplotlib inline 激活,详细链接
%matplotlib notebook 提供交互性操作,但可能会有点慢,因为响应是在服务器端完成的。
mpld3提供matplotlib代码的替代性呈现(通过d3),虽然不完整,但很好。
bokeh生成可交互图像的更好选择。
plot.ly可以生成非常好的图,可惜是付费服务。
5、 Jupyter Magic命令
上文提到的%matplotlib inline 是Jupyter Magic命令之一。
# This will list all magic commandsIn [53]: %lsmagicOut[53]:Available linemagics:%alias%alias_magic %autocall %automagic %autosave %bookmark %cat %cd %clear %colors %config %connect_info %cp %debug %dhist %dirs %doctest_mode %ed %edit %env %gui %hist %history %killbgscripts %ldir %less %lf %lk %ll %load %load_ext %loadpy %logoff %logon %logstart %logstate %logstop %ls %lsmagic %lx %macro %magic %man %matplotlib %mkdir %more %mv %notebook %page %pastebin %pdb %pdef %pdoc %pfile %pinfo %pinfo2 %popd %pprint %precision %profile %prun %psearch %psource %pushd %pwd %pycat %pylab %qtconsole %quickref %recall %rehashx %reload_ext %rep %rerun %reset %reset_selective %rm %rmdir %run %save %sc %set_env %store %sx %system %tb %time %timeit %unalias %unload_ext %who %who_ls %whos %xdel %xmodeAvailable cellmagics:%%! %%HTML%%SVG %%bash%%capture %%debug%%file %%html%%javascript %%js%%latex %%perl%%prun %%pypy%%python %%python2%%python3 %%ruby%%script %%sh%%svg %%sx%%system %%time%%timeit %%writefileAutomagic is ON, % prefix IS NOT neededforline magics.
推荐阅读Jupyter magic命令的相关文档,它一定会对你很有帮助。
6、 Jupyter Magic-%env:设置环境变量
不必重启jupyter服务器进程,也可以管理notebook的环境变量。有的库(比如theano)使用环境变量来控制其行为,%env是最方便的途径。
In [55]:# Running %env without any arguments# lists all environment variables # The line below sets the environment # variable OMP_NUM_THREADS %env OMP_NUM_THREADS=4
env: OMP_NUM_THREADS=4
7、Jupyter Magic - %run: 运行python代码
%run 可以运行.py格式的python代码——这是众所周知的。不那么为人知晓的事实是它也可以运行其它的jupyter notebook文件,这一点很有用。
注意:使用%run 与导入一个python模块是不同的。
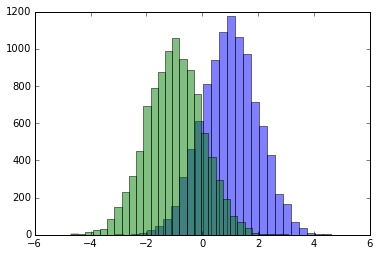
In [56]:# this will execute and show the output from # all code cells of the specified notebook %run ./two-histograms.ipynb
8、Jupyter Magic -%load:从外部脚本中插入代码
该操作用外部脚本替换当前cell。可以使用你的电脑中的一个文件作为来源,也可以使用URL。
In [ ]:# Before Running%load ./hello_world.pyIn [61]:# After Running # %load ./hello_world.py if__name__ =="__main__":print("Hello World!")
Hello World!
9、Jupyter Magic - %store: 在notebook文件之间传递变量
%store 命令可以在两个notebook文件之间传递
In [62]: data ='this is the string I want to pass to different notebook'%store datadeldata# This has deleted the variable
Stored'data'(str)
现在,在一个新的notebook文档里……
In [1]: %store -r dataprint(data)
thisis thestringI want to pass to different notebook
10、Jupyter Magic - %who: 列出所有的全局变量
不加任何参数, %who 命令可以列出所有的全局变量。加上参数 str 将只列出字符串型的全局变量。
In [1]: one = "for the money" two = "for the show" three = "to get ready now go cat go" %who str
one three two
11、Jupyter Magic – 计时
有两种用于计时的jupyter magic命令: %%time 和 %timeit.当你有一些很耗时的代码,想要查清楚问题出在哪时,这两个命令非常给力。 仔细体会下我的描述哦。 %%time 会告诉你cell内代码的单次运行时间信息。
In [4]: %%timeimporttimefor_inrange(1000): time.sleep(0.01)# sleep for 0.01 seconds
CPUtimes:user21.5ms,sys: 14.8ms,total: 36.3msWalltime: 11.6s
%%timeit 使用了Python的 timeit 模块,该模块运行某语句100,000次(默认值),然后提供最快的3次的平均值作为结果。
In [3]:importnumpy %timeit numpy.random.normal(size=100)
Theslowestruntook7.29timeslongerthanthefastest.Thiscouldmeanthatanintermediateresultisbeingcached. 100000loops,bestof3: 5.5µsperloop
12、Jupyter Magic - %%writefile and %pycat:导出cell内容/显示外部脚本的内容
使用%%writefile magic可以保存cell的内容到外部文件。 而%pycat功能相反,把外部文件语法高亮显示(以弹出窗方式)。
In [7]: %%writefile pythoncode.pyimportnumpydefappend_if_not_exists(arr, x):ifxnotinarr: arr.append(x)defsome_useless_slow_function():arr = list()foriinrange(10000): x = numpy.random.randint(0,10000) append_if_not_exists(arr, x)
Writingpythoncode.py
In [8]: %pycat pythoncode.pyimportnumpydefappend_if_not_exists(arr, x):ifxnotinarr: arr.append(x)defsome_useless_slow_function():arr = list()foriinrange(10000): x = numpy.random.randint(0,10000) append_if_not_exists(arr, x)
13、Jupyter Magic - %prun: 告诉你程序中每个函数消耗的时间
使用%prun+函数声明会给你一个按顺序排列的表格,显示每个内部函数的耗时情况,每次调用函数的耗时情况,以及累计耗时。
In[47]: %prunsome_useless_slow_function()
26324functioncallsin0.556secondsOrderedby:internaltimencallstottimepercallcumtimepercallfilename:lineno(function) 10000 0.527 0.000 0.528 0.000 :2(append_if_not_exists) 10000 0.022 0.000 0.022 0.000{method'randint'of'mtrand.RandomState'objects}10.0060.0060.5560.556:6(some_useless_slow_function)63200.0010.0000.0010.000{method'append'of'list'objects}10.0000.0000.5560.556:1() 1 0.000 0.000 0.556 0.556 {built-in method exec} 1 0.000 0.000 0.000 0.000 {method 'disable' of '_lsprof.Profiler' objects}
14、Jupyter Magic –用%pdb调试程序
Jupyter 有自己的调试界面The Python Debugger (pdb),使得进入函数内部检查错误成为可能。
Pdb中可使用的命令见链接
In [ ]: %pdbdefpick_and_take(): picked = numpy.random.randint(0,1000) raise NotImplementedError() pick_and_take() Automatic pdb calling has been turned ON --------------------------------------------------------------------------- NotImplementedError Traceback (most recent call last) in()5raise NotImplementedError()6--->7pick_and_take() inpick_and_take()3defpick_and_take():4picked = numpy.random.randint(0,1000) --->5raise NotImplementedError()67pick_and_take()NotImplementedError:> (5)pick_and_take()3defpick_and_take():4picked = numpy.random.randint(0,1000) --->5raise NotImplementedError()67pick_and_take() ipdb>
15、末句函数不输出
有时候不让末句的函数输出结果比较方便,比如在作图的时候,此时,只需在该函数末尾加上一个分号即可。
In [4]: %matplotlib inline from matplotlib import pyplotasplt import numpy x = numpy.linspace(0,1,1000)**1.5In [5]:# Here you get the output of the function plt.hist(x)Out[5]: (array([216.,126.,106.,95.,87.,81.,77.,73.,71.,68.]),array([0.,0.1,0.2,0.3,0.4,0.5,0.6,0.7,0.8,0.9,1.]), )
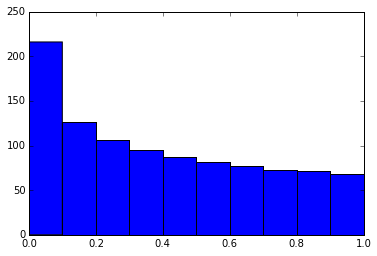
In [6]:# By adding a semicolon at the end, the output is suppressed. plt.hist(x);
16、运行Shell命令
在notebook内部运行shell命令很简单,这样你就可以看到你的工作文件夹里有哪些数据集。
In[7]: !ls*.csv
nba_2016.csvtitanic.csvpixar_movies.csvwhitehouse_employees.csv
17、用LaTex 写公式
当你在一个Markdown单元格里写LaTex时,它将用MathJax呈现公式:如 $$ P(A \mid B) = \frac{P(B \mid A) , P(A)}{P(B)} $$
会变成
$$ P(A \mid B) = \frac{P(B \mid A) , P(A)}{P(B)} $$
18、在notebook内用不同的内核运行代码
如果你想要,其实可以把不同内核的代码结合到一个notebook里运行。 只需在每个单元格的起始,用Jupyter magics调用kernal的名称:
%%bash
%%HTML
%%python2
%%python3
%%ruby
%%perl
In [6]: %%bashforiin{1..5}doecho"i is$i"done
iis1iis2iis3iis4iis5
19、给Jupyter安装其他的内核
Jupyter的优良性能之一是可以运行不同语言的内核。下面以运行R内核为例说明:
简单的方法:通过Anaconda安装R内核
conda install -c r r-essentials
稍微麻烦的方法:手动安装R内核
如果你不是用Anaconda,过程会有点复杂,首先,你需要从CRAN安装R。 之后,启动R控制台,运行下面的语句:
install.packages(c('repr','IRdisplay','crayon','pbdZMQ','devtools'))devtools::install_github('IRkernel/IRkernel')IRkernel::installspec()# to register the kernel in the current R installation
20、在同一个notebook里运行R和Python
要这么做,最好的方法事安装rpy2(需要一个可以工作的R),用pip操作很简单:
pip install rpy2
然后,就可以同时使用两种语言了,甚至变量也可以在二者之间公用:
In [1]: %load_ext rpy2.ipythonIn [2]: %Rrequire(ggplot2)Out[2]: array([1], dtype=int32)In [3]:importpandasaspd df = pd.DataFrame({'Letter': ['a','a','a','b','b','b','c','c','c'],'X': [4,3,5,2,1,7,7,5,9],'Y': [0,4,3,6,7,10,11,9,13],'Z': [1,2,3,1,2,3,1,2,3] })In [4]: %%R -i df ggplot(data = df) + geom_point(aes(x = X, y= Y, color = Letter, size = Z))

21、用其他语言写函数
有时候numpy的速度有点慢,我想写一些更快的代码。
原则上,你可以在动态库里编译函数,用python来封装…
但是如果这个无聊的过程不用自己干,岂不更好?
你可以在cython或fortran里写函数,然后在python代码里直接调用。
首先,你要先安装:
!pip install cython fortran-magic In [ ]: %load_ext CythonIn [ ]: %%cythondefmyltiply_by_2(float x):return2.0* xIn [ ]: myltiply_by_2(23.)
我个人比较喜欢用Fortran,它在写数值计算函数时十分方便。更多的细节在这里。
In [ ]: %load_ext fortranmagicIn [ ]: %%fortran subroutine compute_fortran(x, y, z) real, intent(in) :: x(:), y(:) real, intent(out) :: z(size(x,1)) z = sin(x + y) end subroutine compute_fortranIn [ ]: compute_fortran([1,2,3], [4,5,6])
还有一些别的跳转系统可以加速python 代码。更多的例子见链接
22、支持多指针
Jupyter支持多个指针同步编辑,类似Sublime Text编辑器。按下Alt键并拖拽鼠标即可实现。
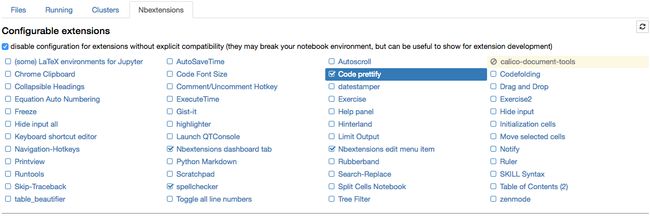
23、Jupyter外接拓展
Jupyter-contrib extensions是一些给予Jupyter更多更能的延伸程序,包括jupyter spell-checker和code-formatter之类.
下面的命令安装这些延伸程序,同时也安装一个菜单形式的配置器,可以从Jupyter的主屏幕浏览和激活延伸程序。
!pip install https://github.com/ipython-contrib/jupyter_contrib_nbextensions/tarball/master!pip install jupyter_nbextensions_configurator!jupyter contrib nbextension install --user!jupyter nbextensions_configuratorenable--user
24、从Jupyter notebook创建演示稿
Damian Avila的RISE允许你从已有的notebook创建一个powerpoint形式的演示稿。 你可以用conda来安装RISE:
conda install -c damianavila82 rise
或者用pip安装:
pip install RISE
然后运行下面的代码来安装和激活延伸程序:
jupyter-nbextension install rise --py --sys-prefixjupyter-nbextensionenablerise --py --sys-prefix
25、Jupyter输出系统
Notebook本身以HTML的形式显示,单元格输出也可以是HTML形式的,所以你可以输出任何东西:视频/音频/图像。 这个例子是浏览我所有的图片,并显示前五张图的缩略图。
In [12]:importosfromIPython.displayimportdisplay, Image names = [fforfinos.listdir('../images/ml_demonstrations/')iff.endswith('.png')]fornameinnames[:5]: display(Image('../images/ml_demonstrations/'+ name, width=100))


我们也可以用bash命令创建一个相同的列表,因为magics和bash运行函数后返回的是python 变量:
In [10]: names = !ls ../images/ml_demonstrations/*.png names[:5]Out[10]: ['../images/ml_demonstrations/colah_embeddings.png','../images/ml_demonstrations/convnetjs.png','../images/ml_demonstrations/decision_tree.png','../images/ml_demonstrations/decision_tree_in_course.png','../images/ml_demonstrations/dream_mnist.png']
26、大数据分析
很多方案可以解决查询/处理大数据的问题:
ipyparallel(之前叫 ipython cluster) 是一个在python中进行简单的map-reduce运算的良好选择。我们在rep中使用它来并行训练很多机器学习模型。
pyspark
spark-sql magic%%sql
27、分享notebook
分享notebook最方便的方法是使用notebook文件(.ipynb),但是对那些不使用notebook的人,你还有这些选择:
通过File > Download as > HTML 菜单转换到html文件。
用gists或者github分享你的notebook文件。这两个都可以呈现notebook,示例见链接
如果你把自己的notebook文件上传到github的仓库,可以使用很便利的Mybinder服务,允许另一个人进行半个小时的Jupyter交互连接到你的仓库。
用jupyterhub建立你自己的系统,这样你在组织微型课堂或者工作坊,无暇顾及学生们的机器时就非常便捷了。
将你的notebook存储在像dropbox这样的网站上,然后把链接放在nbviewer,nbviewer可以呈现任意来源的notebook。
用菜单File > Download as > PDF 保存notebook为PDF文件。如果你选择本方法,我强烈建议你读一读Julius Schulz的文章
用Pelican从你的notebook创建一篇博客。
作者:Mingooo
链接:https://www.jianshu.com/p/64605d7a6f27
来源:
著作权归作者所有,任何形式的转载都请联系作者获得授权并注明出处。