Hisat2-Stringtie-DESeq2复现Transcript-level expression analysis of RNA-seq experiments with ...
目录
- 整体流程
-
- 标准流程:比对 - 转录本组装 - 转录本合并 - 定量 - 分析
- 快速流程:比对 - 定量 - 分析
- 多看手册
- 详细步骤
-
- 分析前准备工作
-
- 新建工作目录
- 对RNA-seq结果进行QC
- 下载基因组
- 生成索引文件
- 偷懒神器-python
- 标准分析流程
-
- step1. HISAT2--将测序结果比对到参考基因组
- step2. stringtie--转录本组装
- step3. stringtie--转录本合并
- step4. stringtie--定量
- step5. DESeq2分析与画图
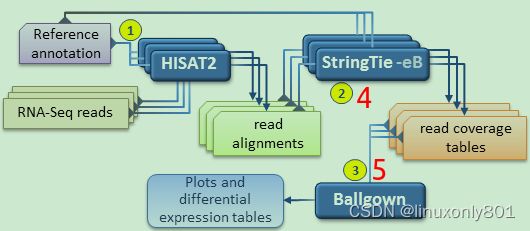
整体流程
根据stringtie手册,对于RNA-seq数据的分析,一般有两种常用套路:
标准流程:比对 - 转录本组装 - 转录本合并 - 定量 - 分析
该方式使用merge的原因:After assembling each sample, the full set of assemblies is passed to StringTie’s merge function, which merges together all the gene structures found in any of the samples. This step is required because transcripts in some of the samples might be only partially covered by reads, and as a consequence only partial versions of them will be assembled in the initial StringTie run. The merge step creates a set of transcripts that is consistent across all samples, so that the transcripts can be compared in subsequent steps. The merged transcripts are then fed back to StringTie one more time so that it can re-estimate the transcript abundances using the merged structures.
在RNA-seq的reads结果可能仅仅cover了部分转录本(比如同一个样品,3个重复,就有可能出现第一个样品检测到了A基因,第二个样品没有检测到),因此在第2步组装的时候,也只组装了部分转录本,即下面每个绿色的Assembled transcripts都是不一样的,所以如果直接拿这样的结果进行分析,可能会出现系统误差,因此,把这些所有的Assembled transcripts都merge到一起,从而生成一个Merged transcripts,这个合并后的Merged transcripts就相当于一个完整的transcripts,因此在分析的时候就可以做到每个样本都进行一致的比较(consistent across all samples)。这样就不仅可以进行表达差异分析,还可以进行新isoform的发现(新isoform的发现有点难度,超出本文的范围,可以看看https://www.nature.com/articles/s41467-017-00050-4)

快速流程:比对 - 定量 - 分析
该方式更简单,更快速。适用于下面两种情况:1.不想找新isoform,2. 使用已经详细注释的物种进行比对(if there is no interest in novel isoforms, or if only a well known set of transcripts of interest are targeted by the analysis. )。该方式只有三步,其中第2步与上一种方式的步骤4类似(只是在比对时,一个使用merged transcripts,一个使用reference annotation),第3步与上一种方式的步骤5一样。之所以这样是可行的,是因为:
- 如果不想找新isoform,只是做基因表达差异,直接找个内参就足够了;
- 已经详细注释的基因组已经被无数人进行过merge操作了,你就不需要再自己手动merge操作了,直接使用就可以了。
多看手册
RNAseq的整体流程很简单:比对 -(转录本组装 - 转录本合并)- 定量 - 分析。
比对使用HISAT2,组装-合并-定量使用stringtie,分析使用DESeq2。其它的软件也可以使用,这里使用这三个软件进行。建议多看看官网manual。
HISAT2官网
stringtie官网
DESeq2官网
如果想使用已经发表的RNA-seq数据,可以到SRA下载:
SRA主页
详细步骤
注:代码在其它的电脑上不一定能跑通,最大的出错原因是相对路径错误,使用时需要根据自己的文件路径进行相应的修改。
分析前准备工作
新建工作目录
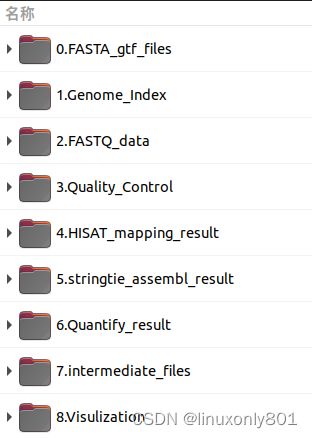
新建工作目录的目的就是要组织好自己分析过程中的文件,养成良好的习惯。自己随意,我现在的习惯如下(注意,所有文件夹不得含有空格):
mkdir 0.FASTA_gtf_files 1.Genome_Index 2.FASTQ_data 3.Quality_Control 4.HISAT_mapping_result 5.stringtie_assembl_result 6.Quantify_result 7.intermediate_files 8.Visulization
对RNA-seq结果进行QC
假设现在已经有了RNAseq数据,如果没有就:
wget ftp://ftp.ccb.jhu.edu/pub/RNAseq_protocol/chrX_data.tar.gz  # 下载数据
tar xvzf chrX_data.tar.gz  # 解压数据
解压完成后,把所有的测序文件放入2.FASTQ_data文件夹中。基因组的fasta文件和gtf文件放入0.FASTA_gtf_files文件夹中。其它文件放入7.intermediate_files文件夹中。
使用FastQC和MultiQC进行RNA-seq测序结果的QC检测,注意,两个软件的安装方式不同,一个apt,一个pip:
# fastqc
sudo apt install fastqc
# multiqc
pip install multiqc
# 使用fastqc进行检测
# 先使用cd命令进入项目文件夹,再进行
fastqc -t 8 -o 3.Quality_Control/ 2.FASTQ_data/*.gz
multiqc -o 3.Quality_Control/ 3.Quality_Control/*
支行结束后,在文件夹中就可以看到所有结果了,只要打开multiqc_report.html就可以了。
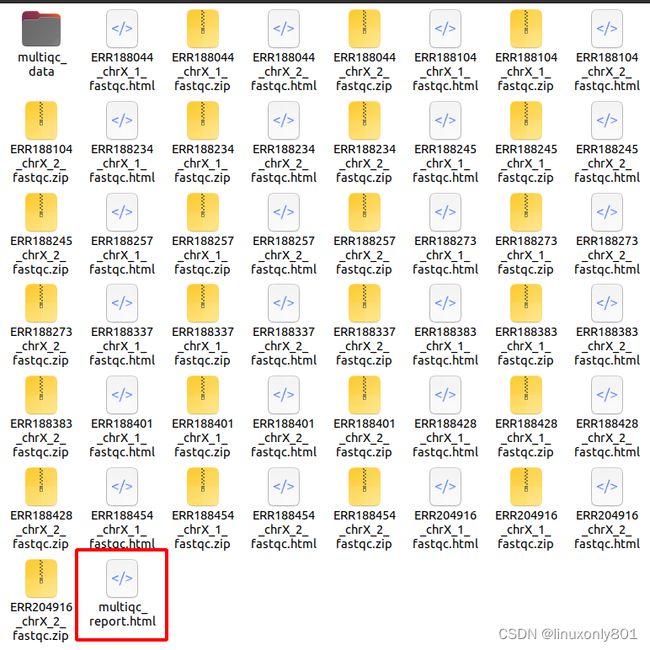
打开之后,就可以详细的检查所有QC结果了:

如果测序结果符合要求,就可以进行下一步了。
下载基因组
如果研究物种是:
H. sapiens
M. musculus
R. norvegicus
D. melanogaster
C. elegans
S. cerevisiae
那么就可以直接去HISAT2官网下载就行。
如果研究的不是这些物种,就需要自己构建索引。构建索引需要使用物种基因组的fasta序列,还需要物种基因组的gtf文件。两者可以从NCBI, ENSEMBL, UCSC下载。从哪里下载都是一样的,看自己喜好就行。
我喜欢从ENSEMBL下载:
ENSEMBL主页
ENSEMBL物种基因组页
这里以人的基因组(虽然已经有chrX,但走个流程)下载为例。

进入上面两个网址,下载自己需要的文件。
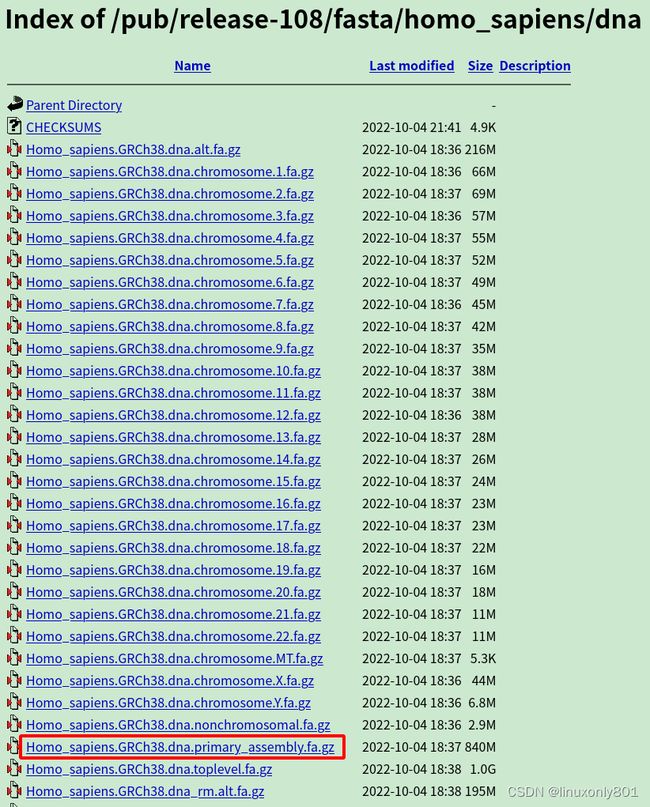

不过现在我还不打算使用上面这两个,我仍然使用Transcript-level expression analysis of RNA-seq experiments with HISAT, StringTie and Ballgown文章中提供的数据,因为分析入门使用小数据集更好。
生成索引文件
整体的思路就是:先使用gtf文件对splice sites和exons进行提取,再把这两个信息整合到fasta文件中。
把文章中提供的chrX.gtf 和chrX.fa两个文件放到0.FASTA_gtf_files文件夹中,在该文件夹中打开终端,输入:
hisat2_extract_splice_sites.py chrX.gtf > genome.ss  # 提取剪接变体信息
hisat2_extract_exons.py chrX.gtf > genome.exon  # 提取外显子信息
这样就可以生成两个文件,用于建立索引。使用生成的两个文件和fasta文件生成索引,输入:
hisat2-build -p 8 --exon genome.exon --ss genome.ss chrX.fa ../1.Genome_Index/chrx_tran
漫长的等待过后就可以在1.Genome_Index文件夹下看到8个文件(手动生成的文件与论文中的文件大小相似,可能是使用的参数不同导致)。

偷懒神器-python
不想打字,不想写bash,自己写了一个简单的python代码。同样的工作也可以使用bash进行批量操作。
import os

rna_dir = '../../Rprojects/RNAseqDemo2_DESeq2/2.FASTQ_data'  # 自己根据实际情况写
file_lists = (os.listdir(rna_dir))
sample_list = []
for file_name in file_lists:
    sample_id = file_name.split('_')[0]  # 自己根据实际情况写

    if sample_id in sample_list:
        pass
    else:
        sample_list.append(sample_id)
print(sample_list)


for item in sample_list:
    line =f'hisat2 -p 8 --dta -x 1.Genome_Index/chrX_tran -1 2.FASTQ_data/{item}_chrX_1.fastq.gz -2 2.FASTQ_data/{item}_chrX_2.fastq.gz -S 4.HISAT_mapping_result/{item}_chrX.sam'   # 自己根据实际情况写
    print(line)

for item in sample_list:
    line = f'samtools sort -@ 8 -o 4.HISAT_mapping_result/{item}_chrX.bam 4.HISAT_mapping_result/{item}_chrX.sam'  # 自己根据实际情况写
    print(line)

for item in sample_list:
    line = f'hisat2 -p 8 --dta -x 1.Genome_Index/chrX_tran -1 2.FASTQ_data/{item}_chrX_1.fastq.gz -2 2.FASTQ_data/{item}_chrX_2.fastq.gz --summary-file 4.HISAT_mapping_result/{item}_chrX_summary.txt | samtools sort -@ 8 -o 4.HISAT_mapping_result/{item}_chrX.bam'  # 自己根据实际情况写
    print(line)

for item in sample_list:
    line = f'stringtie -p 8 -G 0.FASTA_gtf_files/chrX.gtf -o 5.stringtie_assembl_result/{item}_chrX.gtf 4.HISAT_mapping_result/{item}_chrX.bam' # 自己根据实际情况写
    with open('merge_list.txt', 'a') as file:
        file.write(f'5.stringtie_assembl_result/{item}_chrX.gtf\n') # 自己根据实际情况写
    print(line)

for item in sample_list:
    line = f'stringtie -p 8 -e -G 5.stringtie_assembl_result/stringtie_merged.gtf -o 6.Quantify_result/{item}/{item}_chrX.gtf -A 6.Quantify_result/{item}/gene_abundances.tsv 4.HISAT_mapping_result/{item}_chrX.bam'
    with open('sample_list.txt', 'a') as file:
        file.write(f'{item}_chrX\t./{item}/{item}_chrX.gtf\n')
    print(line)
标准分析流程
step1. HISAT2–将测序结果比对到参考基因组
如果想生成sam后再转换成bam,可以使用下面这个两步法(不推荐,占用空间太多,而且几乎没有啥用):
hisat2 -p 8 --dta -x 1.Genome_Index/chrX_tran -1 2.FASTQ_data/ERR188454_chrX_1.fastq.gz -2 2.FASTQ_data/ERR188454_chrX_2.fastq.gz -S 4.HISAT_mapping_result/ERR188454_chrX.sam
hisat2 -p 8 --dta -x 1.Genome_Index/chrX_tran -1 2.FASTQ_data/ERR188401_chrX_1.fastq.gz -2 2.FASTQ_data/ERR188401_chrX_2.fastq.gz -S 4.HISAT_mapping_result/ERR188401_chrX.sam
hisat2 -p 8 --dta -x 1.Genome_Index/chrX_tran -1 2.FASTQ_data/ERR188257_chrX_1.fastq.gz -2 2.FASTQ_data/ERR188257_chrX_2.fastq.gz -S 4.HISAT_mapping_result/ERR188257_chrX.sam
hisat2 -p 8 --dta -x 1.Genome_Index/chrX_tran -1 2.FASTQ_data/ERR188234_chrX_1.fastq.gz -2 2.FASTQ_data/ERR188234_chrX_2.fastq.gz -S 4.HISAT_mapping_result/ERR188234_chrX.sam
hisat2 -p 8 --dta -x 1.Genome_Index/chrX_tran -1 2.FASTQ_data/ERR188428_chrX_1.fastq.gz -2 2.FASTQ_data/ERR188428_chrX_2.fastq.gz -S 4.HISAT_mapping_result/ERR188428_chrX.sam
hisat2 -p 8 --dta -x 1.Genome_Index/chrX_tran -1 2.FASTQ_data/ERR204916_chrX_1.fastq.gz -2 2.FASTQ_data/ERR204916_chrX_2.fastq.gz -S 4.HISAT_mapping_result/ERR204916_chrX.sam
hisat2 -p 8 --dta -x 1.Genome_Index/chrX_tran -1 2.FASTQ_data/ERR188245_chrX_1.fastq.gz -2 2.FASTQ_data/ERR188245_chrX_2.fastq.gz -S 4.HISAT_mapping_result/ERR188245_chrX.sam
hisat2 -p 8 --dta -x 1.Genome_Index/chrX_tran -1 2.FASTQ_data/ERR188104_chrX_1.fastq.gz -2 2.FASTQ_data/ERR188104_chrX_2.fastq.gz -S 4.HISAT_mapping_result/ERR188104_chrX.sam
hisat2 -p 8 --dta -x 1.Genome_Index/chrX_tran -1 2.FASTQ_data/ERR188383_chrX_1.fastq.gz -2 2.FASTQ_data/ERR188383_chrX_2.fastq.gz -S 4.HISAT_mapping_result/ERR188383_chrX.sam
hisat2 -p 8 --dta -x 1.Genome_Index/chrX_tran -1 2.FASTQ_data/ERR188044_chrX_1.fastq.gz -2 2.FASTQ_data/ERR188044_chrX_2.fastq.gz -S 4.HISAT_mapping_result/ERR188044_chrX.sam
hisat2 -p 8 --dta -x 1.Genome_Index/chrX_tran -1 2.FASTQ_data/ERR188337_chrX_1.fastq.gz -2 2.FASTQ_data/ERR188337_chrX_2.fastq.gz -S 4.HISAT_mapping_result/ERR188337_chrX.sam
hisat2 -p 8 --dta -x 1.Genome_Index/chrX_tran -1 2.FASTQ_data/ERR188273_chrX_1.fastq.gz -2 2.FASTQ_data/ERR188273_chrX_2.fastq.gz -S 4.HISAT_mapping_result/ERR188273_chrX.sam

samtools sort -@ 8 -o 4.HISAT_mapping_result/ERR188454_chrX.bam 4.HISAT_mapping_result/ERR188454_chrX.sam
samtools sort -@ 8 -o 4.HISAT_mapping_result/ERR188401_chrX.bam 4.HISAT_mapping_result/ERR188401_chrX.sam
samtools sort -@ 8 -o 4.HISAT_mapping_result/ERR188257_chrX.bam 4.HISAT_mapping_result/ERR188257_chrX.sam
samtools sort -@ 8 -o 4.HISAT_mapping_result/ERR188234_chrX.bam 4.HISAT_mapping_result/ERR188234_chrX.sam
samtools sort -@ 8 -o 4.HISAT_mapping_result/ERR188428_chrX.bam 4.HISAT_mapping_result/ERR188428_chrX.sam
samtools sort -@ 8 -o 4.HISAT_mapping_result/ERR204916_chrX.bam 4.HISAT_mapping_result/ERR204916_chrX.sam
samtools sort -@ 8 -o 4.HISAT_mapping_result/ERR188245_chrX.bam 4.HISAT_mapping_result/ERR188245_chrX.sam
samtools sort -@ 8 -o 4.HISAT_mapping_result/ERR188104_chrX.bam 4.HISAT_mapping_result/ERR188104_chrX.sam
samtools sort -@ 8 -o 4.HISAT_mapping_result/ERR188383_chrX.bam 4.HISAT_mapping_result/ERR188383_chrX.sam
samtools sort -@ 8 -o 4.HISAT_mapping_result/ERR188044_chrX.bam 4.HISAT_mapping_result/ERR188044_chrX.sam
samtools sort -@ 8 -o 4.HISAT_mapping_result/ERR188337_chrX.bam 4.HISAT_mapping_result/ERR188337_chrX.sam
samtools sort -@ 8 -o 4.HISAT_mapping_result/ERR188273_chrX.bam 4.HISAT_mapping_result/ERR188273_chrX.sam
如果不想生成中间的sam文件,可以使用下面这个一步生成bam的代码(推荐这个方式,节省空间,内容可以使用samtools view xxx.bam进行查看):
hisat2 -p 8 --dta -x 1.Genome_Index/chrX_tran -1 2.FASTQ_data/ERR188454_chrX_1.fastq.gz -2 2.FASTQ_data/ERR188454_chrX_2.fastq.gz --summary-file 4.HISAT_mapping_result/ERR188454_chrX_summary.txt | samtools sort -@ 8 -o 4.HISAT_mapping_result/ERR188454_chrX.bam
hisat2 -p 8 --dta -x 1.Genome_Index/chrX_tran -1 2.FASTQ_data/ERR188401_chrX_1.fastq.gz -2 2.FASTQ_data/ERR188401_chrX_2.fastq.gz --summary-file 4.HISAT_mapping_result/ERR188401_chrX_summary.txt | samtools sort -@ 8 -o 4.HISAT_mapping_result/ERR188401_chrX.bam
hisat2 -p 8 --dta -x 1.Genome_Index/chrX_tran -1 2.FASTQ_data/ERR188257_chrX_1.fastq.gz -2 2.FASTQ_data/ERR188257_chrX_2.fastq.gz --summary-file 4.HISAT_mapping_result/ERR188257_chrX_summary.txt | samtools sort -@ 8 -o 4.HISAT_mapping_result/ERR188257_chrX.bam
hisat2 -p 8 --dta -x 1.Genome_Index/chrX_tran -1 2.FASTQ_data/ERR188234_chrX_1.fastq.gz -2 2.FASTQ_data/ERR188234_chrX_2.fastq.gz --summary-file 4.HISAT_mapping_result/ERR188234_chrX_summary.txt | samtools sort -@ 8 -o 4.HISAT_mapping_result/ERR188234_chrX.bam
hisat2 -p 8 --dta -x 1.Genome_Index/chrX_tran -1 2.FASTQ_data/ERR188428_chrX_1.fastq.gz -2 2.FASTQ_data/ERR188428_chrX_2.fastq.gz --summary-file 4.HISAT_mapping_result/ERR188428_chrX_summary.txt | samtools sort -@ 8 -o 4.HISAT_mapping_result/ERR188428_chrX.bam
hisat2 -p 8 --dta -x 1.Genome_Index/chrX_tran -1 2.FASTQ_data/ERR204916_chrX_1.fastq.gz -2 2.FASTQ_data/ERR204916_chrX_2.fastq.gz --summary-file 4.HISAT_mapping_result/ERR204916_chrX_summary.txt | samtools sort -@ 8 -o 4.HISAT_mapping_result/ERR204916_chrX.bam
hisat2 -p 8 --dta -x 1.Genome_Index/chrX_tran -1 2.FASTQ_data/ERR188245_chrX_1.fastq.gz -2 2.FASTQ_data/ERR188245_chrX_2.fastq.gz --summary-file 4.HISAT_mapping_result/ERR188245_chrX_summary.txt | samtools sort -@ 8 -o 4.HISAT_mapping_result/ERR188245_chrX.bam
hisat2 -p 8 --dta -x 1.Genome_Index/chrX_tran -1 2.FASTQ_data/ERR188104_chrX_1.fastq.gz -2 2.FASTQ_data/ERR188104_chrX_2.fastq.gz --summary-file 4.HISAT_mapping_result/ERR188104_chrX_summary.txt | samtools sort -@ 8 -o 4.HISAT_mapping_result/ERR188104_chrX.bam
hisat2 -p 8 --dta -x 1.Genome_Index/chrX_tran -1 2.FASTQ_data/ERR188383_chrX_1.fastq.gz -2 2.FASTQ_data/ERR188383_chrX_2.fastq.gz --summary-file 4.HISAT_mapping_result/ERR188383_chrX_summary.txt | samtools sort -@ 8 -o 4.HISAT_mapping_result/ERR188383_chrX.bam
hisat2 -p 8 --dta -x 1.Genome_Index/chrX_tran -1 2.FASTQ_data/ERR188044_chrX_1.fastq.gz -2 2.FASTQ_data/ERR188044_chrX_2.fastq.gz --summary-file 4.HISAT_mapping_result/ERR188044_chrX_summary.txt | samtools sort -@ 8 -o 4.HISAT_mapping_result/ERR188044_chrX.bam
hisat2 -p 8 --dta -x 1.Genome_Index/chrX_tran -1 2.FASTQ_data/ERR188337_chrX_1.fastq.gz -2 2.FASTQ_data/ERR188337_chrX_2.fastq.gz --summary-file 4.HISAT_mapping_result/ERR188337_chrX_summary.txt | samtools sort -@ 8 -o 4.HISAT_mapping_result/ERR188337_chrX.bam
hisat2 -p 8 --dta -x 1.Genome_Index/chrX_tran -1 2.FASTQ_data/ERR188273_chrX_1.fastq.gz -2 2.FASTQ_data/ERR188273_chrX_2.fastq.gz --summary-file 4.HISAT_mapping_result/ERR188273_chrX_summary.txt | samtools sort -@ 8 -o 4.HISAT_mapping_result/ERR188273_chrX.bam
比对结束后,hisat2会生成summary文件(如果使用上面的两步法,这个summary会打印在终端里面),内容含义可以看看下面我写的注释(下图是直接copy的官网中的图):
 整个hisat2的分析结果。最终的96.7%的比对结果就是去除所有没有比对上的结果。
step2. stringtie–转录本组装
组装没有啥好讲的,就是按照代码走流程就行。
stringtie -p 8 -G 0.FASTA_gtf_files/chrX.gtf -o 5.stringtie_assembl_result/ERR188454_chrX.gtf 4.HISAT_mapping_result/ERR188454_chrX.bam
stringtie -p 8 -G 0.FASTA_gtf_files/chrX.gtf -o 5.stringtie_assembl_result/ERR188401_chrX.gtf 4.HISAT_mapping_result/ERR188401_chrX.bam
stringtie -p 8 -G 0.FASTA_gtf_files/chrX.gtf -o 5.stringtie_assembl_result/ERR188257_chrX.gtf 4.HISAT_mapping_result/ERR188257_chrX.bam
stringtie -p 8 -G 0.FASTA_gtf_files/chrX.gtf -o 5.stringtie_assembl_result/ERR188234_chrX.gtf 4.HISAT_mapping_result/ERR188234_chrX.bam
stringtie -p 8 -G 0.FASTA_gtf_files/chrX.gtf -o 5.stringtie_assembl_result/ERR188428_chrX.gtf 4.HISAT_mapping_result/ERR188428_chrX.bam
stringtie -p 8 -G 0.FASTA_gtf_files/chrX.gtf -o 5.stringtie_assembl_result/ERR204916_chrX.gtf 4.HISAT_mapping_result/ERR204916_chrX.bam
stringtie -p 8 -G 0.FASTA_gtf_files/chrX.gtf -o 5.stringtie_assembl_result/ERR188245_chrX.gtf 4.HISAT_mapping_result/ERR188245_chrX.bam
stringtie -p 8 -G 0.FASTA_gtf_files/chrX.gtf -o 5.stringtie_assembl_result/ERR188104_chrX.gtf 4.HISAT_mapping_result/ERR188104_chrX.bam
stringtie -p 8 -G 0.FASTA_gtf_files/chrX.gtf -o 5.stringtie_assembl_result/ERR188383_chrX.gtf 4.HISAT_mapping_result/ERR188383_chrX.bam
stringtie -p 8 -G 0.FASTA_gtf_files/chrX.gtf -o 5.stringtie_assembl_result/ERR188044_chrX.gtf 4.HISAT_mapping_result/ERR188044_chrX.bam
stringtie -p 8 -G 0.FASTA_gtf_files/chrX.gtf -o 5.stringtie_assembl_result/ERR188337_chrX.gtf 4.HISAT_mapping_result/ERR188337_chrX.bam
stringtie -p 8 -G 0.FASTA_gtf_files/chrX.gtf -o 5.stringtie_assembl_result/ERR188273_chrX.gtf 4.HISAT_mapping_result/ERR188273_chrX.bam
step3. stringtie–转录本合并
合并需要提供一个txt文件,用于记录需要把哪些文件进行合并。上面的代码可以直接生成这个txt文件。
把代码生成的merge_list.txt文件copy到7.intermediate_files文件夹下,按照代码走流程就行。
stringtie --merge -p 8 -G 0.FASTA_gtf_files/chrX.gtf -o 5.stringtie_assembl_result/stringtie_merged.gtf 7.intermediate_files/merge_list.txt
step4. stringtie–定量
定量过程需要先使用stringtie进行每个样品的分析,再使用 prepDE.py 把所有结果合并到一个文件中。
stringtie -p 8 -e -G 5.stringtie_assembl_result/stringtie_merged.gtf -o 6.Quantify_result/ERR188454/ERR188454_chrX.gtf -A 6.Quantify_result/ERR188454/gene_abundances.tsv 4.HISAT_mapping_result/ERR188454_chrX.bam
stringtie -p 8 -e -G 5.stringtie_assembl_result/stringtie_merged.gtf -o 6.Quantify_result/ERR188401/ERR188401_chrX.gtf -A 6.Quantify_result/ERR188401/gene_abundances.tsv 4.HISAT_mapping_result/ERR188401_chrX.bam
stringtie -p 8 -e -G 5.stringtie_assembl_result/stringtie_merged.gtf -o 6.Quantify_result/ERR188257/ERR188257_chrX.gtf -A 6.Quantify_result/ERR188257/gene_abundances.tsv 4.HISAT_mapping_result/ERR188257_chrX.bam
stringtie -p 8 -e -G 5.stringtie_assembl_result/stringtie_merged.gtf -o 6.Quantify_result/ERR188234/ERR188234_chrX.gtf -A 6.Quantify_result/ERR188234/gene_abundances.tsv 4.HISAT_mapping_result/ERR188234_chrX.bam
stringtie -p 8 -e -G 5.stringtie_assembl_result/stringtie_merged.gtf -o 6.Quantify_result/ERR188428/ERR188428_chrX.gtf -A 6.Quantify_result/ERR188428/gene_abundances.tsv 4.HISAT_mapping_result/ERR188428_chrX.bam
stringtie -p 8 -e -G 5.stringtie_assembl_result/stringtie_merged.gtf -o 6.Quantify_result/ERR204916/ERR204916_chrX.gtf -A 6.Quantify_result/ERR204916/gene_abundances.tsv 4.HISAT_mapping_result/ERR204916_chrX.bam
stringtie -p 8 -e -G 5.stringtie_assembl_result/stringtie_merged.gtf -o 6.Quantify_result/ERR188245/ERR188245_chrX.gtf -A 6.Quantify_result/ERR188245/gene_abundances.tsv 4.HISAT_mapping_result/ERR188245_chrX.bam
stringtie -p 8 -e -G 5.stringtie_assembl_result/stringtie_merged.gtf -o 6.Quantify_result/ERR188104/ERR188104_chrX.gtf -A 6.Quantify_result/ERR188104/gene_abundances.tsv 4.HISAT_mapping_result/ERR188104_chrX.bam
stringtie -p 8 -e -G 5.stringtie_assembl_result/stringtie_merged.gtf -o 6.Quantify_result/ERR188383/ERR188383_chrX.gtf -A 6.Quantify_result/ERR188383/gene_abundances.tsv 4.HISAT_mapping_result/ERR188383_chrX.bam
stringtie -p 8 -e -G 5.stringtie_assembl_result/stringtie_merged.gtf -o 6.Quantify_result/ERR188044/ERR188044_chrX.gtf -A 6.Quantify_result/ERR188044/gene_abundances.tsv 4.HISAT_mapping_result/ERR188044_chrX.bam
stringtie -p 8 -e -G 5.stringtie_assembl_result/stringtie_merged.gtf -o 6.Quantify_result/ERR188337/ERR188337_chrX.gtf -A 6.Quantify_result/ERR188337/gene_abundances.tsv 4.HISAT_mapping_result/ERR188337_chrX.bam
stringtie -p 8 -e -G 5.stringtie_assembl_result/stringtie_merged.gtf -o 6.Quantify_result/ERR188273/ERR188273_chrX.gtf -A 6.Quantify_result/ERR188273/gene_abundances.tsv 4.HISAT_mapping_result/ERR188273_chrX.bam
这样定量完后,会生成多个文件夹,每个文件夹都会包含一个gtf和一个tsv文件,这时stringtie提供了一个 prepDE.py 脚本,可以把所有的文件进行合并。下载下来这个文件,放入6.Quantify_result文件夹。同时把上面python代码生成的sample_list.txt也放到6.Quantify_result文件夹中。
prepDE.py (python3) : http://ccb.jhu.edu/software/stringtie/dl/prepDE.py3

在6.Quantify_result文件夹中打开终端,输入:
python3 prepDE.py -i sample_list.txt
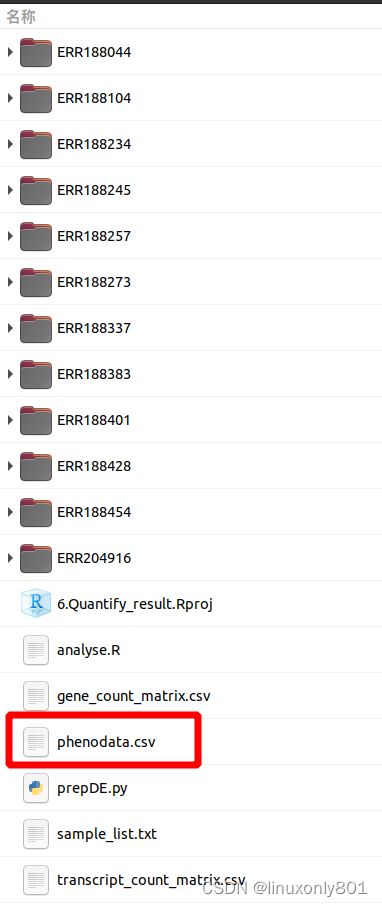
运行结束后,会在同一个文件夹下再生成gene_count_matrix.csv和transcript_count_matrix.csv两个文件:

step5. DESeq2分析与画图
当拿到了上面两个csv文件后,就可以使用DESeq2进行分析了,参考stringtie官方manual的分析流程:
分析时,尽量把当前文件夹建立成一个R project,这样有利于进行分析和后续的交流。新建一个analyse.R的代码文件。
在使用DESeq2时,需要给软件提供一个Phenodata.csv(名字随意,主要是提供分析用的列名),在这个例子中,Phenodata.csv的内容如下:
"ids","sex","population"
"ERR188044_chrX","male","YRI"
"ERR188104_chrX","male","YRI"
"ERR188234_chrX","female","YRI"
"ERR188245_chrX","female","GBR"
"ERR188257_chrX","male","GBR"
"ERR188273_chrX","female","YRI"
"ERR188337_chrX","female","GBR"
"ERR188383_chrX","male","GBR"
"ERR188401_chrX","male","GBR"
"ERR188428_chrX","female","GBR"
"ERR188454_chrX","male","YRI"
"ERR204916_chrX","female","YRI"
# 导入DESeq2包
> library("DESeq2")
# 加载上面计算出的gene_count_matrix.csv,并指定列。
> countData <- as.matrix(read.csv("gene_count_matrix.csv", row.names="gene_id"))
> # 加载phenodata,并指定列。
> colData <- read.csv('phenodata.csv', row.names=1)
# 查检一下countData的列是否与colData的行是相等的且顺序相同。
> all(rownames(colData) == colnames(countData))  # 输出结果需要为:TRUE
> countData <- countData[, rownames(colData)]
> all(rownames(colData) == colnames(countData))  # 输出结果需要为:TRUE
# 使用DESeqDataSetFromMatrix创建一个DESeqDataSet。
> dds <- DESeqDataSetFromMatrix(countData = countData,
        colData = colData, design = ~ sex)
# 运行DESeq2的默认分析流程,并把结果赋值。
> dds <- DESeq(dds)
> res <- results(dds)
# 把运算结果按照你想要的方式进行排序。
> orderedres <- res[order(res$padj),]
# 直接在Rstudio画出火山图。EnhancedVolcano的使用方式建议参考官网说明:https://www.bioconductor.org/packages/release/bioc/html/EnhancedVolcano.html
# 还有其它的包可以使用,自己可以多研究一下
> library(EnhancedVolcano)
> EnhancedVolcano(ordered_res, lab = rownames(res), x = 'log2FoldChange', y = 'pvalue',
                pCutoff = 10e-2, xlim = c(-5,5), ylim = c(0, 5))
# 如果需要把结果输入,就使用下面的代码把分析结果输出成csv文件。
> analysed_res <- as.data.frame(orderedres)
> analysed_res$genename <- rownames(analysed_res)
> write.table(analysed_res, file = 'analysedData.csv', sep=',',row.names = F, col.names = T)
最终输出的结果如下:

可以通过修改EnhancedVolcano中的参数,从而达到自己想要的结果。