python :matplotlib绘折线图(基础一)
1.首先导入模块,框定出x和y轴的范围,生成简单的折线图
# 导入matplotlib的pyplot模块
import matplotlib.pyplot as plt
import random

x = range(0, 5)  # 定义x轴的范围0-4
y = [random.randint(1, 5) for i in range(5)]  # y轴范围,y的值由1-5的随机数生成
plt.plot(x, y)

plt.show()
plt.close()
需要注意的是,在pycharm中,如果不加上plt.show(),图形无法显示 ,plt.close()是清空画图的数据,为了避免出现上一次的运行结果。
2.下一步,就可以设置折线图的标题(title)、横纵坐标(xlabel,ylabel)的名称
plt.title('fig.1')
plt.xlabel('x-1')
plt.ylabel('y-1')
3.中文显示问题
Matplotlib默认只显示英文字体,遇到中文字体会显示长方形的方框,解决办法一般有两种:
"""方法一:中文标题问题"""
# 解决中文显示问题
# plt.rcParams['font.sans-serif'] = ['SimHei']  # 用来正常显示中文标签,SimHei指定具体字体
# plt.rcParams['axes.unicode_minus'] = False  # 正常显示负号

"""方法二:中文标题问题"""
x_label = list(x)
x_label_show = ["10点{}分".format(i) for i in range(60)]
# rotation旋转的度数
plt.xticks(x_label[::3], x_label_show[::3], rotation=-45, fontproperties='KaiTi', color='green')
plt.ylabel('数量', fontproperties='KaiTi', color='green')
plt.plot(x, y)
方法一可通过plt.rcParams['font.sans-serif'] = ['SimHei']指定具体的字体,方法二可通过fontproperties指定具体字体,rotation指定坐标值旋转的角度 ,color指定具体的颜色
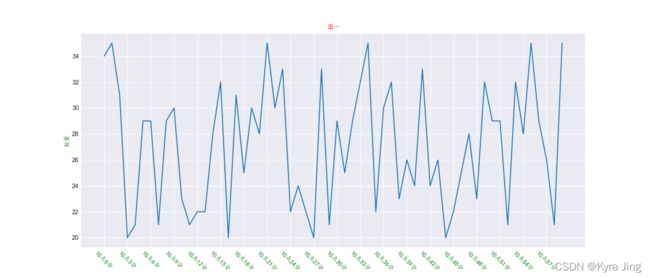
完整代码
# 导入pyplot绘图包
import matplotlib.pyplot as plt
import random

x = range(0, 60)
y = [random.randint(20, 35) for i in range(60)]  # 生成随机数

# 指定全局画图主题
""" 所有画图主题
    ['Solarize_Light2', '_classic_test_patch', 'bmh', 'classic', 'dark_background',
    'fast', 'fivethirtyeight', 'ggplot', 'grayscale', 'seaborn', 'seaborn-bright',
    'seaborn-colorblind', 'seaborn-dark', 'seaborn-dark-palette', 'seaborn-darkgrid',
    'seaborn-deep', 'seaborn-muted', 'seaborn-notebook', 'seaborn-paper', 'seaborn-pastel',
    'seaborn-poster', 'seaborn-talk', 'seaborn-ticks', 'seaborn-white', 'seaborn-whitegrid',
    'tableau-colorblind10']
"""
plt.style.use('seaborn-darkgrid')
print(plt.style.available)  # 查看所有全局画图主题

fig = plt.figure(figsize=(18, 6), dpi=80)  # 创建画布
plt.title('图一', fontproperties='KaiTi', color='red')

"""方法一:中文标题问题"""
# 解决中文显示问题
# plt.rcParams['font.sans-serif'] = ['SimHei']  # 用来正常显示中文标签,SimHei指定具体字体
# plt.rcParams['axes.unicode_minus'] = False  # 正常显示负号

"""方法二:中文标题问题"""
x_label = list(x)
x_label_show = ["10点{}分".format(i) for i in range(60)]
# rotation旋转的度数
plt.xticks(x_label[::3], x_label_show[::3], rotation=-45, fontproperties='KaiTi', color='green')
plt.ylabel('数量', fontproperties='KaiTi', color='green')
plt.plot(x, y)

plt.show()
plt.close()  # 避免出现上一次的运行结果
结果图
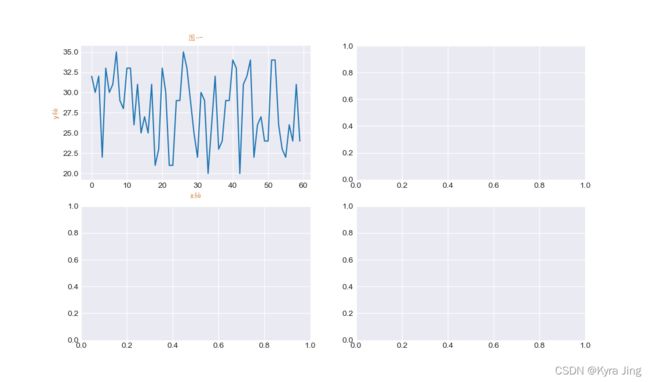
4.若要在一个画布上创建多个子图,可使用add_subplot()进行添加,其余设置同上
# 导入pyplot绘图包
import matplotlib.pyplot as plt
import random

x = range(0, 60)
y = [random.randint(20, 35) for i in range(60)]  # 生成随机数

plt.style.use('seaborn-darkgrid')  # 指定画图主题

fig = plt.figure(figsize=(16, 8))  # 创建画布
# 1. 逐个添加
ax = fig.add_subplot(2, 2, 1)  # 指定图形显示位置(子图)
plt.plot(x, y)  # 绘制图形

ax2 = fig.add_subplot(2, 2, 2)
ax3 = fig.add_subplot(2, 2, 3)
ax4 = fig.add_subplot(2, 2, 4)
# 2. 使用循环添加子图
"""for i in range(1, 5):
    ax = fig.add_subplot(2, 2, i)  # 创建子图"""

# 设置子图的表名和轴标签
ax.set_title('图一', fontproperties='KaiTi', color='peru')
ax.set_xlabel('x轴', fontproperties='KaiTi', color='peru')
ax.set_ylabel('y轴', fontproperties='KaiTi', color='peru')

plt.show()
plt.close()
结果
在绘制子图时,还有很多其他的参数
matplotlib是比较底层的绘图工具,几乎所有的元素都可以 重新设置,因此函数和接口较多,可分类记忆。


