TensorRT部署总结
文章目录
-
-
- 1、什么是TensorRT
- 2、流程
- 3、推荐方案
-
- 3.1 视频作者的方案
- 3.2 方案优缺点
- 3.3 方案具体过程
- 4、如何正确导出ONNX,并在C++中推理
-
- 4.1 指定维度时不加int与加int
-
- 4.1.1 指定维度时不加int
- 4.1.2 指定维度时加int
- 5、如何在C++中使用起来
- 6、动态batch和动态宽高的处理方式
-
- 6.1 动态batch的指定
- 6.2 动态宽高的指定
- 7、实现一个自定义插件
-
1、什么是TensorRT
2、流程
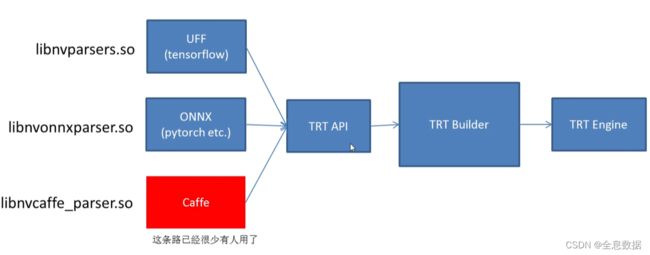
如果使用pytorch,通常使用ONNX,也就是中间一条方案。
3、推荐方案
3.1 视频作者的方案
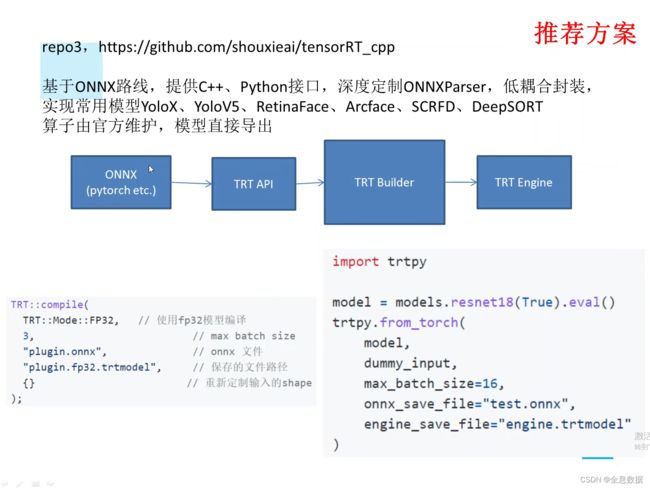
因为由pytorch到ONNX由pytorch官方维护,并且更新频率较快,由ONNX到TensorRT由TensorRT官方维护,所以采用下面的方案,GitHub地址:链接
3.2 方案优缺点
3.3 方案具体过程
4、如何正确导出ONNX,并在C++中推理
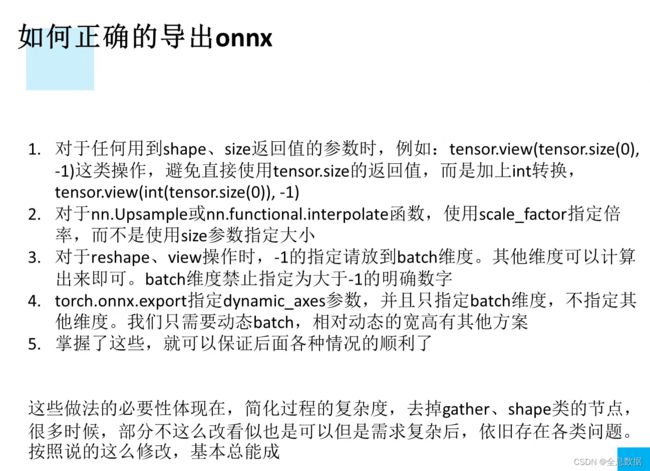
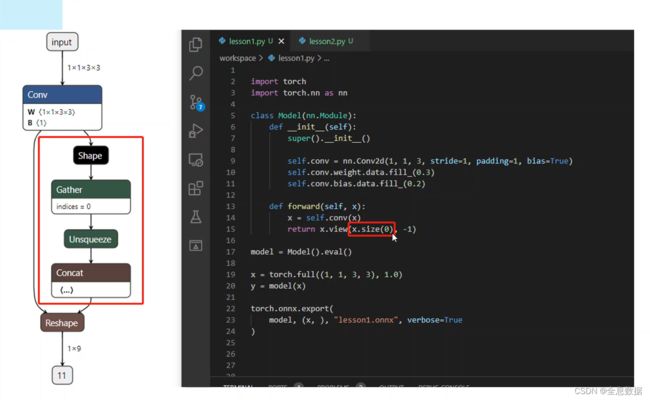
对于第一点:是因为如果写成size或shape返回的参数时,会造成pytorch对size的跟踪,生成gather和shape等节点。
4.1 指定维度时不加int与加int
4.1.1 指定维度时不加int
指定维度时不加int,会生成shape、gather、unsqueeze、concat等节点
代码:
import torch
import torch.nn as nn


class Module(nn.Module):
    def __init__(self):
        super(Module, self).__init__()
        self.conv = nn.Conv2d(1, 1, kernel_size=3, stride=1, padding=1, bias=True)
        self.conv.weight.data.fill_(0.3)
        self.conv.bias.data.fill_(0.2)

    def forward(self, x):
        x = self.conv(x)
        return x.view(x.size(0), -1)


model = Module().eval()
x = torch.full((1, 1, 3, 3), 1.0)
y = model(x)

torch.onnx.export(model, (x,), "lesson1.onnx", verbose=True)
4.1.2 指定维度时加int
代码:
import torch
import torch.nn as nn


class Module(nn.Module):
    def __init__(self):
        super(Module, self).__init__()
        self.conv = nn.Conv2d(1, 1, kernel_size=3, stride=1, padding=1, bias=True)
        self.conv.weight.data.fill_(0.3)
        self.conv.bias.data.fill_(0.2)

    def forward(self, x):
        x = self.conv(x)
        return x.view(-1, int(x.numel()//x.size(0)))


model = Module().eval()
x = torch.full((1, 1, 3, 3), 1.0)
y = model(x)

torch.onnx.export(model, (x,), "lesson1.onnx", verbose=True)
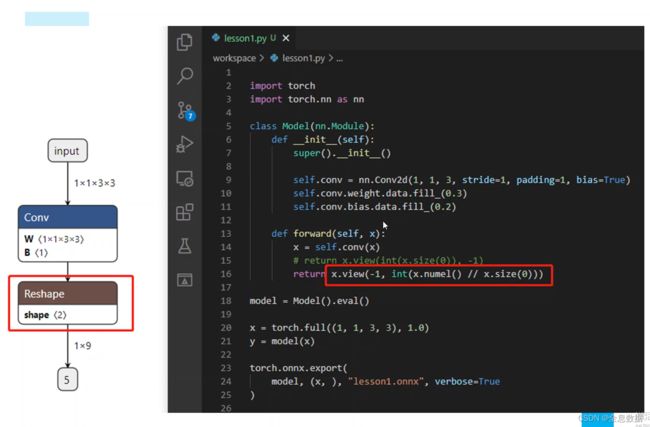
使用正确导出ONNX的第1、3条,batch指定为-1,其余维度指定前面加上 int;
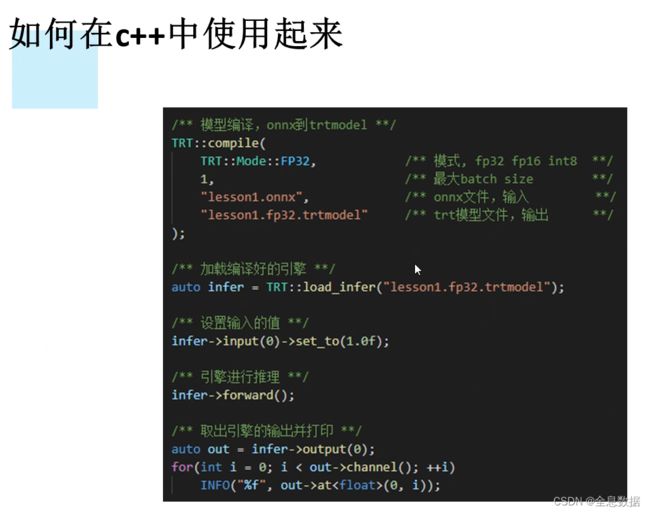
5、如何在C++中使用起来
6、动态batch和动态宽高的处理方式
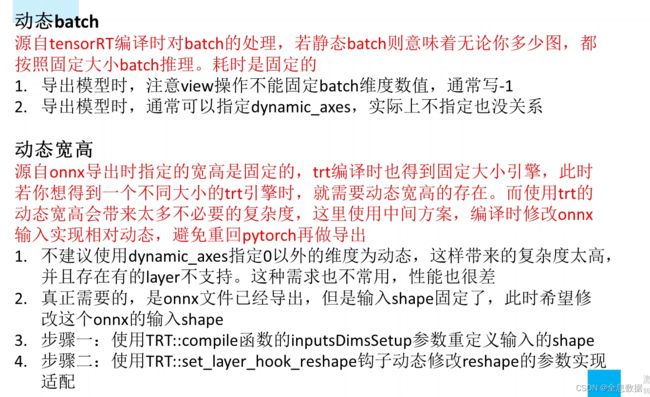
关于动态batch,因为tensorRT对静态batch的处理,即使设的batch是32,如果输入的图片是1或者是32都是按32来处理的,所以耗时是固定的,且缺少灵活性。
关于动态宽高,如果使用trt的动态宽高,即是说可以接收分辨率输入为320×320、640×640的图片,这样做灵活性增高但复杂性也在增高。所以采用在编译时修改ONNX的输入实现相对动态,避免重回pytorch再做导出的操作。
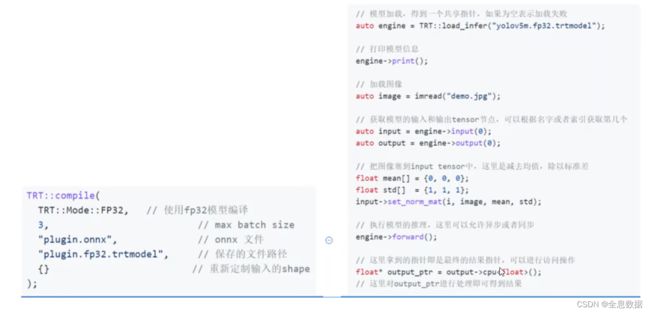
如下图,在 {} 修改输入的shape。

视频也说到:一个trt引擎可以处理多个分辨率大小的图片是没有意义的,因为复杂度会增高,效率也会大打折扣,所以一个引擎一个固定大小的输入分辨率即可。
不建议使用dynamic_axes指定0意外的维度为动态,意思是说:batch维度为动态指定,指定为-1,气态维度固定大小即可。
6.1 动态batch的指定
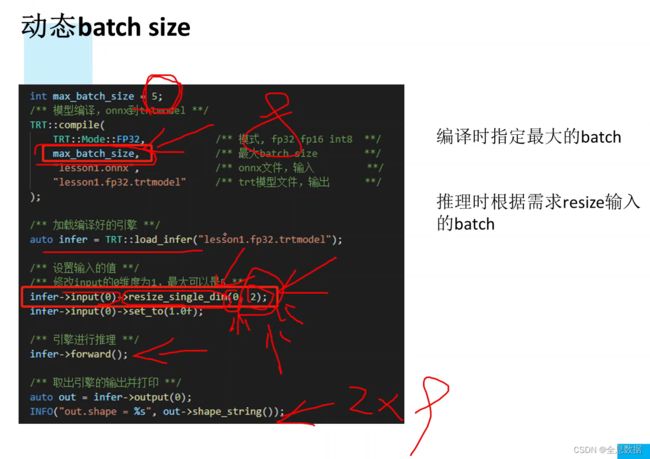
编译时指定最大的batch,上图指定的最大batch为5,推理时使用的是2。
resize_single_dim(0, 2),指定单个维度,0:第一个维度即batch,2:指定batch为2。
6.2 动态宽高的指定
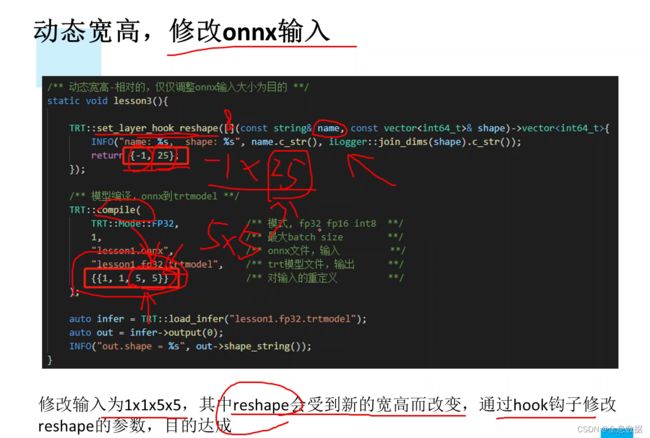
修改两个地方,一个是return返回,-1指定batch,25是5×5的结果;编译时也修改为{{1,1,5,5}}
7、实现一个自定义插件
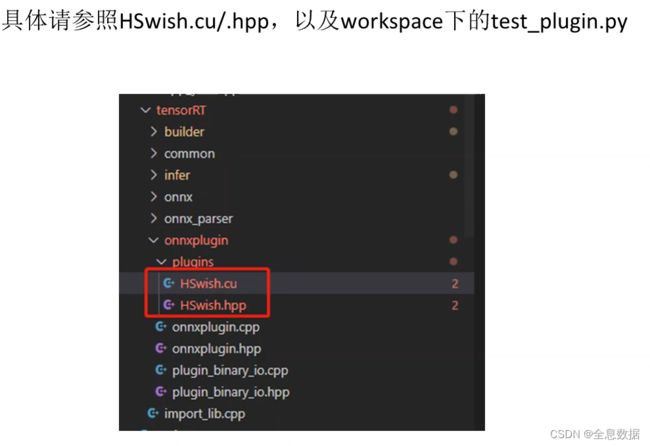
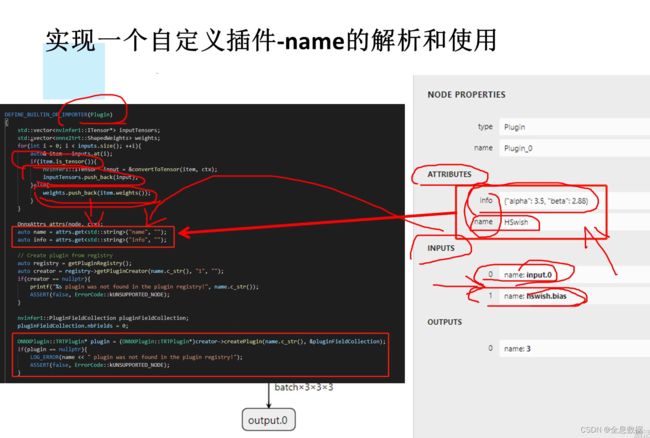
首先是test_plugin.py导出ONNX,再调用这些插件。先看一下test_plugin.py,
代码:
import torch
import torch.nn.functional as F
import torch.nn as nn
import json


class HSwishImplementation(torch.autograd.Function):

    # 主要是这里,对于autograd.Function这种自定义实现的op,只需要添加静态方法symbolic即可,
    # 除了g以外的参数应与forward函数的除ctx以外完全一样
    # 这里演示了input->作为tensor输入,bias->作为参数输入,两者将会在tensorRT里面具有不同的处理方式
    # 对于附加属性(attributes),以 "名称_类型简写" 方式定义,类型简写,
    # 请参考:torch/onnx/symbolic_helper.py中_parse_arg函数的实现【from torch.onnx.symbolic_helper import _parse_arg】
    # 属性的定义会在对应节点生成attributes,并传给tensorRT的onnx解析器做处理
    @staticmethod
    def symbolic(g, input, bias):
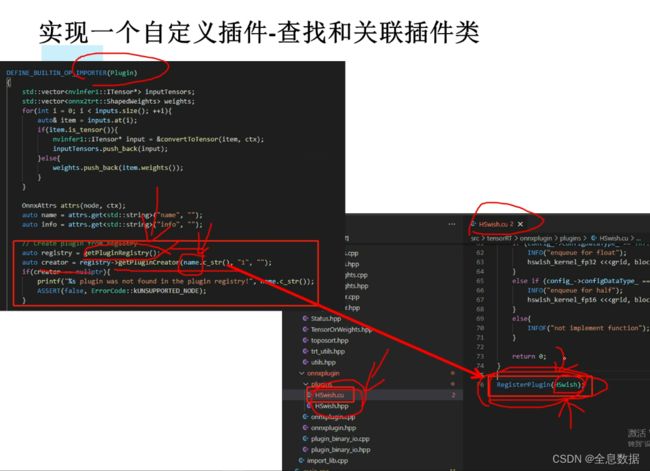
        # 如果配合当前tensorRT框架,则必须名称为Plugin,参考:tensorRT/src/tensorRT/onnx_parser/builtin_op_importers.cpp的160行定义
        # 若你想自己命名,可以考虑做类似修改即可
        #
        # name_s表示,name是string类型的,对应于C++插件的名称,参考:tensorRT/src/tensorRT/onnxplugin/plugins/HSwish.cu的82行定义的名称
        # info_s表示,info是string类型的,通常我们可以利用json.dumps,传一个复杂的字符串结构,然后在CPP中json解码即可。参考:
        #             sxai/tensorRT/src/tensorRT/onnxplugin/plugins/HSwish.cu的39行
        return g.op("Plugin", input, bias, name_s="HSwish", info_s=json.dumps({"alpha": 3.5, "beta": 2.88}))

    # 这里的forward只是为了让onnx导出时可以执行,实际上写与不写意义不大,只需要返回同等的输出维度即可
    @staticmethod
    def forward(ctx, i, bias):
        ctx.save_for_backward(i)
        return i * F.relu6(i + 3) / 6

    # 这里省略了backward


class MemoryEfficientHSwish(nn.Module):
    def __init__(self):
        super(MemoryEfficientHSwish, self).__init__()

        # 这里我们假设有bias作为权重参数
        self.bias = nn.Parameter(torch.zeros((3, 3, 3, 3)))
        self.bias.data.fill_(3.15)

    def forward(self, x):
        # 我们假设丢一个bias进去
        return HSwishImplementation.apply(x, self.bias)


class FooModel(torch.nn.Module):
    def __init__(self):
        super(FooModel, self).__init__()
        self.hswish = MemoryEfficientHSwish()

    def forward(self, input1, input2):
        return F.relu(input2 * self.hswish(input1))


dummy_input1 = torch.zeros((1, 3, 3, 3))
dummy_input2 = torch.zeros((1, 3, 3, 3))
model = FooModel()

# 这里演示了2个输入的情况,实际上你可以自己定义几个输入
torch.onnx.export(
    model,
    (dummy_input1, dummy_input2),
    'hswish.plugin.onnx',
    input_names=["input.0", "input.1"],
    output_names=["output.0"],
    verbose=True,
    opset_version=11,  # >=11支持性更好,默认等于9
    # 动态指定全为batch
    dynamic_axes={"input.0": {0: "batch"}, "input.1": {0: "batch"}, "output.0": {0: "batch"}},
    enable_onnx_checker=False  # 作为插件而言老是报错,所以改为False
)
print("Done")
输出:
其实就是先使用test_plugin.py文件先导出ONNX文件,再用tensorRT进行编译和推理,
#include 参考:哔站视频链接


