- Anaconda 详细下载与安装教程
Anaconda详细下载与安装教程1.简介Anaconda是一个用于科学计算的开源发行版,包含了Python和R的众多常用库。它还包括了conda包管理器,可以方便地安装、更新和管理各种软件包。2.下载Anaconda2.1访问官方网站首先,打开浏览器,访问Anaconda官方网站。2.2选择适合的版本在页面中,你会看到两个主要的下载选项:AnacondaIndividualEdition:适用于
- AIGC工具与软件开发流程的深度集成方案
Irene-HQ
软件开发测试AIGC测试工具githubAIGC程序人生面试
一、代码开发环节集成路径环境配置标准化安装AIGC工具包并配置环境变量(如设置AIGC_TOOL_PATH),确保团队开发环境一致。在IDE插件市场安装Copilot等工具,实现编码时实时建议调用。人机协作新模式需求解析:上传PRD文档,AI自动提取业务规则生成类结构(如支付模块的PaymentService雏形)。代码补全:输入注释//JWT验证中间件,生成OAuth2.0
- 个人日记本小程序开发方案(使用IntelliJ IDEA)
HH予
嵌入式驱动工程项目开发intellij-ideajavaide
个人日记本小程序开发方案(使用IntelliJIDEA)一、项目创建与环境配置1.新建项目打开IDEA→NewProject→JavaFX选择JDK11+版本添加必要依赖:<groupId
- 2.4 基于dpdk的用户态协议栈的实现
百亿苍狗
高性能网络设计专栏开发语言网络
操作系统PosixAPI所提供的网络接口,数据收发是基于用户态与内核态的频繁切换实现。而dpdk实现了绕过内核监管,直接在用户态访问网络硬件,避免频繁状态切换。DPDK安装与配置虚拟机环境配置检查是否支持多队列网卡cat/proc/interrupts|grepens33(获取整个机器的终端),结果19:4202120IO-APIC19-fasteoiens33,不支持多队列网卡。虚拟机关机,修改
- 在指定conda 环境里安装 jupyter 和 python kernel的方法
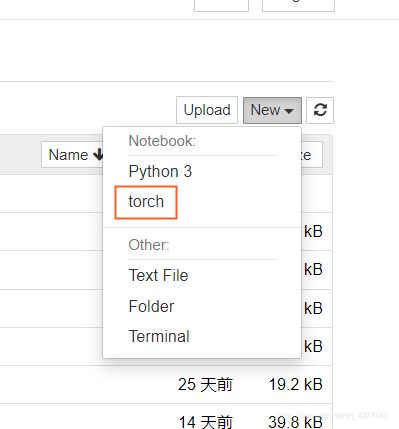
在Conda的指定环境中安装Jupyter和PythonKernel是一个常见操作,以下是详细步骤,确保在指定环境中正确配置Jupyter和PythonKernel:1.准备工作确保已安装Anaconda或Miniconda,Conda环境管理工具可用。确认已创建或计划使用的Conda环境。2.步骤:安装Jupyter和PythonKernel步骤1:创建或激活目标Conda环境创建新环境(如果尚
- pycharm无法识别pip安装的包
在使用conda创建一个新的环境后,有些包通过pip的方式安装更方便有效,若在pip安装后,遇到该环境没有此包,或pycharm监测不到此包,通常是pip的环境指向有问题。解决措施:#首先检查当前pip的指向whichpip'若输出为/home/username/anaconda/bin/pip,则说明当前pip指向有问题,处于base环境中'#退出当前环境condadeactivateyourc
- jetson agx orin 刷机、cuda、pytorch配置指南【亲测有效】
jetsonagxorin刷机指南注意事项刷机具体指南cuda环境配置指南Anconda、Pytorch配置注意事项1.使用设备自带usbtoc的传输线时,注意c口插到orin左侧的口,右侧的口不支持数据传输;2.刷机时需准备ubuntu系统,可以是虚拟机,注意安装SDKManager刷机时,JetPack版本要选对,JetPack6.0的对应ubuntu22,cuda12版本,对应pytorch
- Rust 安装与环境配置(超详细教程,零基础向)
人才程序员
杂谈rust开发语言后端爬虫swooleflaskmysql
文章目录Rust安装与环境配置(超详细教程,零基础向)一、Rust安装前的准备Rust支持的系统平台:二、安装Rust(不同平台)✅1.Windows系统1.1安装Rustup1.2等待安装完成✅2.macOS系统2.1安装Homebrew(如果尚未安装)2.2使用Homebrew安装rustup:✅3.Linux系统三、Rust工具介绍1.`rustc`:Rust编译器2.`cargo`:Rus
- C++交叉编译工具链制作以及QT交叉编译环境配置
三雷科技
c++qt数据库交叉编译
https://github.com/crosstool-ng/crosstool-ng/releasesC++交叉编译工具链制作以及QT交叉编译环境配置1源码构建2使用命令2.1查看列表2.2查看配置2.3配置2.4编译2.5编译完成后问题总结configure:error:missingrequiredtool:makeinfoconfigure:error:missingrequiredto
- 零代码玩转大模型!LLaMA Factory:你的专属模型精修师
jane_xing
人工智能llama
你是否曾对大语言模型(LLM)的强大能力心驰神往,却苦于以下难题?想定制专属模型?微调代码看不懂,环境配置太复杂…硬件资源有限?动辄需要数张A100,普通设备望而却步…中文任务不给力?原生模型中文理解弱,效果难达预期…部署门槛高?模型优化、压缩、服务化步步是坎?好消息是:LLaMAFactory来拯救你啦!它就像一家功能齐全的“模型精修店”,让你无需深厚AI功底,也能轻松定制、优化和部署大模型!一
- Node.js安装及环境配置完全指南(手把手保姆级教程)
Cyb3rMagnet
node.js其他
文章目录一、为什么你的开发环境总出问题?二、安装包去哪下才靠谱?1.Windows用户看这里2.Mac用户专属通道3.Linux用户命令行秘籍三、环境配置防坑指南1.PATH变量自查(重要!)2.Windows环境变量手动配置3.Mac/Linux用户看这里四、npm加速大法1.换国内镜像源(速度提升10倍!)2.安装cnpm(可选)五、版本管理神器nvm1.安装nvm2.常用命令六、常见报错急救
- python虚拟环境
#列出虚拟环境列表python3-mvenv--list#创建python虚拟环境python3-mvenv虚拟环境名称#激活ptyhon虚拟环境source虚拟环境名称/bin/activate#python虚拟环境配置pip源vim虚拟环境名称/pip.conf[global]index-url=http://mirrors.aliyun.com/pypi/simple/[install]tr
- 基于LIDC-IDRI肺结节肺癌数据集的人工智能深度学习分类良性和恶性肺癌(Python 全代码)全流程解析(二)
基于LIDC-IDRI肺结节肺癌数据集的人工智能深度学习分类良性和恶性肺癌(Python全代码)全流程解析(二)1环境配置和数据集预处理1.1环境配置1.1数据集预处理2深度学习模型训练和评估2.1深度学习模型训练2.1深度学习模型评估笑话一则开心一下喽完整代码如下:模型文件如下深度学习模型讲解---待续第一部分内容的传送门第三部分传送门1环境配置和数据集预处理1.1环境配置环境配置建议使用ana
- Text2Reward学习笔记
1.提示词请问,“glew”是一个RL工程师常用的工具库吗?请问,thiscodebase主要是做什么用的呀?1.1解释代码是否可以请您根据thiscodebase的主要功能,参考PyTorch的文档格式和文档风格,使用Markdown格式为选中的代码行编写一段相应的文档说明呢?2.项目环境配置2.1新建环境[official]2.1.1Featurizecondacreate-p~/work/d
- 大模型学习应用 5: Vercel 部署 Python FastAPI 项目完整指南
大地之灯
大模型应用与学习学习pythonfastapi大模型应用开发github
目录Vercel部署PythonFastAPI项目完整指南一、项目代码结构介绍1.1项目目录结构1.2核心文件代码解析1.2.1FastAPI主应用(`api/app.py`)1.2.2基础Python函数(`api/hello.py`)1.2.3依赖配置(`requirements.txt`)1.2.4Python环境配置(`Pipfile`)1.2.5路由配置(`vercel.json`)二、
- Java编程从入门到精通:全栈学习路径与实战案例指南
AI编程员
001AI传统&编程语言002AI编程工具汇总003AI编程作品汇总人工智能深度学习AI编程知识图谱需求分析
Java编程从入门到精通:全栈学习路径与实战案例指南一、入门基础:环境搭建与核心语法1.1开发环境配置(2025最新版)JDK17LTS:长期支持版本,提供模块化系统(JPMS)和文本块等新特性开发工具:IntelliJIDEA(智能代码补全)或VSCode+Java扩展包环境验证:java-version#输出:openjdk17.0.101.2基础语法精要数据类型与运算符://文本块(Java
- 云原生信息提取系统:容器化流程与CI_CD集成实践
一、问题引出:自动化信息获取为何难以工程化?在实际开发中,我们经常需要对互联网页面进行结构解析与内容提取,但这些任务常常陷入以下困境:本地测试没问题,一旦部署到线上环境便频繁出错;环境配置不一致导致执行失败;内容接口更新频繁,人工维护成本高;无法做到自动更新与持续运行;对接口访问策略缺乏灵活适配手段。这说明,仅靠“能运行的脚本”远远不够,信息提取任务也需要标准化的开发、测试与交付机制。二、真实挑战
- Spring Boot 多环境配置详解
白仑色
Spring系列springboot后端java配置管理微服务架构
关键词:SpringBoot、多环境配置、application.yml、profile、dev、test、prod✅摘要在实际项目开发中,我们通常需要为不同的运行环境(如开发、测试、生产)配置不同的参数。SpringBoot提供了强大的多环境配置支持机制,通过application-{profile}.yml或application-{profile}.properties文件,我们可以轻松实现
- Scrapy分布式爬虫进阶:动态代理与并发优化实战
Kelaru
pythonprojectscrapy分布式爬虫python
写在前面。。。继“动态网页”“登录网站”“经验总结”“分布式爬虫”后,本篇献上Scrapy-Redis进阶实战,基于QuotestoScrape,聚焦动态代理池和并发优化,代码简洁,经验点燃智慧,适合新手到老兵。准备工作1.环境配置Python:3.8+(推荐3.10)。依赖安装:pipinstallscrapy==2.11.2scrapy-redis==0.7.4redis==5.0.8requ
- windows下tokenizers-cpp编译
Wite_Chen
windowstokenizers-cpp
github地址一、rust环境配置参考二、编译1、修改cmakelists.txt,支持x86和64编译(tokenizers_c库,原始版本windows下只支持64位)修改顶层CMakeLists.txt文件(77行),支持x86编译elseif(CMAKE_SYSTEM_NAMESTREQUAL"Windows")#set(TOKENIZERS_CPP_CARGO_TARGETx86_64
- Conda安装与使用
目录一、软件安装及conda管理1.conda下载2.miniconda安装二、环境配置1.配置镜像:2.创建环境、移除环境:3.查看小环境4.进入、退出小环境5.查找并安装软件三、一步到位其他:参考资料:一、软件安装及conda管理conda可以来管理大量的生物信息学软件,或者想要复现一些文章中的实验结果需要不同环境的切换。1.conda下载(1)anacondaanaconda|镜像站使用帮助
- 0.基本环境配置、数据库介绍
ersanshi055
生信小菜鸟生信基本知识r语言生信分析
目录一、R与Rstudio的下载与安装二、R包安装与加载1.R包安装2.R包加载三、常用R包1.tidyverse2.ggplot2四、常用数据库1.GEO2.TGGA一、R与Rstudio的下载与安装介绍:Home-RDocumentation下载:R:CRAN:MirrorsRstudio:DownloadRStudio-PositR、Rstudio安装:根据指引安装,R和Rstudio比较占
- docker 无法拉取镜像解决方法
Sandman6z
docker容器运维
目录我在omv中通过后台页面拉取alist镜像总是失败,原因千奇百怪今天再战终于解决首先,到dockerhub找镜像和wiki进入docker账号设置找到里面提示了登录操作和密码命令行中执行后会提示成功之后按需配置代理,同时检查自己的配置检查Docker代理配置查看当前Docker环境配置systemctlshowdocker--propertyEnvironment2.查看代理配置文件cat/e
- [达梦数据库]达梦单节点安装
1环境配置1.1查看软硬件信息查看cpu信息:[root@localhost~]#lscpu[root@localhost~]#cat/proc/cpuinfo注意:特别是国产cpu,龙芯、飞腾查看内存信息:[root@localhost~]#free-m注意:数据库内存要至少1G,linuxswap分区一般是物理内存的1.5倍查看硬盘、分区信息[root@localhost~]#fdisk-l[
- 麒麟V10安装部署达梦数据库(单机版)
熊娜丽莎的微笑
数据库运维开发linux
提示:文章写完后,目录可以自动生成,如何生成可参考右边的帮助文档文章目录前言1.单机部署过程1.1部署规划1.2数据库软件安装及环境配置1.2.1操作系统配置1.2.2数据库软件安装1.3使用dminit工具初始化实例1.4注册服务并启动实例1.5登录数据库1.6归档配置1.7定制备份策略1.8数据库参数优化1.9配置sql日志1.10迁移信息统计查询总结前言麒麟V10安装部署达梦数据库单机安装的
- 深入解读MCP:构建低延迟、高吞吐量通信中间件
LCG元
MCP中间件
目录MCP核心架构设计MCP中间件架构图协议设计与消息格式MCP协议头结构消息体编码示例核心模块实现1.高性能网络层(基于Netty)2.零拷贝内存队列3.高效路由引擎4.消息持久化模块性能优化技巧1.批量合并写操作2.CPU缓存行优化3.内存池技术可靠性保障机制消息处理流程图实现代码:消息重试机制性能基准测试压测环境配置性能测试结果生产部署方案集群拓扑图部署脚本示例总结与最佳实践性能优化矩阵部署
- Cython提高破解和反编译的门槛
Cython提高破解和反编译的门槛文章目录Cython提高破解和反编译的门槛一、环境配置1.1安装必须的依赖1.2安装MicrosoftC++BuildTools二、修改代码后缀2.1将你的.py文件修改为.pyx文件2.2新建入口文件2.3编写setup.py2.4编译二进制模块2.5用PyInstaller分别打包入口文件三、清理无用文件,保留发布文件四、遇到的问题与解决方法4.1缺少库4.2
- Python 领域 vllm 安装与环境配置全攻略
Python编程之道
Python编程之道python开发语言ai
Python领域vllm安装与环境配置全攻略关键词:Python、vllm、安装、环境配置、深度学习摘要:本文围绕Python领域中vllm的安装与环境配置展开,全面且深入地介绍了vllm的相关知识。首先阐述了背景信息,包括目的范围、预期读者、文档结构和术语表。接着详细讲解了vllm的核心概念与联系,分析其核心算法原理并给出具体操作步骤,还引入了相关数学模型和公式进行说明。通过项目实战,提供代码实
- SpringBoot-18-企业云端开发实践之web开发基础
皮皮冰燃
SpringBootspringboot后端
文章目录1环境准备1.1Web应用概念介绍1.2开发环境配置2SpringBoot快速上手2.1SpringBoot介绍2.2新建项目示例2.2.1Springinitializr2.2.2pom.xml2.2.3HelloController.java2.3开发环境热部署2.3.1pom.xml2.3.2application.properties(可选)2.3.3IDEA工具设置热部署3web
- AI初学者如何对大模型进行微调?——零基础保姆级实战指南
仅需8GB显存,三步完成个人专属大模型训练四步实战:从环境配置到模型发布步骤1:云端环境搭建(10分钟)推荐使用阿里魔塔ModelScope免费GPU资源:#注册后执行环境初始化pip3install--upgradepippip3installbitsandbytes>=0.39.0gitclone--depth1https://github.com/hiyouga/LLaMA-Factory.
- java解析APK
3213213333332132
javaapklinux解析APK
解析apk有两种方法
1、结合安卓提供apktool工具,用java执行cmd解析命令获取apk信息
2、利用相关jar包里的集成方法解析apk
这里只给出第二种方法,因为第一种方法在linux服务器下会出现不在控制范围之内的结果。
public class ApkUtil
{
/**
* 日志对象
*/
private static Logger
- nginx自定义ip访问N种方法
ronin47
nginx 禁止ip访问
因业务需要,禁止一部分内网访问接口, 由于前端架了F5,直接用deny或allow是不行的,这是因为直接获取的前端F5的地址。
所以开始思考有哪些主案可以实现这样的需求,目前可实施的是三种:
一:把ip段放在redis里,写一段lua
二:利用geo传递变量,写一段
- mysql timestamp类型字段的CURRENT_TIMESTAMP与ON UPDATE CURRENT_TIMESTAMP属性
dcj3sjt126com
mysql
timestamp有两个属性,分别是CURRENT_TIMESTAMP 和ON UPDATE CURRENT_TIMESTAMP两种,使用情况分别如下:
1.
CURRENT_TIMESTAMP
当要向数据库执行insert操作时,如果有个timestamp字段属性设为
CURRENT_TIMESTAMP,则无论这
- struts2+spring+hibernate分页显示
171815164
Hibernate
分页显示一直是web开发中一大烦琐的难题,传统的网页设计只在一个JSP或者ASP页面中书写所有关于数据库操作的代码,那样做分页可能简单一点,但当把网站分层开发后,分页就比较困难了,下面是我做Spring+Hibernate+Struts2项目时设计的分页代码,与大家分享交流。
1、DAO层接口的设计,在MemberDao接口中定义了如下两个方法:
public in
- 构建自己的Wrapper应用
g21121
rap
我们已经了解Wrapper的目录结构,下面可是正式利用Wrapper来包装我们自己的应用,这里假设Wrapper的安装目录为:/usr/local/wrapper。
首先,创建项目应用
&nb
- [简单]工作记录_多线程相关
53873039oycg
多线程
最近遇到多线程的问题,原来使用异步请求多个接口(n*3次请求) 方案一 使用多线程一次返回数据,最开始是使用5个线程,一个线程顺序请求3个接口,超时终止返回 缺点 测试发现必须3个接
- 调试jdk中的源码,查看jdk局部变量
程序员是怎么炼成的
jdk 源码
转自:http://www.douban.com/note/211369821/
学习jdk源码时使用--
学习java最好的办法就是看jdk源代码,面对浩瀚的jdk(光源码就有40M多,比一个大型网站的源码都多)从何入手呢,要是能单步调试跟进到jdk源码里并且能查看其中的局部变量最好了。
可惜的是sun提供的jdk并不能查看运行中的局部变量
- Oracle RAC Failover 详解
aijuans
oracle
Oracle RAC 同时具备HA(High Availiablity) 和LB(LoadBalance). 而其高可用性的基础就是Failover(故障转移). 它指集群中任何一个节点的故障都不会影响用户的使用,连接到故障节点的用户会被自动转移到健康节点,从用户感受而言, 是感觉不到这种切换。
Oracle 10g RAC 的Failover 可以分为3种:
1. Client-Si
- form表单提交数据编码方式及tomcat的接受编码方式
antonyup_2006
JavaScripttomcat浏览器互联网servlet
原帖地址:http://www.iteye.com/topic/266705
form有2中方法把数据提交给服务器,get和post,分别说下吧。
(一)get提交
1.首先说下客户端(浏览器)的form表单用get方法是如何将数据编码后提交给服务器端的吧。
对于get方法来说,都是把数据串联在请求的url后面作为参数,如:http://localhost:
- JS初学者必知的基础
百合不是茶
js函数js入门基础
JavaScript是网页的交互语言,实现网页的各种效果,
JavaScript 是世界上最流行的脚本语言。
JavaScript 是属于 web 的语言,它适用于 PC、笔记本电脑、平板电脑和移动电话。
JavaScript 被设计为向 HTML 页面增加交互性。
许多 HTML 开发者都不是程序员,但是 JavaScript 却拥有非常简单的语法。几乎每个人都有能力将小的
- iBatis的分页分析与详解
bijian1013
javaibatis
分页是操作数据库型系统常遇到的问题。分页实现方法很多,但效率的差异就很大了。iBatis是通过什么方式来实现这个分页的了。查看它的实现部分,发现返回的PaginatedList实际上是个接口,实现这个接口的是PaginatedDataList类的对象,查看PaginatedDataList类发现,每次翻页的时候最
- 精通Oracle10编程SQL(15)使用对象类型
bijian1013
oracle数据库plsql
/*
*使用对象类型
*/
--建立和使用简单对象类型
--对象类型包括对象类型规范和对象类型体两部分。
--建立和使用不包含任何方法的对象类型
CREATE OR REPLACE TYPE person_typ1 as OBJECT(
name varchar2(10),gender varchar2(4),birthdate date
);
drop type p
- 【Linux命令二】文本处理命令awk
bit1129
linux命令
awk是Linux用来进行文本处理的命令,在日常工作中,广泛应用于日志分析。awk是一门解释型编程语言,包含变量,数组,循环控制结构,条件控制结构等。它的语法采用类C语言的语法。
awk命令用来做什么?
1.awk适用于具有一定结构的文本行,对其中的列进行提取信息
2.awk可以把当前正在处理的文本行提交给Linux的其它命令处理,然后把直接结构返回给awk
3.awk实际工
- JAVA(ssh2框架)+Flex实现权限控制方案分析
白糖_
java
目前项目使用的是Struts2+Hibernate+Spring的架构模式,目前已经有一套针对SSH2的权限系统,运行良好。但是项目有了新需求:在目前系统的基础上使用Flex逐步取代JSP,在取代JSP过程中可能存在Flex与JSP并存的情况,所以权限系统需要进行修改。
【SSH2权限系统的实现机制】
权限控制分为页面和后台两块:不同类型用户的帐号分配的访问权限是不同的,用户使
- angular.forEach
boyitech
AngularJSAngularJS APIangular.forEach
angular.forEach 描述: 循环对obj对象的每个元素调用iterator, obj对象可以是一个Object或一个Array. Iterator函数调用方法: iterator(value, key, obj), 其中obj是被迭代对象,key是obj的property key或者是数组的index,value就是相应的值啦. (此函数不能够迭代继承的属性.)
- java-谷歌面试题-给定一个排序数组,如何构造一个二叉排序树
bylijinnan
二叉排序树
import java.util.LinkedList;
public class CreateBSTfromSortedArray {
/**
* 题目:给定一个排序数组,如何构造一个二叉排序树
* 递归
*/
public static void main(String[] args) {
int[] data = { 1, 2, 3, 4,
- action执行2次
Chen.H
JavaScriptjspXHTMLcssWebwork
xwork 写道 <action name="userTypeAction"
class="com.ekangcount.website.system.view.action.UserTypeAction">
<result name="ssss" type="dispatcher">
- [时空与能量]逆转时空需要消耗大量能源
comsci
能源
无论如何,人类始终都想摆脱时间和空间的限制....但是受到质量与能量关系的限制,我们人类在目前和今后很长一段时间内,都无法获得大量廉价的能源来进行时空跨越.....
在进行时空穿梭的实验中,消耗超大规模的能源是必然
- oracle的正则表达式(regular expression)详细介绍
daizj
oracle正则表达式
正则表达式是很多编程语言中都有的。可惜oracle8i、oracle9i中一直迟迟不肯加入,好在oracle10g中终于增加了期盼已久的正则表达式功能。你可以在oracle10g中使用正则表达式肆意地匹配你想匹配的任何字符串了。
正则表达式中常用到的元数据(metacharacter)如下:
^ 匹配字符串的开头位置。
$ 匹配支付传的结尾位置。
*
- 报表工具与报表性能的关系
datamachine
报表工具birt报表性能润乾报表
在选择报表工具时,性能一直是用户关心的指标,但是,报表工具的性能和整个报表系统的性能有多大关系呢?
要回答这个问题,首先要分析一下报表的处理过程包含哪些环节,哪些环节容易出现性能瓶颈,如何优化这些环节。
一、报表处理的一般过程分析
1、用户选择报表输入参数后,报表引擎会根据报表模板和输入参数来解析报表,并将数据计算和读取请求以SQL的方式发送给数据库。
2、
- 初一上学期难记忆单词背诵第一课
dcj3sjt126com
wordenglish
what 什么
your 你
name 名字
my 我的
am 是
one 一
two 二
three 三
four 四
five 五
class 班级,课
six 六
seven 七
eight 八
nince 九
ten 十
zero 零
how 怎样
old 老的
eleven 十一
twelve 十二
thirteen
- 我学过和准备学的各种技术
dcj3sjt126com
技术
语言VB https://msdn.microsoft.com/zh-cn/library/2x7h1hfk.aspxJava http://docs.oracle.com/javase/8/C# https://msdn.microsoft.com/library/vstudioPHP http://php.net/manual/en/Html
- struts2中token防止重复提交表单
蕃薯耀
重复提交表单struts2中token
struts2中token防止重复提交表单
>>>>>>>>>>>>>>>>>>>>>>>>>>>>>>>>>>
蕃薯耀 2015年7月12日 11:52:32 星期日
ht
- 线性查找二维数组
hao3100590
二维数组
1.算法描述
有序(行有序,列有序,且每行从左至右递增,列从上至下递增)二维数组查找,要求复杂度O(n)
2.使用到的相关知识:
结构体定义和使用,二维数组传递(http://blog.csdn.net/yzhhmhm/article/details/2045816)
3.使用数组名传递
这个的不便之处很明显,一旦确定就是不能设置列值
//使
- spring security 3中推荐使用BCrypt算法加密密码
jackyrong
Spring Security
spring security 3中推荐使用BCrypt算法加密密码了,以前使用的是md5,
Md5PasswordEncoder 和 ShaPasswordEncoder,现在不推荐了,推荐用bcrpt
Bcrpt中的salt可以是随机的,比如:
int i = 0;
while (i < 10) {
String password = "1234
- 学习编程并不难,做到以下几点即可!
lampcy
javahtml编程语言
不论你是想自己设计游戏,还是开发iPhone或安卓手机上的应用,还是仅仅为了娱乐,学习编程语言都是一条必经之路。编程语言种类繁多,用途各 异,然而一旦掌握其中之一,其他的也就迎刃而解。作为初学者,你可能要先从Java或HTML开始学,一旦掌握了一门编程语言,你就发挥无穷的想象,开发 各种神奇的软件啦。
1、确定目标
学习编程语言既充满乐趣,又充满挑战。有些花费多年时间学习一门编程语言的大学生到
- 架构师之mysql----------------用group+inner join,left join ,right join 查重复数据(替代in)
nannan408
right join
1.前言。
如题。
2.代码
(1)单表查重复数据,根据a分组
SELECT m.a,m.b, INNER JOIN (select a,b,COUNT(*) AS rank FROM test.`A` A GROUP BY a HAVING rank>1 )k ON m.a=k.a
(2)多表查询 ,
使用改为le
- jQuery选择器小结 VS 节点查找(附css的一些东西)
Everyday都不同
jquerycssname选择器追加元素查找节点
最近做前端页面,频繁用到一些jQuery的选择器,所以特意来总结一下:
测试页面:
<html>
<head>
<script src="jquery-1.7.2.min.js"></script>
<script>
/*$(function() {
$(documen
- 关于EXT
tntxia
ext
ExtJS是一个很不错的Ajax框架,可以用来开发带有华丽外观的富客户端应用,使得我们的b/s应用更加具有活力及生命力。ExtJS是一个用 javascript编写,与后台技术无关的前端ajax框架。因此,可以把ExtJS用在.Net、Java、Php等各种开发语言开发的应用中。
ExtJs最开始基于YUI技术,由开发人员Jack
- 一个MIT计算机博士对数学的思考
xjnine
Math
在过去的一年中,我一直在数学的海洋中游荡,research进展不多,对于数学世界的阅历算是有了一些长进。为什么要深入数学的世界?作为计算机的学生,我没有任何企图要成为一个数学家。我学习数学的目的,是要想爬上巨人的肩膀,希望站在更高的高度,能把我自己研究的东西看得更深广一些。说起来,我在刚来这个学校的时候,并没有预料到我将会有一个深入数学的旅程。我的导师最初希望我去做的题目,是对appe