SolidWorks二次开发随记(一)
SolidWorks二次开发随记
- 1、开发模式
- 2、二次开发API与应用
-
- 相关书籍
- API文档
- 开发环境
- 插件UI的修改与调用
-
- UI修改
- 调用回调函数
- SolidWorks界面
- 3、参考
1、开发模式
SolidWorks二次开发的模式有两种,一种是开发独立的可执行文件,与SW进行异步交互;另一种是SolidWorks插件,与SolidWorks同处于一个进程。但是也可同时应用两种模式,比如迈迪公司的今日制造插件,点击按钮启动相应的程序,多个应用可方便管理。
2、二次开发API与应用
相关书籍
1、SOLIDWORKS API 二次开发实例详解 主讲C# 二次开发
2、SolidWorks 高级教程 二次开发与API (2007版)(官方教程)主讲VB 二次开发
听老大说则这个要出新版的啦,不知道什么时候出
API文档
1、在安装目录下,有apihelp帮助文档,可以帮助理解
2、利用宏录制功能,可以快速得到相关操作的代码实例,了解相关函数的用法
开发环境
开发环境我使用的是VS2015,需要开发插件的可以利用SolidWorks提供的模板,安装文件在SolidWorks的安装包中,名为SOLIDWORKS API SDK.msi 安装之后就可以在VS中的项目模板中发现它啦

如果没有,就比如我在另一台电脑上测试的那样,可以手动执行,找到SOLIDWORKS API SDK.msi 安装文件,在其位置新建txt文本,输入
msiexec /a “SOLIDWORKS API SDK.msi” /quiet TARGETDIR=“D:\文件夹”
将txt保存并改扩展名为.bat,然后双击执行该文件,在相应的文件夹下找
Personal\Visual Studio 2012\Templates\ProjectTemplates\Visual C#
将文件夹下的文件拷贝到
C:\Users\*****\Documents\Visual Studio 2015\Templates\ProjectTemplates\Visual C#
重新打开就可以看见SwCSharpAddin模板文件啦
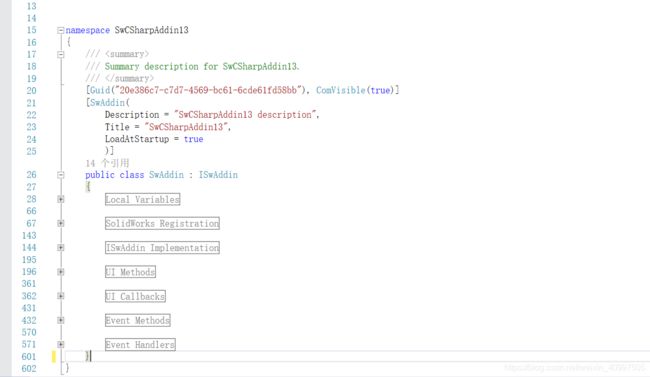
新建项目,打开主程序,就可以看到下面的内容,各个模块实现相关的功能
SolidWorks Registration:实现dll的注册与删除,插件程序是以dll载入到SolidWorks当中的,后面的程序打包与卸载需要注意dll的注册与删除
我们将完善UI Methods和UI Callbacks模块实现我们插件的个性化

插件UI的修改与调用
UI修改
public void AddCommandMgr()
        {
            ICommandGroup cmdGroup;
            if (iBmp == null)
                iBmp = new BitmapHandler();
            Assembly thisAssembly;
            int cmdIndex0, cmdIndex1, cmdIndex2;
            string Title = "***插件", ToolTip = "***插件";   //标题
            int[] docTypes = new int[]{(int)swDocumentTypes_e.swDocASSEMBLY,
                                       (int)swDocumentTypes_e.swDocDRAWING,
                                       (int)swDocumentTypes_e.swDocPART};
            thisAssembly = System.Reflection.Assembly.GetAssembly(this.GetType());
            int cmdGroupErr = 0;
            bool ignorePrevious = false;
            object registryIDs;
            //get the ID information stored in the registry
            bool getDataResult = iCmdMgr.GetGroupDataFromRegistry(mainCmdGroupID, out registryIDs);
            int[] knownIDs = new int[3] { mainItemID1, mainItemID2, mainItemID3 };
            if (getDataResult)
            {
                if (!CompareIDs((int[])registryIDs, knownIDs)) //if the IDs don't match, reset the commandGroup
                {
                    ignorePrevious = true;
                }
            }
            //命令图标 小的16px,大的24px
            cmdGroup = iCmdMgr.CreateCommandGroup2(mainCmdGroupID, Title, ToolTip, "", -1, ignorePrevious, ref cmdGroupErr);
            cmdGroup.LargeIconList = iBmp.CreateFileFromResourceBitmap("SwCSharpAddin2.*******24.bmp", thisAssembly);
            cmdGroup.SmallIconList = iBmp.CreateFileFromResourceBitmap("SwCSharpAddin2.*******16.bmp", thisAssembly);
            cmdGroup.LargeMainIcon = iBmp.CreateFileFromResourceBitmap("SwCSharpAddin2.***logo24.png", thisAssembly);
            cmdGroup.SmallMainIcon = iBmp.CreateFileFromResourceBitmap("SwCSharpAddin2.***logo16.png", thisAssembly);

            //加载我们自己的命令
            int menuToolbarOption = (int)(swCommandItemType_e.swMenuItem | swCommandItemType_e.swToolbarItem);
            cmdIndex0 = cmdGroup.AddCommandItem2("CreateCube", -1, "Create a cube", "Create cube", 4, "CreateCube", "", mainItemID1, menuToolbarOption);
            cmdIndex1 = cmdGroup.AddCommandItem2("Show PMP", -1, "Display sample property manager", "Show PMP", 5, "ShowPMP", "EnablePMP", mainItemID2, menuToolbarOption);
            cmdIndex2 = cmdGroup.AddCommandItem2("属性修改", -1, "文档属性的添加与修改", "属性修改", 3, "AttModification", "", mainItemID3, menuToolbarOption);

            cmdGroup.HasToolbar = true;
            cmdGroup.HasMenu = true;
            cmdGroup.Activate();
            bool bResult;

            //FlyoutGroup flyGroup = iCmdMgr.CreateFlyoutGroup(flyoutGroupID, "Dynamic Flyout", "Flyout Tooltip", "Flyout Hint",
            //  cmdGroup.SmallMainIcon, cmdGroup.LargeMainIcon, cmdGroup.SmallIconList, cmdGroup.LargeIconList, "FlyoutCallback", "FlyoutEnable");
            //flyGroup.AddCommandItem("FlyoutCommand 1", "test", 0, "FlyoutCommandItem1", "FlyoutEnableCommandItem1");
            //flyGroup.FlyoutType = (int)swCommandFlyoutStyle_e.swCommandFlyoutStyle_Simple;

            foreach (int type in docTypes)
            {
                CommandTab cmdTab;
                cmdTab = iCmdMgr.GetCommandTab(type, Title);
                if (cmdTab != null & !getDataResult | ignorePrevious)//if tab exists, but we have ignored the registry info (or changed command group ID), re-create the tab.  Otherwise the ids won't matchup and the tab will be blank
                {
                    bool res = iCmdMgr.RemoveCommandTab(cmdTab);
                    cmdTab = null;
                }
                //if cmdTab is null, must be first load (possibly after reset), add the commands to the tabs
                if (cmdTab == null)
                {
                    cmdTab = iCmdMgr.AddCommandTab(type, Title);
                    CommandTabBox cmdBox = cmdTab.AddCommandTabBox();
                    int[] cmdIDs = new int[3];
                    int[] TextType = new int[3];
                    cmdIDs[0] = cmdGroup.get_CommandID(cmdIndex0);
                    TextType[0] = (int)swCommandTabButtonTextDisplay_e.swCommandTabButton_TextBelow;
                    cmdIDs[1] = cmdGroup.get_CommandID(cmdIndex1);
                    TextType[1] = (int)swCommandTabButtonTextDisplay_e.swCommandTabButton_TextBelow;
                    cmdIDs[2] = cmdGroup.get_CommandID(cmdIndex2);
                    TextType[2] = (int)swCommandTabButtonTextDisplay_e.swCommandTabButton_TextBelow;
                    //cmdIDs[2] = cmdGroup.ToolbarId;
                    //TextType[2] = (int)swCommandTabButtonTextDisplay_e.swCommandTabButton_TextHorizontal | (int)swCommandTabButtonFlyoutStyle_e.swCommandTabButton_ActionFlyout;
                    bResult = cmdBox.AddCommands(cmdIDs, TextType);   //添加我们的命令

                    //CommandTabBox cmdBox1 = cmdTab.AddCommandTabBox();
                    //cmdIDs = new int[1];
                    //TextType = new int[1];

                    //cmdIDs[0] = flyGroup.CmdID;
                    //TextType[0] = (int)swCommandTabButtonTextDisplay_e.swCommandTabButton_TextBelow | (int)swCommandTabButtonFlyoutStyle_e.swCommandTabButton_ActionFlyout;
                    //bResult = cmdBox1.AddCommands(cmdIDs, TextType);

                    //cmdTab.AddSeparator(cmdBox1, cmdIDs[0]);    //命令分隔线
                }
            }
            thisAssembly = null;
        }
调用回调函数
public void AttModification()
        {
            string path = System.Reflection.Assembly.GetExecutingAssembly().Location;
            string directory = System.IO.Path.GetDirectoryName(path);
            //调用我们自己的程序
            System.Diagnostics.Process.Start(directory + @"\****\****.exe");
        }
SolidWorks界面
这样就完成了我们自己的界面,图标我遮住了,因为盗的别人的图,讲究看,当我们点击相应的属性修改命令,就可以调用我们自己的程序,完成相应的功能。

3、参考
书籍
1、SOLIDWORKS API 二次开发实例详解 机械工出版社
2、SolidWorks 高级教程 二次开发与API (2007版)(官方教程)机械工出版社
相关链接
1、01关于SolidWorks二次开发apisdk安装和如何使用api
2、C# SolidWorks 二次开发 API—插件的打包注册与分发
3、基于C#的SolidWorks插件开发(1)–SolidWorks API接口介绍
