【Golang基础知识篇】 ①基本类型底层实现
文章目录
- string
-
-
- 面试题:字符串转byte数组时,是否会发生内存拷贝?
-
- slice
-
-
- 切片扩容规则
-
- map
-
- map底层实现
-
-
- hmap
- bmap
- map hash冲突了怎么办?
-
- map扩容时机
-
-
- 为什么map扩容选择增量?
- map翻倍扩容原理
- map写入数据内部执行流程
- map扩容总结
-
- map优化点
-
- map gc优化手段
- bigcache优化
- channel实现
-
-
-
- channel存在3种状态:
-
-
- context原理
-
-
- context是如何传递的?
- context是如何触发取消的
-
- cancelCtx类型
- timerCtx
- time
-
- time.sleep() time.Tick()优劣性对比
- reflect
-
-
- 什么是反射
- 为什么要用反射,(需要反射的 2 个常见场景)
- new make
- select 底层实现
-
-
- sync系列
-
- sync.map实现
- sync.pool
-
- sync.Pool 适应场景
- sync.Pool使用示例
- 源码分析
- defer
-
-
- panic defer revover定义
- 10种panic方法:
- panic recover定义
- 为什么要 defer 才能 recover
- defer recover 小结
-
string
StringHeader是字符串在Go的底层数据结构:
type StringHeader struct {
  Data uintptr
  Len  int
}
面试题:字符串转byte数组时,是否会发生内存拷贝?
解析:字符串转切片一定会产生内存拷贝,严格来说,只要是发生数据类型转换都会发生内存拷贝。
,因为频繁的内存拷贝听起来对于性能来说不是很友好,那就要想想有没有什么办法使得字符串在转切片的时候不发生内存拷贝呢?
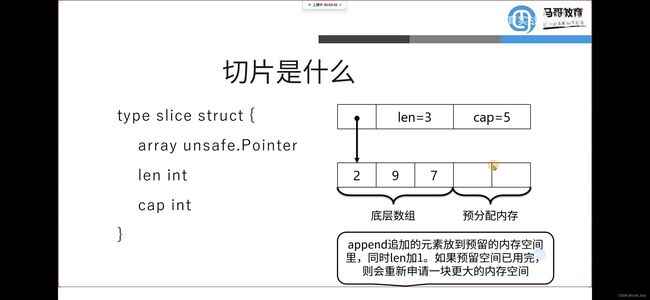
SliceHeader是切片在G的底层数据结构:
type SliceHeader struct {
  Data uintptr
  Len  int
  Cap  int
}
package main
import (
"fmt"
"reflect"
"unsafe"
)
func main() {
a := "aaa"
ssh := *(*reflect.StringHeader)(unsafe.Pointer(&a))
b := *(*[]byte)(unsafe.Pointer(&ssh))
fmt.Printf("%v", b)
}
如果我们想要在底层实现StringHeader和SliceHeader的互转,只需要把StringHeader的地址强制转换为SliceHeader就可以。
-
Go的unsafe包实现了上述功能,来看下介绍:
-
unsafe.Pointer(&a) 方法可以得到变量a的指针地址。
-
(*reflect.StringHeader)(unsafe.Pointer(&a)) 可把字符串a转成底层结构形式。
-
(*[]byte)(unsafe.Pointer(&ssh)) 可把ssh底层结构体转成byte的切片的指针。
slice
切片扩容规则
- 扩容规则
当需要的容量超过原切片容量的两倍时,会使用需要的容量作为新容量。(长度是奇数就+1为容量,是偶数就长度为容量)
当原切片长度小于1024时,新切片的容量会直接翻倍。
而当原切片的容量大于等于1024时,会反复地增加25%,直到新容量超过所需要的容量。
map
map底层实现
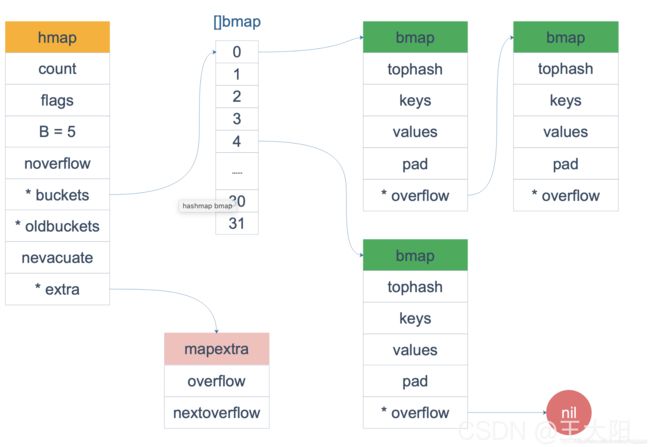
熟悉 map 结构体的读者应该知道,hmap 由很多 bmap(bucket) 构成,每个 bmap 都保存了 8 个 key/value 对:
hmap
有时落在同一个 bmap 中的 key/value 太多了,超过了 8 个,就会由溢出 bmap 来承接,即 overflow bmap(后面我们叫它 bucket)。溢出的 bucket 和原来的 bucket 形成一个“拉链”。
对于这些 overflow 的 bucket,在 hmap 结构体和 bmap 结构体里分别有一个 extra.overflow 和 overflow 字段指向它们。
hmap
// A header for a Go map.

type hmap struct {
	count     int // map内的元素个数,调用 len(map) 时,直接返回此值
	flags     uint8 // 标志位,例如表示map正在被写入或者被遍历
	B         uint8 // buckets 的对数 log_2,即含有 2^B 个buckets。这样的好处是方便用位操作实现取模
	noverflow uint16 // 溢出桶的近似数
	hash0     uint32 // 哈希种子
	buckets   unsafe.Pointer // 【指向 buckets数组(连续内存空间),数组的类型为[]bmap,大小为 2^B】
	oldbuckets unsafe.Pointer // 扩容的时候,buckets 长度会是 oldbuckets 的两倍
	nevacuate uintptr // 指示扩容进度,小于此地址的 buckets 迁移完成
	extra *mapextra // optional fields
}
bmap
bmap 就是我们常说的“桶”,桶里面会最多装 8 个 key,这些 key 之所以会落入同一个桶,是因为它们经过哈希计算后,哈希结果是“一类”的。在桶内,又会根据 key 计算出来的 hash 值的高 8 位来决定 key 到底落入桶内的哪个位置(一个桶内最多有8个位置)。
如果有第 9 个 key-value 落入当前的 bucket,那就需要再构建一个 bucket ,通过 overflow 指针连接起来。
hint 大于 8 又会怎么样?答案很明显,性能问题,其时间复杂度改变(也就是执行效率出现问题)
注意:在哈希桶中,键值之间并不是相邻排列的,而是键放在一起,值放在一起,来减少因为键值类型不同而产生的不必要的内存对齐
如果按照 key/value/key/value/… 这样的模式存储,那在每一个 key/value 对之后都要额外 padding 7 个字节;而将所有的 key,value 分别绑定到一起,这种形式 key/key/…/value/value/…,则只需要在最后添加 padding。
// A bucket for a Go map.

type bmap struct {
// tophash generally contains the top byte of the hash value
// for each key in this bucket. If tophash[0] < minTopHash,
// tophash[0] is a bucket evacuation state instead.
tophash [bucketCnt]uint8 // 【bucketCnt在源码中被const为8, 每个bmap结构最多存放8组键值对】
// Followed by bucketCnt keys and then bucketCnt elems.
// NOTE: packing all the keys together and then all the elems together makes the
// code a bit more complicated than alternating key/elem/key/elem/... but it allows
// us to eliminate padding which would be needed for, e.g., map[int64]int8.
// Followed by an overflow pointer.
//
}
map hash冲突了怎么办?
Go 语言采用的是哈希查找表,并且使用链表解决哈希冲突。
-
哈希函数
哈希函数,又称散列算法、散列函数。主要作用是通过特定算法将数据根据一定规则组合重新生成得到一个散列值
而在哈希表中,其生成的散列值常用于寻找其键映射到哪一个桶上。而一个好的哈希函数,应当尽量少的出现哈希冲突,以此保证操作哈希表的时间复杂度(但是哈希冲突在目前来讲,是无法避免的。我们需要 “解决” 它)
-
链地址法
在哈希操作中,相当核心的一个处理动作就是 “哈希冲突” 的解决。而在 Go map 中采用的就是 "链地址法 " 去解决哈希冲突,又称 “拉链法”。其主要做法是数组 + 链表的数据结构,其溢出节点的存储内存都是动态申请的,因此相对更灵活。而每一个元素都是一个链表。
map扩容时机
- 1.map中数据总个数/桶个数>6.5,引发翻倍扩容。mapassign中的overLoadFactor函数。可以理解为kv数量有一个值
负载因子 load factor,用途是评估哈希表当前的时间复杂度,其与哈希表当前包含的键值对数、桶数量等相关。如果负载因子越大,则说明空间使用率越高,但产生哈希冲突的可能性更高。而负载因子越小,说明空间使用率低,产生哈希冲突的可能性更低 - 2.使用了太多的溢出桶时(溢出桶使用的太多会导致map处理速度降低)。mapassign中的tooManyOverflowBuckets函数。
B<=15,已使用的溢出桶个数>=2的B次方时,引发等量扩容。
B>15,已使用的溢出桶个数>=2的15次方时,引发等量扩容。
为什么map扩容选择增量?
如果是全量扩容的话,那问题就来了。假设当前 hmap 的容量比较大,直接全量扩容的话,就会导致扩容要花费大量的时间和内存,导致系统卡顿,最直观的表现就是慢。显然,不能这么做
而增量扩容,就可以解决这个问题。它通过每一次的 map 操作行为去分摊总的一次性动作。因此有了 buckets/oldbuckets 的设计,它是逐步完成的,并且会在扩容完毕后才进行清空
扩容完毕后(预分配),不会马上就进行迁移。而是采取增量扩容的方式,当有访问到具体 bukcet 时,才会逐渐的进行迁移(将 oldbucket 迁移到 bucket)
这时候又想到,既然迁移是逐步进行的。那如果在途中又要扩容了,怎么办?
1.B会根据扩容后新桶的个数进行增加(翻倍扩容 新B=旧B+1,等量扩容 新B=旧B)。
2.oldbuckets指向原来的桶(旧桶)。
3.buckets指向新创建的桶(新桶中暂时还没有数据)。
4.nevacuate设置为0,表示如果数据迁移的话,应该从原桶(旧桶)中的第0个位置开始迁移。
5.noverflow设置为0,扩容后新桶中已使用的溢出桶为0。
6.extra.oldoverflow设置为原桶(旧桶)已使用的所有溢出桶。即:h.extra.oldoverflow = h.extra.overflow。
7.extra.overflow设置为nil,因为新桶中还未使用溢出桶。
8.extra.nextOverflow设置为新创建的桶中的第一个溢出桶的位置。
map翻倍扩容原理
map写入数据内部执行流程
map扩容总结
-
Map 的赋值难点在于数据的扩容和数据的搬迁操作。
-
扩容不是一定会新增空间,也有可能是只是做了内存整理。
-
tophash 的标志即可以判断是否为空,还会判断是否搬迁,以及搬迁的位置为X or Y。
-
delete map 中的key,有可能出现很多空的kv,会导致搬迁操作。如果可以避免,尽量避免。
map优化点
-
提前分配内存: 一切都和其他地方一样。初始化map时,指定其大小。
-
使用空结构作为值: struct{}什么都不是,因此例如对信号值使用这种方法是非常有益的。
-
及时清空map
map只能增长,不能缩小。我们需要控制这一点——完全而明确地重置map。因为删除其所有元素无济于事。 -
尽量不要在键和值中使用指针
如果 map 不包含指针,那么 GC 就不会在它上面浪费宝贵的时间。而且要知道字符串也是指针——使用[]byte而不是字符串作为键。
map gc优化手段
在 go 里,由于 GC STW(Stop the World) 的存在大的哈希表是非常要命的,看看 bigcache 开发团队的博客的测试数据:
With an empty cache, this endpoint had maximum responsiveness latency of 10ms for 10k rps. When the cache was filled, it had more than a second latency for 99th percentile. Metrics indicated that there were over 40 mln objects in the heap and GC mark and scan phase took over four seconds.
缓存塞满后,堆上有 4 千万个对象,GC 的扫描过程就超过了 4 秒钟,这就不能忍了。
主要的优化思路有:
-
offheap(堆外内存),GC 只会扫描堆上的对象,那就把对象都搞到栈上去,但是这样这个缓存库就高度依赖 offheap 的 malloc 和 free 操作了
-
参考 freecache 的思路,用 ringbuffer 存 entry,绕过了 map 里存指针,简单瞄了一下代码,后面有空再研究一下(继续挖坑
-
利用 Go 1.5+ 的特性:
当 map 中的 key 和 value 都是基础类型时,GC 就不会扫到 map 里的 key 和 value
如果我们仔细看 mapextra 结构体里对 overflow 字段的注释,会发现这里有“文章”。
type mapextra struct {
 overflow    *[]*bmap
 oldoverflow *[]*bmap

 nextOverflow *bmap
}
意思是如果 map 的 key 和 value 都不包含指针的话,在 GC 期间就可以避免对它的扫描。在 map 非常大(几百万个 key)的场景下,能提升不少性能。
那具体是怎么实现“不扫描”的呢?
我们知道,bmap 这个结构体里有一个 overflow 指针,它指向溢出的 bucket。因为它是一个指针,所以 GC 的时候肯定要扫描它,也就要扫描所有的 bmap。
而当 map 的 key/value 都是非指针类型的话,扫描是可以避免的,直接标记整个 map 的颜色(三色标记法)就行了,不用去扫描每个 bmap 的 overflow 指针。
但是溢出的 bucket 总是可能存在的,这和 key/value 的类型无关。
于是就利用 hmap 里的 extra 结构体的 overflow 指针来 “hold” 这些 overflow 的 bucket,并把 bmap 结构体的 overflow 指针类型变成一个 unitptr 类型(这些是在编译期干的)。于是整个 bmap 就完全没有指针了,也就不会在 GC 期间被扫描。
tips:
uintptr是一个无符号的整型,它可以保存一个指针地址。
它可以进行指针运算。
uintptr无法持有对象, GC不把uintptr当指针, 所以uintptr类型的目标会被回收。
想取值需要转成unsafe.Pointer后, 需再转到相对应的指针类型。
overflow *[]*bmap
另一方面,当 GC 在扫描 hmap 时,通过 extra.overflow 这条路径(指针)就可以将 overflow 的 bucket 正常标记成黑色,从而不会被 GC 错误地回收。
当我们知道上面这些原理后,就可以利用它来对一些场景进行性能优化:
map[string]int -> map[[12]byte]int
因为 string 底层有指针,所以当 string 作为 map 的 key 时,GC 阶段会扫描整个 map;而数组 [12]byte 是一个值类型,不会被 GC 扫描。
bigcache优化
-
可以通过 sharding 来降低资源竞争
-
可以用位运算来取余数做 sharding (需要是 2 的整数幂 - 1)
-
避免 map 中出现指针、使用 go 基础类型可以显著降低 GC 压力、提升性能
-
bigcache 底层存储是 bytes queue,初始化时设置合理的配置项可以减少 queue 扩容的次数,提升性能
https://blog.csdn.net/RA681t58CJxsgCkJ31/article/details/125325536
channel实现
channel底层实现
// channel 类型定义
type hchan struct {
    // channel 中的元素数量, len
    qcount   uint           // total data in the queue

    // channel 的大小, cap
    dataqsiz uint           // size of the circular queue

    // channel 的缓冲区,环形数组实现
    buf      unsafe.Pointer // points to an array of dataqsiz elements

    // 单个元素的大小
    elemsize uint16

    // closed 标志位
    closed   uint32

    // 元素的类型
    elemtype *_type // element type 指向类型元数据 (内存复制、垃圾回收等机制依赖数据的类型信息)

    // send 和 recieve 的索引,用于实现环形数组队列(用于记录 交替读写的下标位置)
    sendx    uint   // send index
    recvx    uint   // receive index

    // recv goroutine 等待队列
    recvq    waitq  // list of recv waiters

    // send goroutine 等待队列
    sendq    waitq  // list of send waiters

    // lock protects all fields in hchan, as well as several
    // fields in sudogs blocked on this channel.
    //
    // Do not change another G's status while holding this lock
    // (in particular, do not ready a G), as this can deadlock
    // with stack shrinking.
    lock mutex
}

// 等待队列的链表实现
type waitq struct {
    first *sudog
    last  *sudog
}

// in src/runtime/runtime2.go
// 对 G 的封装
type sudog struct {
    // The following fields are protected by the hchan.lock of the
    // channel this sudog is blocking on. shrinkstack depends on
    // this for sudogs involved in channel ops.

    g          *g
    selectdone *uint32 // CAS to 1 to win select race (may point to stack)
    next       *sudog
    prev       *sudog
    elem       unsafe.Pointer // data element (may point to stack)

    // The following fields are never accessed concurrently.
    // For channels, waitlink is only accessed by g.
    // For semaphores, all fields (including the ones above)
    // are only accessed when holding a semaRoot lock.

    acquiretime int64
    releasetime int64
    ticket      uint32
    parent      *sudog // semaRoot binary tree
    waitlink    *sudog // g.waiting list or semaRoot
    waittail    *sudog // semaRoot
    c           *hchan // channel
}
一个通道发送和接收通道,默认是阻塞的。
如果没有缓冲区,单纯的往其中放入元素立马就会进入阻塞状态,必须有其他的线程从其中取走元素。通俗的讲要有一个线程不断的取这个管道的元素,才能往其中放入元素。它就像一个窄窄的门框,进去就得出来。
而有一个缓冲区的管道想一段地道,放入的元素不会马上进入阻塞状态,只有第二个准备进入而第一个还没有进入的情况下才会阻塞。
package main

import (
	"fmt"
	"time"
)

func main() {

	intChan := make(chan int, 1)
	go func() {
		for {
			v, ok := <-intChan
			if !ok {
				break
			}else{
				fmt.Println(v)
			}
		}
	}()
	intChan <- 1
	close(intChan)
	time.Sleep(time.Second * 1)
}
Channel是异步进行的。
channel存在3种状态:
- nil,未初始化的状态,只进行了声明,或者手动赋值为nil
- active,正常的channel,可读或者可写
- closed,已关闭,千万不要误认为关闭channel后,channel的值是nil
context原理
Go 1.7 标准库引入 context,中文译作“上下文”,准确说它是 goroutine 的上下文,包含 goroutine 的运行状态、环境、现场等信息。
每个Goroutine在执行之前,都要先知道程序当前的执行状态,通常将这些执行状态封装在一个Context变量中,传递给要执行的Goroutine中。上下文则几乎已经成为传递与请求同生存周期变量的标准方法。在网络编程下,当接收到一个网络请求Request,处理Request时,我们可能需要开启不同的Goroutine来获取数据与逻辑处理,即一个请求Request,会在多个Goroutine中处理。而这些Goroutine可能需要共享Request的一些信息;同时当Request被取消或者超时的时候,所有从这个Request创建的所有Goroutine也应该被结束。
-
context作用
在 Goroutine 构成的树形结构中对信号进行同步以减少计算资源的浪费是 context.Context 的最大作用。Go 服务的每一个请求都是通过单独的 Goroutine 处理的2,HTTP/RPC 请求的处理器会启动新的 Goroutine 访问数据库和其他服务。通常需要访问一些与请求特定的数据,比如终端用户的身份认证信息、验证相关的token、请求的截止时间。
当一个请求被取消或超时时,所有用来处理该请求的 goroutine 都应该迅速退出,然后系统才能释放这些 goroutine 占用的资源。context 主要用来在 goroutine 之间传递上下文信息,包括:取消信号、超时时间、截止时间、k-v 等。
https://zhuanlan.zhihu.com/p/68792989
https://www.cnblogs.com/zhangboyu/p/7456606.html
-
每一个 context.Context 都会从最顶层的 Goroutine 一层一层传递到最下层。context.Context 可以在上层 Goroutine 执行出现错误时,将信号及时同步给下层。
context是如何传递的?
https://tech.ipalfish.com/blog/2020/03/30/golang-context/
首先可以明确,任何一种context都具有传递性,而传递性的内在机制可以理解为: 在调用WithCancel、WithTimeout、WithValue时如何处理父子context。从传递性的角度来说,几种With*函数内部都是通过propagateCancel这个函数来实现的,下面以WithCancel函数为例
newCancelCtx是cancelCtx赋值父context的过程,而propagateCancel建立父子context之间的联系。
func propagateCancel(parent Context, child canceler) {
	if parent.Done() == nil {
		return // parent is never canceled
	}
	if p, ok := parentCancelCtx(parent); ok {
		p.mu.Lock()
		if p.err != nil {
			// parent has already been canceled
			child.cancel(false, p.err)
		} else {
			if p.children == nil {
				p.children = make(map[canceler]struct{})
			}
			p.children[child] = struct{}{}
		}
		p.mu.Unlock()
	} else {
		go func() {
			select {
			case <-parent.Done():
				child.cancel(false, parent.Err())
			case <-child.Done():
			}
		}()
	}
}
1.如果parent.Done是nil,则不做任何处理,因为parent context永远不会取消,比如TODO()、Background()、WithValue等。
2.parentCancelCtx根据parent context的类型,返回bool型ok,ok为真时需要建立parent对应的children,并保存parent->child映射关系(cancelCtx、timerCtx这两种类型会建立,valueCtx类型会一直向上寻找,而循环往上找是因为cancel是必须的,然后找一种最合理的),这里children的key是canceler接口,并不能处理所有的外部类型,所以会有else,示例见上述代码注释处。对于其他外部类型,不建立直接的传递关系。
context是如何触发取消的
cancel函数是幂等的,可以被多次调用。
context中包含done channel可以用来确认是否取消、通知取消。
cancelCtx类型
cancelCtx会主动进行取消,在自顶向下取消的过程中,会遍历children context,然后依次主动取消。通过channel通知
// cancel closes c.done, cancels each of c's children, and, if
// removeFromParent is true, removes c from its parent's children.
func (c *cancelCtx) cancel(removeFromParent bool, err error) {
	if err == nil {
		panic("context: internal error: missing cancel error")
	}
	c.mu.Lock()
	if c.err != nil {
		c.mu.Unlock()
		return // already canceled
	}
	c.err = err
	if c.done == nil {
		c.done = closedchan
	} else {
		close(c.done)
	}
	for child := range c.children {
		// NOTE: acquiring the child's lock while holding parent's lock.
		child.cancel(false, err)
	}
	c.children = nil
	c.mu.Unlock()

	if removeFromParent {
		removeChild(c.Context, c)
	}
}
timerCtx
WithTimeout是通过WithDeadline来实现的,均对应timerCtx类型。通过parentCancelCtx函数的定义我们知道,timerCtx也会记录父子context关系。但是timerCtx是通过timer定时器触发cancel调用的,部分实现如下
func WithDeadline(parent Context, d time.Time) (Context, CancelFunc) {
	if cur, ok := parent.Deadline(); ok && cur.Before(d) {
		// The current deadline is already sooner than the new one.
		return WithCancel(parent)
	}
	c := &timerCtx{
		cancelCtx: newCancelCtx(parent),
		deadline:  d,
	}
	propagateCancel(parent, c)
	dur := time.Until(d)
	if dur <= 0 {
		c.cancel(true, DeadlineExceeded) // deadline has already passed
		return c, func() { c.cancel(false, Canceled) }
	}
	c.mu.Lock()
	defer c.mu.Unlock()
	if c.err == nil {
		// 超时控制利用time.AfterFunc
		c.timer = time.AfterFunc(dur, func() {
			c.cancel(true, DeadlineExceeded)
		})
	}
	return c, func() { c.cancel(true, Canceled) }
}
time
go的time和ticket的调用
或者叫timmer internal和其他语言的开发思路不一样。
其他语言,多是注册回调函数,定时,时间到了调用回调。
go是 通过 chan的阻塞实现的。
调用的地方,读取chan 定时,时间到,向chan写入值,阻塞解除,调用函数
time.sleep() time.Tick()优劣性对比
现在我们知道了,Tick,Sleep,包括time.After函数,都使用的timer结构体,都会被放在同一个协程中统一处理,这样看起来使用Tick,Sleep并没有什么区别。
实际上是有区别的,
- Sleep是使用睡眠完成定时任务,需要被调度唤醒。
- Tick函数是使用channel阻塞当前协程,完成定时任务的执行。
当前并不清楚golang 阻塞和睡眠对资源的消耗会有什么区别,这方面不能给出建议。
优势:
1.使用channel阻塞协程完成定时任务比较灵活,可以结合select设置超时时间以及默认执行方法,
2.可以设置timer的主动关闭,以及不需要每次都生成一个timer(这方面节省系统内存,垃圾收回也需要时间)。
所以,建议使用time.Tick完成定时任务。
reflect
什么是反射
在计算机科学中,反射是指计算机程序在运行时(Run time)可以访问、检测和修改它本身状态或行为的一种能力。用比喻来说,反射就是程序在运行的时候能够“观察”并且修改自己的行为。
实际上,它的本质是程序在运行期探知对象的类型信息和内存结构,不用反射能行吗?可以的!使用汇编语言,直接和内层打交道,什么信息不能获取?但是,当编程迁移到高级语言上来之后,就不行了!就只能通过反射来达到此项技能。
为什么要用反射,(需要反射的 2 个常见场景)
- 有时你需要编写一个函数,但是并不知道传给你的参数类型是什么,可能是没约定好;也可能是传入的类型很多,这些类型并不能统一表示。这时反射就会用的上了。
- 有时候需要根据某些条件决定调用哪个函数,比如根据用户的输入来决定。这时就需要对函数和函数的参数进行反射,在运行期间动态地执行函数。
在讲反射的原理以及如何用之前,还是说几点不使用反射的理由:
- 与反射相关的代码,经常是难以阅读的。在软件工程中,代码可读性也是一个非常重要的指标。
- Go 语言作为一门静态语言,编码过程中,编译器能提前发现一些类型错误,但是对于反射代码是无能为力的。所以包含反射相关的代码,很可能会运行很久,才会出错,这时候经常是直接 panic,可能会造成严重的后果。
- 反射对性能影响还是比较大的,比正常代码运行速度慢一到两个数量级。所以,对于一个项目中处于运行效率关键位置的代码,尽量避免使用反射特性。
new make
new
// The new built-in function allocates memory. The first argument is a type,
// not a value, and the value returned is a pointer to a newly
// allocated zero value of that type.
func new(Type) *Type
它的参数是一个类型,返回值为指向该类型内存地址的指针,同时会把分配的内存置为零,也就是类型的零值, 即字符为空,整型为0,逻辑值为false
make 仅用来分配及初始化类型为 slice、map、chan 的数据。new 可分配任意类型的数据.
new 分配返回的是指针,即类型 *Type。make 返回引用,即 Type.
new 分配的空间被清零, make 分配空间后,会进行初始化.
new一般是默认的初始化,无法复制,很多时候,默认的初始化并不友好。比如结构体
我们一般
type Rect struct{}
// 我们通过加取地址符号&来做初始化
var v Rect
r := &v{}
select 底层实现
/**
定义select 结构
*/
type hselect struct {
	tcase     uint16   // total count of scase[]      总的case数目
	ncase     uint16   // currently filled scase[]    目前已经注册的case数目
	pollorder *uint16  // case poll order             【超重要】 轮询的case序号
	lockorder *uint16  // channel lock order          【超重要】chan的锁定顺序

    // case 数组,为了节省一个指针的 8 个字节搞成这样的结构
    // 实际上要访问后面的值,还是需要进行指针移动
    // 指针移动使用 runtime 内部的 add 函数
	scase     [1]scase // one per case (in order of appearance)  【超重要】保存当前case操作的chan数组 (按照轮询顺序)
}


/**
select 中每一个case的定义
*/
type scase struct {
	elem        unsafe.Pointer // data element                           数据指针
	c           *hchan         // chan                                   当前case所对应的chan引用
	pc          uintptr        // return pc (for race detector / msan)   和汇编中的pc同义,表示 程序计数器,用于指示当前将要执行的下一条机器指令的内存地址
	kind        uint16         // 通道的类型 default <-chan  chan->
	receivedp   *bool.         // pointer to received bool, if any
	releasetime int64
}
源码包src/runtime/select.go:selectgo()定义了select选择case的函数:
func selectgo(cas0 *scase, order0 *uint16, ncases int) (int, bool) {
    //1. 锁定scase语句中所有的channel
    //2. 按照随机顺序检测scase中的channel是否ready
    //   2.1 如果case可读,则读取channel中数据,解锁所有的channel,然后返回(case index, true)
    //   2.2 如果case可写,则将数据写入channel,解锁所有的channel,然后返回(case index, false)
    //   2.3 所有case都未ready,则解锁所有的channel,然后返回(default index, false)
    //3. 所有case都未ready,且没有default语句
    //   3.1 将当前协程加入到所有channel的等待队列
    //   3.2 当将协程转入阻塞,等待被唤醒
    //4. 唤醒后返回channel对应的case index
    //   4.1 如果是读操作,解锁所有的channel,然后返回(case index, true)
    //   4.2 如果是写操作,解锁所有的channel,然后返回(case index, false)
}
sync系列
sync.map实现
sync.Map 的实现原理可概括为:
- 1、过 read 和 dirty 两个字段将读写分离,读的数据存在只读字段 read 上,将最新写入的数据则存在 dirty 字段上
- 2、读取时会先查询 read,不存在再查询 dirty,写入时则只写入 dirty
- 3、读取 read 并不需要加锁,而读或写 dirty 都需要加锁
- 4、另外有 misses 字段来统计 read 被穿透的次数(被穿透指需要读 dirty 的情况),超过一定次数则将 dirty 数据同步到 read 上
- 5、对于删除数据则直接通过标记来延迟删除
map底层虽然写的尤为漂亮,但是为了效率,没有把线程安全安排上,所以另外加了sync.map,兼容线程安全。
总结: sync.map实现就是依靠两张map对读操作和写操作分离,后续根据需要在把dirty map合入 read map中。相对于乐观锁实现的方式,写进程执行的时候,读进程也可能在read map上进行。
sync.pool
sync.Pool 适应场景
sync.Pool 本质用途是增加临时对象的重用率,减少 GC 负担;
sync.Pool 中保存的元素有如下特征:
- Pool 池里的元素随时可能释放掉,释放策略完全由 runtime 内部管理;
- Get 获取到的元素对象可能是刚创建的,也可能是之前创建好 cache 的,使用者无法区分;
- Pool 池里面的元素个数你无法知道;
所以,只有的你的场景满足以上的假定,才能正确的使用 Pool 。
划重点:临时对象。像 socket 这种带状态的、长期有效的资源是不适合 Pool 的。
那么这个池子的目的就是为了复用已经使用过的对象,来达到优化内存使用和回收的目的。说白了,一开始这个池子会初始化一些对象供你使用,如果不够了呢,自己会通过new产生一些,当你放回去了之后这些对象会被别人进行复用,当对象特别大并且使用非常频繁的时候可以大大的减少对象的创建和回收的时间。
sync.Pool使用示例
package main

import (
    "fmt"
    "sync"
)
// 定义一个 Person 结构体,有Name和Age变量
type Person struct {
    Name string
    Age int
}
// 初始化sync.Pool,new函数就是创建Person结构体
func initPool() *sync.Pool {
    return &sync.Pool{
        New: func() interface{} {
            fmt.Println("创建一个 person.")
            return &Person{}
        },
    }
}
// 主函数,入口函数
func main() {
    pool := initPool()
    person := pool.Get().(*Person)
    fmt.Println("首次从sync.Pool中获取person:", person)
    person.Name = "Jack"
    person.Age = 23
    pool.Put(person)
    fmt.Println("设置的对象Name: ", person.Name)
    fmt.Println("设置的对象Age: ", person.Age)
    fmt.Println("Pool 中有一个对象,调用Get方法获取:", pool.Get().(*Person))
    fmt.Println("Pool 中没有对象了,再次调用Get方法:", pool.Get().(*Person))
}
运行结果如下所示:
创建一个 person.
首次从sync.Pool中获取person:&{ 0}
设置的对象Name: Jack
设置的对象Age: 23
Pool 中有一个对象,调用Get方法获取:&{Jack 23}
创建一个 person.
Pool 中没有对象了,再次调用Get方法: &{ 0}
2.申请对象 Get
Get 方法会返回 Pool 已经存在的对象;如果没有就使用New方法创建.
3.释放对象 Put
对象或资源不用时,调用 Put 方法把对象或资源放回池子,池子里面的对象啥时候真正释放是由 go_runtime进行回收,是不受外部控制的。
源码分析
创建一个 Pool 实例,关键一点是配置 New 方法,声明 Pool 元素创建的方法。源码1.15版本的 Pool.go 声明 Pool结构如下:
// A Pool must not be copied after first use.
type Pool struct {
        noCopy noCopy

        local     unsafe.Pointer // local fixed-size per-P pool, actual type is [P]poolLocal
        localSize uintptr        // size of the local array

        victim     unsafe.Pointer // local from previous cycle
        victimSize uintptr        // size of victims array

        // New optionally specifies a function to generate
        // a value when Get would otherwise return nil.
        // It may not be changed concurrently with calls to Get.
        New func() interface{}   // New是一个方法、返回值为 接口
}


// Local per-P Pool appendix.
type poolLocalInternal struct {
    private interface{} // Can be used only by the respective P.
    shared  poolChain   // Local P can pushHead/popHead; any P can popTail.
}

type poolLocal struct {
    poolLocalInternal

    // Prevents false sharing on widespread platforms with
    // 128 mod (cache line size) = 0 .
    pad [128 - unsafe.Sizeof(poolLocalInternal{})%128]byte
}
https://zhuanlan.zhihu.com/p/369605252
为了使得可以在多个goroutine中高效的使用并发,sync.Pool会为每个P(对应CPU,这里有点像GMP模型)都分配一个本地池,当执行Get或者Put操作的时候,会先将goroutine和某个P的对象池关联,再对该池进行操作。
我们可以看到其实结构并不复杂,但是如果自己看的话有点懵。注意几个细节就ok。
- local这里面真正的是[P]poolLocal其中P就是GPM模型中的P,有多少个P数组就有多大,也就是每个P维护了一个本地的poolLocal。
- poolLocal里面维护了一个private一个shared,看名字其实就很明显了,- private是给自己用的,而shared的是一个队列,可以给别人用的。注释写的也很清楚,自己可以从队列的头部存然后从头部取,而别的P可以从尾部取。
- victim这个从字面上面也可以知道,幸存者嘛,当进行gc的stw时候,会将local中的对象移到victim中去,也就是说幸存了一次gc,
func (p *Pool) Get() interface{} {
    ......
    l, pid := p.pin()
    x := l.private
    l.private = nil
    if x == nil {
        // Try to pop the head of the local shard. We prefer
        // the head over the tail for temporal locality of
        // reuse.
        x, _ = l.shared.popHead()
        if x == nil {
            x = p.getSlow(pid)
        }
    }
    runtime_procUnpin()
    ......
    if x == nil && p.New != nil {
        x = p.New()
    }
    return x
}

func (p *Pool) getSlow(pid int) interface{} {
    // See the comment in pin regarding ordering of the loads.
    size := atomic.LoadUintptr(&p.localSize) // load-acquire
    locals := p.local                        // load-consume
    // Try to steal one element from other procs.
    for i := 0; i < int(size); i++ {
        l := indexLocal(locals, (pid+i+1)%int(size))
        if x, _ := l.shared.popTail(); x != nil {
            return x
        }
    }

    // Try the victim cache. We do this after attempting to steal
    // from all primary caches because we want objects in the
    // victim cache to age out if at all possible.
    size = atomic.LoadUintptr(&p.victimSize)
    if uintptr(pid) >= size {
        return nil
    }
    locals = p.victim
    l := indexLocal(locals, pid)
    if x := l.private; x != nil {
        l.private = nil
        return x
    }
    for i := 0; i < int(size); i++ {
        l := indexLocal(locals, (pid+i)%int(size))
        if x, _ := l.shared.popTail(); x != nil {
            return x
        }
    }

    // Mark the victim cache as empty for future gets don't bother
    // with it.
    atomic.StoreUintptr(&p.victimSize, 0)

    return nil
}
我去掉了其中一些竞态分析的代码,Get的逻辑其实非常清晰。
- 如果 private 不是空的,那就直接拿来用
- 如果 private 是空的,那就先去本地的shared队列里面从头 pop 一个
- 如果本地的 shared 也没有了,那 getSlow 去拿,其实就是去别的P的 shared 里面偷,偷不到回去 victim 幸存者里面找
- 如果最后都没有,那就只能调用 New 方法创建一个了
defer
go中提供了一个defer语句用来延迟一个函数(匿名函数)或者方法的执行,它会在函数执行完成之 后调用。-般为了防止代码里有资源泄露,对于打开的资源比如文件 等我们需要显示进行关闭,这种场合就是defer发挥作用最好的场景,也是go代码中使用defer最常用的场景。
如果你用过python的话,go 中的defer和python使用with语句保证资源会被关闭目的一样。另 外函数里可以使用多个defer语句,如果有多个defer它们会按照后进先出(L ast In First Out)的顺序执行。
https://zhuanlan.zhihu.com/p/463848031
panic defer revover定义
panic 是 Go 语言中的一个内置函数,可以停止程序的控制流,改变其流转,并且触发恐慌事件。
recover 也是一个内置函数,但其功能与 panic 相对,recover 可以让程序重新获取恐慌后的程序(goroutine)控制权,但是必须在 defer 中 recover 才会生效。
代码清理逻辑
panic: 除数不能为0!

goroutine 1 [running]:
main.main()
		D:/goLang/github/golang_project/错误和异常处理/panic 和 recover/panic_recover.go:27 +0x62
exit status 2

第一行表示出问题的协程,
第二行是问题代码所在的包和函数,
第三行时问题代码的具体位置,
最后一行则是程序的退出状态。
无论是 Go 语言底层抛出 panic,还是我们在代码中显式抛出 panic,处理机制都是一样的:当遇到 panic 时,
Go 语言会中断当前协程中(main 函数)后续代码的执行,然后执行在中断代码之前定义的 defer 语句(按照先入后出的顺序),
最后程序退出并输出 panic 错误信息,以及出现错误的堆栈跟踪信息,在这里就是
10种panic方法:
数组切片越界,空指针调用,过早关闭HTTP响应体(resp.body.calose()),除零,向关闭的chan发送消息,重复关闭chan,关闭未初始化的的chan,使用未初始化的map,跨goroutine处理panic,sync计数负数。
还有一些defer了也无法recover的方法,比如fatalthrow,fatalpanic等,比如并发写入map时就会引起fatalthrow。
panic recover定义
panic 是 Go 语言中的一个内置函数,可以停止程序的控制流,改变其流转,并且触发恐慌事件。而 recover 也是一个内置函数,但其功能与 panic 相对,recover 可以让程序重新获取恐慌后的程序控制权,但是必须在 defer 中 recover 才会生效。
为什么要 defer 才能 recover
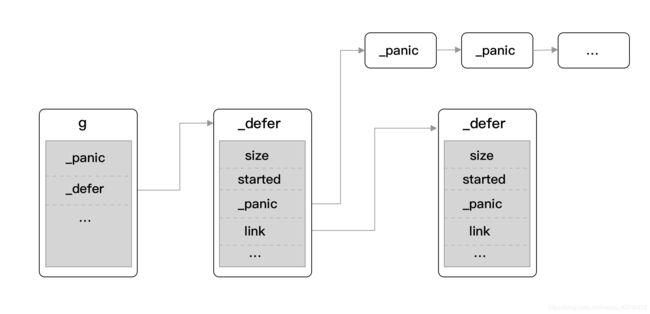
我们可得知在调用 panic 方法后,runtime.gopanic 方法实际上处理的是当前 Goroutine 上所挂载的 ._panic 链表(所以无法对其他 Goroutine 的异常事件响应),然后会对其所属的 defer 链表和 recover 进行检测并处理,最后调用退出命令中止应用程序。
为了解答这些问题,我们要回到一切的起源 panic 才能知晓一二,panic 关键字的具体代码实现如下:
func gopanic(e interface{}) {
    gp := getg()
    ...
    var p _panic
    p.arg = e
    p.link = gp._panic
    gp._panic = (*_panic)(noescape(unsafe.Pointer(&p)))

    for {
        d := gp._defer
        if d == nil {
            break
        }

        // defer...
        ...
        d._panic = (*_panic)(noescape(unsafe.Pointer(&p)))

        p.argp = unsafe.Pointer(getargp(0))
        reflectcall(nil, unsafe.Pointer(d.fn), deferArgs(d), uint32(d.siz), uint32(d.siz))
        p.argp = nil

        // recover...
        if p.recovered {
            ...
            mcall(recovery)
            throw("recovery failed") // mcall should not return
        }
    }

    preprintpanics(gp._panic)
    fatalpanic(gp._panic) // should not return
    *(*int)(nil) = 0      // not reached
}
通过分析上述代码,我们可以大致了解到其处理过程:
- 获取指向当前 Goroutine 的指针。
- 初始化一个 panic 的基本单位 _panic 用作后续的操作。
- 获取当前 Goroutine 上挂载的 _defer。
- 若当前存在 defer 调用,则调用 reflectcall 方法去执行先前 defer 中延迟执行的- 代码,若在执行过程中需要运行 recover 将会调用 gorecover 方法。
- 中断程序结束前,调用 preprintpanics 方法打印出所涉及的 panic 消息。
- 最后调用 fatalpanic 中止应用程序,实际是执行 exit(2) 进行最终退出行为的。
我们可得知在调用 panic 方法后,runtime.gopanic 方法实际上处理的是当前 Goroutine 上所挂载的 ._panic 链表(所以无法对其他 Goroutine 的异常事件响应),然后会对其所属的 defer 链表和 recover 进行检测并处理,最后调用退出命令中止应用程序。
defer recover 小结
- panic处理过程中会检测是否有defer的函数调用
- 如果有,按照先进后出的顺序依次执行
- 如果defer中有recover调用,则将调用栈修改到deferreturn,使得程序正常执行
- 否则当defer的函数调用执行完后,打印panic信息,进程退出


