分布式事务框架seata1.4.2整合到SpringCloud Alibaba 2.x
文章目录
- 分布式事务框架seata1.4.2整合到SpringCloud Alibaba 2.x
-
- 一、安装并配置Seata1.4.2
-
- 下载Seata
- ~~修改file.conf~~(废弃步骤,不需要操作,使用下面的配置中心替代)
- 修改registry.conf
- 添加seataServer.properties
- 为TC添加数据库
- 启动Seata服务器
- 二、微服务接入Seata
-
- 添加依赖
- 在bootstrap.yaml中添加seata配置
- 为RM添加数据库表
- 整合完成,如何使用?
分布式事务框架seata1.4.2整合到SpringCloud Alibaba 2.x
我使用的SpringCloud Alibaba是2.1.0版本,理论上来说如下的整合步骤适合2.x版本
seata支持本地单机部署版,也支持集群部署,我们使用集群版本,但是集群中只有一台机器的方式来部署,为了统一集群的配置,这就需要使用到nacos和mysql
nacos和mysql的安装此处跳过
一、安装并配置Seata1.4.2
下载Seata
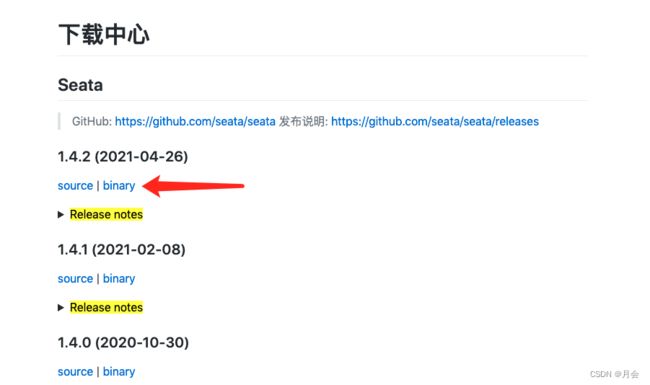
Seata官网下载页 https://seata.io/zh-cn/blog/download.html
下载编译好的binary版本
解压
修改file.conf(废弃步骤,不需要操作,使用下面的配置中心替代)
file.conf用于配置seata的TC服务端的全局事务id等其他数据,我们使用数据库来做存储,默认用的本地文件做存储(无法集群使用)
下面只列出修改点,没有列的内容不需要做改动
store {
	mode = "db"
	db {
    datasource = "druid"
    dbType = "mysql"
    ## mysql8之后要使用这个驱动,否则无需改动
    driverClassName = "com.mysql.cj.jdbc.Driver"
    url = "jdbc:mysql://127.0.0.1:3306/seata?rewriteBatchedStatements=true"
    user = "root"
    password = "12345678"
  }
}
修改registry.conf
registry.conf用于配置seata的TC服务器服务注册和配置中心相关
下面只列出修改点,没有列的内容不需要做改动
registry {
 	type = "nacos"
	nacos {
    # 注册到nacos中的应用名
    application = "seata-server"
    serverAddr = "127.0.0.1:8848"
    group = "SEATA_GROUP"
    namespace = "填自己的namespace,建议给seata服务器单独创一个namespace"
    # 集群名称,就用默认名称:default
    cluster = "default"
    username = "nacos"
    password = "nacos"
	}
}

config {
  type = "nacos"
  nacos {
    serverAddr = "127.0.0.1:8848"
    namespace = "填自己的namespace,建议给seata服务器单独创一个namespace"
    group = "SEATA_GROUP"
    username = "nacos"
    password = "nacos"
    # 读取的配置文件id
    dataId = "seataServer.properties"
  }
}
添加seataServer.properties
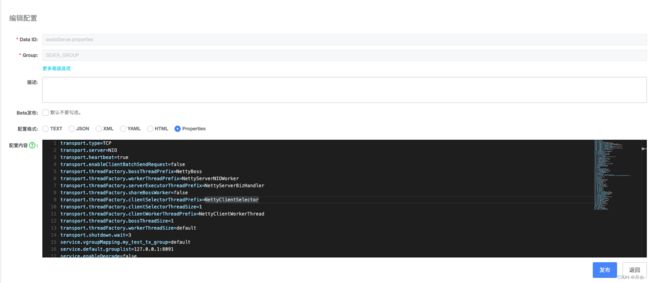
上一步中我们让seata的TC服务器从nacos读取配置,接下来就完善nacos中要读取的配置
先从官网下载默认的配置文件
Seata官方gitee https://gitee.com/seata-io/seata/blob/v1.4.2/script/config-center/config.txt
然后在nacos中响应的namespace下创建该配置文件
需要修改一下内容
下面只列出修改点,没有列的内容不需要做改动
store.mode=db
store.db.datasource=druid
store.db.dbType=mysql
# mysql8之后要使用这个驱动,否则无需改动
store.db.driverClassName=com.mysql.cj.jdbc.Driver
store.db.url=jdbc:mysql://127.0.0.1:3306/seata?useUnicode=true&rewriteBatchedStatements=true
store.db.user=root
store.db.password=12345678
service.vgroupMapping.my_test_tx_group=default
最后一行中
my_test_tx_group为事务组,可以随意更换,相应的需要使用分布式事务的微服务中使用的事务组需要和该参数一致,下面会讲到,=右边的内容为该事务组使用哪一个集群可以配置多个vgroupMappding,如下:
service.vgroupMapping.my_test_tx_group_1=cluster1
service.vgroupMapping.my_test_tx_group_2=cluster2这里我们只需要配置1个做测试即可
为TC添加数据库
Seata官方gitee sql脚本 https://gitee.com/seata-io/seata/blob/v1.4.2/script/server/db/mysql.sql
该脚本在Seata的独立数据库中执行,即上一步中配置的db中
启动Seata服务器
在seata的bin目录中执行启动脚本
./seata-server.sh
二、微服务接入Seata
添加依赖
添加seata微服务依赖,springcloudalibaba项目有默认的seata微服务版本,所以不指定版本
2.1.0的微服务中默认使用0.7.1的seata依赖,所以排除掉更换为1.4.2
同时添加springboot对seata的支持,同1.4.2版本
<dependency>
  <groupId>com.alibaba.cloudgroupId>
  <artifactId>spring-cloud-starter-alibaba-seataartifactId>
  <exclusions>
    <exclusion>
      <groupId>io.seatagroupId>
      <artifactId>seata-allartifactId>
    exclusion>
  exclusions>
dependency>
<dependency>
  <groupId>io.seatagroupId>
  <artifactId>seata-spring-boot-starterartifactId>
  <version>1.4.2version>
dependency>
<dependency>
  <groupId>io.seatagroupId>
  <artifactId>seata-allartifactId>
  <version>1.4.2version>
dependency>
在bootstrap.yaml中添加seata配置
此处有坑,防坑
如果报错can not get cluster name in registry config 'service.vgroupMapping.xxx-fescar-service-group', please make sure registry config correct
则表示服务没有配置使用哪一个事务组,seata默认的事务组名为{服务name}-fescar-service-group
所以如果报上方错误,表示微服务启动的时候没有配置事务组或没有读取到配置
spring:
  cloud:
		alibaba:
      seata:
        # 对应seataServer.properties中的service.vgroupMapping.my_test_tx_group 集群分组
        # 可能由于版本问题,下面的seata.tx-service-group无法正确读取,所以在此处重新以老版本的方式配置
        tx-service-group: my_test_tx_group

seata:
  # 对应seataServer.properties中的service.vgroupMapping.my_test_tx_group 集群分组
  tx-service-group: my_test_tx_group
  service:
    vgroup-mapping:
      my_test_tx_group: default
  registry:
    type: nacos
    nacos:
      # seata-server注册在nacos中的服务名
      application: seata-server
      server-addr: 127.0.0.1:8848
      group : SEATA_GROUP
      namespace: 你的namespace
      username: nacos
      password: nacos
  config:
    type: nacos
    nacos:
      server-addr: 127.0.0.1:8848
      group: SEATA_GROUP
      namespace: 你的namespace
      dataId: seataServer.properties
      username: nacos
      password: nacos
为RM添加数据库表
因为本地事务提交后就无法再回滚,所以在RM客户端上配置undo_log表保存提交事务前的旧数据,以便分布式事务回滚数据
Seata官方gitee sql脚本 https://gitee.com/seata-io/seata/blob/v1.4.2/script/client/at/db/mysql.sql
该脚本执行在微服务对应的数据库中
整合完成,如何使用?
本地事务,我们使用@Transactional注解在service的方法中使用
当本地事务不满足需求,要用分布式事务时将@Transactional替换成@GlobalTransactional即可,Seata在@GlobalTransactional中沿用了@Transactional参数


