掌握Swagger3自动化生成接口文档完成后端提效
文章目录
- OpenApi规范
- Swagger3快速上手
-
- Swagger3使用
- Swagger3.x常用注解讲解和配置
-
- @Api 模块配置
- @ApiOperation 接口配置
- @ApiParam 方法参数配置
- @ApiIgnore 忽略此接口
- @ApiModel()和@ApiModelProperty()
- @ApiResponse描述接口响应
- 注意
- 可能出现的问题
OpenApi规范
开放API规范(OAS)是⼀种无需编写实际API代码就可以记录API的方法。 这是⼀种开放源代码格式,可以用来描述API。 在此过程中,我们可以使用JSON或YAML格式。
OpenAPI文档有三个必需的部分或对象,也可以增加其他模块:
- openapi - OpenAPI规范版本的语义版本号
- info - 有关API的元数据
- paths - API的可用路径和操作
Swagger3快速上手
基于OpenAPI 规范(OpenAPI Specification,OAS)构建的开源接口文档自动生成工具,可以让开发人员快速设计、构建、记录以及使用Rest API
Swagger 主要包含了以下三个部分:
- Swagger Editor:基于浏览器的编辑器, 使用它编写OpenAPI 规范。
- Swagger UI:它会将编写的OpenAPI 规范呈现为交互式的 API ⽂档
- Swagger Codegen:它可以通过为 OpenAPI(以前称为 Swagger)规范定义的任何 API生成服务器存根和客户端SDK来简化构建过程。
使用:
在java代码里面增加注解生成接口文档
优点:
- ⽀持SpringMVC、SpringBoot、SpringCloud等主流java框架 对java代码友好
- 界面简洁
国内比较活跃,主要是spring社区带动功能比较多
缺点:
- 对跨语⾔⽀持不友好(可以和knife4j整合解决这个 问题)
- 代码需要引入相关依赖包和配置
- 文档相对缺少
Swagger3使用
添加依赖
<dependency>
	<groupId>io.springfoxgroupId>
	<artifactId>springfox-boot-starterartifactId>
	<version>3.0.0version>
dependency>
增加配置
#spring.application.name=1024shop接口,增加中文会乱码,可以修改文件编码,或者使用yml格式
spring.application.name=1024shop

# ===== 自定义swagger配置 ===== #
swagger.enable=true
swagger.application-name= ${spring.application.name}
swagger.application-version=1.0
#swagger.application-description=1024shop电商平台管理后端接口文档
swagger.application-description=1024shop api info
创建配置类
@Component
@Data
@ConfigurationProperties("swagger")
@EnableOpenApi
public class SwaggerConfiguration {
        /**
         * 是否开启swagger,生产环境一般关闭,所以这里定义一个变量
         */
        private Boolean enable;

        /**
         * 项目应用名
         */
        private String applicationName;

        /**
         * 项目版本信息
         */
        private String applicationVersion;

        /**
         * 项目描述信息
         */
        private String applicationDescription;

        @Bean
        public Docket docket(){

            return new Docket(DocumentationType.OAS_30)

                    .pathMapping("/")

                    // 定义是否开启swagger,false为关闭,可以通过变量控制,线上关闭
                    .enable(enable)

                    //配置api文档元信息
                    .apiInfo(apiInfo())

                    // 选择哪些接口作为swagger的doc发布
                    .select()


                    //apis() 控制哪些接口暴露给swagger,
                    // RequestHandlerSelectors.any() 所有都暴露
                    // RequestHandlerSelectors.basePackage("net.xdclass.*")  指定包位置
                    // withMethodAnnotation(ApiOperation.class)标记有这个注解 ApiOperation
                    .apis(RequestHandlerSelectors.withMethodAnnotation(ApiOperation.class))

                    .paths(PathSelectors.any())

                    .build();
        }

        private ApiInfo apiInfo() {
            return new ApiInfoBuilder()
                    .title(applicationName)
                    .description(applicationDescription)
                    .contact(new Contact("豆浆两块钱",
                            "https://blog.csdn.net/qq_46033586",
                            "[email protected]"))
                    .version(applicationVersion)
                    .build();
        }
}
访问路径
http://localhost:8080/swagger-ui/index.html
Swagger3.x常用注解讲解和配置
@Api 模块配置
⽤在controller类,描述API接口
@Api(tags = "轮播图管理模块",value = "轮播图管理相关接口")
@RestController
@RequestMapping("api/v1/banner")
public class BannerController {
}
@ApiOperation 接口配置
⽤在方法上,描述接口方法
@ApiOperation("轮播列表")
@GetMapping("list")
public JsonData list(){
}
@ApiParam 方法参数配置
用在入参上面,描述参数
@ApiOperation("查看用户详情")
@GetMapping("detail")
public JsonData query(@ApiParam(name = "id",value = "用户id",example = "1")
                      @RequestParam("id") int id){
}
@ApiIgnore 忽略此接口
不生成文档
@ApiIgnore
@ApiOperation("根据id删除用户")
@DeleteMapping("/delete/{id}")
public JsonData delById(
	@ApiParam(name = "id",value = "用户id",example = "1")
	@PathVariable int id){
}
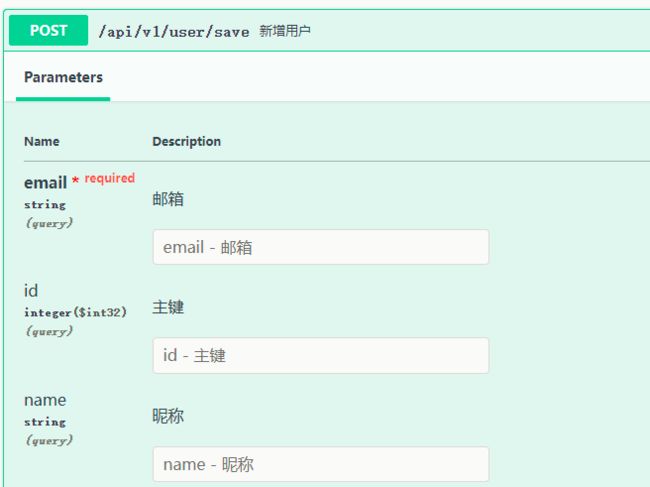
@ApiModel()和@ApiModelProperty()
@ApiModel()
用于类表示对类进行说明,用于参数用实体类接收,value–表示对象名,description–描述这种⼀般用在post创建的时候,使用对象提交这样的场景
@ApiModelProperty()
用于方法,字段:表示对model属性的说明或者数据操作更改
value–字段说明
name–重写属性名字
dataType–重写属性类型
required–是否必填
example–举例说明
hidden–隐藏
@ApiModel(value = "新增用户请求模型")
@Data
public class SaveUserRequest {

    @ApiModelProperty(value = "主键")
    private int id;

    @ApiModelProperty(value = "邮箱",required = true,example = "[email protected]")
    private String email;

    @ApiModelProperty(value = "手机号",required = false)
    private String phone;

    @ApiModelProperty(value = "昵称")
    private  String name;
}


@ApiOperation("新增用户")
@PostMapping("save")
//public JsonData save(SaveUserRequest userRequest){
public JsonData save(@RequestBody SaveUserRequest userRequest){
	return JsonData.buildSuccess();
}
@ApiResponse描述接口响应
public class HttpCodeStatus {
    public static final String REDIRECT = "302";
}


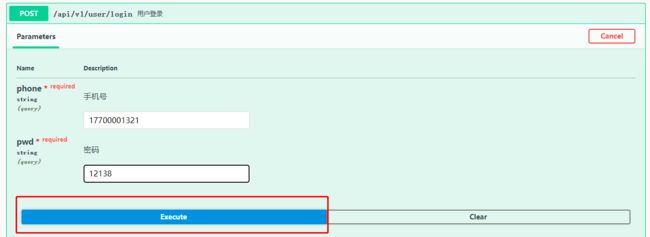
@ApiOperation("用户登录")
@PostMapping("login")
@ApiResponses({
	@ApiResponse(responseCode = HttpCodeStatus.REDIRECT, description = "重定向,跳转登录"),
	@ApiResponse(responseCode = "403",description = "没权限"),
	})
public JsonData login(
	@ApiParam(name = "phone", value = "手机号",example = "13888888888")
	@RequestParam("phone") String phone,

	@ApiParam(name = "pwd", value = "密码",example = "123456")
	@RequestParam("pwd")String pwd){

	return JsonData.buildSuccess();
}
注意
明确接口的Http请求方式:⼀个接口使用@RequestMapping会生成多个文档
可能出现的问题
org.springframework.context.ApplicationContextException:
Failed to start bean ‘documentationPluginsBootstrapper’;nested exception is java.lang.NullPointerException
SpringBoot2.6之后,Spring MVC处理程序映射匹配请求路径的默认策略已从 AntPathMatcher 更改为PathPatternParser。如果需要切换为AntPathMatcher,官方给出的方法是配置spring.mvc.pathmatch.matching-strategy=ant_path_matcher
只需要将spring.mvc.pathmatch.matching-strategy=ant_path_matcher添加到配置文件中即可。


