默认的Dialog
布局,就一个简单的textview,弄个背景,好区分
默认的显示成这样,可以看到宽度默认是有限制的,我们的match是无效的,
修改宽度大家应该知道的,下边的代码
        override fun onStart() {
            super.onStart()
            val window = dialog.window
            val param = window!!.attributes
            param.width = resources.displayMetrics.widthPixels
            window.attributes = param
        }
现在长这样,可以看到,两边还是有边距的,宽度设置和屏幕一样没用的,其实吧,我个人觉得这样挺好的,你是个dialog,留个边距才是合理的,铺满了咋还能看出是dialog。
可实际中,ui可能就需要你不准留间距,那就只好想办法解决了
我去看看源码有没有设置这个的地方
看AlertDialog里边可以发现它是用AlertController来生成的,这个类跳不过去,自己去源码下边找下,然后打开看了下,view的添加过程
构造方法
可以看到里边加载了好多布局,看名字大概就知道干啥的了,我们普通的布局就是这个了布局alert_dialog
    public AlertController(Context context, DialogInterface di, Window window) {
        mContext = context;
        mDialogInterface = di;
        mWindow = window;
        mHandler = new ButtonHandler(di);

        final TypedArray a = context.obtainStyledAttributes(null,
                R.styleable.AlertDialog, R.attr.alertDialogStyle, 0);

        mAlertDialogLayout = a.getResourceId(
                R.styleable.AlertDialog_layout, R.layout.alert_dialog);
        mButtonPanelSideLayout = a.getResourceId(
                R.styleable.AlertDialog_buttonPanelSideLayout, 0);
        mListLayout = a.getResourceId(
                R.styleable.AlertDialog_listLayout, R.layout.select_dialog);

        mMultiChoiceItemLayout = a.getResourceId(
                R.styleable.AlertDialog_multiChoiceItemLayout,
                R.layout.select_dialog_multichoice);
        mSingleChoiceItemLayout = a.getResourceId(
                R.styleable.AlertDialog_singleChoiceItemLayout,
                R.layout.select_dialog_singlechoice);
        mListItemLayout = a.getResourceId(
                R.styleable.AlertDialog_listItemLayout,
                R.layout.select_dialog_item);

        a.recycle();
    }
alert_dialog.xml
这个布局到源码platforms里对应的版本里可以找到,自己随便找个版本吧
//省略,下边就是标题,内容,以及3个button按钮了,就不帖了
AlertController里布局的添加
mWindow.setContentView(contentView); 可以看到就是把我们dialog默认的布局id传进去了,就是上边那个alert_dialog.xml
    public void installContent() {
        /* We use a custom title so never request a window title */
        mWindow.requestFeature(Window.FEATURE_NO_TITLE);
        int contentView = selectContentView();
        mWindow.setContentView(contentView);
        setupView();
        setupDecor();
    }

    private int selectContentView() {
        if (mButtonPanelSideLayout == 0) {
            return mAlertDialogLayout;
        }
        if (mButtonPanelLayoutHint == AlertDialog.LAYOUT_HINT_SIDE) {
            return mButtonPanelSideLayout;
        }
        // TODO: use layout hint side for long messages/lists
        return mAlertDialogLayout;
    }
这个dialog的里边的布局逻辑就不管了,我们知道我们这个view最后是通过windown方法添加到页面上了。
打印下dialog的页面构成
既然知道和window有关,那就打印下
            val mWindow = dialog.window
            val decor = mWindow.getDecorView()
            checkView(decor)

        private fun checkView(decor:View){
            if(decor!=null&&decor is ViewGroup){
                val vg=decor as ViewGroup
                val count=vg.childCount
                repeat(count){
                    val child=vg.getChildAt(it)
                    println("parent=${vg}======child${count}====${it}====$child")
                    if(child is ViewGroup){
                        checkView(child)
                    }
                }
            }
        }
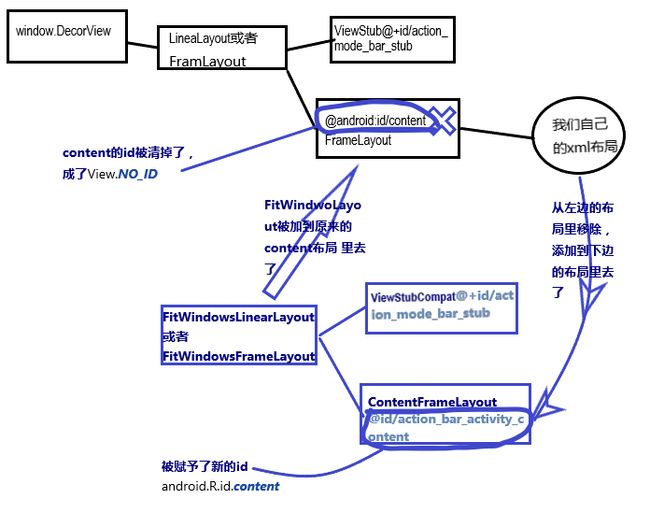
打印完可以看到,他的页面结构和activity差不多,或者说是一样的。
这里有一张activity页面的布局图,可以参考https://www.jianshu.com/p/1e222b3ac7a0 后边有分析。
我们这里的dialog,对应的就是黑色字体的部分。
也就是dialog里我们自定义的布局,是放在一个id是content的Framelayout下边的
我们打印出的view,其实可以看到left,top,right,bottom这几个值的
从最里边到最外边,parentPanel这个id上边的布局文件有
android.widget.LinearLayout{6a24d84 V.E...... ........ 0,0-531,150 #10202f0 android:id/parentPanel}

android.widget.FrameLayout{40c6797 V.E...... ........ 0,0-531,150 #1020002 android:id/content}

android.widget.FrameLayout{6932216 V.E...... ........ 16,16-547,166}

com.android.internal.policy.PhoneWindow$DecorView{ab44b31 V.E...... R....... 0,0-563,182}
我们看到decorview下边的那个FrameLayout,他的left,top,right,bottom值,可以猜到它设置了一个margin,或者也可能是decorview设置的padding。
打印下的结果是decorview设置了padding,4个padding都是16.
找到原因,那就改呗
        override fun onStart() {
            super.onStart()
            val window = dialog.window
            val param = window!!.attributes
            param.width = resources.displayMetrics.widthPixels
            window.attributes = param
            window.decorView.setPadding(0,0,0,0)
        }
改完成这样了,文字部分不见了,而且打印结果来看,padding确实没了,我们的view宽度也确实和屏幕一样了。对比上边的图,应该知道,我们的文字就是默认的textView.
从打印结果,我们的view宽度和屏幕一样宽了,从图上来看,Textview明显也就是在最左边了,只是左边那部分看不到了。感觉是布局没刷新?
后来想到弄个背景颜色看看,结果发现弄完背景就正常了,甚至那paddding都不需要,如下
        override fun onStart() {
            super.onStart()
            val window = dialog.window
            val param = window!!.attributes
            param.width = resources.displayMetrics.widthPixels
            window.attributes = param
//            window.decorView.setPadding(0,0,0,0)
//            window.decorView.setBackgroundColor(Color.RED)
            window.setBackgroundDrawable(ColorDrawable(Color.RED))
        }
我们看下源码,sources目录下随便找个版本
D:\sdk\sources\android-23\com\android\internal\policy\PhoneWindow.java
    @Override
    public final void setBackgroundDrawable(Drawable drawable) {
        if (drawable != mBackgroundDrawable || mBackgroundResource != 0) {
            mBackgroundResource = 0;
            mBackgroundDrawable = drawable;
            if (mDecor != null) {
                mDecor.setWindowBackground(drawable);
            }
            if (mBackgroundFallbackResource != 0) {
                mDecor.setBackgroundFallback(drawable != null ? 0 : mBackgroundFallbackResource);
            }
        }
    }

//DecorView 也在这个类里边
        public void setWindowBackground(Drawable drawable) {
            if (getBackground() != drawable) {
                setBackgroundDrawable(drawable);
                if (drawable != null) {
                    drawable.getPadding(mBackgroundPadding);
                } else {
                    mBackgroundPadding.setEmpty();
                }
                drawableChanged();
            }
        }
可以看到window.setBackgroundDrawable(ColorDrawable(Color.RED))最终也是给decorview设置背景的
那么这样写可以不
window.decorView.setBackgroundColor(Color.RED)
背景没问题,不过这种padding还在,就 需要加上
window.decorView.setPadding(0,0,0,0)
也就是,下边这两句的效果和window.setBackgroundDrawable(ColorDrawable(Color.RED))一样
window.decorView.setBackgroundColor(Color.RED)
window.decorView.setPadding(0,0,0,0)
那么仔细看下就可以发现window.setBackgroundDrawable(ColorDrawable(Color.RED))这个方法里最后多了一行代码drawable.getPadding(mBackgroundPadding);
看下这个方法,可以看到把Rect的值弄成0了.
    public boolean getPadding(@NonNull Rect padding) {
        padding.set(0, 0, 0, 0);
        return false;
    }
而后边还调用了一个方法drawableChanged();
下图可以看到,用到了这个padding,而这个padding被弄成0了都,仔细看看了,感觉他好像本来就是0
也就是初始化,然后上边setWindowBackground()方法里用到,然后就下图了。
另外一个mFramePadding也差不多
分析下布局的加载过程
decorview-framlayout-framlayout-dialog的布局
dialog的show方法如下,其他代码省略,就留了2行,
        mWindowManager = (WindowManager) context.getSystemService(Context.WINDOW_SERVICE);

        final Window w = new PhoneWindow(mContext);

    public void show() {
        onStart();
        if (!mCreated) {
            dispatchOnCreate(null);//这个会调用dialog的onCreate方法的
        }
        mDecor = mWindow.getDecorView();//如果 为空,里边会创建DecorView的

        mWindowManager.addView(mDecor, l);

    }
看下AlertDialog的布局是咋加进去的
//AlertDialog方法
    protected void onCreate(Bundle savedInstanceState) {
        super.onCreate(savedInstanceState);
        mAlert.installContent();
    }
//
    public void installContent() {
        int contentView = selectContentView();
        mWindow.setContentView(contentView);
        setupView();
    }
看下phoneWindow
    public void setContentView(int layoutResID) {
        // Note: FEATURE_CONTENT_TRANSITIONS may be set in the process of installing the window
        // decor, when theme attributes and the like are crystalized. Do not check the feature
        // before this happens.
        if (mContentParent == null) {
            installDecor();
        } else if (!hasFeature(FEATURE_CONTENT_TRANSITIONS)) {
            mContentParent.removeAllViews();
        }

        if (hasFeature(FEATURE_CONTENT_TRANSITIONS)) {
        } else {
            mLayoutInflater.inflate(layoutResID, mContentParent);//这里添加的,mContentParent是decorview里加的那个布局
        }
        mContentParentExplicitlySet = true;
    }
看下phonewindow,这里会分析DecorView的创建,以及上边mContentParent的添加过程。
    public final View getDecorView() {
        if (mDecor == null || mForceDecorInstall) {
            installDecor();
        }
        return mDecor;
    }
下边会省略无关的代码,只保留view的创建相关的代码
    private DecorView mDecor;
    // This is the view in which the window contents are placed. It is either
    // mDecor itself, or a child of mDecor where the contents go.
ViewGroup mContentParent;
 private void installDecor() {
 if (mDecor == null) {
            mDecor = generateDecor(-1);
        }
if (mContentParent == null) {
            mContentParent = generateLayout(mDecor);


}
继续
protected ViewGroup generateLayout(DecorView decor) {

 WindowManager.LayoutParams params = getAttributes();
        // The rest are only done if this window is not embedded; otherwise,
        // the values are inherited from our container.
        if (getContainer() == null) {
            if (mBackgroundDrawable == null) {
                if (mBackgroundResource == 0) {
                    mBackgroundResource = a.getResourceId(
                            R.styleable.Window_windowBackground, 0);
                }
                if (mFrameResource == 0) {
                    mFrameResource = a.getResourceId(R.styleable.Window_windowFrame, 0);
                }
            }
        }
//
int layoutResource;
//根据条件不同获取到layoutresource
layoutResource = R.layout.screen_swipe_dismiss;
layoutResource = R.layout.screen_title_icons;
layoutResource = R.layout.screen_progress;
layoutResource = R.layout.screen_custom_title;

mDecor.onResourcesLoaded(mLayoutInflater, layoutResource);
}
下边DecorView的方法就是把上边的布局加载到DecorView里
    void onResourcesLoaded(LayoutInflater inflater, int layoutResource) {

        mDecorCaptionView = createDecorCaptionView(inflater);
        final View root = inflater.inflate(layoutResource, null);
        if (mDecorCaptionView != null) {
            if (mDecorCaptionView.getParent() == null) {
                addView(mDecorCaptionView,
                        new ViewGroup.LayoutParams(MATCH_PARENT, MATCH_PARENT));
            }
            mDecorCaptionView.addView(root,
                    new MarginLayoutParams(MATCH_PARENT, MATCH_PARENT));
        } else {

            // Put it below the color views.
            addView(root, 0, new ViewGroup.LayoutParams(MATCH_PARENT, MATCH_PARENT));
        }
        mContentRoot = (ViewGroup) root;//新加的这个布局成了容器,后边的东西都是加到这里的
        initializeElevation();
    }
查找这个padding到底是哪里弄的
我打印了相关的几个rect,前边分析过decorview在setbackground以后会调用一个drawableChanged()的方法,这个方法里调用了setpadding方法,如下
    private void drawableChanged() {
        if (mChanging) {
            return;
        }

        setPadding(mFramePadding.left + mBackgroundPadding.left,
                mFramePadding.top + mBackgroundPadding.top,
                mFramePadding.right + mBackgroundPadding.right,
                mFramePadding.bottom + mBackgroundPadding.bottom);
        requestLayout();
        invalidate();
打印下这4个的值
    private final Rect mDrawingBounds = new Rect();

    private final Rect mBackgroundPadding = new Rect();

    private final Rect mFramePadding = new Rect();

    private final Rect mFrameOffsets = new Rect();
使用反射获取
val decor =  dialog.window.getDecorView()
            reflectValue(decor,"mDrawingBounds")
            reflectValue(decor,"mBackgroundPadding")
            reflectValue(decor,"mFramePadding")
            reflectValue(decor,"mFrameOffsets")

        private fun reflectValue(decor: View,filedName:String){
            try {
                var filed=decor.javaClass.getDeclaredField(filedName)
                filed.isAccessible=true
                val rect= filed.get(decor) as Rect
                println("$filedName==========${rect.toShortString()}")
            } catch (e: Exception) {
                e.printStackTrace()
            }
        }
结果,这种我修改过宽度为屏幕宽1024,
mDrawingBounds==========[0,0][1024,204]
mBackgroundPadding==========[16,16][16,16]
mFramePadding==========[0,0][0,0]
mFrameOffsets==========[0,0][0,0]
可以看到mBackgroundPadding是有值的,那看下这个值设置的,可以查到是在给DecorView设置背景的时候
drawable.getPadding(mBackgroundPadding); 获取到的,好像我就知道InsetDrawable有padding,其他Drawable还真没研究过,抽空看看还有哪个带padding的
        public void setWindowBackground(Drawable drawable) {
            if (getBackground() != drawable) {
                setBackgroundDrawable(drawable);
                if (drawable != null) {
                    drawable.getPadding(mBackgroundPadding);
                } else {
                    mBackgroundPadding.setEmpty();
                }
                drawableChanged();
            }
        }
找到哪里设置的,那么就简单了,现在查下系统啥时候给它设置的背景,背景哪里来的,可以看到用的就是主题里的windowBackground资源,那去找下这个资源文件啥样
protected ViewGroup generateLayout(DecorView decor){

                if (mBackgroundResource == 0) {
                    mBackgroundResource = a.getResourceId(
                            R.styleable.Window_windowBackground, 0);
                }
                if (mFrameResource == 0) {
                    mFrameResource = a.getResourceId(R.styleable.Window_windowFrame, 0);
                }
}
去主题里找下
因为现在用的都是Theme.AppCompat 主题,所以就去appcompat-v7下去找