Kubernetes 存储(Configmap、Secret、Volume、PV-PVC)
Kubernetes 存储
- 一、ConfigMap
-
- 1、ConfigMap描述信息
- 2、ConfigMap的创建
- 3、Pod中使用ConfigMap
- 4、ConfigMap的热更新
- 二、Secret
-
- 1、Secret存在意义
- 2、Secret的三种类型
- 3、Service Account
- 4、Opaque Secret
- 三、volume
-
- 1、背景
- 2、卷的类型
- 3、卷类型:emptyDir
- 4、卷类型:hostPath
- 四、PV-PVC
-
- 1、持久化演示说明 - NFS
- 2、关于StatefulSet
一、ConfigMap
1、ConfigMap描述信息
ConfigMap 功能在 Kubernetes1.2 版本中引入,许多应用程序会从配置文件、命令行参数或环境变量中读取配置信息。ConfigMap API 给我们提供了向容器中注入配置信息的机制,ConfigMap 可以被用来保存单个属性,也可以用来保存整个配置文件或者 JSON 二进制大对象
2、ConfigMap的创建
I、使用目录创建
$ ls /root/configmap/dir/
game.properties
ui.properties

$ cat /root/configmap/dir/game.properties
enemies=aliens
lives=3
enemies.cheat=true
enemies.cheat.level=noGoodRotten
secret.code.passphrase=UUDDLRLRBABAS
secret.code.allowed=true
secret.code.lives=30


$ cat /root/configmap/ui.properties
color.good=purple
color.bad=yellow
allow.textmode=true
how.nice.to.look=fairlyNice


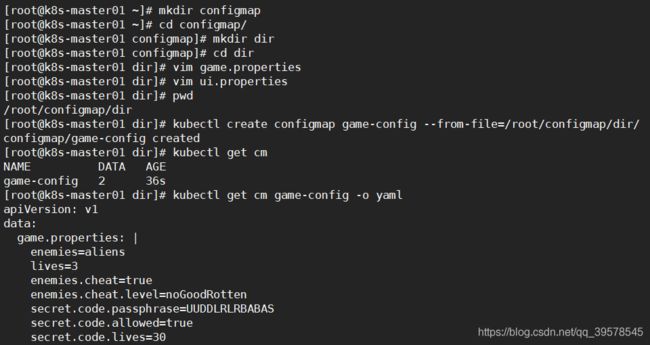
$ kubectl create configmap game-config --from-file=/root/configmap/dir/

game-config :configmap的名称
--from-file:指定一个目录,目录下的所有内容都会被创建出来。以键值对的形式
--from-file指定在目录下的所有文件都会被用在 ConfigMap 里面创建一个键值对,键的名字就是文件名,值就是文件的内容
kubectl get cm 查看configmap文件
kubectl get cm game-config -o yaml   查看详细信息
kubectl describe cm
II、使用文件创建
只要指定为一个文件就可以从单个文件中创建 ConfigMap
$ kubectl create configmap game-config-2 --from-file=/root/configmap/dir/game.properties
$ kubectlget describe cm game-config-2
--from-file这个参数可以使用多次,你可以使用两次分别指定上个实例中的那两个配置文件,效果就跟指定整个目录是一样的
III、使用字面值创建
使用文字值创建,利用—from-literal参数传递配置信息,该参数可以使用多次,格式如下
$ kubectl create configmap special-config --from-literal=special.how=very --from-literal=special.type=charm
$ kubectl describe configmaps special-config    #查看
--from-literal=special.how=very
指定键名为special.how  键值为very
3、Pod中使用ConfigMap
I、使用 ConfigMap 来替代环境变量
apiVersion: v1
kind: ConfigMap
metadata:
  name: special-config
  namespace: default
data:
  special.how: very
  special.type: charm

#special.how: very   键名:键值
[root@k8s-master01 env]# vim env.yaml
apiVersion: v1
kind: ConfigMap
metadata:
  name: env-config
  namespace: default
data:
  log_level: INFO

[root@k8s-master01 env]# kubectl apply -f env.yaml
configmap/env-config created

将两个ConfigMap文件(env-config和special-config)注入到pod的环境变量
vim pod.yaml
apiVersion: v1
kind: Pod
metadata:
  name: dapi-test-pod
spec:
  containers:
    - name: test-container
      image: hub.atguigu.com/library/myapp:v1
      command: ["/bin/sh","-c","env"]
      env:                           #第一种导入方案
        - name: SPECIAL_LEVEL_KEY
          valueFrom:
            configMapKeyRef:
              name: special-config    #从那个configMap文件导入
              key: special.how       #导入的是那个键的键名,就是将special.how键的键值赋予给 SPECIAL_LEVEL_KEY
        - name: SPECIAL_TYPE_KEY
          valueFrom:
            configMapKeyRef:
              name: special-config
              key: special.type
      envFrom:                   #第二种导入方案
         - configMapRef:
             name: env-config
  restartPolicy: Never
kubectl delete deployment --all
kubectl delete ingress --all
kubectl delete svc svc-1 svc-2 svc-3
kubectl create -f pod.yaml
kubectl get pod
kubectl log dapi-test-pod

II、用 ConfigMap 设置命令行参数
apiVersion: v1
kind: ConfigMap
metadata:
  name: special-config
  namespace: default
data:
  special.how: very
  special.type: charm
vim pod1.yaml
apiVersion: v1
kind: Pod
metadata:
  name: dapi-test-pod66
spec:
  containers:
    - name: test-container
      image: hub.atguigu.com/library/myapp:v1
      command: ["/bin/sh","-c","echo $(SPECIAL_LEVEL_KEY) $(SPECIAL_TYPE_KEY)"]  # 把环境变量当成输出的命令
      env:
        - name: SPECIAL_LEVEL_KEY
          valueFrom:
            configMapKeyRef:
              name: special-config
              key: special.how #导入的是那个键的键名,就是将special.how键的键值赋予给 SPECIAL_LEVEL_KEY
        - name: SPECIAL_TYPE_KEY
          valueFrom:
            configMapKeyRef:
              name: special-config
              key: special.type
  restartPolicy: Never # 表示运行完command后不会重启容器
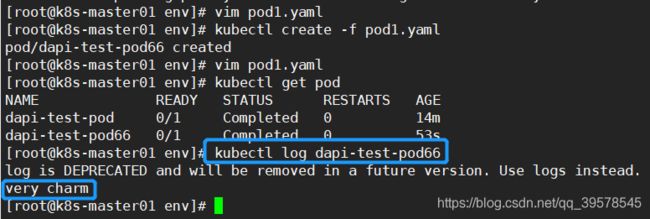
kubectl create -f pod1.yaml
kubectl get pod
kubectl log dapi-test-pod66
apiVersion: v1
kind: ConfigMap
metadata:
  name: special-config
  namespace: default
data:
  special.how: very
  special.type: charm
在数据卷里面使用这个 ConfigMap,有不同的选项。最基本的就是将文件填入数据卷,在这个文件中,键就是文件名,键值就是文件内容
vim pod2.yaml
kubectl apply -f pod2.yaml
apiVersion: v1
kind: Pod
metadata:
  name: dapi-test-pod22
spec:
  containers:
    - name: test-container
      image: hub.atguigu.com/library/myapp:v1
      command: ["/bin/sh","-c","sleep 600s"]
      volumeMounts:                      #容器下进行volum挂载
      - name: config-volume                #挂载的名称为config-volume,与下边相呼应
        mountPath: /etc/config
  volumes:
    - name: config-volume      #名称为config-volume
      configMap:              #从configMap导入
        name: special-config     #导入的configMap名称
  restartPolicy: Never

以volume方案挂载,configmap是文件名,键值会成为文件内容
4、ConfigMap的热更新
vim hostupdate.yaml
kubectl apply -f hotupdate.yaml
#创建一个configMap
apiVersion: v1
kind: ConfigMap
metadata:
  name: log-config
  namespace: default
data:
  log_level: INFO  #键名是log_level,键名是INFO
---
#创建Deployment对configMap进行调用,调用的方式是以volum方式进行挂载
apiVersion: extensions/v1beta1
kind: Deployment
metadata:
  name: my-nginx
spec:
  replicas: 1
  template:
    metadata:
      labels:
        run: my-nginx
    spec:
      containers:
      - name: my-nginx
        image: hub.atguigu.com/library/myapp:v1
        ports:
        - containerPort: 80
        volumeMounts:
        - name: config-volume
          mountPath: /etc/config
      volumes:
        - name: config-volume
          configMap:
            name: log-config
验证/etc/config下,是否有log_level文件且内容是INFO

热更新验证:
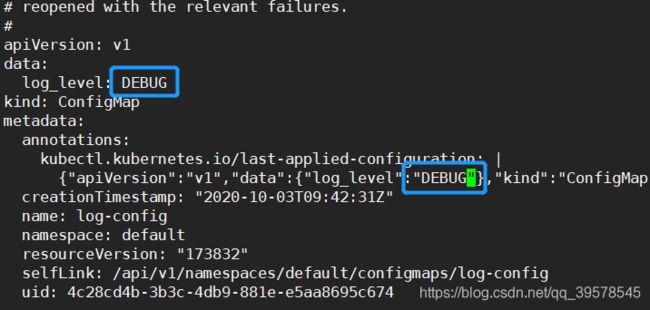
修改ConfigMap
kubectl edit configmap log-config

ConfigMap 更新后滚动更新 Pod
更新 ConfigMap 目前并不会触发相关 Pod 的滚动更新,可以通过修改 pod annotations 的方式强制触发滚动更新
$ kubectl patch deployment my-nginx --patch'{"spec": {"template": {"metadata": {"annotations":{"version/config": "20190411" }}}}}'
这个例子里我们在.spec.template.metadata.annotations中添加version/config,每次通过修改version/config来触发滚动更新
- 更新 ConfigMap 后:使用该 ConfigMap 挂载的 Env 不会同步更新使用该 ConfigMap 挂载的 Volume 中的数据需要一段时间(实测大概10秒)才能同步更新
通过ConfigMap方式去保存配置文件,以及一些数据,这些数据可以被导入到pod内部成为环境变量或文件,从而达到热更新的目的。但是是以明文的方式进行保存,对于密钥,密码文件用ConfigMap就不合适了。
二、Secret
1、Secret存在意义
Secret 解决了密码、token、密钥等敏感数据的配置问题,而不需要把这些敏感数据暴露到镜像或者 Pod Spec中。Secret 可以以 Volume 或者环境变量的方式使用
2、Secret的三种类型
- Service Account:用来访问 Kubernetes API(保护),由 Kubernetes 自动创建,并且会自动挂载到 Pod 的/run/secrets/kubernetes.io/serviceaccount目录中
- Opaque:base64编码格式的Secret,用来存储密码、密钥等
- kubernetes.io/dockerconfigjson:用来存储私有 docker registry 的认证信息(私有仓库的认证用户名和密码)
常用的是后面两个
3、Service Account
Service Account 用来访问 Kubernetes API,由 Kubernetes 自动创建,并且会自动挂载到 Pod的/run/secrets/kubernetes.io/serviceaccount目录中
找到有与API接触的
kubectl get pod -n kube-system
kubectl exec kube-proxy-9ntqp -n kube-system -it -- /bin/sh
# cd /run/secrets/kubernetes.io/serviceaccount
# ls
ca.crt	namespace  token
ca.crt 就是访问API Server使用的HTTPS双向认证
4、Opaque Secret
1、创建说明
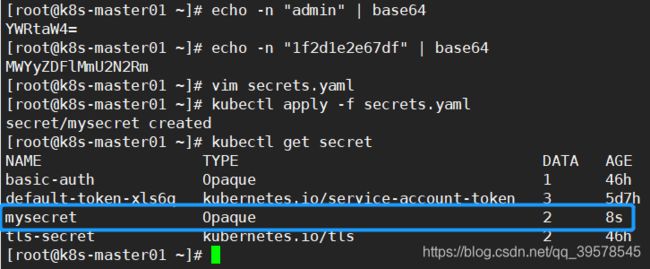
Opaque 类型的数据是一个 map 类型,要求 value 是 base64 编码格式:
$ echo -n "admin" | base64
YWRtaW4=

$ echo -n "1f2d1e2e67df" | base64
MWYyZDFlMmU2N2Rm
vim secrets.yaml
apiVersion: v1
kind: Secret
metadata:
  name: mysecret
type: Opaque
data:
  password: MWYyZDFlMmU2N2Rm
  username: YWRtaW4=
2、使用方式(两种)
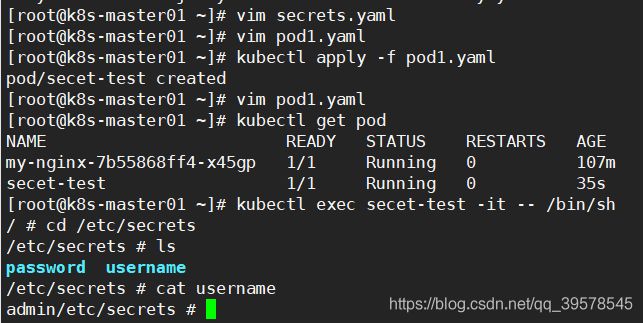
1)、将 Secret 挂载到 Volume 中
vim pod1.yaml
apiVersion: v1
kind: Pod
metadata:
  labels:
    name: secret-test
  name: secret-test
spec:
  volumes:
  - name: secrets
    secret:
      secretName: mysecret  # 与 secret.yaml对应
  containers:
  - image: hub.atguigu.com/library/myapp:v1
    name: db
    volumeMounts:
    - name: secrets  # 与上面 volumes的name对应
      mountPath: "/etc/secrets"
      readOnly: true
2)、将 Secret 导出到环境变量中
kubectl delete pod --all
vim pod2.yaml
apiVersion: extensions/v1beta1
kind: Deployment
metadata:
  name: pod-deployment
spec:
  replicas: 2
  template:
    metadata:
      labels:
        app: pod-deployment
    spec:
      containers:
      - name: pod-1
        image: hub.atguigu.com/library/myapp:v1
        ports:
        - containerPort: 80
        env:
        - name: TEST_USER
          valueFrom:
            secretKeyRef:
              name: mysecret
              key: username  # 会把username的值admin赋予给TEST_USER
        - name: TEST_PASSWORD
          valueFrom:
            secretKeyRef:
               name: mysecret
               key: password
kubectl apply -f pod2.yaml
kubectl get pod
kubect exec pod-deployment-57cf4db6cc-89znm -it – /bin/sh

3、kubernetes.io/dockerconfigjson(docker仓库的认证信息)
使用 Kuberctl 创建 docker registry 认证的 secret
$ kubectl create secret docker-registry myregistrykey --docker-server=DOCKER_REGISTRY_SERVER --docker-username=DOCKER_USER --docker-password=DOCKER_PASSWORD --docker-email=DOCKER_EMAILsecret “myregistrykey” created.
在创建 Pod 的时候,通过imagePullSecrets来引用刚创建的 `myregistrykey
apiVersion: v1
kind: Pod
metadata:
name: foo
spec:
 containers:
 - name: foo
image: roc/awangyang:v1
 imagePullSecrets:
- name: myregistrykey
在自己私有仓库下的认证
三、volume
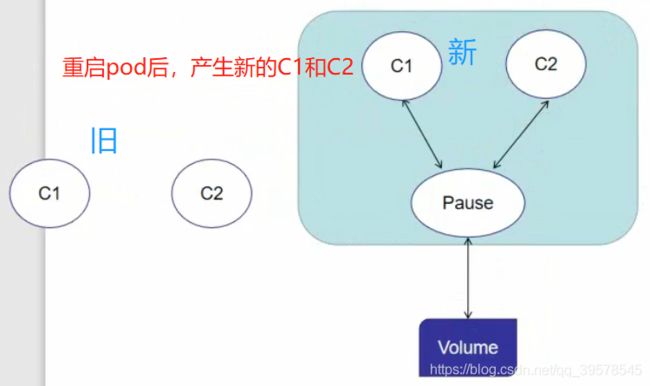
容器磁盘上的文件的生命周期是短暂的,这就使得在容器中运行重要应用时会出现一些问题。首先,当容器崩溃时,kubelet 会重启它,但是容器中的文件将丢失——容器以干净的状态(镜像最初的状态)重新启动。(initC) 其次,在Pod中同时运行多个容器时,这些容器之间通常需要共享文件。Kubernetes 中的Volume抽象就很好的解决了这些问题
Persistent Volume
持久卷
容器C1和C2共享Pause的存储卷,重启后,由于Volume卷依然在,文件不会丢失
1、背景
Kubernetes 中的卷有明确的寿命 —— 与封装它的 Pod 相同。所f以,卷的生命比 Pod 中的所有容器都长,当这个容器重启时数据仍然得以保存。当然,当 Pod 不再存在时,卷也将不复存在。也许更重要的是,Kubernetes支持多种类型的卷,Pod 可以同时使用任意数量的卷
2、卷的类型
3、卷类型:emptyDir
当 Pod 被分配给节点时,首先创建emptyDir卷,并且只要该 Pod 在该节点上运行,该卷就会存在。正如卷的名字所述,它最初是空的。Pod 中的容器可以读取和写入emptyDir卷中的相同文件,尽管该卷可以挂载到每个容器中的相同或不同路径上。当出于任何原因从节点中删除 Pod 时,emptyDir中的数据将被永久删除
emptyDir的用法有:
①暂存空间,例如用于基于磁盘的合并排序(很多个容器数据需要组合合并,则emptyDir作为临时空间存放)
②用作长时间计算崩溃恢复时的检查点
③Web服务器容器提供数据时,保存内容管理器容器提取的文件
em.yaml
apiVersion: v1
kind: Pod
metadata:
 name: test-pd
spec:
 containers:
 - image: hub.atguigu.com/library/myapp:v1
   name: test-container
   volumeMounts:
   - mountPath: /cache
     name: cache-volume
 volumes:
 - name: cache-volume
   emptyDir: {}
em2.yaml,两个容器测试volume共享空卷
apiVersion: v1
kind: Pod
metadata:
 name: test-pd2
spec:
 containers:
 - image: hub.atguigu.com/library/myapp:v1
   name: test-container
   volumeMounts:
   - mountPath: /cache
     name: cache-volume
 - image: busybox
   name: liveness-exec-container
   imagePullPolicy: IfNotPresent
   command: ["/bin/sh","-c","sleep 6000s"]
   volumeMounts:
   - mountPath: /test
     name: cache-volume
 volumes:
 - name: cache-volume
   emptyDir: {}
4、卷类型:hostPath
hostPath 卷将主机节点的文件系统中的文件或目录挂载到集群中
hostPath的用途如下:
①运行需要访问 Docker 内部的容器;使用/var/lib/docker的hostPath
②在容器中运行 cAdvisor;使用/dev/cgroups的hostPath
③允许 pod 指定给定的 hostPath 是否应该在 pod 运行之前存在,是否应该创建,以及它应该以什么形式存在
除了所需的path属性之外,用户还可以为hostPath卷指定type
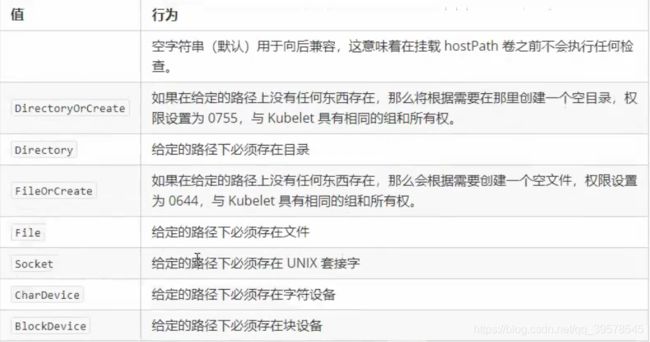
使用这种卷类型是请注意,因为:
- 由于每个节点上的文件都不同,具有相同配置(例如从 podTemplate 创建的)的 pod 在不同节点上的行为可能会有所不同
- 当 Kubernetes 按照计划添加资源感知调度时,将无法考虑hostPath使用的资源
- 在底层主机上创建的文件或目录只能由 root 写入。您需要在特权容器中以 root 身份运行进程,或修改主机上的文件权限以便写入hostPath卷
实验操作:
pod1.yaml
apiVersion: v1
kind: Pod
metadata:
  name: test-pd
spec:
  containers:
  - image: wangyanglinux/myapp:v2
    name: test-container
    volumeMounts:
    - mountPath: /test-pd
      name: test-volume
  volumes:
  - name: test-volume
    hostPath:
      # directory location on host
      path: /data
      # this field is optional
      type: Directory
然后在node1、node2节点上,创建/data
[root@k8s-node01 ~]# mkdir /data
[root@k8s-node02 ~]# mkdir /data
[root@k8s-master01 volume]# kubectl create -f pod1.yaml
[root@k8s-master01 volume]# kubectl exec -it test-pd -it – /bin/sh
在node01可以看得到有index.html,在node02看不到。这就是hostPath

四、PV-PVC
PV(PersistentVolume)
是由管理员设置的存储,它是群集的一部分。就像节点是集群中的资源一样,PV也是集群中的资源。PV是Volume 之类的卷插件,但具有独立于使用PV的Pod 的生命周期。此API对象包含存储实现的细节,即 NFS、iSCSI 或特定于云供应商的存储系统
PVC(PersistentVolumeClaim)
是用户存储的请求。它与Pod 相似。Pod 消耗节点资源,PVC消耗PV资源。Pod 可以请求特定级别的资源(CPU和内存)。声明可以请求特定的大小和访问模式(例如,可以以读/写一次或只读多次模式挂载)
静态pv
集群管理员创建一些PV。它们带有可供群集用户使用的实际存储的细节。它们存在于KubernetesAPl中,可用于消费
动态
当管理员创建的静态PV都不匹配用户的PersistentVolumec1aim 时,集群可能会尝试动态地为PVC创建卷。此配置基于 storageclasses:PVC必须请求[存储类],并且管理员必须创建并配置该类才能进行动态创建。声明该类为”…可以有效地禁用其动态配置
要启用基于存储级别的动态存储配置,集群管理员需要启用API server 上的Defaultstorageclass[D准入控制器]
。例如,通过确保 Defaultstorageclass位于API server 组件的-admission-control标志,使用逗号分隔的有序值列表中,可以完成此操作
绑定
master中的控制环路监视新的PVC,寻找匹配的PV(如果可能),并将它们绑定在一起。如果为新的PVC动态调配PV,则该环路将始终将该PV绑定到PVC。否则,用户总会得到他们所请求的存储,但是容量可能超出要求的数量。一旦PV和PVC绑定后,PersistentVolumeClaim 绑定是排他性的,不管它们是如何绑定的。PVC跟PV绑定是一对一的映射
持久化卷声明的保护
PVC保护的目的是确保由 pod正在使用的PVC不会从系统中移除,因为如果被移除的话可能会导致数据丢失
当启用PVC保护alpha功能时,如果用户删除了一个pod 正在使用的PVC,则该PVC不会被立即删除。PVC的删除将被推迟,直到PVC不再被任何pod使用
持久化卷类型
PersistentVolume 类型以插件形式实现。Kubernetes 目前支持以下插件类型:

持久卷演示代码
NFS
apiVersion: v1
kind: PersistentVolume
metadata:
  name: pv0003
spec:
  capacity:
    storage: 5Gi # 卷大小
  volumeMode: Filesystem # 文件类型
  accessModes: # 访问策略
  - ReadWriteOnce # 仅仅读写仅仅一个人
  persistentVolumeReclaimPolicy: Recycle # 回收策略
  storageClassName: slow # 存储类的名称
  mountOptions:
  - hard
  - nfsvers=4.1
  nfs:
    path: /tmp
    server: 172.17.0.2
PV 访问模式
PersistentVolume可以以资源提供者支持的任何方式挂载到主机上。如下表所示,供应商具有不同的功能,每个PV 的访问模式都将被设置为该卷支持的特定模式。例如,NFS 可以支持多个读/写客户端,但特定的 NFS PV 可能以只读方式导出到服务器上。每个 PV 都有一套自己的用来描述特定功能的访问模式
- ReadWriteOnce——该卷可以被单个节点以读/写模式挂载
- ReadOnlyMany——该卷可以被多个节点以只读模式挂载
- ReadWriteMany——该卷可以被多个节点以读/写模式挂载
在命令行中,访问模式缩写为:
- RWO - ReadWriteOnce
- ROX - ReadOnlyMany
- RWX - ReadWriteMany
回收策略
- Retain(保留,PV不再使用也不给别人使用)—— 手动回收
- (废弃了的策略)Recycle(回收)—— 基本擦除(rm -rf /thevolume/*)
- Delete(删除)—— 关联的存储资产(例如 AWS EBS、GCE PD、Azure Disk 和 OpenStack Cinder 卷)将被删除
当前,只有 NFS 和 HostPath 支持回收策略。AWS EBS、GCE PD、Azure Disk 和 Cinder 卷支持删除策略
状态
卷可以处于以下的某种状态:
- Available(可用)——一块空闲资源还没有被任何声明绑定
- Bound(已绑定)——卷已经被声明绑定
- Released(已释放)——声明被删除,但是资源还未被集群重新声明
- Failed(失败)——该卷的自动回收失败
命令行会显示绑定到 PV 的 PVC 的名称
1、持久化演示说明 - NFS
1、安装 NFS 服务器
在Harbor机器上安装nfs
yum install -y nfs-common nfs-utils  rpcbind
mkdir /nfs # 创建共享目录
chmod 777 /nfs
chown nfsnobody /nfs
vim /etc/exports
/nfs *(rw,no_root_squash,no_all_squash,sync)
      #允许读写,管理员权限,sync的拷贝方式
systemctl start rpcbind
systemctl start nfs
然后在所有的kubernetes节点上安装nfs客户端
yum install -y nfs-utils rpcbind
在master上测试harbor机器上的nfs系统是否可以正常使用
[root@k8s-master01 ~]# mkdir /test
showmount -e 10.0.100.13
[root@k8s-master01 ~]# mount -t nfs 10.0.100.13:/nfs /test  # 挂载到test目录下
cd /test
echo 123456 >> index.html
cat index.html
123456
umount /test
rm -rf /test
Harbor上创建多个PV
vim /etc/exports
/nfs *(rw,no_root_squash,no_all_squash,sync)
/nfs1 *(rw,no_root_squash,no_all_squash,sync)
/nfs2 *(rw,no_root_squash,no_all_squash,sync)
/nfs3 *(rw,no_root_squash,no_all_squash,sync)
mkdir /nfs1 /nfs2 /nfs3
chmod 777 /nfs1 /nfs2 /nfs3
chown nfsnobody /nfs1 /nfs2 /nfs3
systemctl restart rpcbind
systemctl restart nfs
###master上测试/nfs1是否能够挂载
mount -t nfs 10.0.100.13:/nfs1 /test
2、部署 PV
mkdir pv
vim pv.yaml
apiVersion: v1
kind: PersistentVolume
metadata:
  name: nfspv1
spec:
  capacity:
    storage: 10Gi
  accessModes:
  - ReadWriteOnce
  persistentVolumeReclaimPolicy: Retain
  storageClassName: nfs
  nfs:
    path: /nfs
    server: 10.0.100.13
kubectl create -f pv.yaml
kubectl get pv

部署多个PV
vim pv.yaml
apiVersion: v1
kind: PersistentVolume
metadata:
  name: nfspv1
spec:
  capacity:
    storage: 10Gi
  accessModes:
  - ReadWriteOnce
  persistentVolumeReclaimPolicy: Retain
  storageClassName: nfs
  nfs:
    path: /nfs
    server: 10.0.100.13
---
apiVersion: v1
kind: PersistentVolume
metadata:
  name: nfspv2
spec:
  capacity:
    storage: 5Gi
  accessModes:
  - ReadOnlyMany
  persistentVolumeReclaimPolicy: Retain
  storageClassName: nfs
  nfs:
    path: /nfs1
    server: 10.0.100.13
---
apiVersion: v1
kind: PersistentVolume
metadata:
  name: nfspv3
spec:
  capacity:
    storage: 5Gi
  accessModes:
  - ReadWriteOnce
  persistentVolumeReclaimPolicy: Retain
  storageClassName: nfs
  nfs:
    path: /nfs2
    server: 10.0.100.13
---
apiVersion: v1
kind: PersistentVolume
metadata:
  name: nfspv4
spec:
  capacity:
    storage: 50Gi
  accessModes:
  - ReadWriteOnce
  persistentVolumeReclaimPolicy: Retain
  storageClassName: nfs
  nfs:
    path: /nfs3
    server: 10.0.100.13
kubectl create -f pv.yaml
kubectl get pv
3、创建服务并使用 PVC
如果要使用StatefulSet,必须要创建一个无头服务(service)
vim pod.yaml
apiVersion: v1
kind: Service
metadata:
  name: nginx
  labels:
    app: nginx
spec:
  ports:
  - port: 80
    name: web
  clusterIP: None # 无头服务必须先建立,不需要对应的IP和端口
  selector:
    app: nginx
---
apiVersion: apps/v1
kind: StatefulSet # 控制器
metadata:
  name: web
spec:
  selector:
    matchLabels:
      app: nginx  # 当app是nginx时匹配
  serviceName: "nginx"  # 是StatefulSet对应的必须是无头服务的SVC
  replicas: 3
  template:
    metadata:
      labels:
        app: nginx
    spec:
      containers:
      - name: nginx
        image: wangyanglinux/myapp:v1
        ports:
        - containerPort: 80
          name: web
        volumeMounts:
        - name: nfs-www
          mountPath: /usr/share/nginx/html
  volumeClaimTemplates: # 卷的请求声明模板
  - metadata:
      name: nfs-www
    spec:
      accessModes: ["ReadWriteOnce"]  # 访问模式必须匹配RWO
      storageClassName: "nfs" # 类必须要匹配nfs
      resources:
        requests:
          storage: 1Gi # 就近(内存)原则绑定
kubectl create -f pod.yaml
kubectl get pv
kubectl get pvc
kubectl get statefulset
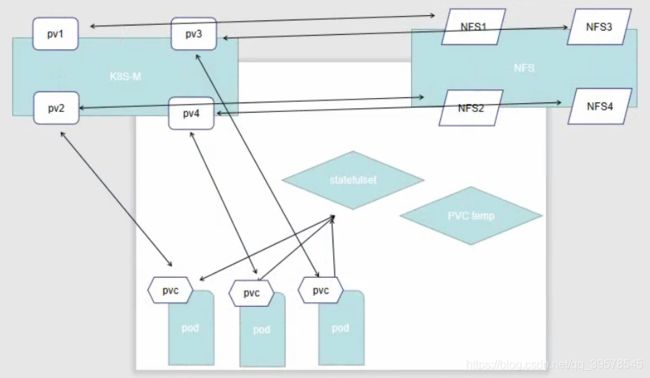
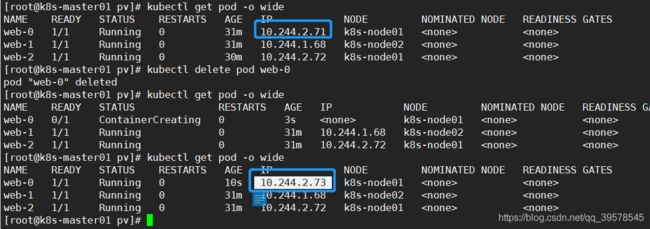
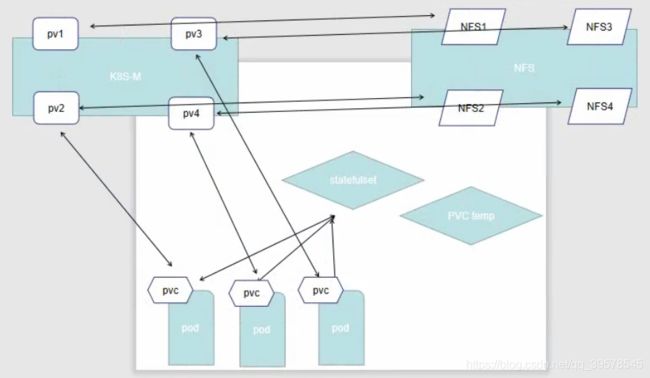
每个pod都有自己的请求模板,然后会创建对应的PVC,PVC会根据PV进行匹配,匹配成功然后绑定(删除pod后会生成同样pod不同IP地址)
测试验证
nfs1对应web-1 10.244.2.71 实际对应的是harbor的nfs
nfs3对应web-0 10.244.1.68 实际对应的是harbor的nfs2
nfs4对应web-2 10.244.2.72 实际对应的是harbor的nfs3
在harbor上
cd /nfs
vim index.html
chmod 777 index.html


在master节点上
kubectl get pod -o wide
curl  10.xxxx
详情查看
kubectl describe pv nfspv1

2、关于StatefulSet
- 匹配 Pod name ( 网络标识 ) 的模式为:(statefulset名称)−(序号),比如上面的示例:web-0,web-1,web-2
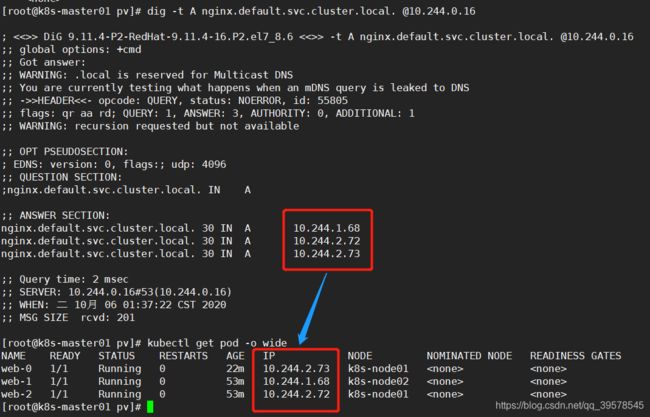
- StatefulSet 为每个 Pod 副本创建了一个 DNS 域名,这个域名的格式为: $(podname).(headless server name) 即web-0.nginx,也就意味着服务间是通过Pod域名来通信而非 Pod IP,因为 当Pod所在Node发生故障时, Pod 会被飘移到其它 Node 上,Pod IP 会发生变化,但是 Pod 域名不会有变化
- StatefulSet 使用 Headless 服务来控制 Pod 的域名,这个域名的 FQDN 为:
$(service name) .$(namespace).svc.cluster.local,其中,“cluster.local” 指的是集群的域名 - 根据 volumeClaimTemplates,为每个 Pod 创建一个 pvc,pvc 的命名规则匹配模式:(volumeClaimTemplates.name)-(pod_name),比如上面的 volumeMounts.name=nfs-www, Podname=web-[0-2],因此创建出来的 PVC 是 nfs-www-web-0、nfs-www-web-1、nfs-www-web-2
- 删除 Pod 不会删除其 pvc,手动删除 pvc 将自动释放 pv
测试验证
①网络标识
kubectl get pod -o wide
kubectl get svc
kubectl exec web-0 -it – /bin/sh

③coredns
kubectl get pod -o wide -n kube-system
dig -t A nginx.default.svc.cluster.local @10.244.0.16
Statefulset的启停顺序:
- 有序部署:部署StatefulSet时,如果有多个Pod副本,它们会被顺序地创建(从0到N-1)并且,在下一个Pod运行之前所有之前的Pod必须都是Running和Ready状态。
- 有序删除:当Pod被删除时,它们被终止的顺序是从N-1到0。
kubectl delete statefulset --all - 有序扩展:当对Pod执行扩展操作时,与部署一样,它前面的Pod必须都处于Running和Ready状态。
StatefulSet使用场景:
- 稳定的持久化存储,即Pod重新调度后还是能访问到相同的持久化数据,基于 PVC 来实现。
- 稳定的网络标识符,即 Pod 重新调度后其 PodName 和 HostName 不变。
- 有序部署,有序扩展,基于 init containers 来实现。
- 有序收缩。
补充:删除
①删除,有yaml
kubectl delete -f pv/pod.yaml
②kubectl delete svc nginx
③kubectl delete pvc --all
④kubectl delete pv --all
删除对应的nfs
⑤kubectl edit pv nfspv1 改动里面的数值,dd
⑥https://www.cnblogs.com/weifeng1463/p/11490399.html

