springboot启动流程和Tomcat启动
springboot启动流程和Tomcat启动
- 1.springboot启动函数
- 2.注解@SpringBootApplication
-
- 2.1@SpringBootConfiguration
- 2.2 @EnableAutoConfiguration
- 2.3 @ComponentScan
- 3 SpringApplication.run
- 4 TOMCAT的启动
1.springboot启动函数
springboot启动函数如下所示:
@SpringBootApplication(scanBasePackages = {"TestLab.JustTalk_Server", "TestLab.JustTalk_Common"})
public class JustTalkServerApplication {

	public static void main(String[] args) {
		SpringApplication.run(JustTalkServerApplication.class, args);
	}

}
主要包含两个个部分:
- 注解@SpringBootApplication
- SpringApplication.run()方法
2.注解@SpringBootApplication
让我们点进@SpringBootApplication
@Target({ElementType.TYPE})
@Retention(RetentionPolicy.RUNTIME)
@Documented
@Inherited
@SpringBootConfiguration
@EnableAutoConfiguration
@ComponentScan(
    excludeFilters = {@Filter(
    type = FilterType.CUSTOM,
    classes = {TypeExcludeFilter.class}
), @Filter(
    type = FilterType.CUSTOM,
    classes = {AutoConfigurationExcludeFilter.class}
)}
)
public @interface SpringBootApplication {
}
可以看出来,其主要作用的是如下三个注解
- @SpringBootConfiguration
- @EnableAutoConfiguration
- @ComponentScan
让我们分别看一下这三个注解有什么作用
2.1@SpringBootConfiguration
@Target({ElementType.TYPE})
@Retention(RetentionPolicy.RUNTIME)
@Documented
@Configuration
@Indexed
public @interface SpringBootConfiguration {
    @AliasFor(
        annotation = Configuration.class
    )
    boolean proxyBeanMethods() default true;
}
可见与@SpringBootConfiguration和@Configuration功能相同,标注当前类是配置类。
2.2 @EnableAutoConfiguration
@Target({ElementType.TYPE})
@Retention(RetentionPolicy.RUNTIME)
@Documented
@Inherited
@AutoConfigurationPackage
@Import({AutoConfigurationImportSelector.class})
public @interface EnableAutoConfiguration {
    String ENABLED_OVERRIDE_PROPERTY = "spring.boot.enableautoconfiguration";

    Class<?>[] exclude() default {};

    String[] excludeName() default {};
}
在上面一串注解中起重要作用的是@AutoConfigurationPackage和@Import({AutoConfigurationImportSelector.class})
@Import()可以直接指定实体类,加载这个类定义到context中。
@Target({ElementType.TYPE})
@Retention(RetentionPolicy.RUNTIME)
@Documented
@Inherited
@Import({Registrar.class})
public @interface AutoConfigurationPackage {
    String[] basePackages() default {};

    Class<?>[] basePackageClasses() default {};
}
如上可见,@AutoConfigurationPackage借助Registrar.class完成注册,通过getPackageNames注册当前启动类的根package
    static class Registrar implements ImportBeanDefinitionRegistrar, DeterminableImports {
        Registrar() {
        }

        public void registerBeanDefinitions(AnnotationMetadata metadata, BeanDefinitionRegistry registry) {
            AutoConfigurationPackages.register(registry, (String[])(new AutoConfigurationPackages.PackageImports(metadata)).getPackageNames().toArray(new String[0]));
        }
    }
接下来是AutoConfigurationImportSelector类,紧接着会调用其中的selectImports方法。
public class AutoConfigurationImportSelector implements DeferredImportSelector, BeanClassLoaderAware, ResourceLoaderAware, BeanFactoryAware, EnvironmentAware, Ordered {
    public String[] selectImports(AnnotationMetadata annotationMetadata) {
        if (!this.isEnabled(annotationMetadata)) {
            return NO_IMPORTS;
        } else {
            AutoConfigurationImportSelector.AutoConfigurationEntry autoConfigurationEntry = this.getAutoConfigurationEntry(annotationMetadata);
            return StringUtils.toStringArray(autoConfigurationEntry.getConfigurations());
        }
    }
}
selectImports会返回autoConfigurationEntry.getConfigurations()然后通过
getCandidateConfigurations->SpringFactoriesLoader.loadFactoryNames最终从META-INF/spring.factories中加载配置类。
Enumeration urls = classLoader.getResources("META-INF/spring.factories");
2.3 @ComponentScan
@Retention(RetentionPolicy.RUNTIME)
@Target({ElementType.TYPE})
@Documented
@Repeatable(ComponentScans.class)
public @interface ComponentScan {
}
@ComponentScan注解相信很多人都知道它的作用,也就是指定扫描的范围,加载该范围内的bean和context等,默认扫描路径为声明@ComponentScan所在类的package。可以通过scanBasePackages = {“XXX”, “XXX”}来指定需要扫描的包。
3 SpringApplication.run
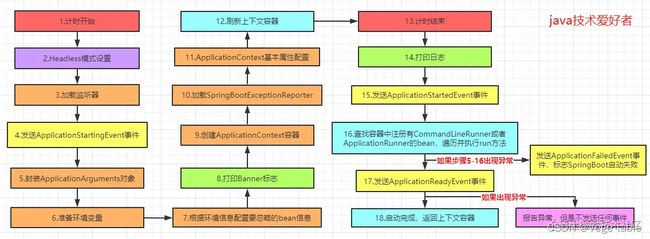
SpringApplication.run是一个静态方法,但最终会创建一个SpringApplication去调用run方法
//1
    public static ConfigurableApplicationContext run(Class<?> primarySource, String... args) {
        return run(new Class[]{primarySource}, args);
    }
//2
    public static ConfigurableApplicationContext run(Class<?>[] primarySources, String[] args) {
        return (new SpringApplication(primarySources)).run(args);
    }

    public static void main(String[] args) throws Exception {
        run(new Class[0], args);
    }
 //3 调用构造器
     public SpringApplication(ResourceLoader resourceLoader, Class<?>... primarySources) {
        this.sources = new LinkedHashSet();
        this.bannerMode = Mode.CONSOLE;
        this.logStartupInfo = true;
        this.addCommandLineProperties = true;
        this.addConversionService = true;
        this.headless = true;
        this.registerShutdownHook = true;
        this.additionalProfiles = Collections.emptySet();
        this.isCustomEnvironment = false;
        this.lazyInitialization = false;
        this.applicationContextFactory = ApplicationContextFactory.DEFAULT;
        this.applicationStartup = ApplicationStartup.DEFAULT;
        this.resourceLoader = resourceLoader;
        Assert.notNull(primarySources, "PrimarySources must not be null");
        this.primarySources = new LinkedHashSet(Arrays.asList(primarySources));
        this.webApplicationType = WebApplicationType.deduceFromClasspath();
        this.bootstrapRegistryInitializers = new ArrayList(this.getSpringFactoriesInstances(BootstrapRegistryInitializer.class));
        this.setInitializers(this.getSpringFactoriesInstances(ApplicationContextInitializer.class));
        this.setListeners(this.getSpringFactoriesInstances(ApplicationListener.class));
        this.mainApplicationClass = this.deduceMainApplicationClass();
    }
    //4 run
public ConfigurableApplicationContext run(String... args) {
    //创建计时器
    StopWatch stopWatch = new StopWatch();
    //开始计时
    stopWatch.start();
    //定义上下文对象
    ConfigurableApplicationContext context = null;
    Collection<SpringBootExceptionReporter> exceptionReporters = new ArrayList<>();
    //Headless模式设置
    configureHeadlessProperty();
    //加载SpringApplicationRunListeners监听器
    SpringApplicationRunListeners listeners = getRunListeners(args);
    //发送ApplicationStartingEvent事件
    listeners.starting();
    try {
        //封装ApplicationArguments对象
        ApplicationArguments applicationArguments = new DefaultApplicationArguments(args);
        //配置环境模块
        ConfigurableEnvironment environment = prepareEnvironment(listeners, applicationArguments);
        //根据环境信息配置要忽略的bean信息
        configureIgnoreBeanInfo(environment);
        //打印Banner标志
        Banner printedBanner = printBanner(environment);
        //创建ApplicationContext应用上下文
        context = createApplicationContext();
        //加载SpringBootExceptionReporter
        exceptionReporters = getSpringFactoriesInstances(SpringBootExceptionReporter.class,
                                                         new Class[] { ConfigurableApplicationContext.class }, context);
        //ApplicationContext基本属性配置
        prepareContext(context, environment, listeners, applicationArguments, printedBanner);
        //刷新上下文
        refreshContext(context);
        //刷新后的操作,由子类去扩展
        afterRefresh(context, applicationArguments);
        //计时结束
        stopWatch.stop();
        //打印日志
        if (this.logStartupInfo) {
            new StartupInfoLogger(this.mainApplicationClass).logStarted(getApplicationLog(), stopWatch);
        }
        //发送ApplicationStartedEvent事件,标志spring容器已经刷新,此时所有的bean实例都已经加载完毕
        listeners.started(context);
        //查找容器中注册有CommandLineRunner或者ApplicationRunner的bean,遍历并执行run方法
        callRunners(context, applicationArguments);
    }
    catch (Throwable ex) {
        //发送ApplicationFailedEvent事件,标志SpringBoot启动失败
        handleRunFailure(context, ex, exceptionReporters, listeners);
        throw new IllegalStateException(ex);
    }

    try {
        //发送ApplicationReadyEvent事件,标志SpringApplication已经正在运行,即已经成功启动,可以接收服务请求。
        listeners.running(context);
    }
    catch (Throwable ex) {
        //报告异常,但是不发送任何事件
        handleRunFailure(context, ex, exceptionReporters, null);
        throw new IllegalStateException(ex);
    }
    return context;
}
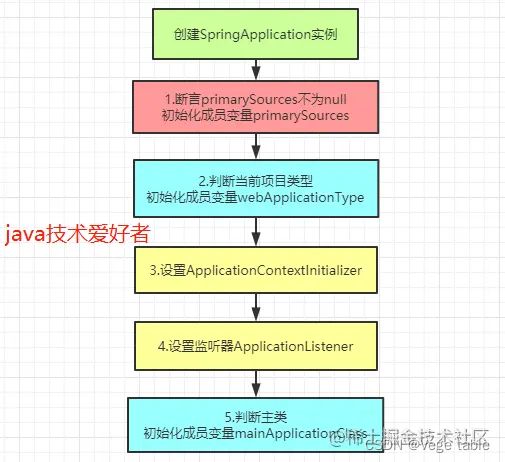
在创建SpringApplication的构造器中做的事如下所述:
最终完成springboot的完整启动过程
4 TOMCAT的启动
想要知道springboot是怎样启动Tomcat服务的就需要关注上一节中第4步执行的run方法,在其中执行了createApplicationContext方法创建上下文。
createApplicationContext
//创建上下文
    protected ConfigurableApplicationContext createApplicationContext() {
        return this.applicationContextFactory.create(this.webApplicationType);
    }


	public interface ApplicationContextFactory {
	    ApplicationContextFactory DEFAULT = (webApplicationType) -> {
	        try {
	            switch(webApplicationType) {
	            case SERVLET:
	                return new AnnotationConfigServletWebServerApplicationContext();
	            case REACTIVE:
	                return new AnnotationConfigReactiveWebServerApplicationContext();
	            default:
	                return new AnnotationConfigApplicationContext();
	            }
	        } catch (Exception var2) {
	            throw new IllegalStateException("Unable create a default ApplicationContext instance, you may need a custom ApplicationContextFactory", var2);
	        }
	    };
	    //创建
	    ConfigurableApplicationContext create(WebApplicationType webApplicationType);

	}
spring根据webApplicationType创建AnnotationConfigServletWebServerApplicationContext类,创建上下文。
接下来的prepareContext方法会运行一些初始化的流程,然后会注册一些spring boot启动所需要的bean,加载一些初始的beans。
refreshContext(context);
从refreshContext一直深入,最终会调用AbstractApplicationContext中的refresh方法,refresh方法是spring中管理bean的核心方法
public void refresh() throws BeansException, IllegalStateException {
    synchronized (this.startupShutdownMonitor) {
        // 忽略掉不重要!启动阶段标记,初始化时标记位为false,执行refresh完毕后修改为true(最后的end方法).
        StartupStep contextRefresh = this.applicationStartup.start("spring.context.refresh");

        // 1. 准备刷新上下文方法,用于设置准备刷新前的一些参数:
        //  程序启动标志位/上下文拓展资源加载/上下文环境准备情况验证/监听器监听事件容器初始化准备
        prepareRefresh();

        // 2. 获取BeanFactory,内部调用refreshBeanFactory()和getBeanFactory()均由子类实现
        //  告知子类刷新Bean工厂(设置序列号ID--> 参考GenericApplicationContext)
        ConfigurableListableBeanFactory beanFactory = obtainFreshBeanFactory();

        // 3. 初始化Bean工厂,设置基础属性: ClassLoader、SPEL(SPring表达式)解析器、属性编辑器(自定义属性覆盖默认属性)、
        //  添加系统BeanPostProcessor`ResourceEditorRegistrar(初始化前执行一些Aware即invokeAwareInterfaces方法)`、
        //  忽略一些系统级接口装配依赖、注入一些不能自动创建的Bean依赖(Bean工厂,ResourceLoader(加载资源文件),事件发布类,上下文)、
        //  加系统BeanPostProcessor`ApplicationListenerDetector(Bean初始化后执行,判断是否是单例监听器加到上下文中)`、
        //  加入AspectJ静态代理支持、系统环境Bean检查注册
        prepareBeanFactory(beanFactory);

        try {
            // 4. BeanFactory配置好的后置拓展操作.由子类拓展.可在这里提前加入自定义BeanFactoryPostProcess
            postProcessBeanFactory(beanFactory);

            // 忽略掉不重要!启动阶段标记
            StartupStep beanPostProcess = this.applicationStartup.start("spring.context.beans.post-process");
            // 5. 执行BeanFactory后置处理. Spring的SPI机制保障(可看我自动装载文章).
            invokeBeanFactoryPostProcessors(beanFactory);

            // 6. 注册BeanPostProcessors到BeanFacotry中并排序,并未执行.涉及到Bean生命周期执行
            registerBeanPostProcessors(beanFactory);
            beanPostProcess.end();

            // 7. 初始化MessageSource,用于消息国际化处理
            initMessageSource();

            // 8. 初始化上下文事件广播器
            initApplicationEventMulticaster();

            // 9. 子类实现,springbootstarterweb在此创建web容器,并提前生成容器所需的Bean及其对应生命周期
            onRefresh();

            // 10. 给广播器中注册监听器,执行初期事件
            registerListeners();

            // 11. 初始化所有非懒加载单例Bean
            finishBeanFactoryInitialization(beanFactory);

            // 12. 完成刷新,发布上下文刷新完毕事件
            finishRefresh();
        }catch (BeansException ex) {
            if (logger.isWarnEnabled()) {
                logger.warn("Exception encountered during context initialization - " +
                        "cancelling refresh attempt: " + ex);
            }
            // 刷新异常,销毁已经创建的Bean
            destroyBeans();
            // 取消刷新,设置active为false
            cancelRefresh(ex);
            // Propagate exception to caller.
            throw ex;
        }finally {
            // Reset common introspection caches in Spring's core, since we
            // might not ever need metadata for singleton beans anymore...

            resetCommonCaches();
            // 刷新结束,设置标志位为true
            contextRefresh.end();
        }
    }
}
我们可以看出在其中的onrefresh方法中创建了createWebServer
    protected void onRefresh() {
        super.onRefresh();

        try {
            this.createWebServer();
        } catch (Throwable var2) {
            throw new ApplicationContextException("Unable to start reactive web server", var2);
        }
    }

    private void createWebServer() {
        WebServerManager serverManager = this.serverManager;
        if (serverManager == null) {
            StartupStep createWebServer = this.getApplicationStartup().start("spring.boot.webserver.create");
            String webServerFactoryBeanName = this.getWebServerFactoryBeanName();
            ReactiveWebServerFactory webServerFactory = this.getWebServerFactory(webServerFactoryBeanName);
            createWebServer.tag("factory", webServerFactory.getClass().toString());
            boolean lazyInit = this.getBeanFactory().getBeanDefinition(webServerFactoryBeanName).isLazyInit();
            this.serverManager = new WebServerManager(this, webServerFactory, this::getHttpHandler, lazyInit);
            this.getBeanFactory().registerSingleton("webServerGracefulShutdown", new WebServerGracefulShutdownLifecycle(this.serverManager.getWebServer()));
            this.getBeanFactory().registerSingleton("webServerStartStop", new WebServerStartStopLifecycle(this.serverManager));
            createWebServer.end();
        }

        this.initPropertySources();
    }
继续追踪WebServerManager方法
    WebServerManager(ReactiveWebServerApplicationContext applicationContext, ReactiveWebServerFactory factory, Supplier<HttpHandler> handlerSupplier, boolean lazyInit) {
        this.applicationContext = applicationContext;
        Assert.notNull(factory, "Factory must not be null");
        this.handler = new WebServerManager.DelayedInitializationHttpHandler(handlerSupplier, lazyInit);
        this.webServer = factory.getWebServer(this.handler);
    }

	@FunctionalInterface
	public interface ReactiveWebServerFactory {
    	WebServer getWebServer(HttpHandler httpHandler);
	}
进入接口getWebServer,在这里接口ReactiveWebServerFactory 有多个实现类

此时我们进入Tomcat实现类中
    public WebServer getWebServer(HttpHandler httpHandler) {

        Connector connector = new Connector(this.protocol);
        connector.setThrowOnFailure(true);
        tomcat.getService().addConnector(connector);
        this.customizeConnector(connector);
        tomcat.setConnector(connector);
        tomcat.getHost().setAutoDeploy(false);
        this.configureEngine(tomcat.getEngine());

		TomcatHttpHandlerAdapter servlet = new TomcatHttpHandlerAdapter(httpHandler);
        this.prepareContext(tomcat.getHost(), servlet);
        return this.getTomcatWebServer(tomcat);
    }
可以看到其中创建了connector 对象和Engine容器。
getTomcatWebServer
getTomcatWebServer中创建了TomcatWebServer对象,然后调用initialize方法完成初始化。在initialize中
    protected TomcatWebServer getTomcatWebServer(Tomcat tomcat) {
        return new TomcatWebServer(tomcat, this.getPort() >= 0, this.getShutdown());
    }

    public TomcatWebServer(Tomcat tomcat, boolean autoStart, Shutdown shutdown) {
        this.monitor = new Object();
        this.serviceConnectors = new HashMap();
        Assert.notNull(tomcat, "Tomcat Server must not be null");
        this.tomcat = tomcat;
        this.autoStart = autoStart;
        this.gracefulShutdown = shutdown == Shutdown.GRACEFUL ? new GracefulShutdown(tomcat) : null;
        this.initialize();
    }
    //initialize方法
    private void initialize() throws WebServerException {
        logger.info("Tomcat initialized with port(s): " + this.getPortsDescription(false));
        synchronized(this.monitor) {
            try {
                this.addInstanceIdToEngineName();
                Context context = this.findContext();
                context.addLifecycleListener((event) -> {
                    if (context.equals(event.getSource()) && "start".equals(event.getType())) {
                        this.removeServiceConnectors();
                    }

                });
                //启动服务
                this.tomcat.start();
                this.rethrowDeferredStartupExceptions();

                try {
                    ContextBindings.bindClassLoader(context, context.getNamingToken(), this.getClass().getClassLoader());
                } catch (NamingException var5) {
                }

                this.startDaemonAwaitThread();
            } catch (Exception var6) {
                this.stopSilently();
                this.destroySilently();
                throw new WebServerException("Unable to start embedded Tomcat", var6);
            }

        }
    }
在tomcat.start方法中完成Tomcat服务的启动
@Override
public void start() throws WebServerException {
	synchronized (this.monitor) {
		if (this.started) {
			return;
		}
		try {
			addPreviouslyRemovedConnectors();
			Connector connector = this.tomcat.getConnector();
			if (connector != null && this.autoStart) {
				performDeferredLoadOnStartup();
			}
			checkThatConnectorsHaveStarted();
			this.started = true;
			//在控制台打印这句日志,如果在yml设置了上下文,这里会打印
			logger.info("Tomcat started on port(s): " + getPortsDescription(true) + " with context path '"
					+ getContextPath() + "'");
		}
		catch (ConnectorStartFailedException ex) {
			stopSilently();
			throw ex;
		}
		catch (Exception ex) {
			throw new WebServerException("Unable to start embedded Tomcat server", ex);
		}
		finally {
			Context context = findContext();
			ContextBindings.unbindClassLoader(context, context.getNamingToken(), getClass().getClassLoader());
		}
	}
}
参考链接:
SpringBoot启动流程是怎样的?
SPRINGBOOT启动流程及其原理
SpringBoot内置tomcat启动原理
AbstractApplicationContext.refresh()应用上下文刷新方法

