web服务之NGINX架构&模块
文章目录
-
-
- 3.2 nginx架构
-
- 3.2.1 nginx进程结构
- 3.2.2 epoll模型
- 3.3 nginx模块
-
- 3.3.1 动态模块
- 3.3.2 模块本质
- 3.3.3 模块指令
- 3.3.4 请求处理的11个阶段
-
- 1.nginx模块简介
- 2.请求处理流程示意图
- 3.请求处理的11个阶段
-
3.2 nginx架构
架构基础
3.2.1 nginx进程结构
任何Unix应用程序的基本基础都是线程或进程。
NGINX Worker流程内部

每个NGINX工作进程都使用NGINX配置初始化,并且由主进程提供一组侦听套接字。
NGINX工作进程始于等待侦听套接字上的事件(accept_mutex和内核套接字分片)。事件由新的传入连接启动。这些连接被分配给状态机 -HTTP状态机是最常用的,但是NGINX还为流(原始TCP)流量和许多邮件协议(SMTP,IMAP和POP3)实现状态机。
状态机本质上是一组指令,用于告诉NGINX如何处理请求。大多数执行与NGINX相同功能的Web服务器都使用类似的状态机-区别在于实现。
1.单进程结构
用于开发,调试环境
2.多进程结构

3.参考链接
https://www.nginx.com/blog/inside-nginx-how-we-designed-for-performance-scale/
3.2.2 epoll模型
Linux中IO复用工具:在Linux中先后出现了select、poll、epoll等,FreeBSD的kqueue也是非常优秀的IO复用工具,kqueue的原理和epoll很类似
参考知乎文章:https://www.zhihu.com/question/20122137/answer/14049112
流:一个流可以是文件,socket,pipe等等可以进行I/O操作的内核对象。
阻塞:比如某个时候你在等快递,但是你不知道快递什么时候过来,而且你没有别的事可以干(或者说接下来的事要等快递来了才能做);那么你可以去睡觉了,因为你知道快递把货送来时一定会给你打个电话(假定一定能叫醒你)。
非阻塞忙轮询:接着上面等快递的例子,如果用忙轮询的方法,那么你需要知道快递员的手机号,然后每分钟给他挂个电话:“你到了没?”
为了避免CPU空转,可以引进了一个代理(一开始有一位叫做select的代理,后来又有一位叫做poll的代理,不过两者的本质是一样的)。
这个代理比较厉害,可以同时观察许多流的I/O事件,在空闲的时候,会把当前线程阻塞掉,当有一个或多个流有I/O事件时,就从阻塞态中醒来,于是我们的程序就会轮询一遍所有的流(于是我们可以把“忙”字去掉了)。
于是,如果没有I/O事件产生,我们的程序就会阻塞在select处。
epoll可以理解为event poll,不同于忙轮询和无差别轮询,epoll只会把哪个流发生了怎样的I/O事件通知我们。此时我们对这些流的操作都是有意义的。(复杂度降低到了O(k),k为产生I/O事件的流的个数,也有认为O(1)的)
注:单个select最多只能同时处理1024个socket。
select的做法:
步骤1的解法:select创建3个文件描述符集,并将这些文件描述符拷贝到内核中,这里限制了文件句柄的最大的数量为1024(注意是全部传入—第一次拷贝);
步骤2的解法:内核针对读缓冲区和写缓冲区来判断是否可读可写,这个动作和select无关;
步骤3的解法:内核在检测到文件句柄可读/可写时就产生中断通知监控者select,select被内核触发之后,就返回可读可写的文件句柄的总数;
步骤4的解法:select会将之前传递给内核的文件句柄再次从内核传到用户态(第2次拷贝),select返回给用户态的只是可读可写的文件句柄总数,再使用FD_ISSET宏函数来检测哪些文件I/O可读可写(遍历);
步骤5的解法:select对于事件的监控是建立在内核的修改之上的,也就是说经过一次监控之后,内核会修改位,因此再次监控时需要再次从用户态向内核态进行拷贝(第N次拷贝)
epoll的做法:
步骤1的解法:首先执行epoll_create在内核专属于epoll的高速cache区,并在该缓冲区建立红黑树和就绪链表,用户态传入的文件句柄将被放到红黑树中(第一次拷贝)。
步骤2的解法:内核针对读缓冲区和写缓冲区来判断是否可读可写,这个动作与epoll无关;
步骤3的解法:epoll_ctl执行add动作时除了将文件句柄放到红黑树上之外,还向内核注册了该文件句柄的回调函数,内核在检测到某句柄可读可写时则调用该回调函数,回调函数将文件句柄放到就绪链表。
步骤4的解法:epoll_wait只监控就绪链表就可以,如果就绪链表有文件句柄,则表示该文件句柄可读可写,并返回到用户态(少量的拷贝);
步骤5的解法:由于内核不修改文件句柄的位,因此只需要在第一次传入就可以重复监控,直到使用epoll_ctl删除,否则不需要重新传入,因此无多次拷贝。
简单说:epoll是继承了select/poll的I/O复用的思想,并在二者的基础上从监控IO流、查找I/O事件等角度来提高效率,具体地说就是内核句柄列表、红黑树、就绪list链表来实现的。
epoll高效的原因:
这是由于我们在调用epoll_create时,内核除了帮我们在epoll文件系统里建了个file结点,在内核cache里建了个红黑树用于存储以后epoll_ctl传来的socket外,还会再建立一个list链表,用于存储准备就绪的事件.
当epoll_wait调用时,仅仅观察这个list链表里有没有数据即可。有数据就返回,没有数据就sleep,等到timeout时间到后即使链表没数据也返回。所以,epoll_wait非常高效。
五种网络IO模型和select/epoll对比:https://zhuanlan.zhihu.com/p/38277885

3.3 nginx模块
3.3.1 动态模块
nginx在编译时可以将模块编程成动态模块,需要使用模块时被可执行文件加载
./configure --XXX=dynamic
3.3.2 模块本质
指令
内置变量
3.3.3 模块指令
值指令:可以被局部的值指令覆盖
动作指令:一旦满足某条件直接执行
3.3.4 请求处理的11个阶段
1.nginx模块简介
- 核心功能(Core Functionality)
参考网址:http://nginx.org/en/docs/ngx_core_module.html
功能:主要负责nginx的main区块和event区块,定义了nginx的全局参数
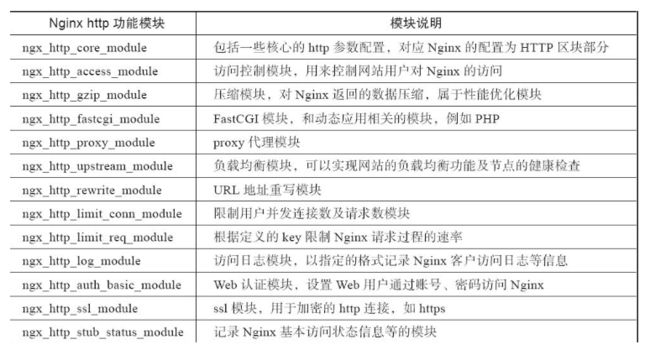
- http标准功能模块集合
参考网址:http://nginx.org/en/docs/
模块列表
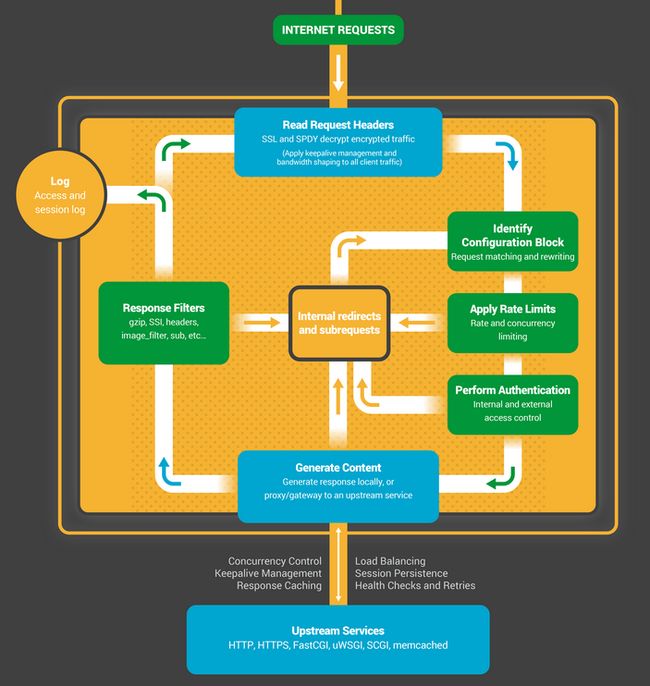
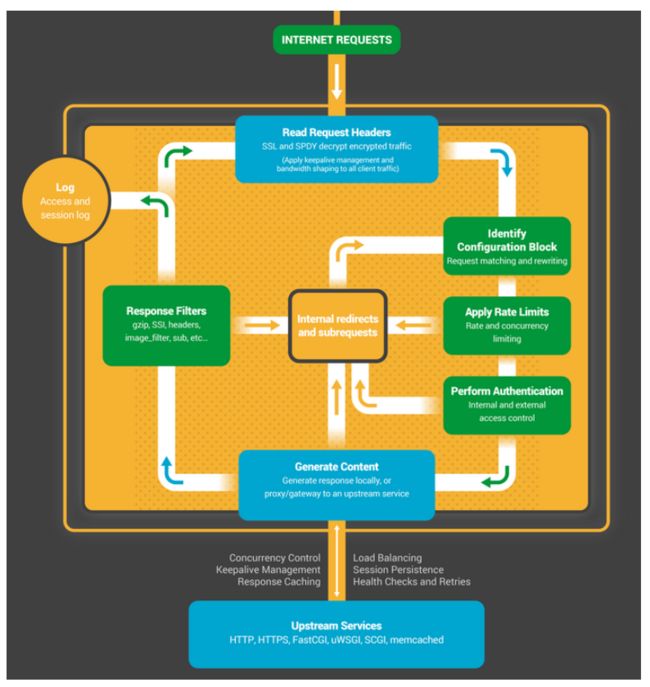
2.请求处理流程示意图
3.请求处理的11个阶段
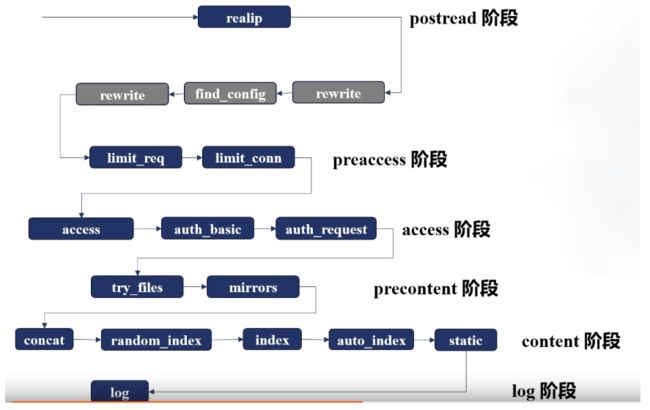
1.POST_READ
读取请求头后
realip
REALIP_MODULE模块:https://my.oschina.net/xxj123go/blog/907041/print
1.1 模块功能
在复杂集群环境中remote_addr 为反向代理的地址,而不是真实客户端ip,realip用于获取真正客户端地址
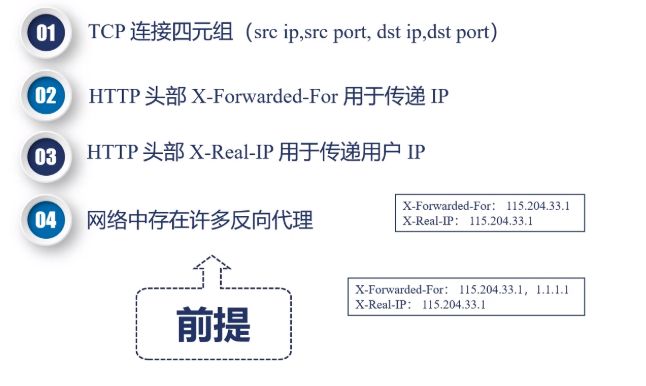
1.2 模块指令
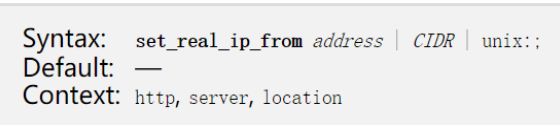
set_real_ip_from 定义可信任的地址
real_ip_header 定义使用那个请求头部

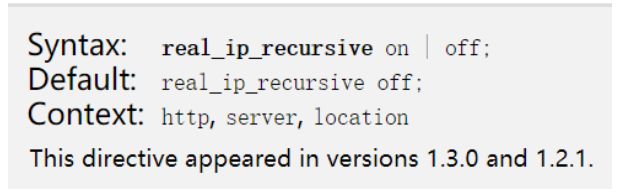
real_ip_recursive 如果最后一个地址是本机地址则去除,去去除后的非本机地址
1.3 模块变量
$realip_remote_addr 替换之前的remote_addr
$realip_remote_port 替换之前的remote_port
1.4 模块实战
1.编辑hosts
192.168.217.155 www.pl.com realip.pl.com
2.安装nginx(编译realip到nginx)
./configire --prefix=/usr/local/nginx --with-http_realip_module
make
3.配置
nginx.conf
include conf.d/*.conf;
vi /usr/local/nginx/conf/conf.d/realip.conf
server {
        listen 80;
        server_name realip.pl.com;
        error_log logs/realip.err_log;

        set_real_ip_from 192.168.217.155;
        #real_ip_header X_Real_IP;
        #real_ip_recursive off;
        real_ip_recursive off;
        real_ip_header X-Forwarded-For;

        location / {
                return  200 "Client real ip: $realip_remote_addr  $remote_addr\n";
        }

}
当real_ip_recursive为off时,nginx会把real_ip_header指定的HTTP头中的最后一个IP当成真实IP
当real_ip_recursive为on时,nginx会把real_ip_header指定的HTTP头中的最后一个不是信任服务器的IP当成真实IP
4…测试
curl -H 'X-Forwarded-For:1.1.1.1,2.2.2.2'  realip.pl.com
curl -H 'X-Forwarded-For:1.1.1.1,2.2.2.2,172.16.199.183'  realip.pl.com
热部署
nginx -s top
ps aux | grep nginx
kill -QUIT PID
ps aux | grep nginx
cd objs/nginx
cp objs/nginx /usr/local/nginx/sbin
2.SERVER_REWRITE
执行rewrite
rewrite模块:https://www.cnblogs.com/beyang/p/7832460.html
2.1 模块名称
http_rewrite_module(默认)
2.2 模块功能
return返回状态码
rewrite返回URL重定向
2.3 模块指令
return
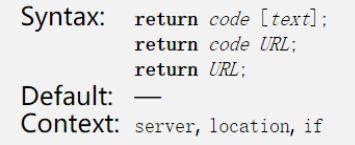
用户对特定状态码返回不同url

返回状态码
- 444 关闭连接
- 301 永久重定向
- 302 临时重定向,禁止被缓存
rewrite
对资源进行URL重写
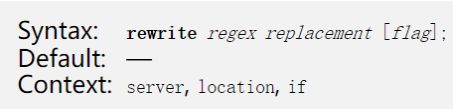
flags
--last
		进行新的location匹配
--break
		停止脚本指令的执行
--redirect
		返回302重定向
--permanent
		返回301重定向
if
条件判断

条件规则
- 检查变量为空或者值是否为0,直接使用
- 将变量与字符串做匹配,使用=或者!=
- 将变量与正则表达式做匹配
~或!~
~*或!~*忽略大小写 - 检查文件是否存在,使用-f或者!-f
- 检查目录是否存在,使用-d或者!-d
- 检查文件,目录,软链接是否存在,使用-e或者!-e
- 检查是否为可执行文件:使用-x或!-x
举例
if ($http_user_agent ~ MSIE) {
    rewrite ^(.*)$ /msie/$1 break;
}

if ($http_cookie ~* "id=([^;]+)(?:;|$)") {
    set $id $1;
}

if ($request_method = POST) {
    return 405;
}

if ($slow) {
    limit_rate 10k;
}

if ($invalid_referer) {
    return 403;
}
2.4 模块实战
1.目录结构
/data/test/one 1.txt 内容test1
/data/test/two 2.txt 内容test2
/data/test/three 3.txt 内容test3
2.配置指令
server {
        listen 80;
        server_name rewrite.pl.com;
        root /data/test/;
        location /one {
                        rewrite /one(.*) /two$1 last;
                        return 200 'One\n';
        }

        location /two {
                        rewrite /two(.*) /three$1;
                        #rewrite /two(.*) /three$1 break;
                        return 200 'Two\n';
        }

        location /three {
                        return 200 'three\n';
        }
}
3.问题
return与rewrite指令执行顺序? rewrite
访问/one/3.txt,/two/3.txt,three/3.txt分别返回的是什么? Two Two three
如果不携带flag会怎样?效果在以下测试体现。
4.测试
[root@www ~]# curl  rewrite.pl.com/one/3.txt
Two
[root@www ~]# curl  rewrite.pl.com/two/3.txt
Two
[root@www ~]# curl  rewrite.pl.com/three/3.txt
three
测试break flag
rewrite /two(.*) /three$1 break;

[root@www ~]# curl  rewrite.pl.com/two/3.txt
test3
3.FIND_CONFIG
关于一些对location认识的误区:https://www.cnblogs.com/lidabo/p/4169396.html
根据uri替换location,仅在nginx框架中使用,没有任何模块在此阶段生效
location 匹配用户URI,并执行后面的配置段
location [匹配标识] 匹配网站URI { 匹配URI后执行的配置段 }
3.1 语法:
location URI	普通字符模糊匹配
location = URI	进行普通字符精确匹配
location ^~ URI	^~表示普通字符模糊匹配,如果该选项匹配,只匹配该选项,不匹配别的选项,一般用来匹配目录
location ~ URI	波浪线表示执行一个正则匹配,区分大小写
location ~* URI	表示执行一个正则匹配,不区分大小写
3.2 匹配顺序
1.遍历匹配全部前缀字符串location
优先精确匹配=,匹配到不往下匹配
匹配到^~直接使用,不往下匹配
2.记住最长匹配的前缀字符串location
3.按nginx.conf的配置依次匹配正则表达式location
匹配,则使用其配置指令
不匹配则使用前面匹配到的最长的字符串location
3.3 示例
server {
    listen       80;
    server_name  location.pl.com;
    root   html;
    location / {
        return 401;
    }
    location = / {
        return 402;
    }
    location /documents/ {
        return 403;
    }
    location ^~ /images/ {
        return 404;
    }
    location ~* \.(gif|jpg|jpeg)$ {
        return 500;
    }
}
测试
[root@www ~]# curl  -I  http://location.pl.com
HTTP/1.1 402 Payment Required
Server: nginx/1.14.0
Date: Sat, 06 Jun 2020 01:58:46 GMT
Content-Type: text/html
Content-Length: 183
Connection: keep-alive
[root@www ~]# curl  -I  http://location.pl.com/
HTTP/1.1 402 Payment Required
Server: nginx/1.14.0
Date: Sat, 06 Jun 2020 01:59:14 GMT
Content-Type: text/html
Content-Length: 183
Connection: keep-alive
[root@www ~]# curl  -I  http://location.pl.com/index.html
HTTP/1.1 401 Unauthorized
Server: nginx/1.14.0
Date: Sat, 06 Jun 2020 01:59:56 GMT
Content-Type: text/html
Content-Length: 195
Connection: keep-alive
[root@www ~]# curl  -I  http://location.pl.com/documents/index.html
HTTP/1.1 403 Forbidden
Server: nginx/1.14.0
Date: Sat, 06 Jun 2020 02:00:19 GMT
Content-Type: text/html
Content-Length: 169
Connection: keep-alive
[root@www ~]# curl  -I  http://location.pl.com/images/1.gif
HTTP/1.1 404 Not Found
Server: nginx/1.14.0
Date: Sat, 06 Jun 2020 02:00:39 GMT
Content-Type: text/html
Content-Length: 169
Connection: keep-alive
[root@www ~]# curl  -I  http://location.pl.com/documents/q.jpg
HTTP/1.1 500 Internal Server Error
Server: nginx/1.14.0
Date: Sat, 06 Jun 2020 02:00:56 GMT
Content-Type: text/html
Content-Length: 193
Connection: close
结论
| URI请求 | HTTP响应 |
|---|---|
| curl -I http://location.pl.com | 402 |
| curl -I http://location.pl.com/ | 402 |
| curl -I http://location.pl.com/index.html | 401 |
| curl -I http://location.pl.com/documents/index.html | 403 |
| curl -I http://location.pl.com/images/1.gif | 404 |
| curl -I http://location.pl.com/documents/q.jpg | 500 |
4.REWRITE
根据替换结果继续执行rewrite
rewrite
5.POST_REWRITE
执行rewrite后处理
6.PREACCESS
认证预处理,请求限制,连接限制
limit_conn
6.1 模块名称
http_limit_conn_module(默认编译)
http_limit_conn_module:https://www.cnblogs.com/duanxz/p/3977756.html
对于一些服务器流量异常、负载过大,甚至是大流量的恶意攻击访问等,进行并发数的限制;该模块可以根据定义的键来限制每个键值的连接数,只有那些正在被处理的请求(这些请求的头信息已被完全读入)所在的连接才会被计数。
6.2 模块指令
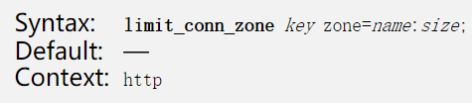
limit_conn_zone 定义共享内容大小,以及key关键字
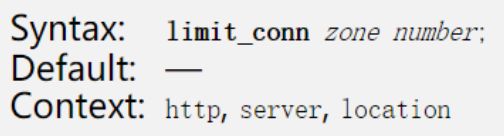
limit_conn 限制并发连接数
limit_conn_log_level 限制发生时的日志级别
limit_conn_status 向客户端返回的错误码
6.3 模块实战
配置
limit_conn_zone $binary_remote_addr zone=addr:10m;

server {
        listen 80;
        server_name limit.pl.com;
        root html/;

        location / {
                limit_conn_status 500;
                limit_conn_log_level warn;
                limit_rate 50;   #向用户返回速率
                limit_conn addr 1;  #限制用户并发连接数1
        }
}
测试
会发现返回的内容是一行一行返回的。
克隆会话,同时发起连接。500

limit_req
限制每个客户端的每秒处理请求数
6.4 模块名称
http_limit_req_module(默认编译)
6.5 模块算法
leaky bucket漏桶算法
漏桶算法:https://www.cnblogs.com/duanxz/p/4123068.html
水(请求)先进入到漏桶里,漏桶以一定的速度出水(接口有响应速率),当水流入速度过大会直接溢出(访问频率超过接口响应速率),然后就拒绝请求,而当入小于出的情况下,漏桶不起任何作用。

6.6 模块指令
limit_req_zone rate为r/s,或者r/m

limit_req

limit_req_status 默认返回503

6.7 模块实战
验证问题
limit_req delay 不delay有什么区别?使用nodelay则表示不希望超过的请求被延迟。
limit_req与limit_conn配置同时生效,哪个有效?limit_req
limit_req
limit_conn
配置
limit_conn_zone $binary_remote_addr zone=addr:10m;
limit_req_zone $binary_remote_addr zone=one:10m rate=2r/m;

server {
        listen 80;
        server_name limit.pl.com;
        error_log logs/limit.err_log info;
        root html/;

        location / {
                limit_conn_status 500;
                limit_conn_log_level warn;
                #limit_rate 50;
                #limit_conn addr 1;
                #limit_req zone=one burst=3 nodelay;
                limit_req zone=one;
        }
}
测试
单独limit_req_zone
[root@www ~]# ab -n100 -c100 http://limit1.pl.com/index.html
This is ApacheBench, Version 2.3 <$Revision: 1430300 $>
Copyright 1996 Adam Twiss, Zeus Technology Ltd, http://www.zeustech.net/
Licensed to The Apache Software Foundation, http://www.apache.org/

Benchmarking limit1.pl.com (be patient).....done


Server Software:        nginx/1.14.0
Server Hostname:        limit1.pl.com
Server Port:            80

Document Path:          /index.html
Document Length:        642 bytes

Concurrency Level:      100
Time taken for tests:   0.007 seconds
Complete requests:      100
Failed requests:        99
   (Connect: 0, Receive: 0, Length: 99, Exceptions: 0)
Write errors:           0
Non-2xx responses:      99
Total transferred:      38990 bytes
HTML transferred:       21729 bytes
Requests per second:    14178.36 [#/sec] (mean)
Time per request:       7.053 [ms] (mean)
Time per request:       0.071 [ms] (mean, across all concurrent requests)
Transfer rate:          5398.58 [Kbytes/sec] received

Connection Times (ms)
              min  mean[+/-sd] median   max
Connect:        0    1   0.3      1       2
Processing:     2    4   0.3      4       4
Waiting:        0    4   0.4      4       4
Total:          2    5   0.4      5       6

Percentage of the requests served within a certain time (ms)
  50%      5
  66%      6
  75%      6
  80%      6
  90%      6
  95%      6
  98%      6
  99%      6
 100%      6 (longest request)
limit_req_zone
burst=3,使用nodelay则表示不希望超过的请求被延迟。
[root@www ~]# ab -n100 -c100 http://limit1.pl.com/index.html
This is ApacheBench, Version 2.3 <$Revision: 1430300 $>
Copyright 1996 Adam Twiss, Zeus Technology Ltd, http://www.zeustech.net/
Licensed to The Apache Software Foundation, http://www.apache.org/

Benchmarking limit1.pl.com (be patient).....done


Server Software:        nginx/1.14.0
Server Hostname:        limit1.pl.com
Server Port:            80

Document Path:          /index.html
Document Length:        642 bytes

Concurrency Level:      100
Time taken for tests:   0.008 seconds
Complete requests:      100
Failed requests:        96
   (Connect: 0, Receive: 0, Length: 96, Exceptions: 0)
Write errors:           0
Non-2xx responses:      96
Total transferred:      40460 bytes
HTML transferred:       23016 bytes
Requests per second:    13210.04 [#/sec] (mean)
Time per request:       7.570 [ms] (mean)
Time per request:       0.076 [ms] (mean, across all concurrent requests)
Transfer rate:          5219.51 [Kbytes/sec] received

Connection Times (ms)
              min  mean[+/-sd] median   max
Connect:        0    1   0.3      1       2
Processing:     3    4   0.2      4       4
Waiting:        1    4   0.4      4       4
Total:          3    5   0.4      5       6

Percentage of the requests served within a certain time (ms)
  50%      5
  66%      6
  75%      6
  80%      6
  90%      6
  95%      6
  98%      6
  99%      6
 100%      6 (longest request)
这时发现失败为96个。
同时配置
limit_req与limit_conn
[root@www ~]# ab -n100 -c100 http://limit1.pl.com/index.html
This is ApacheBench, Version 2.3 <$Revision: 1430300 $>
Copyright 1996 Adam Twiss, Zeus Technology Ltd, http://www.zeustech.net/
Licensed to The Apache Software Foundation, http://www.apache.org/

Benchmarking limit1.pl.com (be patient).....done


Server Software:        nginx/1.14.0
Server Hostname:        limit1.pl.com
Server Port:            80

Document Path:          /index.html
Document Length:        642 bytes

Concurrency Level:      100
Time taken for tests:   0.007 seconds
Complete requests:      100
Failed requests:        99
   (Connect: 0, Receive: 0, Length: 99, Exceptions: 0)
Write errors:           0
Non-2xx responses:      99
Total transferred:      38990 bytes
HTML transferred:       21729 bytes
Requests per second:    14275.52 [#/sec] (mean)
Time per request:       7.005 [ms] (mean)
Time per request:       0.070 [ms] (mean, across all concurrent requests)
Transfer rate:          5435.57 [Kbytes/sec] received

Connection Times (ms)
              min  mean[+/-sd] median   max
Connect:        0    1   0.2      1       1
Processing:     2    4   0.2      4       4
Waiting:        1    4   0.3      4       4
Total:          2    5   0.3      5       5

Percentage of the requests served within a certain time (ms)
  50%      5
  66%      5
  75%      5
  80%      5
  90%      5
  95%      5
  98%      5
  99%      5
 100%      5 (longest request)
失败了99个,

关于limit_req和limit_conn的区别:
limit_req和limit_conn:https://www.cnblogs.com/duanxz/p/3967033.html
limit_req和limit_conn两个模块都是为了来限流的,但是两者不在一个层面
connection是连接,即常说的tcp连接,通过三次握手而建立的一个完整状态机。建立一个连接,必须得要三次握手。
request是指请求,即http请求,(注意,tcp连接是有状态的,而构建在tcp之上的http却是无状态的协议)。
通过打开一个网页,然后通过wareshark可以看到,一个连接建立后(即三次握手后),在这个连接断开之前(即四次挥手之前),会有很多的http request,这就是他们的区别:即一个连接的生命周期中,会存在一个或者多个请求,这是为了加快效率,避免每次请求都要三次握手建立连接,现在的HTTP/1.1协议都支持这种特性,叫做keepalive。
7.ACCESS
认证处理
acess
7.1 模块名称
http_access_module(默认编译)
http_access_module:https://www.cnblogs.com/wt645631686/p/8252915.html
Nginx基于access_module有局限性
原理:基于客户端的IP,但是对于Nginx来说,它不会管你哪个是真正的客户端,如果我们的访问不是客户端与服务端直接连接,而是通过了一层代理,比如它的代理可以负载均衡、CDN的这种代理实现,也就是我们的访问不是客户端直接访问的服务端,而是通过其他的中间件访问服务端,这时候会出现一个问题,因为Nginx的access_module它是基于remote_addr这个变量来识别客户端的IP的,那么如果一个ip通过中间件访问服务端,那么Nginx认为访问的ip就是中间件的IP,那么我们在基于IP做限制的时候,那么其实是没有作用的。所以这样的话,准确性是不高的,所以就是利用nginx的access_module有局限性。
解决:
(1)HTTP_X_FORWARDED_FOR。
(2)结合geo模块
(3)通过HTTP自定义变量传递
7.2 模块功能
对IP做访问控制
7.3 模块指令
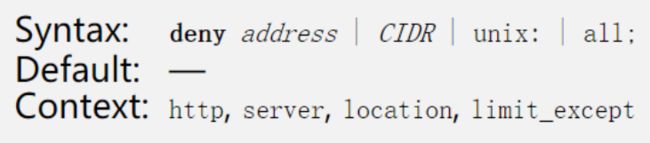
allow

deny
7.4 模块实战
[root@www ~]# vim /usr/local/nginx/conf/conf.d/access.conf

server {
    listen       80;
    server_name  access.pl.com;
    root   /data/access/;
    location / {
        deny  192.168.217.155;
        #allow 192.168.217.154;
        allow 192.168.217.0/24;
        allow 10.0.0.0/16;
        allow 2001:0db8::/32;
        deny  all;
        index index.html;
    }
}
#从上到下的顺序,类似iptables。匹配到了便跳出。如上的例子先禁止了192.168.217.155,接下来允许了3个网段,其中包含了一个ipv6,最后未匹配的IP全部禁止访问.被deny的将返回403状态码。
在192.168.217.155测试
[root@www ~]# curl access.pl.com

403 Forbidden

403 Forbidden
nginx/1.14.0
在192.168.217.154测试
[root@localhost ~]# curl access.pl.com
 access
auth_basic
7.5 模块名称
http_auth_basic_module(默认)
7.6 模块功能
验证用户密码
7.7 模块指令
auth_basic 定义认证字符串
auth_basic_user_file 用户密码文件
通过htpasswd生成(包名httpd-tools)
htpasswd -c file -b user password
7.8 模块实战
配置
[root@www ~]# vim /usr/local/nginx/conf/conf.d/auth.conf

server {
    listen       80;
    server_name  auth.pl.com;
    root   /data/auth/;
    location / {
        satisfy any;

        auth_basic           "closed site";
        auth_basic_user_file htpasswd;
        index index.html;
    }
}
密码生成
[root@www ~]# htpasswd -c /usr/local/nginx/conf/htpasswd alice
New password:
Re-type new password:
Adding password for user alice
测试
[root@www ~]# curl auth.pl.com

401 Authorization Required

401 Authorization Required
nginx/1.14.0
在浏览器上测试
输入用户名密码

结果

auth_request
7.9 模块名称
http_auth_request_module(未编译)
http_auth_request_module:https://blog.csdn.net/qq_34556414/article/details/105809958
7.10 模块功能
向上游服务器转发请求,若上游服务返回2xx状态码,则继续执行,若返回401或者403则响应给客户端
7.11 模块指令
auth_request uri|off;
auth_request_set $variable_name
7.12 模块实战
俩个虚拟主机,一个模拟代理,一个模拟上游
代理
[root@www ~]# vim /usr/local/nginx/conf/conf.d/auth_req.conf

server {
    listen 80;
    server_name auth_req.server.com;
    root /data/auth_req;
    location / {
        auth_request /test_auth;
    }

    location = /test_auth{
        proxy_pass http://auth.pl.com/auth_test;
        proxy_pass_request_body off;
        proxy_set_header Content-Length "";
        proxy_set_header X-Original-URI $request_uri;
    }
}
上游服务器
[root@www ~]# vim /usr/local/nginx/conf/conf.d/auth.conf

server {
    listen       80;
    server_name  auth.pl.com;
    root   /data/auth/;
    location / {
        #isatisfy any;

        #auth_basic           "closed site";
        #auth_basic_user_file htpasswd;
        index index.html;
    }


    location /auth_test {
        index index.html;
        #return 200 'auth success';
        return 403 'auth fail';
    }
}
测试return 200 ‘auth success’;

更改return 403 ‘auth fail’;

satisfy指令
值为all,代表access阶段所有模块都放行才放行请求,值为any,代表access阶段所有模块只要任意一个放行就放行
satisfy any|all;
8.POST_ACCESS
认证后处理, 认证不通过, 丢包
9.PRECONTENT
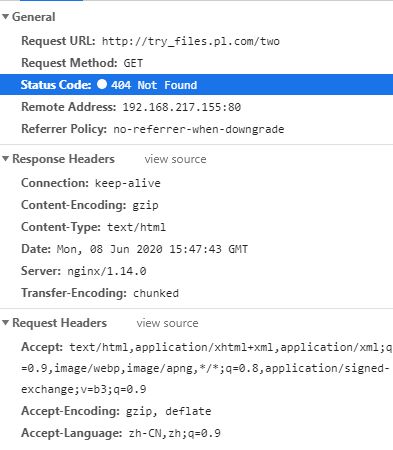
尝试try标签
try_files
9.1 模块名称
http_try_files_module(默认编译)
http_try_files_module:https://blog.csdn.net/qq_34556414/article/details/105823587
9.2 模块功能
依次试图访问多个url对应的文件(由root或者alias指令指定),当文件存在时返回文件内容,如果所有文件都不存在,则最后一个URL结果或者code返回
在搭建wordpress站点的时候可以使用到try_files指令。该指令用于反向代理达到场景非常有用,可以先去尝试在nginx上直接获取磁盘上的内容,如果没有这个文件再反向代理到上游服务。
9.3 模块指令

9.4 模块实战
[root@www mirrors]# vim /usr/local/nginx/conf/conf.d/try_files.conf

server {
    listen       80;
    server_name  try_files.pl.com;
    root   /data/try_files/;
    location /one {
        try_files /mirrors/admin.html
        $uri $uri/index.html $uri.html
        @lasturl;
    }

    location @lasturl {
        return 200 "this is the lastest url\n";
    }

    location /two {
        try_files $uri $uri/index.html $uri.html =404;
    }

}
测试
[root@www mirrors]# curl try_files.pl.com/one
this is the lastest url
404
10.CONTENT
内容处理
index 返回index指定文件的内容
autoindex
10.1 模块说明
返回root/alias指定目录中文件列表,用于共享文件
10.2 模块指令
autoindex on|off; autoindex开关
autoindex_exec_size on|off; 返回精确大小单位还是自动转换大小单位
autoindex_format html | xml | json | jsonp; 返回默认页面格式
autoindex_localtime on|off; 显示时间
static
10.3 模块功能
用于映射url到指令目录中
10.4 模块指令
root
完整url映射进文件路径中
root html/one;

one-->  /tmp

document_root	/usr/local/nginx/html/one

realpath_root
alias
只将location后的URL映射到文件路径
type
根据types指令中mime类型和文件后缀返回centent_type的类型
types {text/html html;image/gif gif;}
default_type
后缀为知是默认返回的content_type,默认值是text/plain
log_not_found on|off
关闭文件未找到的日志记录,提升大量文件未找到时的日志记录性能
10.5 模块变量
$request_filename 待访问文件的完整路径
$document_root 由URL和root/alias规则生成的目录路径
$realpath_root 将document_root中软链接等替换成真实路径
10.6 模块实战1
配置
[root@www ~]# vim /usr/local/nginx/conf/conf.d/static.conf

        server_name static.pl.com;
server {
        listen 80;
        server_name static.pl.com;
        location /root {
                root /data/static/html;
        }
        location /alias {
                alias /data/static/html;
        }
        location ~ /root/(\w+\.txt) {
                root /data/static/html/one/$1;
        }
        location ~ /alias/(\w+\.txt) {
                alias /data/static/html/one/$1;
        }

}
测试
访问不同url结果
	/root ------- html/root
	/root/33.txt ------- html/one/33.txt/root/33.txt
	/alias ------- html/
	/alias/3.txt ------- html/one/3.txt
这里为了更真实,在各路径下都创建了文件。。。
访问http://static.pl.com/roo

访问http://static.pl.com/root/33.txt
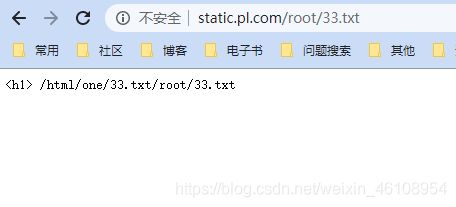
访问http://static.pl.com/alias

访问http://static.pl.com/alias/3.txt

10.7 模块实战2
测试3个变量意义
配置
[root@www ~]# vim /usr/local/nginx/conf/conf.d/static.conf

server {
        listen 80;
        server_name static.pl.com;
        location /root {
                root /data/static/html;
        }
        location /alias {
                alias /data/static/html;
        }
        location ~ /root/(\w+\.txt) {
                root /data/static/html/one/$1;
        }
        location ~ /alias/(\w+\.txt) {
                alias /data/static/html/one/$1;
        }
        location /test {
                alias /data/static/html/new;
                return 200 "$request_filename $document_root $realpath_root\n";
        }
}
测试 curl static.pl.com/test/3.txt
[root@www ~]# curl static.pl.com/test/3.txt
/data/static/html/new/3.txt /data/static/html/new /data/static/html/new
$request_filename 待访问文件的完整路径
$document_root 由URL和root/alias规则生成的目录路径
$realpath_root 将document_root中软链接等替换成真实路径
11.LOG
日志处理
error_log
access_log
11.1 模块名称
http_log_module
11.2 模块功能
将http请求相关信息记录到日志
11.3 模块指令
log_format 定义access日志格式,默认格式combined
access_log

path 可以包含变量,不打开cache时每条日志都需要打开关闭日志文件
if=condition 通过变量值控制请求日志是否记录
buffer=size flush=time 日志缓存
-
开启日志缓存,批量将内存中的日志写入磁盘
-
日志写入磁盘的条件
所有待写入磁盘的日志大小超出缓存大小
达到flush指定的过期时间
worker进程执行reopen命令,或者正在关闭
gzip=level 日志压缩
功能
- 批量压缩内存中的日志,再写入磁盘
- buffer大小默认64k
- 压缩级别默认为1(压缩率低->高,1-9)
open_log_file_cache
对日志文件包含变量时的优化,由于如果日志文件包含变量名会导致日志文件频繁打开关闭影响性能

max 缓存内的最大文件句柄数,超出的最少被使用的句柄会被关闭
inactive 文件访问完后在这段时间内不会被关闭。默认10秒
min_uses 在inactive时间内使用次数超过min_uses才会被继续存在内容中。默认1
valid 超出valid时间后,将对缓存的日志检查是否存在。默认60秒
off 关闭缓存功能
11.4 error_log
错误日志
error_log FILE [LEVEL]
eg: error_log logs/pl.com_err.log
11.5 日志切割
nginx日志模块会将日志记录到指定日志文件中,但时间一久日志文件会越来越大,故需要做日志切割
切割脚本
nginx_log_rotate.sh
#!/bin/bash
Dateformat=`date +%Y%m%d`
Basedir="/usr/local/nginx"
Nginxlogdir="$Basedir/logs"
Logname="access_pl.com"
[ -d $Nginxlogdir ] && cd $Nginxlogdir||exit 1
[ -f ${Logname}.log ]||exit 1
/bin/mv ${Logname}.log ${Dateformat}_${Logname}.log
$Basedir/sbin/nginx -s reload
将脚本写入cron定时切割
logrotate