Spring Cloud Config 整合kafka实现配置热刷新
文章说明:该篇只是作为local环境跑起来,如果是线上,还需要考虑配置文件加密,链接kafka的账号和密码等问题...
一、前置条件:kafka 先跑起来(建议使用docker desktop,简单好用,何乐而不为?)
1.创建一个docker-compose.yml文件 (使用此docker配置需要添加hosts: 127.0.0.1 kafka.local, 127.0.0.1 zookkeeper.local)
version: '2'
services:
  zookeeper:
    image: "zookeeper"
    hostname: "zookeeper.local"
    container_name: "zookeeper"
    #设置网络别名
    networks:
      local:
        aliases:
          - "zookeeper.local"
  kafka:
    image: "wurstmeister/kafka"
    hostname: "kafka.local"
    container_name: "kafka"
    ports:
      - "9092:9092"
    networks:
      local:
        aliases:
          - "kafka.local"
    environment:
      KAFKA_ADVERTISED_HOST_NAME: kafka.local
      KAFKA_ZOOKEEPER_CONNECT: zookeeper:2181
#设置网络,名为local
networks:
  local:
    driver: bridge
2.执行命令 docker-compose up -d (拉取镜像并运行)
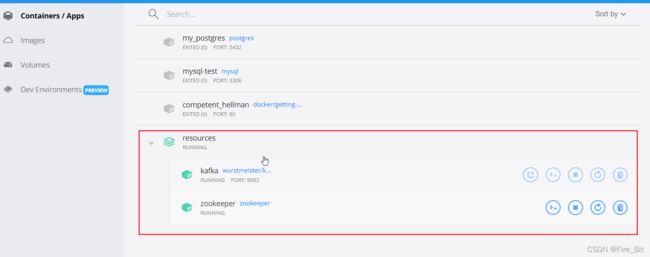
3.第二部执行完之后,打开dockerdesktop 可以看到运行的镜像
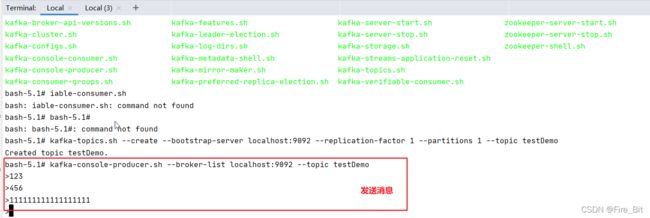
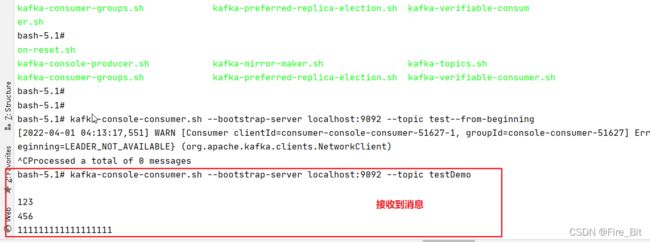
4.进入kafka 的docker容器中,创建topic,并发送接受消息,测试kafka是否正常运行
-
docker exec -it kafka /bin/bash
- kafka-topics.sh --create --bootstrap-server localhost:9092 --replication-factor 1 --partitions 1 --topic testDemo
- kafka-console-producer.sh --broker-list localhost:9092 --topic testDemo
- kafka-console-consumer.sh --bootstrap-server localhost:9092 --topic testDemo
到这里可以看到,kafka正常运行!
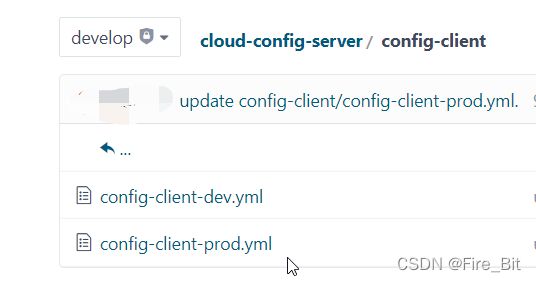
二、建立git仓库(这里很简单,只附一张config结构图)
三、server 端配置
1.pom文件
    4.0.0

        org.springframework.boot
        spring-boot-starter-parent
        2.6.5


    com.firebit
    config-server
    0.0.1-SNAPSHOT
    config-server
    Demo project for Spring Boot

        1.8
        2021.0.1


            org.springframework.boot
            spring-boot-starter-web


            org.springframework.cloud
            spring-cloud-config-server


            org.springframework.cloud
            spring-cloud-starter-bootstrap


            org.springframework.boot
            spring-boot-starter-actuator


            org.springframework.cloud
            spring-cloud-starter-bus-kafka


            org.springframework.boot
            spring-boot-starter-test
            test


            org.projectlombok
            lombok
            true


                org.springframework.cloud
                spring-cloud-dependencies
                ${spring-cloud.version}
                pom
                import


                org.springframework.boot
                spring-boot-maven-plugin


                            org.projectlombok
                            lombok
2.application.yml
server:
  port: 9999
logging:
  level:
    root: info
spring:
  application:
    name: config-server
  cloud:
    config:
      server:
        git:
          uri: https://gitee.com/你自己的git/cloud-config-server.git
          search-paths: /config/{application}/*,/*
          default-label: develop
    bus:
      enabled: true
      refresh:
        enabled: true
      ack:
        enabled: true
      trace:
        enabled: true
  kafka:
    bootstrap-servers: localhost:9092
management:
  endpoints:
    web:
      exposure:
        include: '*'
3.启动类
@SpringBootApplication
@EnableConfigServer
public class ConfigServerApplication {

    public static void main(String[] args) {
        SpringApplication.run(ConfigServerApplication.class, args);
    }

}
四、client 端配置
1.pom文件
    4.0.0

        org.springframework.boot
        spring-boot-starter-parent
        2.6.6


    com.firebit
    config-client
    0.0.1-SNAPSHOT
    config-client
    Demo project for Spring Boot

        1.8
        2021.0.1


            org.springframework.boot
            spring-boot-starter-web


            org.springframework.cloud
            spring-cloud-starter-config


            org.springframework.cloud
            spring-cloud-starter-bootstrap
            3.0.2


            org.springframework.boot
            spring-boot-starter-actuator


            org.springframework.cloud
            spring-cloud-starter-bus-kafka


            org.projectlombok
            lombok
            true


            org.springframework.boot
            spring-boot-starter-test
            test


                org.springframework.cloud
                spring-cloud-dependencies
                ${spring-cloud.version}
                pom
                import


                org.springframework.boot
                spring-boot-maven-plugin


                            org.projectlombok
                            lombok
2.bootstrap.yml (profile这个变量是启动参数,自己给个dev,prod之类的就行)
spring:
  profiles:
    active: ${profile:test}
  application:
    name: config-client
  cloud:
    config:
      fail-fast: true
      uri: http://localhost:9999/
      label: develop
    bus:
      enabled: true
      refresh:
        enabled: true
      ack:
        enabled: true
      trace:
        enabled: true
  kafka:
    bootstrap-servers: localhost:9092
management:
  endpoints:
    web:
      exposure:
        include: '*'
3.application.yml
spring:
  profiles:
    active: ${profile:test}
logging:
  level:
    root: info
hello: default
server:
  port: 8080
fire:
  name: li
  age: 18
---
spring:
  config:
    activate:
      on-profile: test
hello: test
server:
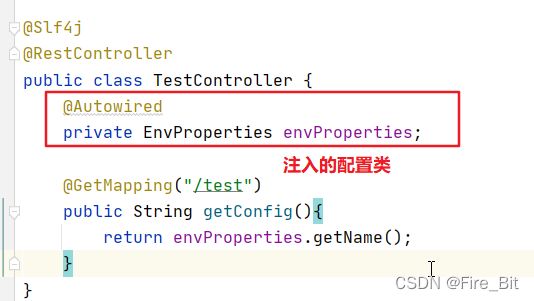
  port: 8881
4.controller 测试类
@Slf4j
@RestController
public class TestController {
    @Autowired
    private EnvProperties envProperties;

    @GetMapping("/test")
    public String getConfig(){
        return envProperties.getName();
    }
}
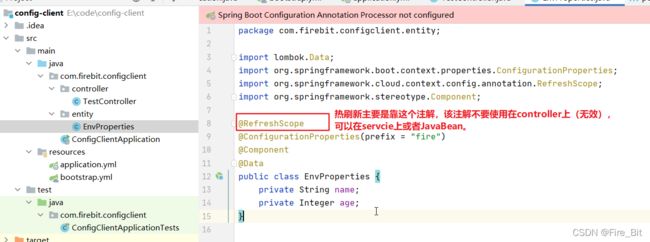
5.refreshscope 注解类
@RefreshScope
@ConfigurationProperties(prefix = "fire")
@Component
@Data
public class EnvProperties {
    private String name;
    private Integer age;
}
6.启动类
@EnableConfigurationProperties
@SpringBootApplication
public class ConfigClientApplication {

    public static void main(String[] args) {
        SpringApplication.run(ConfigClientApplication.class, args);
    }

}
五、测试
1.访问localhost:8080/test(client 以profile=dev启动)
这是仓库的dev配置文件的配置,
接口响应是:
可见配置是正确拉取,
2.修改git仓库的prod配置文件,再次调用localhost:8080/test,会发现响应结果依然是:
prod-goodnight
因为此时并未有去做热刷新啊,这是符合预期的
3.接着去call server端的 refresh接口,localhost:9999/actuator/busrefresh
这个是没有响应内容的,只是返回200
4.再去调用localhost:8080/test,会发现响应内容是你刚刚修改的内容了,此时便是进行了配置的热刷新
5.测试完毕

