2 步搞定springboot 自定义 starter
规范
一般情况下,我们会定义 2 个模块,其中一个负责自动装配,另一个负责依赖管理(启动器)
命名规范为:xxx-spring-boot-starter-autoconfigure、 xxx-spring-boot-starter
具体步骤
第1步 定义自动装配器
1.1 新建模块
根据命名规范为: hello-springboot-starter-autoconfigure
1.2 配置maven
    4.0.0

        org.springframework.boot
        spring-boot-starter-parent
        2.6.2


    com.example.starter
    hello-springboot-starter-autoconfigure
    0.0.1-SNAPSHOT


        1.8


            org.springframework.boot
            spring-boot-starter
1.3 定义装配逻辑
这里我们定义一个 sayhi 的组件,支持自定义前后缀,目的是让使用者直接注入到容器中使用。
1.3.1 定义一个HelloService服务
public class HelloService {

    private HelloProperties helloProperties;

    public HelloProperties getHelloProperties() {
        return helloProperties;
    }

    public void setHelloProperties(HelloProperties helloProperties) {
        this.helloProperties = helloProperties;
    }

    /**
     * say hi 方法
     * @param name
     * @return
     */
    public String sayHi(String name){
        return helloProperties.getPrefix() +"-"+ name +"-"+ helloProperties.getSuffix();
    }
}
1.3.2 定义一个配置类,支持前后缀配置
import org.springframework.boot.context.properties.ConfigurationProperties;

@ConfigurationProperties(value = "example.hello")
public class HelloProperties {
    private String prefix;
    private String suffix;

    public String getPrefix() {
        return prefix;
    }

    public void setPrefix(String prefix) {
        this.prefix = prefix;
    }

    public String getSuffix() {
        return suffix;
    }

    public void setSuffix(String suffix) {
        this.suffix = suffix;
    }
}
1.3.3 定义自动配置类
import org.springframework.beans.factory.annotation.Autowired;
import org.springframework.boot.autoconfigure.condition.ConditionalOnWebApplication;
import org.springframework.boot.context.properties.EnableConfigurationProperties;
import org.springframework.context.annotation.Bean;
import org.springframework.context.annotation.Configuration;
import com.example.starter.HelloProperties;

@Configuration// 指定为配置类
@ConditionalOnWebApplication // 指定条件:如果是 web 应用就生效
@EnableConfigurationProperties( HelloProperties.class ) // 启动配置 properties
public class HelloServiceAutoconfiguration {

    @Autowired
    private HelloProperties helloProperties;

    @Bean
    public HelloService helloService(){
        HelloService helloService = new HelloService();
        helloService.setHelloProperties(helloProperties);
        return helloService;
    }
}
1.4 定义spring.factories
在 resources 目录下,新建 META-INF 目录,在目录新增一个名为 spring.factories 的配置文件,内容如下:
# Auto Configure
org.springframework.boot.autoconfigure.EnableAutoConfiguration=\
com.example.starter.HelloServiceAutoconfiguration
其中配置格式为 key,value 的格式,换行使用 \ , com.example.starter.HelloServiceAutoconfiguration 是我们自定义的自动配置类。
到此位置,自定义自动装配器就搞定了。接下来,我们写一下启动器
第2步 定义启动器
2.1 新建模块
名为:hello-springboot-starter
当然我这里没有按照规范命名,最好命名为: hello-spring-boot-starter
2.2 配置 maven
这里要引入自动装配模块
    4.0.0


    com.example.starter
    hello-springboot-starter
    1.0-SNAPSHOT


            com.example.starter
            hello-springboot-starter-autoconfigure
            0.0.1-SNAPSHOT
好了,这个starter启动器不需要任何代码,只需要 pom 配置即可。
接下来,我们测试一下。
第3步 使用方式
3.1 配置maven
创建springboot项目,并引入自定义 starter
    4.0.0

        org.springframework.boot
        spring-boot-starter-parent
        2.6.2


    com.example.starter
    hello-springboot-starter-test
    0.0.1-SNAPSHOT

        1.8


            org.springframework.boot
            spring-boot-starter-web


            com.example.starter
            hello-springboot-starter
            1.0-SNAPSHOT


                org.springframework.boot
                spring-boot-maven-plugin
3.2 配置properties
当然这一步不是必要的,因为我们的案例支持自定义前后缀,所以要测试一下。
在 application.properties 配置文件配置我们定义的规则
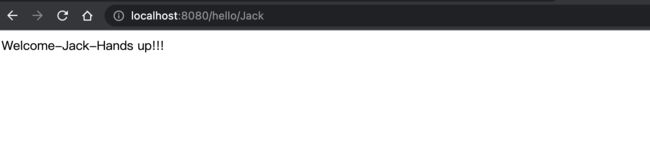
example.hello.prefix=Welcome
example.hello.suffix=Hands up!!!
3.3 定义测试代码
因为是自动装配,我们可以直接使用 @Autowired private HelloService helloService;
import org.springframework.beans.factory.annotation.Autowired;
import org.springframework.web.bind.annotation.GetMapping;
import org.springframework.web.bind.annotation.PathVariable;
import org.springframework.web.bind.annotation.RestController;

@RestController
public class HelloController {

    @Autowired
    private HelloService helloService;

    @GetMapping("hello/{name}")
    public String hello(@PathVariable("name") String name){
        return helloService.sayHi(name);
    }
}
3.4 启动测试
项目启动后,访问浏览器 http://localhost:8080/hello/Jack
源代码见: https://gitee.com/yunnasheng/springboot-starter-example