网络设备自动化运维工具——Nornir3.0.0入门笔记
Nornir概述:
官方网站:https://nornir.readthedocs.io/en/latest/
Nornir是Netmiko的高级封装,天生实现支持多线程并发,并且可与python一起使用。大多数自动化框架通过使用一些繁琐的伪语言(通常几乎是图灵完整的)来隐藏编写它们的语言,但缺乏调试和故障排除工具(明显看出指的是Ansible)。与其他系统集成通常也相当困难,因为它们通常有复杂的api(如果有的话)。这些伪语言的其他一些常见问题是,它们通常在处理数据方面相当糟糕,而且重用性有限。
Nornir旨在通过提供一个纯python框架来解决这些问题。不妨把Nornir想象成自动化的Flask。Nornir将负责处理包含主机信息的目录,它将负责将任务分派到你的设备,并提供一个通用框架来编写“插件”。
注意:目前Nornir要求安装Python 3.6.2或更高版本。
在NetDevOps中,相比于Ansible,目前更推荐使用Nornir,原因除了上述提到的,还有两点:
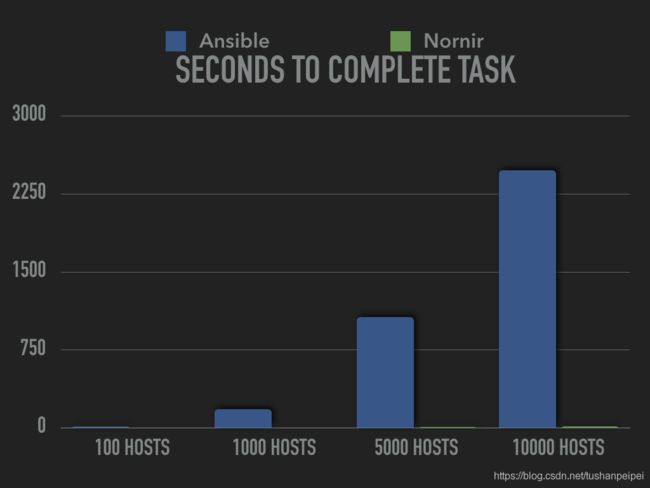
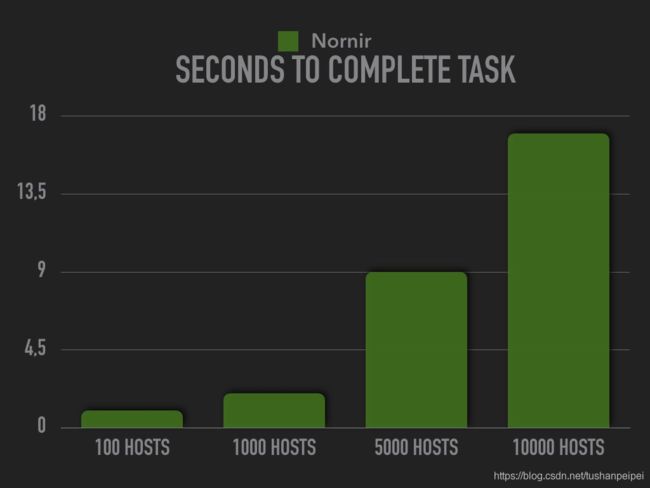
1.Norinir的速度相比于Ansible速度快上不止一星半点,可以根据下图看到:处理1万台设备,Ansible需要2300秒左右,而Nornir只需要17秒。
2. Nornir作为Netmiko的高级封装,自然支持Netmiko所支持的设备。而Ansible目前支持的国产设备相对较少,例如华为设备仅支持CE系列,因此,在国内的环境中,Ansible有较大局限性。
Nornir三大文件:
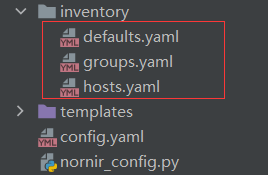
分别为default.yaml、groups.yaml、hosts.yaml:
1.default.yaml:
platform: cisco_ios
username: prin
password: Cisc0123
设置整个系统级别的默认值,如果在hosts.yaml和groups.yaml都没有定义相关信息,则使用default.yaml的信息。
2.groups.yaml:
cisco_ios:
  platform: cisco_ios    # 等于netmiko的device_type
配置整个设备组的相关信息,如果hosts.yaml中没有定义相关信息,则使用其加入的group中的信息。
3.hosts.yaml:
csr1:   #设备名称
    groups:
        - cisco_ios    #自己定义的组名称
    hostname: 192.168.0.66
    connection_options: #  不同的connection_type相关的参数(与netmiko参数相同),例如:cisco_asa的secret
        netmiko:
            extras:
                secret: #  secret密码部分需要提前准备
    data:
        site: sichuan
        type: router
        router_id: 1.1.1.1
        ospf_process_id: 1
        interface_list:
            -   interface_name: Loopback0
                ipaddr: 1.1.1.1
                netmask: 255.255.255.255
            -   interface_name: GigabitEthernet2
                ipaddr: 10.1.1.1
                netmask: 255.255.255.0
            -   interface_name: GigabitEthernet3
                ipaddr: 172.16.0.1
                netmask: 255.255.255.0
        ospf_network_list:
            -   network: 10.1.1.0
                wildmask: 0.0.0.255
                area: 0
            -   network: 1.1.1.1
                wildmask: 0.0.0.0
                area: 0
        domain: cisco.com
        user_info:
            -   username: admin
                privilege: 15
                password: Cisc0123
            -   username: otheradmin
                privilege: 1
                password: Cisc0123
        dns_servers: 114.114.114.114 8.8.8.8
        logging_console: notifications
        logging_hosts:
            -   192.168.0.166
            -   192.168.0.188
hosts.yaml定义与每个具体设备相关的数据信息。而具体hosts.yaml文件如何编写,可以使用python代码打印查看:
from nornir import InitNornir
from nornir.core.inventory import Host
from pprint import pprint

nr = InitNornir(config_file="config.yaml")

pprint(Host.schema(), indent=4)
打印结果如下:
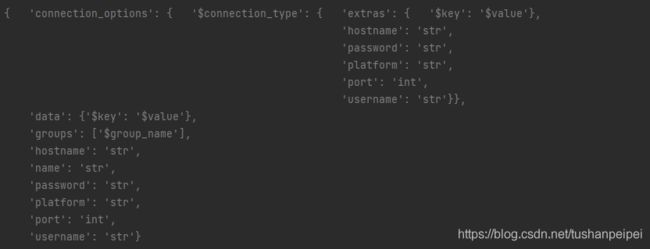
可以通过打印的信息看到,nornir其实是规定了hosts.yaml文件中的一些顶级参数的具体格式(可以对比一下上文的hosts.yaml文件),主要是关于连接设备的一些基础信息,例如hostname、password、platform等。但是data参数的具体信息,我们则可以自己进行定义发挥。
Nornir查询相关代码:
1.查看hosts.yaml文件下所有主机名称:
pprint(nr.inventory.hosts)
2.查看hosts.yaml文件下的具有主机名称:
pprint(nr.inventory.hosts['csr1'])
3.查看groups.yaml文件下所有组的名称
pprint(nr.inventory.groups)
4.查看groups.yaml文件下具体组的名称
pprint(nr.inventory.groups['cisco_ios'])
5.获取hosts.yaml中data下的相关信息
csr1 = nr.inventory.hosts['csr1']
# 获取data下的所有key
print(csr1.keys())
# 提取具体key下的值
print(csr1['interface_list'])
6.过滤出hosts.yaml文件中具体的主机
# 站点为sichuan, 并且类型为router的所有主机
print(nr.filter(site="sichuan", type="router").inventory.hosts)
实验测试:
实验目的:
完成CSR1和CSR2的基础配置。
前提准备:
- 两台CSR1000v设备,地址为192.168.0.88和192.168.0.99。
- 在两台设备上提前配置好SSH。
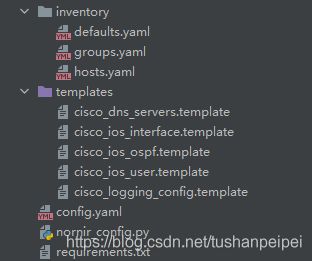
步骤一: 安装python相关模块,requirements.txt文件如下:
hvac==0.10.6
nornir==3.0.0
nornir-jinja2==0.1.1
nornir-netmiko==0.1.1
nornir-utils==0.1.1
cffi>=1.12
cryptography
在requirements.txt文件夹下,使用命令:pip3 install -r requirements.txt -i http://pypi.douban.com/simple/ 完成安装。
步骤二: 定义三大文件
defaults.yaml:
platform: cisco_ios
username: prin
password: Cisc0123
groups.yaml:
cisco_ios:
  platform: cisco_ios
hosts.yaml:
csr1:
    groups:
        - cisco_ios  # 所属于的group
    hostname: 192.168.0.66
    connection_options: #  不同的connection_type相关的参数(与netmiko参数相同),例如:cisco_asa的secret
        netmiko:
            extras:
                secret: #  secret密码部分需要提前准备(enable密码,如果没有的话可以忽略)
    data:  # data数据按照需要配置的数据之星发挥即可
        site: sichuan
        type: router
        router_id: 1.1.1.1
        ospf_process_id: 1
        interface_list:
            -   interface_name: Loopback0
                ipaddr: 1.1.1.1
                netmask: 255.255.255.255
            -   interface_name: GigabitEthernet2
                ipaddr: 10.1.1.1
                netmask: 255.255.255.0
            -   interface_name: GigabitEthernet3
                ipaddr: 172.16.0.1
                netmask: 255.255.255.0
        ospf_network_list:
            -   network: 10.1.1.0
                wildmask: 0.0.0.255
                area: 0
            -   network: 1.1.1.1
                wildmask: 0.0.0.0
                area: 0
        domain: qytang.com
        user_info:
            -   username: qytadmin
                privilege: 15
                password: Cisc0123
            -   username: otheradmin
                privilege: 1
                password: Cisc0123
        dns_servers: 114.114.114.114 8.8.8.8
        logging_console: notifications
        logging_hosts:
            -   192.168.0.166
            -   192.168.0.188

csr2: #定义设备2
    groups:
        - cisco_ios
    hostname: 192.168.0.77
    connection_options: #  不同的connection_type相关的参数(与netmiko参数相同),例如:cisco_asa的secret
        netmiko:
            extras:
                secret: #  secret密码部分需要提前准备
    data:
        site: sichuan
        type: router
        router_id: 2.2.2.2
        ospf_process_id: 1
        interface_list:
            -   interface_name: Loopback0
                ipaddr: 2.2.2.2
                netmask: 255.255.255.255
            -   interface_name: GigabitEthernet2
                ipaddr: 10.1.1.2
                netmask: 255.255.255.0
            -   interface_name: GigabitEthernet3
                ipaddr: 172.16.0.2
                netmask: 255.255.255.0
        ospf_network_list:
            -   network: 10.1.1.0
                wildmask: 0.0.0.255
                area: 0
            -   network: 2.2.2.2
                wildmask: 0.0.0.0
                area: 0
        domain: qytang.com
        user_info:
            -   username: qytadmin
                privilege: 15
                password: Cisc0123
            -   username: otheradmin
                privilege: 1
                password: Cisc0123
        dns_servers: 114.114.114.114 8.8.8.8
        logging_console: notifications
        logging_hosts:
            -   192.168.0.166
            -   192.168.0.188
需要注意的是,这里在hosts.yaml文件中并没与去配置顶级参数,username(SSH账号)、password(SSH密码)和secret(enable密码)的原因是后续可以通过python代码直接在vault(一种保管敏感信息的工具)中提取相关的信息,并且加入在hosts.yaml文件。
使用python提取vault中的密钥的好处是为了不让敏感信息出现在hosts.yaml文件中,增加安全性,这里不展开说明。
步骤四: 定义config.yaml文件:
---
inventory:
  plugin: SimpleInventory
  options:
    host_file: "inventory/hosts.yaml"
    group_file: "inventory/groups.yaml"
    defaults_file: "inventory/defaults.yaml"

runner:
  plugin: threaded
  options:
    num_workers: 100
...
定义三大组件的位置和线程数。
步骤五: 根据CSR1000v的CLI命令,准备好需要使用的jinja2的template,方便后续nornir配置时调用。jinja2相关知识请参考:https://blog.csdn.net/tushanpeipei/article/details/116895189?spm=1001.2014.3001.5501
1.cisco_dns_servers.template:
ip name-server {{ host.dns_servers }}
提前hosts.yaml文件中的键dns_servers对应的值,填入模板中,后续同理。
2.cisco_ios_interface.template:
{% for i in host.interface_list %}
    interface {{ i.interface_name }}
          ip address {{ i.ipaddr }} {{ i.netmask }}
          no shutdown
{% endfor %}
3.cisco_ios_ospf.template:
router ospf {{ host.ospf_process_id }}
    router-id {{ host.router_id }}
    {% for n in host.ospf_network_list %}
      network {{ n.network }} {{ n.wildmask }} area {{ n.area }}
    {% endfor %}
4.cisco_ios_user.template:
ip domain name {{ host.domain }}
{% for i in host.user_info %}
    username {{ i.username }} privilege {{ i.privilege }} password {{ i.password }}
{% endfor %}
5.cisco_logging_config.template:
logging console {{ host.logging_console }}
{% for i in host.logging_hosts %}
    logging host {{ i }}
{% endfor %}
步骤六: 组织nornir的各项task,完成自动化配置
nornir_config.py:
from nornir import InitNornir
from nornir_netmiko.tasks import netmiko_send_command, netmiko_send_config
from nornir_jinja2.plugins.tasks import template_file
from nornir_utils.plugins.functions import print_result
from vault_test.vault_1_init import client
from nornir.core.task import Task, Result

# Nornir加载配置文件
nr = InitNornir(config_file="config.yaml")

# 通过过滤提取,希望应用Task(任务)的主机,本次实验中也就是CSR1和CSR2
routers = nr.filter(
    type="router",
)

# 模板目录
templates_path = './templates/'

# 从vault读取信息,并更新nornir inventory(如果没有vault,则忽略此部分,仅需手工将username、password、secret信息填入hosts.yaml中即可)
for host in routers.inventory.hosts.keys():
    # 从vault读取用户名和密码
    vault_data = client.secrets.kv.v2.read_secret_version(
        mount_point='qytang',
        path=f'{nr.inventory.hosts[host].platform}/cred'
    )
    cred_data = vault_data['data']['data']
    nr.inventory.hosts[host].username = cred_data.get('username')
    nr.inventory.hosts[host].password = cred_data.get('password')
    nr.inventory.hosts[host].connection_options['netmiko'].extras['secret'] = cred_data.get('secret')

# 一个大任务中包含多个小任务
def config_routers(task:Task) -> Result:
    # -------------------------------配置接口------------------------------
    # 读取模板,并通过参数render为具体配置
    ios_interface_template = task.run(
        name='第一步.1:读取IOS接口配置模板',  # 任务名称
        task=template_file,   # 任务的目的是获取配置的模板,固定值
        template='cisco_ios_interface.template',
        path=templates_path
    )

    # 传入具体配置, 对设备进行配置, 注意需要".split('\n')"把配置转换为列表
    task.run(
        task=netmiko_send_config,  # 任务的目的是通过netmiko完成配置,固定值
        name='第一步.2:配置路由器接口',
        config_commands=ios_interface_template.result.split('\n'), # 将模板信息转换为列表,然后通过netmiko进行配置
        cmd_verify=True
    )

    # -------------------------------配置OSPF------------------------------
    # 读取模板,并且通过参数render为具体配置
    ios_ospf_template = task.run(
        name='第二步.1:读取路由器OSPF模板',
        task=template_file,
        template='cisco_ios_ospf.template',
        path=templates_path
    )

    # 传入具体配置, 对设备进行配置, 注意需要".split('\n')"把配置转换为列表
    task.run(
        task=netmiko_send_config,
        name='第二步.2:配置路由器OSPF',
        config_commands=ios_ospf_template.result.split('\n'),
        cmd_verify=True
    )

    # ---------------------------------配置Logging----------------------------
    # 读取模板,并通过参数render为具体配置
    ios_logging_template = task.run(
        name='第三步.1:读取logging服务器配置模板',
        task=template_file,
        template='cisco_logging_config.template',
        path=templates_path
    )

    # 传入具体配置, 对设备进行配置, 注意需要".split('\n')"把配置转换为列表
    task.run(
        task=netmiko_send_config,
        name='第三步.2:配置logging服务器',
        config_commands=ios_logging_template.result.split('\n'),
        cmd_verify=True
    )
    # ---------------------------------配置管理员信息----------------------------
    # 读取模板,并通过参数render为具体配置
    ios_user_template = task.run(
        name='第四步.1:读取设备管理员配置模板',
        task=template_file,
        template='cisco_ios_user.template',
        path=templates_path
    )

    # 传入具体配置, 对设备进行配置, 注意需要".split('\n')"把配置转换为列表
    task.run(
        task=netmiko_send_config,
        name='第四步.2:配置管理员信息',
        config_commands=ios_user_template.result.split('\n'),
        cmd_verify=True
    )

    # ---------------------------------配置管理员信息----------------------------
    # 读取模板,并通过参数render为具体配置
    ios_dns_template = task.run(
        name='第五步.1:读取DNS服务器模板',
        task=template_file,
        template='cisco_dns_servers.template',
        path=templates_path
    )

    # 传入具体配置, 对设备进行配置, 注意需要".split('\n')"把配置转换为列表
    task.run(
        task=netmiko_send_config,
        name='第五步.2:配置DNS服务器',
        config_commands=ios_dns_template.result.split('\n'),
        cmd_verify=True
    )

	# 大任务的执行完成后的返回结果
    return Result(
        host=task.host,
        result=f"{task.host}运行完成"
    )


# 执行大任务,任务名称为配置CSR路由器
run_result = routers.run(task=config_routers,name='配置CSR路由器')
# 打印返回结果。
print_result(run_result)
测试结果:
参考资料来源:弈心、现任明教教主相关学习资料
