Linux编译安装软件合集 (lnmp git rbmq redis php扩展)(持续更新中...)6.25更新
**开机需要启动服务的命令
nginx -t
service php-fpm start
#redis
/opt/local/redis/bin/redis-server /opt/local/redis/redis.conf
#rabbitmq
cd /opt/local/rabbitmq_server-3.8.16/sbin/
./rabbitmq-plugins enable rabbitmq_management # 启动插件
./rabbitmq-server -detached # 启动服务
./rabbitmqctl status # 查看RabbitMQ运行状态
#es
su elastic
cd /opt/local/elastic/bin
./elasticsearch
#kibana
su elastic
cd /opt/local/kibana/bin
./kibana
**关于IP地址的文件修改
/opt/local/redis/redis.conf
	bind 192.168.240.131
安装Nginx
nginx版本下载地址:http://nginx.org/en/download.html
下载解压
wget http://nginx.org/download/nginx-1.19.10.tar.gz
tar zxf nginx-1.19.10.tar.gz
cd nginx-1.19.10
安装依赖库
yum install gcc gcc-c++ glibc -y
yum install pcre-devel -y
yum install zlib-devel -y
yum install openssl-devel -y
执行编译
nginx 编译参数解析
–prefix #nginx安装目录,默认在/usr/local/nginx
–pid-path #pid问件位置,默认在logs目录
–lock-path #lock问件位置,默认在logs目录
–with-http_ssl_module #开启HTTP SSL模块,以支持HTTPS请求。
–with-http_dav_module #开启WebDAV扩展动作模块,可为文件和目录指定权限
–with-http_flv_module #支持对FLV文件的拖动播放
–with-http_realip_module #支持显示真实来源IP地址
–with-http_gzip_static_module #预压缩文件传前检查,防止文件被重复压缩
–with-http_stub_status_module #取得一些nginx的运行状态
–with-mail #允许POP3/IMAP4/SMTP代理模块
–with-mail_ssl_module #允许POP3/IMAP/SMTP可以使用SSL/TLS
–with-pcre=../pcre-8.11 #注意是未安装的pcre路径
–with-zlib=../zlib-1.2.5 #注意是未安装的zlib路径
–with-debug #允许调试日志
–http-client-body-temp-path #客户端请求临时文件路径
–http-proxy-temp-path #设置http proxy临时文件路径
–http-fastcgi-temp-path #设置http fastcgi临时文件路径
–http-uwsgi-temp-path=/var/tmp/nginx/uwsgi #设置uwsgi 临时文件路径
–http-scgi-temp-path=/var/tmp/nginx/scgi #设置scgi 临时文件路径
执行编译
./configure --prefix=/opt/local/nginx --sbin-path=/opt/local/nginx/sbin/nginx --conf-path=/opt/local/nginx/conf/nginx.conf --error-log-path=/var/log/nginx/error.log --http-log-path=/var/log/nginx/access.log --pid-path=/var/run/nginx/nginx.pid --lock-path=/var/lock/nginx.lock --user=nginx --group=nginx --with-http_ssl_module --with-http_stub_status_module --with-http_gzip_static_module --http-client-body-temp-path=/var/tmp/nginx/client/ --http-proxy-temp-path=/var/tmp/nginx/proxy/ --http-fastcgi-temp-path=/var/tmp/nginx/fcgi/ --http-uwsgi-temp-path=/var/tmp/nginx/uwsgi --http-scgi-temp-path=/var/tmp/nginx/scgi --with-pcre
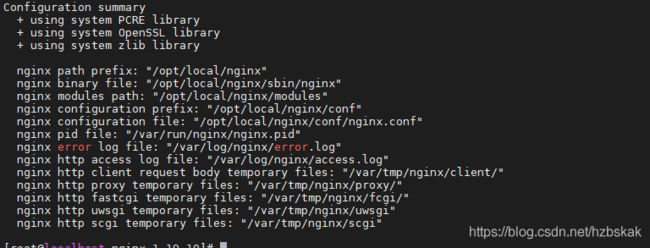
执行成功
make安装
make && make install
修改启动软连接
ln -s /opt/local/nginx/sbin/nginx /usr/bin/
启动nginx
/opt/local/nginx/sbin/nginx
or
nginx -t //已经软连接过了
nginx
可能出现的问题
是安装nginx服务时没有创建nginx用户
解决方法:
创建nginx的用户,是一个程序用户#创建用户nginx useradd -s /bin/nologin -M nginx #设置shell不能登陆,不创建家目录
创建/var/tmp/nginx/client目录
关闭防火墙后,浏览器输入地址访问:
1:查看防火状态

systemctl status firewalld

service  iptables status

2:暂时关闭防火墙

systemctl stop firewalld

service  iptables stop

3:永久关闭防火墙

systemctl disable firewalld

chkconfig iptables off

4:重启防火墙

systemctl enable firewalld

service iptables restart
安装PHP
php版本地址:https://www.php.net/downloads
下载解压
wget https://www.php.net/distributions/php-7.4.19.tar.gz
tar zxf php-7.4.19.tar.gz
cd php-7.4.19
安装依赖库
yum -y install gcc gcc-c++ gcc-g77 make libtool autoconf patch unzip automake libxml2 libxml2-devel ncurses ncurses-devel libtool-ltdl-devel libtool-ltdl libmcrypt libmcrypt-devel libpng libpng-devel libjpeg-devel openssl openssl-devel gd-devel curl curl-devel libxml2 libxml2-devel ncurses ncurses-devel libtool-ltdl-devel libtool-ltdl autoconf automake libaio* sqlite-devel epel-release oniguruma oniguruma-devel libxslt-devel
执行编译
./configure --prefix=/opt/local/php7 --with-curl --with-mysql-sock=/var/tmp/mysql/mysql.sock --with-jpeg-dir --with-freetype-dir --with-gd --with-gettext --with-iconv-dir --with-kerberos --with-libxml-dir --with-mysqli=mysqlnd --with-openssl --with-pcre-regex --with-pdo-mysql=mysqlnd --with-pdo-sqlite --with-pear --with-png-dir --with-xmlrpc --with-xsl --with-zlib --with-pdo-mysql --with-fpm-user=nginx --with-fpm-group=nginx --enable-fpm --enable-bcmath --enable-libxml --enable-inline-optimization --enable-gd-native-ttf --enable-mbregex --enable-mbstring --enable-opcache --enable-pcntl --enable-shmop --enable-soap --enable-sockets --enable-sysvsem --enable-xml --enable-zip --enable-mysqlnd --enable-maintainer-zts
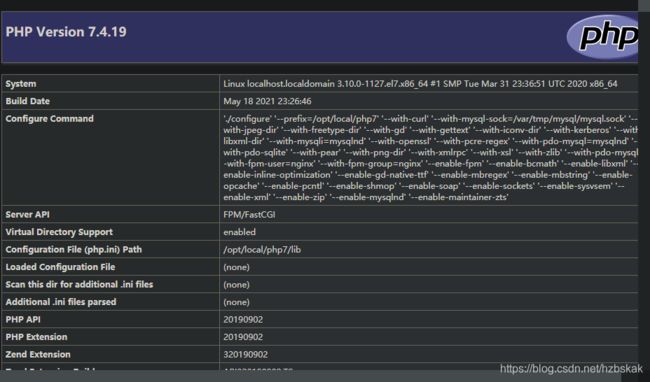
编译成功
make安装
make && make install
配置php
在执行configure的地方执行如下命令
cp php.ini-production /opt/local/php7/etc/php.ini
cd /opt/local/php7/etc/    //查看是否有了 php.ini
在接着执行如下命令
cp php-fpm.conf.default php-fpm.conf
在进入这个目录 cd php-fpm.d/ 在继续执行如下命令
cp www.conf.default www.conf
最后在这个目录 /opt/local/php7/sbin 执行如下命令
./php-fpm
查看一下端口号是否启动了 netstat -lntup | grep php
![]()
由图片可见,php-fpm 已经成功启动了。
设置全局php访问
ln -s /opt/local/php7/bin/php /usr/bin/php
添加永久环境变量,影响所有用户
vim /etc/profile
在文档最后,添加如下命令;说明(sbin 为php-fpm 所在,bin 为php客户端所在)export PATH = "/opt/local/php7/sbin:/opt/local/php7/bin:$PATH"  保持退出 然后运行 source /etc/profile
可能出现的问题
解决重启php-fpm时遇到的一些问题
[root@localhost sbin]# service php-fpm restart
Redirecting to /bin/systemctl restart php-fpm.service
Failed to restart php-fpm.service: Unit not found.
上面的问题是说 php-fpm.service: Unit not found
解决思路:因为php-fpm是编译安装的,所以,那个脚本文件不存在。在service的时候会自动访问 init.d/目录下的php-fpm脚本,没有这个脚本就会报那个错误。
解决方案
-
find / -name ‘init.d.php-fpm’
/root/php-7.4.19/sapi/fpm/init.d.php-fpm
-
cp /root/php-7.4.19/sapi/fpm/init.d.php-fpm /etc/init.d/php-fpm
-
chmod a+x /etc/init.d/php-fpm //修改为可执行权限
-
service php-fpm start
ERROR: unable to bind listening socket for address ‘127.0.0.1:9000’: Address already in use (98)
ERROR: FPM initialization failed
-
netstat -lntup | grep 9000
-
killall php-fpm
-
开启php: service php-fpm start|restart|stop
-
查看:ps aux | grep php
-
查看版本: php -v
-
修改nginx.conf 支持可执行php
vim /opt/local/nginx/conf/nginx.conf
location ~.php$ {
root html;
fastcgi_pass 127.0.0.1:9000;
fastcgi_index index.php;
fastcgi_param SCRIPT_FILENAME /opt/local/nginx/html$fastcgi_script_name; # 这里要用绝对地址
include fastcgi_params;
}nginx -s reload
安装MySql5.7
下载解压
由于MySQL5.7必须使用boost.1.59及以上版本,需要安装boost
[root@localhost ~]# pwd
/root
wget  https://jaist.dl.sourceforge.net/project/boost/boost/1.59.0/boost_1_59_0.tar.gz
tar -zxvf boost_1_59_0.tar.gz
cd boost_1_59_0
./bootstrap.sh
./b2
./b2 install
cd ..
版本地址:https://dev.mysql.com/downloads/mysql/5.7.html#downloads
tar -xvf mysql-5.7.33-linux-glibc2.12-x86_64.tar.gz
mv mysql-5.7.33-linux-glibc2.12-x86_64 /usr/local/mysql
创建用户组和用户并修改权限
groupadd mysql
useradd -r -g mysql mysql
mkdir -p  /data/mysql              #创建目录
chown mysql:mysql -R /data/mysql   #赋予权限
配置my.cnf
vim /etc/my.cnf
[mysqld]
bind-address=0.0.0.0
port=3306
user=mysql
basedir=/usr/local/mysql
datadir=/data/mysql
socket=/tmp/mysql.sock
log-error=/data/mysql/mysql.err
pid-file=/data/mysql/mysql.pid
#character config
character_set_server=utf8mb4
symbolic-links=0
explicit_defaults_for_timestamp=true
初始化数据库
cd /usr/local/mysql/bin/
初始化
./mysqld --defaults-file=/etc/my.cnf --basedir=/usr/local/mysql/ --datadir=/data/mysql/ --user=mysql --initialize
查看密码
cat /data/mysql/mysql.err
启动Mysql,更改root密码
先将mysql.server放置到/etc/init.d/mysql中
cp /usr/local/mysql/support-files/mysql.server /etc/init.d/mysql
启动
service mysql start
修改密码
./mysql -u root -p   #bin目录下 Lrj>7hq9JwFJ

SET PASSWORD = PASSWORD('root');
ALTER USER 'root'@'localhost' PASSWORD EXPIRE NEVER;
FLUSH PRIVILEGES;
ssh连接
use mysql                                            #访问mysql库
update user set host = '%' where user = 'root';      #使root能再任何host访问
FLUSH PRIVILEGES;
软连接
ln -s /usr/local/mysql/bin/mysql /usr/bin
启动
service mysql start
安装Git
版本地址:https://mirrors.edge.kernel.org/pub/software/scm/git/
下载解压
wget https://mirrors.edge.kernel.org/pub/software/scm/git/git-2.31.1.tar.gz
tar -xvf git-2.31.1.tar.gz
编译安装
./configure prefix=/opt/local/git
make && make install
ln -s /opt/local/git/bin/git /usr/bin/git
查看版本号
git --version
加入环境变量
vim /etc/profile
export PATH="/opt/local/git/bin:$PATH" # 加入环境变量
source /etc/profile
安装RabbitMQ
安装erlang
erlang版本地址:https://www.erlang.org/downloads
安装依赖库
yum -y install ncurses-devel

yum -y install openssl-devel

yum -y install unixODBC-devel

yum -y install gcc-c++
下载解压
tar xzf otp_src_24.0.tar.gz
cd otp_src_24.0
编译
./configure --prefix=/opt/local/erlang
make && make install
ln -s /opt/local/erlang/bin/erl /usr/bin/erl
erl
官网介绍安装方式:https://www.rabbitmq.com/install-rpm.html
mq和erlang的版本要对应:https://www.rabbitmq.com/which-erlang.html
mq下载地址:https://www.rabbitmq.com/install-rpm.html#downloads
erlang最新下载地址:https://github.com/rabbitmq/erlang-rpm/releases
安装RabbitMQ
下载
rabbitmq版本地址:https://www.rabbitmq.com/install-generic-unix.html#downloads
wget https://github.com/rabbitmq/rabbitmq-server/releases/download/v3.8.16/rabbitmq-server-generic-unix-3.8.16.tar.xz
xz -d rabbitmq-server-generic-unix-3.8.16.tar.xz
tar -xvf rabbitmq-server-generic-unix-3.8.16.tar
安装配置
cd /opt/local/rabbitmq_server-3.8.16/sbin/
./rabbitmq-plugins enable rabbitmq_management # 启动插件
./rabbitmq-server -detached # 启动服务
./rabbitmqctl add_user root root # 添加用户
./rabbitmqctl set_user_tags root administrator # 设置用户角色
./rabbitmqctl list_users # 查看用户
./rabbitmqctl set_permissions -p / root ".*" ".*" ".*" # 设置用户权限
./rabbitmqctl status # 查看RabbitMQ运行状态
浏览器测试
http://192.168.240.128:15672/#/
AB
安装
yum -y install httpd-tools
ab -V #查看ab版本
使用
-n 访问次数
-c 并发个数
ab -n 1000 -c 10 http://www.baidu.com/
Redis
下载
地址:https://redis.io/download
客户端地址:https://raw.githubusercontent.com/caoxinyu/RedisClient/windows/release/redisclient-win32.x86.2.0.exe
wget https://github.com/redis/redis/archive/unstable.tar.gz
tar -zxvf unstable.tar.gz
mv redis-unstable /opt/local/redis
cd /opt/local/redis/
编译
make
make PREFIX=/opt/local/redis install
配置
vim /opt/local/redis/redis.conf
/daemonize 查找属性,改为yes 添加守护进程
/bind bind 192.168.240.128 # 绑定虚拟机Ip
启动
/opt/local/redis/bin/redis-server /opt/local/redis/redis.conf
crontab
* * * * * cd /opt/local/nginx/html/xxx &&  php think kingdee:sales >> /tmp/test.log
tail -f /tmp/test.log #监听
composer
下载
php -r "copy('https://install.phpcomposer.com/installer', 'composer-setup.php');"
php composer-setup.php
php -r "unlink('composer-setup.php');"
sudo mv composer.phar /usr/local/bin/composer
切换阿里源
composer config -g repo.packagist composer https://mirrors.aliyun.com/composer/
inotify
地址:https://www.php.net/manual/zh/book.inotify.php
利用Linux内核inotify机制,文件更新时系统会主动通知
下载解压编译
tar zxvf inotify-3.0.0.tgz
cd inotify-3.0.0
phpize
./configure --with-php-config=/opt/local/php7/bin/php-config --enable-inotify
make && make install
修改配置
find / -name 'php.ini'
vim /opt/local/php7/etc/php.ini
#配置中新增下面一行
extension=inotify.so
重启php-fpm
service php-fpm restart
php -i | grep inotify # 检查是否安装成功
nodejs
下载解压
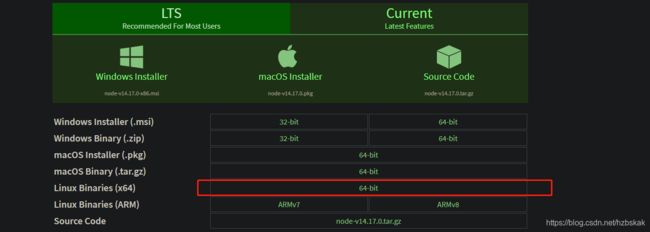
下载地址:https://nodejs.org/en/download/
wget https://nodejs.org/dist/v14.17.0/node-v14.17.0-linux-x64.tar.xz
tar -xvf node-v14.17.0-linux-x64.tar.xz
mv node-v14.17.0-linux-x64 /opt/local/nodejs
建立软连接
ln -s /opt/local/nodejs/bin/npm /usr/local/bin/
ln -s /opt/local/nodejs/bin/node /usr/local/bin/
切换源
npm config set registry https://registry.npm.taobao.org
npm install -g cnpm --registry=https://registry.npm.taobao.org
ln -s /opt/local/nodejs/bin/cnpm /usr/local/bin/cnpm
成功
Elasticsearch
版本:https://www.elastic.co/cn/downloads/past-releases/elasticsearch-7-11-2
下载
wget https://artifacts.elastic.co/downloads/elasticsearch/elasticsearch-7.11.2-linux-x86_64.tar.gz
tar -zxvf elasticsearch-7.11.2-linux-x86_64.tar.gz
mv elasticsearch-7.11.2-linux-x86_64 /opt/local/elastic
配置
cd config/
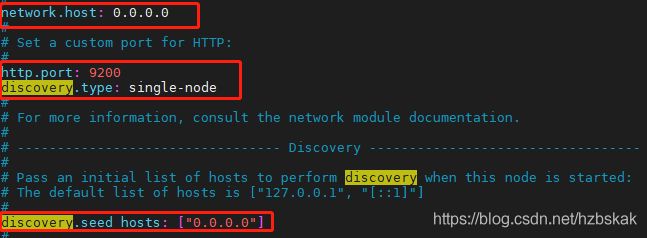
vim elasticsearch.yml
	network.host: 0.0.0.0
	http.port: 9200
	discovery.type: single-node
	discovery.seed_hosts: ["0.0.0.0"]
增加 elastic用户
es不支持root用户启动,增加 elastic用户
groupadd elastic
useradd elastic -g elastic -p elastic
chown -R elastic:elastic /usr/local/elastic
su elastic
启动
cd ../bin/
pwd
	/opt/local/elastic/bin
./elasticsearch
会报错
ERROR: [3] bootstrap checks failed
[1]: max file descriptors [4096] for elasticsearch process is too low, increase to at least [65535]
[2]: max number of threads [3829] for user [elastic] is too low, increase to at least [4096]
[3]: max virtual memory areas vm.max_map_count [65530] is too low, increase to at least [262144]
ERROR: Elasticsearch did not exit normally - check the logs at /opt/local/elastic/elasticsearch-7.11.2/logs/elasticsearch.log
切换root用户修改
vi /etc/sysctl.conf
#新增
vm.max_map_count=262144

vi /etc/security/limits.conf
#新增
* sosft nofile 262144
* hard nofile 524288
* soft nproc 2048
* hard nproc 4096
重启,运行
reboot
cd /opt/local/elastic/bin
./elasticsearch
浏览器访问:
http://192.168.240.131:9200/
{
name: "localhost.localdomain",
cluster_name: "elasticsearch",
cluster_uuid: "_na_",
version: {
number: "7.11.2",
build_flavor: "default",
build_type: "tar",
build_hash: "3e5a16cfec50876d20ea77b075070932c6464c7d",
build_date: "2021-03-06T05:54:38.141101Z",
build_snapshot: false,
lucene_version: "8.7.0",
minimum_wire_compatibility_version: "6.8.0",
minimum_index_compatibility_version: "6.0.0-beta1"
},
tagline: "You Know, for Search"
}
安装ik分词
/opt/local/elastic/bin/elasticsearch-plugin install https://github.com/medcl/elasticsearch-analysis-ik/releases/download/v7.11.2/elasticsearch-analysis-ik-7.11.2.zip
重启
Kibana
版本:https://www.elastic.co/cn/downloads/past-releases/kibana-7-11-2
下载
tar -xzf kibana-7.11.2-linux-x86_64.tar.gz
mv kibana-7.11.2-linux-x86_64 /opt/local/kibana
配置
修改配置文件kibana.yml,文件位置在解压后的文件夹下config下
cd /opt/local/kibana/config
vim kibana.yml
修改内容,主要是server.port、server.host、elasticsearch.url、kibana.index。
# Kibana端口号,默认是5601,注意:“:”和“5601”之间有空格,server之前不允许有空格
server.port: 5601

# kibana地址
server.host: 192.168.240.131

# 添加任何ip都可以访问
server.host: "0.0.0.0"

# 使您能够在运行于代理之后指定挂载Kibana的路径。这只会影响到由Kibana生成的url,
# 您的代理在将请求转发到Kibana之前应该删除basePath值。
# 此设置不能以斜线结束
#server.basePath: ""

# 传入服务器请求的最大有效负载大小(以字节为单位)
#server.maxPayloadBytes: 1048576

# Kibana服务名
#server.name: "your-hostname"

# es地址,可以配置多个
#elasticsearch.hosts: ["http://localhost:9200"]
elasticsearch.hosts: "http://0.0.0.0:9200"

# 当该设置的值为true时,Kibana使用服务器中指定的主机名设置
# 当这个设置的值为false时,Kibana使用连接到这个Kibana实例的主机的主机名
#elasticsearch.preserveHost: true

# Kibana在Elasticsearch中使用索引来存储保存的搜索、可视化和仪表板
#如果索引不存在,则Kibana创建一个新索引
kibana.index: ".kibana"

# 默认加载的应用程序.
#kibana.defaultAppId: "home"

# 如果ES设置了用户验证,则需要配置可用的用户名密码
elasticsearch.username: "用户名"
elasticsearch.password: "密码"

# 分别启用SSL和到peme格式SSL证书和SSL密钥文件的路径。
# 这些设置为从Kibana服务器发送到浏览器的请求启用SSL。
#server.ssl.enabled: false
#server.ssl.certificate: /path/to/your/server.crt
#server.ssl.key: /path/to/your/server.key

# 提供pemm格式SSL证书和密钥文件路径的可选设置。
# 这些文件将验证您的Elasticsearch后端是否使用了相同的密钥文件。
#elasticsearch.ssl.certificate: /path/to/your/client.crt
#elasticsearch.ssl.key: /path/to/your/client.key

# 可选设置,使您能够为您的Elasticsearch实例的证书颁发机构指定PEM文件的路径
#elasticsearch.ssl.certificateAuthorities: [ "/path/to/your/CA.pem" ]

# 若要忽略SSL证书的有效性,请将此设置的值更改为“none”.
#elasticsearch.ssl.verificationMode: full

# 等待Elasticsearch响应ping的时间(毫秒)
# 默认使用elasticsearch.requestTimeout 的设置
#elasticsearch.pingTimeout: 1500

# 等待后端或Elasticsearch响应的时间(毫秒)
#elasticsearch.requestTimeout: 30000

# 默认语言改为中文
i18n.locale: "zh-CN"
启动
cd ../bin/
.kibana
浏览器访问:http://192.168.240.131:5601/
docker
https://www.runoob.com/docker/centos-docker-install.html
https://blog.csdn.net/weixin_39895862/article/details/110465890
服务命令
sudo systemctl start docker
sudo systemctl restart docker    # 重启
sudo systemctl status docker #  查看状态
sudo systemctl stop docker  # 停止
sudo systemctl enable docker

