Taro3.x 快速开发微信小程序以及 minidebug 小程序调试工具使用
前言
最近公司准备开发一款扫码开票类型的微信小程序,时间紧,任务急。第一反应就是打开小程序开放平台查看开发文档,哦豁,官方的组件也太少了吧,难道要自己手写吗 ? 经过多方调研,了解目前市面上比较流行的小程序开发框架有 Uniapp、Taro 。因为目前公司技术栈完全使用的 react hooks + ts 开发,所以在框架选择上自然就选择了 Taro 。
Taro 简介
Taro 是一个开放式跨端跨框架解决方案,支持使用 React/Vue/Nerv 等框架来开发 微信 / 京东 / 百度 / 支付宝 / 字节跳动 / QQ 小程序 / H5 / RN 等应用。
现如今市面上端的形态多种多样,Web、React Native、微信小程序等各种端大行其道。当业务要求同时在不同的端都要求有所表现的时候,针对不同的端去编写多套代码的成本显然非常高,这时候只编写一套代码就能够适配到多端的能力就显得极为需要。
安装及使用
Taro 项目基于 node,请确保已具备较新的 node 环境(>=12.0.0),推荐使用 node 版本管理工具 nvm 来管理 node,这样不仅可以很方便地切换 node 版本,而且全局安装时候也不用加 sudo 了。
CLI 工具安装
首先,你需要使用 npm 或者 yarn 全局安装 @tarojs/cli,或者直接使用 npx:
# 使用 npm 安装 CLI
npm install -g @tarojs/cli

# OR 使用 yarn 安装 CLI
yarn global add @tarojs/cli

# OR 安装了 cnpm,使用 cnpm 安装 CLI
cnpm install -g @tarojs/cli
npm 5.2+ 也可在不全局安装的情况下使用 npx 创建模板项目:
npx @tarojs/cli init taro_init_template
这里为了方便快捷,建议直接使用 npx 创建模板项目哈
运行&启动项目
# yarn
 yarn dev:weapp
 yarn build:weapp

# npm script
 npm run dev:weapp
 npm run build:weapp

# 仅限全局安装
 taro build --type weapp --watch
 taro build --type weapp

# npx 用户也可以使用
 npx taro build --type weapp --watch
 npx taro build --type weapp

# watch 同时开启压缩
$ set NODE_ENV=production && taro build --type weapp --watch # Windows
$ NODE_ENV=production taro build --type weapp --watch # Mac
以上是微信小程序的编译命令,其它小程序编译可以查看项目文件夹下的 package.json 文件夹
运行小程序,你会发现在项目目录下多出了一个 dist 文件夹,打开微信开发者工具,用自己微信号登录,点击小程序界面的 + ,导入项目,项目名称自己定义,目录选择刚刚创建模板项目下的 dist 文件夹,AppId 可以暂时使用测试号哦,后期可以自己注册一个用于开发使用。
[sitemap 索引情况提示] 根据 sitemap 的规则[0],当前页面 [pages/index/index] 将被索引
遇到上述警告,可以设置 project.config.json => setting => checkSiteMap
{
	"miniprogramRoot": "dist/",
	"projectname": "taro_template",
	"description": "taro_template",
	"appid": "touristappid",
	"setting": {
		"urlCheck": true,
		"es6": false,
		"postcss": false,
		"preloadBackgroundData": false,
		"minified": false,
		"newFeature": true,
		"autoAudits": false,
		"coverView": true,
		"showShadowRootInWxmlPanel": false,
		"scopeDataCheck": false,
		"useCompilerModule": false,
    // 这里添加哦
		"checkSiteMap":false
	},
	"compileType": "miniprogram",
	"simulatorType": "wechat",
	"simulatorPluginLibVersion": {},
	"condition": {}
}
快速创建新页面 & 增加 TabBar
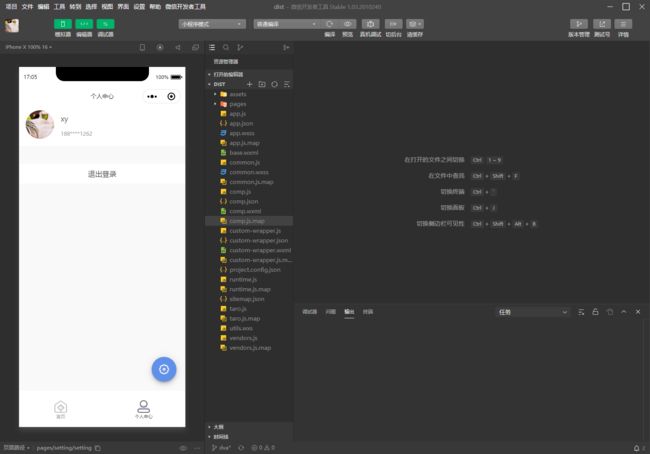
Taro create --name [页面名称] 能够在当前项目的pages目录下快速生成新的页面文件,并填充基础代码,是一个提高开发效率的利器。
新增页面并且配置 app.config.ts
app.config.ts 完整配置
export default {
  pages: [
    "pages/index/index",
    "pages/setting/setting",
    // "pages/login/login"
  ],
  subpackages: [
    {
      root: "pages/login/",
      pages: [
        "login"
      ]
    }
  ],
  window: {
    backgroundTextStyle: "light",
    navigationBarBackgroundColor: "#fff",
    navigationBarTitleText: "WeChat",
    navigationBarTextStyle: "black"
  },
  tabBar: {
    list: [
      {
        pagePath: "pages/index/index",
        text: "首页",
        iconPath: "assets/images/tab_index.png",
        selectedIconPath: "assets/images/tab_index_active.png"
      },
      {
        pagePath: "pages/setting/setting",
        text: "个人中心",
        iconPath: "assets/images/tab_setting.png",
        selectedIconPath: "assets/images/tab_setting_active.png"
      }
    ],
    color: "#BFBFBF",
    selectedColor: "#1296DB",
    backgroundColor: "#fff",
    borderStyle: "white"
  }
};
细心的同学可能会发现,app.config.ts 文件中增加了 subpackages 配置,下面来详细讲下这个配置的作用
subpackages 分包
在小程序启动时,默认会下载主包并启动主包内页面,当用户进入分包内某个页面时,客户端会把对应分包下载下来,下载完成后再进行展示。
目前小程序分包大小有以下限制:
- 整个小程序所有分包大小不超过 20M
- 单个分包/主包大小不能超过 2M
注意:作为 tabbar 页面不能使用分包,可以使用分包的页面添加到 subpackages,且在 pages 中移除
路由
Taro.switchTab(option)
跳转到 tabBar 页面,并关闭其他所有非 tabBar 页面
Taro.reLaunch(option)
关闭所有页面,打开到应用内的某个页面
Taro.redirectTo(option)
关闭当前页面,跳转到应用内的某个页面。但是不允许跳转到 tabbar 页面。
Taro.navigateTo(option)
保留当前页面,跳转到应用内的某个页面。但是不能跳到 tabbar 页面。使用 Taro.navigateBack 可以返回到原页面。小程序中页面栈最多十层。
Taro.navigateBack(option)
关闭当前页面,返回上一页面或多级页面。可通过 getCurrentPages 获取当前的页面栈,决定需要返回几层。
路由不做过多介绍,详细使用方法请参考官方文档。
请求封装 Taro.request
定义统一状态
export const HTTP_STATUS = {
    SUCCESS: 200,
    CREATED: 201,
    ACCEPTED: 202,
    CLIENT_ERROR: 400,
    AUTHENTICATE: 301,
    FORBIDDEN: 403,
    NOT_FOUND: 404,
    SERVER_ERROR: 500,
    BAD_GATEWAY: 502,
    SERVICE_UNAVAILABLE: 503,
    GATEWAY_TIMEOUT: 504
  }

  export const REFRESH_STATUS = {
    NORMAL: 0,
    REFRESHING: 1,
    NO_MORE_DATA: 2
  }
定义错误统一输出方法
import { formatTime } from "../utils/common"
/**
 *
 * @param {string} name 错误名字
 * @param {string} action 错误动作描述
 * @param {string} info 错误信息,通常是 fail 返回的
 */
// eslint-disable-next-line
export const logError = (name: string, action: string, info?: string | object ) => {
  if (!info) {
    info = 'empty'
  }
  let time = formatTime(new Date())
  console.error(time, name, action, info)
  if (typeof info === 'object') {
    info = JSON.stringify(info)
  }
}
定义 request.ts
import Taro from '@tarojs/taro'
import { HTTP_STATUS } from './status'
import { logError } from './error'
import { baseUrl } from './baseUrl'
import { checkLogin } from "./auth"

export default {
  baseOptions(params, method = 'GET') {
    let { url, data } = params
    let contentType = 'application/json'
    contentType = params.contentType || contentType
    type OptionType = {
      url: string,
      data?: object | string,
      method?: any,
      header: object,
      // mode: string,
      success: any,
      error: any,
      xhrFields: object,
    }
    const setCookie = (res: {
      cookies: Array<{
        name: string,
        value: string,
        expires: string,
        path: string
      }>,
      header: {
        'Set-Cookie': string
      }
    }) => {
      if (res.cookies && res.cookies.length > 0) {
        let cookies = Taro.getStorageSync('cookies') || '';
        res.cookies.forEach((cookie, index) => {
          // windows的微信开发者工具返回的是cookie格式是有name和value的,在mac上是只是字符串的
          if (cookie.name && cookie.value) {
            cookies += index === res.cookies.length - 1 ? `${cookie.name}=${cookie.value};expires=${cookie.expires};path=${cookie.path}` : `${cookie.name}=${cookie.value};`
          } else {
            cookies += `${cookie};`
          }
        });
        Taro.setStorageSync('cookies', cookies)
      }
      // if (res.header && res.header['Set-Cookie']) {
      //   Taro.setStorageSync('cookies', res.header['Set-Cookie'])
      // }
    }
    const option: OptionType = {
      url: url.indexOf('http') !== -1 ? url : baseUrl + url,
      data: data,
      method: method,
      header: {
        'content-type': contentType,
        // 增加请求头
        cookie: Taro.getStorageSync('cookies')
      },
      // mode: 'cors',
      xhrFields: { withCredentials: true },
      success(res) {
        console.log('res', res)
        setCookie(res)
        if (res.statusCode === HTTP_STATUS.NOT_FOUND) {
          return logError('api', '请求资源不存在')
        } else if (res.statusCode === HTTP_STATUS.BAD_GATEWAY) {
          return logError('api', '服务端出现了问题')
        } else if (res.statusCode === HTTP_STATUS.FORBIDDEN) {
          return logError('api', '没有权限访问')
        } else if (res.statusCode === HTTP_STATUS.AUTHENTICATE) {
          Taro.clearStorage()
          //跳转到登录页面
          checkLogin()
          return logError('api', '请先登录')
        } else if (res.statusCode === HTTP_STATUS.SUCCESS) {
          return res.data
        }
      },
      error(e) {
        logError('api', '请求接口出现问题', e)
      }
    }
    // eslint-disable-next-line
    return Taro.request(option)
  },
  get(url, data?: object) {
    let option = { url, data }
    return this.baseOptions(option)
  },
  post: function (url, data?: object, contentType?: string) {
    let params = { url, data, contentType }
    return this.baseOptions(params, 'POST')
  },
  put(url, data?: object) {
    let option = { url, data }
    return this.baseOptions(option, 'PUT')
  },
  delete(url, data?: object) {
    let option = { url, data }
    return this.baseOptions(option, 'DELETE')
  }
}
定义 baseUrl.ts
export const baseUrl = 'http://172.36.0.26:3000'
定义 api.ts
import request from "./request"

export const getDetail = (params):Promise<any>=>{
    return request.get('/url', params)
}
组件中使用
  const getDetail = ()=>{
    api.getDetail({
      data: 1232
    }).then((res)=>{
      console.log(res)
    })
  }
Dva 集成使用
react 状态状态管理库: Redux,Dva,Mobx … 本次搭建采用 Dva 来搭建,终于为什么选用 Dva ,完全就是为了尝鲜,因为以前项目中一直使用的 redux,redux 的繁琐想必大家也是知道的。大家也可以去尝试下使用 Mobx 。Mobx 可以称得上是这几个库中最简洁的库了。
当然了,hooks 中的 useContext() 也是组件之间共享状态的一种方案。
安装
npm install --save dva-core dva-loading
npm install --save redux react-redux redux-thunk redux-logger
新增 src/utils/dva.ts
// src/utils/dva.ts
import {create } from 'dva-core';
// import {createLogger } from 'redux-logger';
import createLoading from 'dva-loading';

let app: {use: (arg0: any) => void; model: (arg0: any) => any; start: () => void; _store: any; getStore: () => any; dispatch: any};
let store: {dispatch: any};
let dispatch: any;
let registered: boolean;

function createApp(opt: {models: any[]; initialState: any }) {

  // redux日志, 引用redux-logger
  // opt.onAction = [createLogger()];
  app = create(opt);
  app.use(createLoading({}));


  if (!registered) opt.models.forEach((model: any) => app.model(model));
  registered = true;
  app.start();

  store = app._store;
  app.getStore = () => store;

  dispatch = store.dispatch;

  app.dispatch = dispatch;
  return app;
}

export default {
  createApp,
  getDispatch() {
    return app.dispatch;
  },
  getStore() { // 这个是在非组件的文件中获取Store的方法, 不需要可以不暴露
    return app.getStore();
  },
};
新增 models 文件夹
models 下专门用来统一管理自己的数据
models/index.ts
import { GlobalModelState } from "./setting/types"
import setting from "./setting/index"


const models:Array<GlobalModelState> = [
    setting
]

export default models
models/setting/index.ts
import * as types from "./types";

const setting: types.GlobalModelState = {
  namespace: "setting",
  state: {
    userInfo: {}
  },

  // 修改 state 中的数据
  reducers: {
    setUserInfo(state, { data }) {
      console.log(data);
      return {
        ...state,
        userInfo: data.userInfo
      };
    }
  }

  // 异步操作后修改 state 中的数据
  // effects: {
  //   *changeName({ payload }, { put, call }) {
  //     // call 触发异步
  //     // let data = yield call("/api", payload);

  //     // put 触发 action
  //     yield put({
  //       type: "saveName",
  //       data: {
  //         name: "异步修改的",
  //       },
  //     });
  //     yield console.log("run");
  //   },
  // },
};

export default setting;
入口集成
将入口文件 app.ts 修改成 app.tsx,引入 Provider、dva、models。
import { Component, useEffect } from "react";
import { View, Text } from "@tarojs/components";
import "./app.scss";

// 此处必须使用 react-redux 否则报错
import { Provider } from "react-redux";

import dva from "./utils/dva";

import models from "./models";

// 集成 dva
const dvaApp = dva.createApp({
  initialState: {},
  models,
  enableLog: false
});
const store = dvaApp.getStore();

const App: React.FC = ({ children }): JSX.Element => {

  return <Provider store={store}>{children}</Provider>;
};

export default App;
获取 store 中的数据 (useSelector)
const userInfo = useSelector(state => state.setting.userInfo).nickName
修改 store 中的数据 (useDispatch)
  dispatch({
    type:"setting/setUserInfo",
    data:{
      userInfo
    }
  })
页面适配问题
Taro 默认按照designWidth:750的尺寸来进行自动转换,如果 UI 给的设计稿是 375 的宽度,可以修改 config => **index.js **
designWidth: 750,
  deviceRatio: {
    640: 2.34 / 2,
    750: 1,
    828: 1.81 / 2,
    375: 2
  },
当然了,只是修改上面部分还远远不够,这个时候运行项目,你会发现 taro-ui 组件样式变得好大,what ? 组件被放大了两倍 ? 不要慌,按照如下配置即可
yarn add postcss-px-scale
const config = {
  projectName: "taro_template",
  date: "2021-6-23",
  designWidth: 750,
  deviceRatio: {
    640: 2.34 / 2,
    750: 1,
    828: 1.81 / 2,
    375: 2
  },
  sourceRoot: "src",
  outputRoot: "dist",
  plugins: [],
  defineConstants: {},
  copy: {
    patterns: [],
    options: {}
  },
  framework: "react",
  mini: {
    postcss: {
      pxtransform: {
        enable: true,
        config: {}
      },
      url: {
        enable: true,
        config: {
          limit: 1024 // 设定转换尺寸上限
        }
      },
      cssModules: {
        enable: false, // 默认为 false,如需使用 css modules 功能,则设为 true
        config: {
          namingPattern: "module", // 转换模式,取值为 global/module
          generateScopedName: "[name]__[local]___[hash:base64:5]"
        }
      },
      // 这里增加配置
      "postcss-px-scale": {
        enable: true,
        config: { scale: 0.5, units: "rpx", includes: ["taro-ui"] }
      },
    },
  },
  h5: {
    publicPath: "/",
    staticDirectory: "static",
    esnextModules:['taro-ui'],
    postcss: {
      autoprefixer: {
        enable: true,
        config: {}
      },
      cssModules: {
        enable: false, // 默认为 false,如需使用 css modules 功能,则设为 true
        config: {
          namingPattern: "module", // 转换模式,取值为 global/module
          generateScopedName: "[name]__[local]___[hash:base64:5]"
        }
      },
      // 这里增加配置
      "postcss-px-scale": {
        enable: true,
        config: { scale: 0.5, units: "rem", includes: ["taro-ui"] }
      },
    },
  }
};

module.exports = function(merge) {
  if (process.env.NODE_ENV === "development") {
    return merge({}, config, require("./dev"));
  }
  return merge({}, config, require("./prod"));
};
扫二维码功能
扫码功能就很简单了,可以直接调用官方提供的方法
Taro.scanCode({
    success: result => {
      console.log("扫码成功的回调", result);
    }
  });
更多用法自己查看官方文档吧,这里就不做一一介绍了。
调试技巧 - minidebug
功能介绍
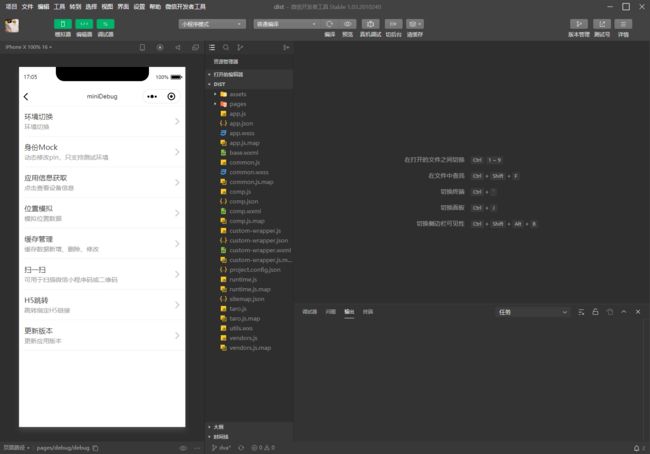
主要功能包括环境切换、身份Mock、应用信息获取、位置模拟、缓存管理、扫一扫、H5跳转、更新版本等。
安装
yarn add @jdlfe/minidebug-next
新建空页面 debug
活学活用,使用 cli 快速创建页面
Taro create -- debug
引入组件 Debug
import { View } from '@tarojs/components'
import { Debug } from '@jdlfe/minidebug-next'

import './debug.scss'

const Bug: React.FC = () => {

  return (
    <View>
      <Debug />
    </View>
  );
};

export default Bug;
增加页面配置入口,用于打开页面,页面最好配置到 subpackages 中,不然会造成主包比较大。
更多用法参考 https://github.com/jdlfe/minidebug
源码地址
Github 仓库地址
最后
如果觉得本文对你有帮助,希望能够给我点赞支持一下哦
也可以关注wx公众号:前端开发爱好者回复加群,一起学习前端技能
公众号内包含很多vue react 实战精选资源教程,欢迎关注


