SpringBoot数据库读写分离
背景
一个项目中数据库最基础同时也是最主流的是单机数据库,读写都在一个库中。当用户逐渐增多,单机数据库无法满足性能要求时,就会进行读写分离改造(适用于读多写少),写操作一个库,读操作多个库,通常会做一个数据库集群,开启主从备份,一主多从,以提高读取性能。当用户更多读写分离也无法满足时,就需要分布式数据库了-NoSQL。
正常情况下读写分离的实现,首先要做一个一主多从的数据库集群,同时还需要进行数据同步。
数据库主从搭建
Master配置
①修改/etc/my.cnf
[mysqld]
datadir=/var/lib/mysql
socket=/var/lib/mysql/mysql.sock
user=mysql
# Disabling symbolic-links is recommended to prevent assorted security risks
symbolic-links=0

server-id=1
log-bin=mysql-bin
binlog-do-db=zpark
binlog-do-db=baizhi
binlog-ignore-db=mysql
binlog-ignore-db=test
expire_logs_days=10
auto_increment_increment=2
auto_increment_offset=1

[mysqld_safe]
log-error=/var/log/mysqld.log
pid-file=/var/run/mysqld/mysqld.pid
②重启MySQL服务
[root@CentOS ~]# service mysqld restart
Stopping mysqld:                                           [  OK  ]
Starting mysqld:                                           [  OK  ]
③登录MySQL主机查看状态
[root@CentOS ~]# mysql -u root -proot
Welcome to the MySQL monitor.  Commands end with ; or \g.
Your MySQL connection id is 2
Server version: 5.1.73-log Source distribution

Copyright (c) 2000, 2013, Oracle and/or its affiliates. All rights reserved.

Oracle is a registered trademark of Oracle Corporation and/or its
affiliates. Other names may be trademarks of their respective
owners.

Type 'help;' or '\h' for help. Type '\c' to clear the current input statement.

mysql> show master status\G
*************************** 1. row ***************************
            File: mysql-bin.000001
        Position: 106
    Binlog_Do_DB: zpark,baizhi
Binlog_Ignore_DB: mysql,test
1 row in set (0.00 sec)
Slave 配置
① 修改/etc/my.cnf文件
[mysqld]
datadir=/var/lib/mysql
socket=/var/lib/mysql/mysql.sock
user=mysql
# Disabling symbolic-links is recommended to prevent assorted security risks
symbolic-links=0

server-id=2
log-bin=mysql-bin
replicate-do-db=zpark
replicate-do-db=baizhi
replicate-ignore-db=mysql
replicate-ignore-db=test
expire_logs_days=10
auto_increment_increment=2
auto_increment_offset=2

[mysqld_safe]
log-error=/var/log/mysqld.log
pid-file=/var/run/mysqld/mysqld.pid
③ 重启MySQL服务
[root@CentOS ~]# service mysqld restart
Stopping mysqld:                                           [  OK  ]
Starting mysqld:                                           [  OK  ]
④ MySQL配置从机
[root@CentOS ~]# mysql -u root -proot
Welcome to the MySQL monitor.  Commands end with ; or \g.
Your MySQL connection id is 2
Server version: 5.1.73-log Source distribution

Copyright (c) 2000, 2013, Oracle and/or its affiliates. All rights reserved.

Oracle is a registered trademark of Oracle Corporation and/or its
affiliates. Other names may be trademarks of their respective
owners.

Type 'help;' or '\h' for help. Type '\c' to clear the current input statement.

mysql> stop slave;
Query OK, 0 rows affected, 1 warning (0.00 sec)

mysql> change master to master_host='主机IP',master_user='root',master_password='root',master_log_file='mysql-bin.000001',master_log_pos=106;
Query OK, 0 rows affected (0.03 sec)

mysql> start slave;
Query OK, 0 rows affected (0.01 sec)

mysql> show slave status\G
*************************** 1. row ***************************
               Slave_IO_State: Waiting for master to send event
                  Master_Host: CentOSB
                  Master_User: root
                  Master_Port: 3306
                Connect_Retry: 60
              Master_Log_File: mysql-bin.000001
          Read_Master_Log_Pos: 106
               Relay_Log_File: mysqld-relay-bin.000002
                Relay_Log_Pos: 251
        Relay_Master_Log_File: mysql-bin.000001
             Slave_IO_Running: Yes
            Slave_SQL_Running: Yes
              Replicate_Do_DB: zpark,baizhi
          Replicate_Ignore_DB: mysql,test
           Replicate_Do_Table:
       Replicate_Ignore_Table:
      Replicate_Wild_Do_Table:
  Replicate_Wild_Ignore_Table:
                   Last_Errno: 0
                   Last_Error:
                 Skip_Counter: 0
          Exec_Master_Log_Pos: 106
              Relay_Log_Space: 407
              Until_Condition: None
               Until_Log_File:
                Until_Log_Pos: 0
           Master_SSL_Allowed: No
           Master_SSL_CA_File:
           Master_SSL_CA_Path:
              Master_SSL_Cert:
            Master_SSL_Cipher:
               Master_SSL_Key:
        Seconds_Behind_Master: 0
Master_SSL_Verify_Server_Cert: No
                Last_IO_Errno: 0
                Last_IO_Error:
               Last_SQL_Errno: 0
               Last_SQL_Error:
1 row in set (0.00 sec)
读写分离实现
读写分离要做的事情就是对于一条SQL该选择哪个数据库去执行,至于谁来做选择数据库这件事儿,无非两个,要么中间件帮我们做,要么程序自己做。因此,一般来讲,读写分离有两种实现方式。第一种是依靠中间件(比如:MyCat),也就是说应用程序连接到中间件,中间件帮我们做SQL分离;第二种是应用程序自己去做分离。

编码思想
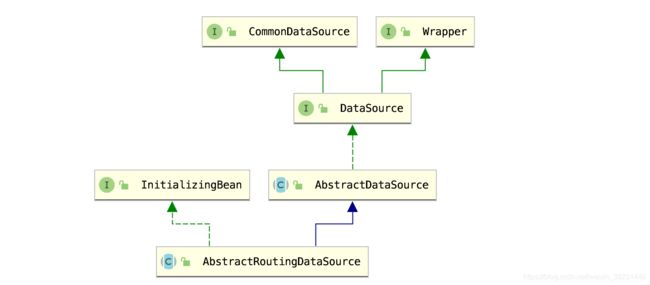
所谓的手写读写分离,需要用户自定义一个动态的数据源,该数据源可以根据当前上下文中调用方法是读或者是写方法决定返回主库的链接还是从库的链接。这里我们使用Spring提供的一个代理数据源AbstractRoutingDataSource接口。

该接口需要用户完善一个determineCurrentLookupKey抽象法,系统会根据这个抽象返回值决定使用系统中定义的数据源。
@Nullable
protected abstract Object determineCurrentLookupKey();
其次该类还有两个属性需要指定defaultTargetDataSource和targetDataSources,其中defaultTargetDataSource需要指定为Master数据源。targetDataSources是一个Map需要将所有的数据源添加到该Map中,以后系统会根据determineCurrentLookupKey方法的返回值作为key从targetDataSources查找相应的实际数据源。如果找不到则使用defaultTargetDataSource指定的数据源。
实现步骤
①添加依赖
<parent>
    <groupId>org.springframework.bootgroupId>
    <artifactId>spring-boot-starter-parentartifactId>
    <version>2.1.5.RELEASEversion>
parent>

<dependency>
    <groupId>org.springframework.bootgroupId>
    <artifactId>spring-boot-starter-webartifactId>
dependency>

<dependency>
    <groupId>commons-fileuploadgroupId>
    <artifactId>commons-fileuploadartifactId>
    <version>1.4version>
dependency>


<dependency>
    <groupId>org.springframework.bootgroupId>
    <artifactId>spring-boot-starter-testartifactId>
dependency>


<dependency>
    <groupId>org.mybatis.spring.bootgroupId>
    <artifactId>mybatis-spring-boot-starterartifactId>
    <version>2.0.1version>
dependency>
<dependency>
    <groupId>mysqlgroupId>
    <artifactId>mysql-connector-javaartifactId>
    <version>5.1.47version>
dependency>

<dependency>
    <groupId>org.springframework.bootgroupId>
    <artifactId>spring-boot-starter-aopartifactId>
dependency>
②application.properties
server.port=8888
server.servlet.context-path=/

spring.servlet.multipart.max-file-size=1MB
spring.servlet.multipart.enabled=true

# spring.servlet.multipart.location=E:/uploadfiles
#spring.datasource.username=root
#spring.datasource.password=root
#spring.datasource.driver-class-name=com.mysql.jdbc.Driver
#spring.datasource.url=jdbc:mysql://localhost:3306/test?useUnicode=true&characterEncoding=UTF8&serverTimezone=UTC&useSSL=false

spring.datasource.master.username=root
spring.datasource.master.password=root
spring.datasource.master.driver-class-name=com.mysql.jdbc.Driver
spring.datasource.master.jdbc-url=jdbc:mysql://CentOSB:3306/baizhi?useUnicode=true&characterEncoding=UTF8&serverTimezone=UTC&useSSL=false

spring.datasource.slave1.username=root
spring.datasource.slave1.password=root
spring.datasource.slave1.driver-class-name=com.mysql.jdbc.Driver
spring.datasource.slave1.jdbc-url=jdbc:mysql://CentOSC:3306/baizhi?useUnicode=true&characterEncoding=UTF8&serverTimezone=UTC&useSSL=false

spring.datasource.slave2.username=root
spring.datasource.slave2.password=root
spring.datasource.slave2.driver-class-name=com.mysql.jdbc.Driver
spring.datasource.slave2.jdbc-url=jdbc:mysql://CentOSC:3306/baizhi?useUnicode=true&characterEncoding=UTF8&serverTimezone=UTC&useSSL=false

## MyBatis DAO
#mybatis.type-aliases-package=com.baizhi.entities
#mybatis.mapper-locations=classpath*:mappers/*.xml
#mybatis.executor-type=batch

spring.http.encoding.charset=utf-8
spring.jackson.time-zone=GMT+8
③配置数据源
/**
 * 该类是自定义数据源,由于必须将系统的数据源给替换掉。
 */
@Configuration
public class UserDefineDatasourceConfig {

    @Bean
    @ConfigurationProperties("spring.datasource.master")
    public DataSource masterDataSource() {
        return DataSourceBuilder.create().build();
    }

    @Bean
    @ConfigurationProperties("spring.datasource.slave1")
    public DataSource slave1DataSource() {
        return DataSourceBuilder.create().build();
    }

    @Bean
    @ConfigurationProperties("spring.datasource.slave2")
    public DataSource slave2DataSource() {
        return DataSourceBuilder.create().build();
    }

    @Bean
    public DataSource userDefineRoutingDataSource(@Qualifier("masterDataSource") DataSource masterDataSource,
                                          @Qualifier("slave1DataSource") DataSource slave1DataSource,
                                          @Qualifier("slave2DataSource") DataSource slave2DataSource) {

        Map<Object, Object> targetDataSources = new HashMap<>();
        targetDataSources.put("master", masterDataSource);
        targetDataSources.put("slave-01", slave1DataSource);
        targetDataSources.put("slave-02", slave2DataSource);

        List<String> slaveDBKeys= Arrays.asList("slave-01","slave-02");

        DynamicRoutingDataSource userDefineRoutingDataSource = new DynamicRoutingDataSource(slaveDBKeys);
        //设置默认数据源
        userDefineRoutingDataSource.setDefaultTargetDataSource(masterDataSource);
        //设定主数据源
        userDefineRoutingDataSource.setTargetDataSources(targetDataSources);

        return userDefineRoutingDataSource;
    }


    /**
     * 当自定义数据源,用户必须覆盖SqlSessionFactory创建
     * @param dataSource
     * @return
     * @throws Exception
     */
    @Bean
    public SqlSessionFactory sqlSessionFactory(@Qualifier("userDefineRoutingDataSource") DataSource dataSource) throws Exception {
        SqlSessionFactoryBean sqlSessionFactoryBean = new SqlSessionFactoryBean();

        sqlSessionFactoryBean.setDataSource(dataSource);
        sqlSessionFactoryBean.setTypeAliasesPackage("com.baizhi.entities");
        sqlSessionFactoryBean.setMapperLocations(new PathMatchingResourcePatternResolver().getResources("classpath*:mappers/*.xml"));

        SqlSessionFactory sqlSessionFactory = sqlSessionFactoryBean.getObject();

        return sqlSessionFactory;
    }

    /**
     * 当自定义数据源,用户必须覆盖SqlSessionTemplate,开启BATCH处理模式
     * @param sqlSessionFactory
     * @return
     */
    @Bean
    public SqlSessionTemplate sqlSessionTemplate(@Qualifier("sqlSessionFactory") SqlSessionFactory sqlSessionFactory) {
        ExecutorType executorType = ExecutorType.BATCH;
        if (executorType != null) {
            return new SqlSessionTemplate(sqlSessionFactory, executorType);
        } else {
            return new SqlSessionTemplate(sqlSessionFactory);
        }
    }

    /***
     * 当自定义数据源,用户必须注入,否则事务控制不生效
     * @param dataSource
     * @return
     */
    @Bean
    public PlatformTransactionManager platformTransactionManager(@Qualifier("userDefineRoutingDataSource") DataSource dataSource) {
        return new DataSourceTransactionManager(dataSource);
    }
}
④配置切面
/**
 * 用户自定义切面,负责读取SlaveDB注解,并且在DBTypeContextHolder中设置读写类型
 */
@Aspect
@Order(0) //必须设置0,表示Spring会将UserDefineDataSourceAOP放置在所有切面的前面
@Component
public class UserDefineDataSourceAOP  {
    private static final Logger logger = LoggerFactory.getLogger(UserDefineDataSourceAOP.class);

    /**
     * 设置环绕切面,该切面的作用是设置当前上下文的读写类型
     * @param pjp
     * @return
     */
    @Around("execution(* com.baizhi.service..*.*(..))")
    public Object around(ProceedingJoinPoint pjp) {
       //获取方法对象
        MethodSignature signature = (MethodSignature) pjp.getSignature();
        Method method = signature.getMethod();
        Object result = null;
        try {
            //获取方法上注解,设置读写模式
            if(method.isAnnotationPresent(SlaveDB.class)){
                DBTypeContextHolder.set(OperatorTypeEnum.READ);
            }else{
                DBTypeContextHolder.set(OperatorTypeEnum.WRITE);
            }
            logger.debug("设置操作类型:"+DBTypeContextHolder.get());
            result = pjp.proceed();
            //清除状态
            DBTypeContextHolder.clear();
        } catch (Throwable throwable) {
          throw new RuntimeException(throwable.getCause());
        }

        return result;
    }
}
⑤用到的其他类
- 动态数据源
/**
 * 该类属于代理数据源,负责负载均衡
 */
public class DynamicRoutingDataSource extends AbstractRoutingDataSource {
    private static final Logger logger = LoggerFactory.getLogger(DynamicRoutingDataSource.class);

    private List<String> slaveDataSourceKey=new  ArrayList();
    private String masterKey="master";
    private static AtomicInteger round=new AtomicInteger(0);

    public DynamicRoutingDataSource(List<String> slaveDataSourceKey) {
        this.slaveDataSourceKey = slaveDataSourceKey;
    }

    /**
     * 系统会根据 该方法的返回值,决定使用定义的那种数据源
     * @return
     */
    @Override
    protected Object determineCurrentLookupKey() {
        String currentDBKey="";
        OperatorTypeEnum operatorType=DBTypeContextHolder.get();
        if(operatorType.equals(OperatorTypeEnum.WRITE)){
            currentDBKey= masterKey;
        }else{
            int value = round.incrementAndGet();
            if(value<0){
                round.set(0);
            }
            currentDBKey= slaveDataSourceKey.get(round.get()%slaveDataSourceKey.size());
        }
        logger.debug("当前使用的操作:"+operatorType+",使用DBKey"+currentDBKey);
        return currentDBKey;
    }
}
- 读写类型
/**
 * 写、读类型
 */
public enum OperatorTypeEnum {
    WRITE, READ;
}
- 记录操作类型
/**
 * 该类主要是用于存储,当前用户的操作类型,将当前的操作存储在当前线程的上下文中
 */
public class OPTypeContextHolder {
    private static final ThreadLocal<OperatorTypeEnum> OPERATOR_TYPE_THREAD_LOCAL = new ThreadLocal<>();
    public static void set(OperatorTypeEnum dbType) {
        OPERATOR_TYPE_THREAD_LOCAL.set(dbType);
    }

    public static OperatorTypeEnum get() {
        return OPERATOR_TYPE_THREAD_LOCAL.get();
    }
    public static void clear(){
        OPERATOR_TYPE_THREAD_LOCAL.remove();
    }
}
- 业务方法标记注解
/**
 * 该注解用于标注,当前用户的调用方法是读还是写
 */
@Retention(RetentionPolicy.RUNTIME) //表示运行时解析注解
@Target(value = {ElementType.METHOD})//表示只能在方法上加
public @interface SlaveDB { }
附录 logback.xml配置
<configuration scan="true" scanPeriod="60 seconds" debug="false">

    <appender name="STDOUT" class="ch.qos.logback.core.ConsoleAppender" >
        <encoder>
            <pattern>%p %c#%M %d{yyyy-MM-dd HH:mm:ss} %m%npattern>
            <charset>UTF-8charset>
        encoder>
    appender>
    <appender name="FILE" class="ch.qos.logback.core.rolling.RollingFileAppender">
      <rollingPolicy class="ch.qos.logback.core.rolling.TimeBasedRollingPolicy">
         <fileNamePattern>logs/userLoginFile-%d{yyyyMMdd}.logfileNamePattern>
         <maxHistory>30maxHistory>
      rollingPolicy>
      <encoder>
         <pattern>%p %c#%M %d{yyyy-MM-dd HH:mm:ss} %m%npattern>
                 <charset>UTF-8charset>
      encoder>
    appender>


    <root level="ERROR">
        <appender-ref ref="STDOUT" />
    root>

    <logger name="org.springframework.jdbc" level="DEBUG" additivity="false">
        <appender-ref ref="STDOUT" />
    logger>
    <logger name="com.baizhi.dao" level="TRACE" additivity="false">
        <appender-ref ref="STDOUT" />
    logger>
    <logger name="com.baizhi.cache" level="DEBUG" additivity="false">
        <appender-ref ref="STDOUT" />
    logger>
    <logger name="com.baizhi.datasource" level="DEBUG" additivity="false">
        <appender-ref ref="STDOUT" />
    logger>
configuration>