EF5&MVC4 学习1、创建新的Contoso University Application,并创建Model Class 生成对应的database
Create The Contoso University Web Application
Contoso University sample web applicatioin 是一个使用MVC4 & EF5 & VS2012创建的Sample网站。网站功能包括:学生入学,课程选择,作业布置。这一系列的教程会教我们如何建立这个网站。
Code First
在Entiry Framework中,我们有三种处理数据的方法:Database First,Model First,and Code First.这个教程中,我们使用Code First。关于这三种之间的差别以及具体该选择哪种,可以参考Entity Framework Development Workflows。
The Contoso University Web Application
功能:用户可以查看,更新学生、课程、教师信息。
这个Application的UI页面,是系统自动生成的Template。所以我们可以关注于怎么去用Entity Framework.之后我们再用Kendo UI去更新我们的UI。
准备(Prerequisits): Windows Azure SDK http://go.microsoft.com/fwlink/?LinkId=254364
一,创建一个MVC WEB Application
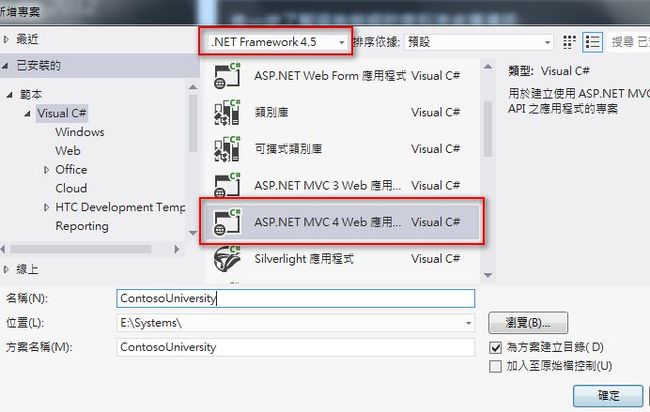
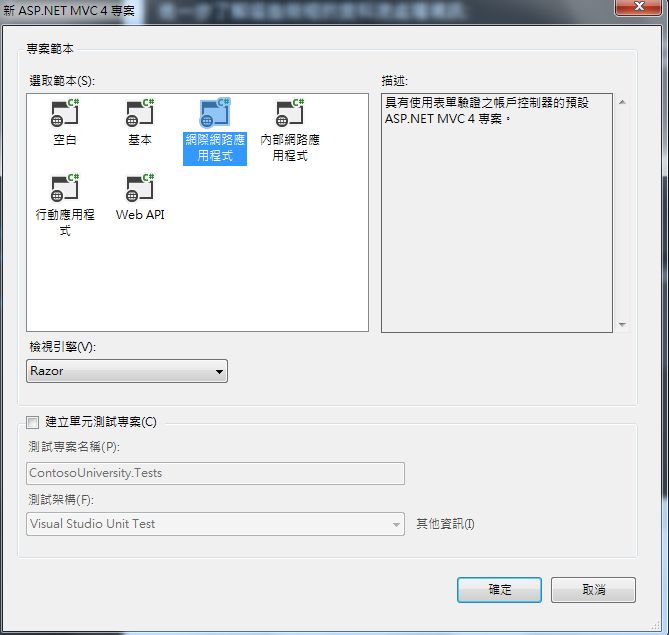
Create a new project named “ContosoUniversity”,Using .NET Framework 4.5
网站样式设置(Set Up The Site Style)
我们会对网站的site menu,layout和home page做出一些更新
Views\Shared\_Layout.cshtml:更改母版页的标题,增加一些连接
<!DOCTYPE html> <html lang="zh"> <head> <meta http-equiv="Content-Type" content="text/html; charset=utf-8"/> <meta charset="utf-8" /> <title>@ViewBag.Title - Contoso University</title> <link href="~/favicon.ico" rel="shortcut icon" type="image/x-icon" /> <meta name="viewport" content="width=device-width" /> @Styles.Render("~/Content/css") @Scripts.Render("~/bundles/modernizr") </head> <body> <header> <div class="content-wrapper"> <div class="float-left"> <p class="site-title">@Html.ActionLink("Contoso University", "Index", "Home")</p> </div> <div class="float-right"> <section id="login"> @Html.Partial("_LoginPartial") </section> <nav> <ul id="menu"> <li>@Html.ActionLink("首頁", "Index", "Home")</li> <li>@Html.ActionLink("關於", "About", "Home")</li> <li>@Html.ActionLink("學生", "Student", "Home")</li> <li>@Html.ActionLink("課程", "Course", "Home")</li> <li>@Html.ActionLink("教師", "Instructors", "Home")</li> <li>@Html.ActionLink("部門", "Departments", "Home")</li> </ul> </nav> </div> </div> </header> <div id="body"> @RenderSection("featured", required: false) <section class="content-wrapper main-content clear-fix"> @RenderBody() </section> </div> <footer> <div class="content-wrapper"> <div class="float-left"> <p>© @DateTime.Now.Year - Contoso University</p> </div> </div> </footer> @Scripts.Render("~/bundles/jquery") @RenderSection("scripts", required: false) </body> </html>
Views\Home\Index.cshtml:只保留以下这些:
Controllers\HomeController.cs:更改ViewBage.Message的内容:
 public ActionResult Index()
        {
            ViewBag.Message = "Welcome to Contoso University";

            return View();
        }
Ctrl+F5运行:
二,为Contoso University application 创建实体数据模型(Entity Data Model)
Model 中添加Entity Class:
1,添加Student.cs类:
using System;
using System.Collections.Generic;
using System.Linq;
using System.Web;

namespace ContosoUniversity.Models
{
    public class Student
    {
        public int StudentID { get; set; }
        public string LastName { get; set; }
        public string FirstMidName { get; set; }
        public DateTime EnrollmentDate { get; set; }

        public virtual ICollection<Enrollment> Entrollments { get; set; }
    }
}
2,添加Course.cs类
using System;
using System.Collections.Generic;
using System.ComponentModel.DataAnnotations.Schema;
using System.Linq;
using System.Web;

namespace ContosoUniversity.Models
{
    public class Course
    {
        [DatabaseGenerated(DatabaseGeneratedOption.None)]
        public int CourseID { get; set; }
        public string Title { get; set; }
        public int Credits { get; set; }

        public virtual ICollection<Enrollment> Enrollments { get; set; }

    }
}
3,添加Enrollment.cs类
using System;
using System.Collections.Generic;
using System.Linq;
using System.Web;

namespace ContosoUniversity.Models
{
    public enum Grade
    {
        A, B, C, D, F
    }
    public class Enrollment
    {

        public int EnrollmentID { get; set; }
        public int CourseID { get; set; }
        public int StudentID { get; set; }
        public Grade? Grade { get; set; }

        public virtual Course Course { get; set; }
        public virtual Student Student { get; set; }
    }
}
三,创建数据上下文类(Create the Database Context)
数据库上下文类是Model 中的实体数据模型(Data Model)和Entity Framework 之间的桥梁
Database context class类继承自System.Data.Entity.DbContext 类,这里面你需要指明哪些实体包含在data model 中。你同样可以自定义某些特定的Entity Framework behavior. 这个Project 中DbContext的类名为SchoolContext
添加DAL文件夹,然后添加SchoolContext类:
using System;
using System.Collections.Generic;
using System.Linq;
using System.Web;

namespace ContosoUniversity.Models
{
    public enum Grade
    {
        A, B, C, D, F
    }
    public class Enrollment
    {

        public int EnrollmentID { get; set; }
        public int CourseID { get; set; }
        public int StudentID { get; set; }
        public Grade? Grade { get; set; }

        public virtual Course Course { get; set; }
        public virtual Student Student { get; set; }
    }
}
DbContext类为每一个实体集(entity set)创建了一个DbSet属性
每一个实体集对应database中的一张table,每一个实体对应
OnModelCreating方法中的modelBuilder.Conventions.Remove 防止表中的数据以复数(Students,Courses,Enrollments)命名。
四,SQL Server Express LocalDB
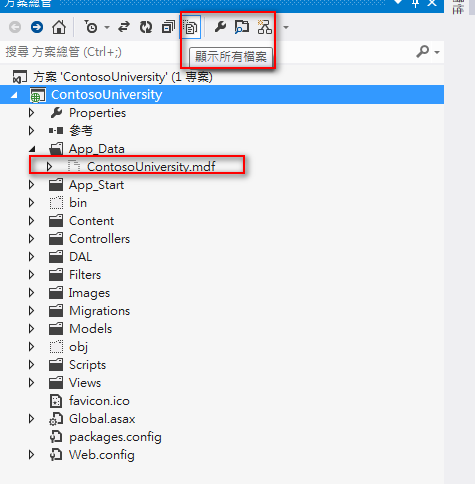
.mdf为后缀的database文件,是一个单独的文件放置于项目中的App_Data文件夹中。LocalDB不被推荐使用在web application中因为它不会和IIS一起工作。在VS2012以及以后的版本中,LocalDB被默认安装在VS中。
如果你是用.mdf存贮数据的话,需要更新web.config,添加链接字符串如下:
<add name="SchoolContext" connectionString="Data Source=(LocalDb)\v11.0;Initial Catalog=ContosoUniversity;Integrated Security=SSPI;AttachDBFilename=|DataDirectory|\ContosoUniversity.mdf" providerName="System.Data.SqlClient" />
默认情况下,Entiry Framework 会在webconfig中寻找和类名DbContext同名的连接字符串(这里是SchoolContext),连接字符串就会指定APP_Data中一个命名为ContosoUniversity.mdf的数据文件
如果你不手动在webconfig中添加这个连接字符串,Entity Framework就会自动给你添加一个连接字符串,但是这个database文件不会再App_Data文件中。
ConnectionStrings 中包含有名字为DefaultConnection的默认的字符串连接,这个连接是用于Membership database的。在这个教程中我们暂时不会用到membership database. 这两种连接的不同之处就是数据库名称(database name)和属性值(attribute value).
五、设置并执行Code First Migration . Set up and Execute a Code First Migration
在我们开始开发项目的时候,我们需要频繁的更新Data Mode中的实体类(entity class ),每一次更新以后,Model 中的字段就和database中的字段不一致了。
所以我们需要配置Entity Framework 来自动drop 或者re-create database来和model 中的实体类同步。这样drop的方法来更新,在开发中我们用的都是测试数据不会有什么问题,但是一旦部署到正式环境,我们就不能用这种方法去同步mode和database了。 Code First的Migrations功能可以让我们更新数据库结果,并且不用去drop 和 re-create database。
5.1 Enable Code First Migrations
1,Package Manager Console:
2,输入命令:PM>enable-migrations -contexttypename SchoolContext
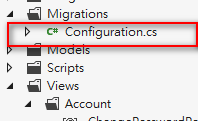
启用成功,并且创建了Migrations文件夹以及Configurations.cs文件
当database在被created的时候以及每一次从Model中进行同步更新的时候,Configuration.cs中的Seed方法就会被调用。
Seed方法可以让我们能够在Code First创建或者更新database以后,插入测试数据。
5.2 Set up Seed Method
namespace ContosoUniversity.Migrations
{
    using System;
    using System.Collections.Generic;
    using System.Data.Entity;
    using System.Data.Entity.Migrations;
    using System.Linq;
    using ContosoUniversity.Models;

    internal sealed class Configuration : DbMigrationsConfiguration<ContosoUniversity.DAL.SchoolContext>
    {
        public Configuration()
        {
            AutomaticMigrationsEnabled = false;
        }

        protected override void Seed(ContosoUniversity.DAL.SchoolContext context)
        {
            //  This method will be called after migrating to the latest version.

            //  You can use the DbSet<T>.AddOrUpdate() helper extension method
            //  to avoid creating duplicate seed data. E.g.
            //
            //    context.People.AddOrUpdate(
            //      p => p.FullName,
            //      new Person { FullName = "Andrew Peters" },
            //      new Person { FullName = "Brice Lambson" },
            //      new Person { FullName = "Rowan Miller" }
            //    );
            //

            var students = new List<Student>{
           new Student { FirstMidName = "Carson",   LastName = "Alexander",
                    EnrollmentDate = DateTime.Parse("2010-09-01") },
                new Student { FirstMidName = "Meredith", LastName = "Alonso",
                    EnrollmentDate = DateTime.Parse("2012-09-01") },
                new Student { FirstMidName = "Arturo",   LastName = "Anand",
                    EnrollmentDate = DateTime.Parse("2013-09-01") },
                new Student { FirstMidName = "Gytis",    LastName = "Barzdukas",
                    EnrollmentDate = DateTime.Parse("2012-09-01") },
                new Student { FirstMidName = "Yan",      LastName = "Li",
                    EnrollmentDate = DateTime.Parse("2012-09-01") },
                new Student { FirstMidName = "Peggy",    LastName = "Justice",
                    EnrollmentDate = DateTime.Parse("2011-09-01") },
                new Student { FirstMidName = "Laura",    LastName = "Norman",
                    EnrollmentDate = DateTime.Parse("2013-09-01") },
                new Student { FirstMidName = "Nino",     LastName = "Olivetto",
                    EnrollmentDate = DateTime.Parse("2005-08-11") }
            };

            students.ForEach(s => context.Students.AddOrUpdate(p => p.LastName, s));
            context.SaveChanges();


            var courses = new List<Course>
            {
                new Course {CourseID = 1050, Title = "Chemistry",      Credits = 3, },
                new Course {CourseID = 4022, Title = "Microeconomics", Credits = 3, },
                new Course {CourseID = 4041, Title = "Macroeconomics", Credits = 3, },
                new Course {CourseID = 1045, Title = "Calculus",       Credits = 4, },
                new Course {CourseID = 3141, Title = "Trigonometry",   Credits = 4, },
                new Course {CourseID = 2021, Title = "Composition",    Credits = 3, },
                new Course {CourseID = 2042, Title = "Literature",     Credits = 4, }

            };
            courses.ForEach(s => context.Courses.AddOrUpdate(p => p.Title, s));
            context.SaveChanges();


            var enrollments = new List<Enrollment>
            {
                new Enrollment {
                    StudentID = students.Single(s => s.LastName == "Alexander").StudentID,
                    CourseID = courses.Single(c => c.Title == "Chemistry" ).CourseID,
                    Grade = Grade.A
                },
                 new Enrollment {
                    StudentID = students.Single(s => s.LastName == "Alexander").StudentID,
                    CourseID = courses.Single(c => c.Title == "Microeconomics" ).CourseID,
                    Grade = Grade.C
                 },
                 new Enrollment {
                    StudentID = students.Single(s => s.LastName == "Alexander").StudentID,
                    CourseID = courses.Single(c => c.Title == "Macroeconomics" ).CourseID,
                    Grade = Grade.B
                 },
                 new Enrollment {
                     StudentID = students.Single(s => s.LastName == "Alonso").StudentID,
                    CourseID = courses.Single(c => c.Title == "Calculus" ).CourseID,
                    Grade = Grade.B
                 },
                 new Enrollment {
                     StudentID = students.Single(s => s.LastName == "Alonso").StudentID,
                    CourseID = courses.Single(c => c.Title == "Trigonometry" ).CourseID,
                    Grade = Grade.B
                 },
                 new Enrollment {
                    StudentID = students.Single(s => s.LastName == "Alonso").StudentID,
                    CourseID = courses.Single(c => c.Title == "Composition" ).CourseID,
                    Grade = Grade.B
                 },
                 new Enrollment {
                    StudentID = students.Single(s => s.LastName == "Anand").StudentID,
                    CourseID = courses.Single(c => c.Title == "Chemistry" ).CourseID
                 },
                 new Enrollment {
                    StudentID = students.Single(s => s.LastName == "Anand").StudentID,
                    CourseID = courses.Single(c => c.Title == "Microeconomics").CourseID,
                    Grade = Grade.B
                 },
                new Enrollment {
                    StudentID = students.Single(s => s.LastName == "Barzdukas").StudentID,
                    CourseID = courses.Single(c => c.Title == "Chemistry").CourseID,
                    Grade = Grade.B
                 },
                 new Enrollment {
                    StudentID = students.Single(s => s.LastName == "Li").StudentID,
                    CourseID = courses.Single(c => c.Title == "Composition").CourseID,
                    Grade = Grade.B
                 },
                 new Enrollment {
                    StudentID = students.Single(s => s.LastName == "Justice").StudentID,
                    CourseID = courses.Single(c => c.Title == "Literature").CourseID,
                    Grade = Grade.B
                 }
            };


            foreach (Enrollment e in enrollments)
            {
                var enrollmentInDataBase = context.Enrollments.Where(
                   s =>
                        s.Student.StudentID == e.StudentID &&
                        s.Course.CourseID == e.CourseID).SingleOrDefault();

                if (enrollmentInDataBase == null)
                {
                    context.Enrollments.Add(e);
                }
            }
            context.SaveChanges();

        }
    }
}
Seed 方法,在Code First Migrations 创建database以及每一次从上次的migrations 进行update database的时候执行。Seed方法的目的是可以让你在application 读取database数据之前向tables中insert data.
Seed方法中添加的数据大部分是测试用的,或者是一些发布到正式环境也必须有的数据,例如部门信息等,这样我们在开发的时候就不用每一次都手动的进行添加数据。
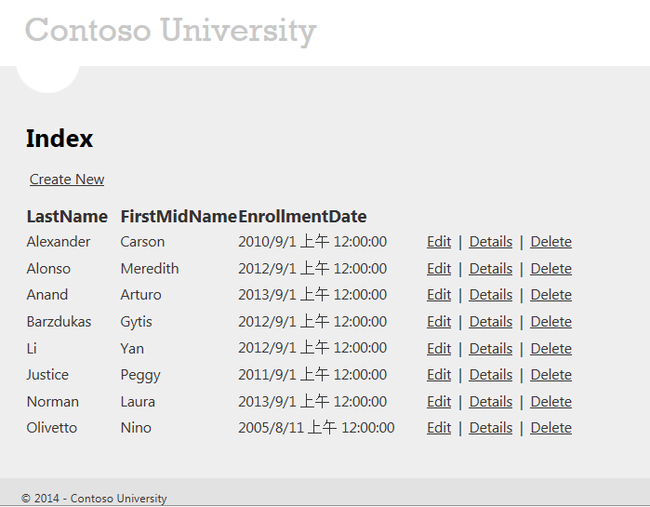
1,更新Seed方法,这样程式运行的时候就会加载这些测试数据
Seed方法把database context对象作为输入参数,然后添加新的实体到database中。对于每一个实体类型来说,code首先创建了实体的集合(list),然后把他们添加到对应的DbSet属性中,然后用SaveChange()方法保存到database.
AddOrUpdate方法执行了一个插入更新的动作。每一次Mirgraiton的时候Seed方法都会执行,它会把开发测试过程中的更新重写到database中。
context.Students.AddOrUpdate(p => p.LastName, s)
AddOrUpate中的第一个参数,指定根据这个参数的属性去检查实体数据是否存在。在测试的Student data中,我们用LastName,因为在List的列表中,LastName是唯一的。
如果我们添加一条LastName重复名称的student.当你进行database migrations的时候就会报出下面的错误:
Sequence contains more than one element
   foreach (Enrollment e in enrollments)
            {
                var enrollmentInDataBase = context.Enrollments.Where(
                   s =>
                        s.Student.StudentID == e.StudentID &&
                        s.Course.CourseID == e.CourseID).SingleOrDefault();

                if (enrollmentInDataBase == null)
                {
                    context.Enrollments.Add(e);
                }
            }
            context.SaveChanges();
Seed方法中添加Enrollment Entities的时候,并没有用到AddOrUpdate方法。
而是用了Add,这个方法会检查enrollment 实体数据是否存在,不存在的话加入一条新的数据,如果存在不会对其进行更新。Foreach循环遍历 Enrollment中的每一个实体,在你第一次update database的时候,这些实体就会被添加到database中。
2.Ctrl+Shift+B重建解决方案:
5.3 Create and Execute the First Migration创建并执行迁移
1,Package Manager Console中输入命令创建最开始的迁移,并更新
1. PM>add-migration InitialCreate
2. PM>update-database
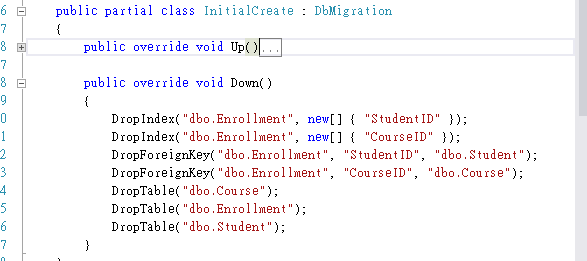
add-migration 命令添加了Migrations文件夹,并且包含迁移类文件,迁移类生成了database. InitialCreate是自己定义的参数名字。
迁移类中的Up方法,创建了和Model Class中实体集合(entity sets)对应的database tables. Down方法是删除这些实体。Migrations调用Up方法去执行data model 中的改变。当你Update-database的时候,Migrations调用了Down方法。
update-database 先调用Up方法创建数据库,然后调用Seed方法把数据填充到数据库中。
完成以上,我们便在App_Data中创建了一个.mdf后缀的SQL Server 数据库文件。.mdf文件的名字是我们在webconfig的连接字符串中定义的。
我们看到资料库和.mdf文件:
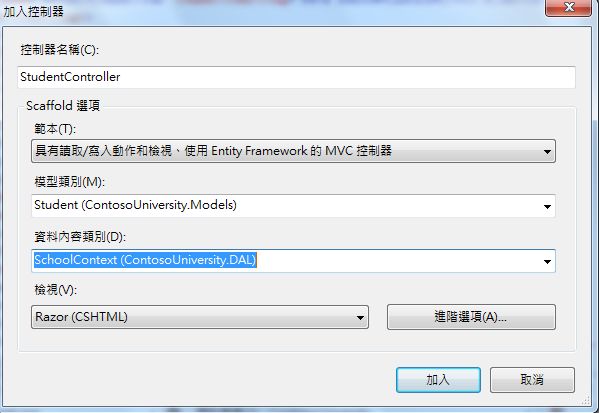
六、Creating a Student Controller and Views
总结:
我们创建了一个简单的application。接下来,我们会学习如何执行CRUD(create,read,update,delete)。
C#基础:
