使用Hexo+Next搭建个人博客
欢迎光临我的博客查看最新文章: https://river106.cn
1、博客系统:Hexo
官网:Hexo
安装
需要安装nodejs, nodejs自带了npm包管理, 参考博文:CentOS7.6安装nodejs
npm install hexo-cli -gHexo 版本:5.4.0
写博文
新增博文可通过命令:
hexo new "我的第一个hexo博文"此命令会在source/_posts文件夹下生成:我的第一个hexo博文.md
---
title: 我的第一个hexo博文
date: 2021-12-11 20:49:12
categories: hexo
tags:
  - hexo
---
可手动添加分类及标签。
生成静态文件
hexo generate # 可简写为: hexo g启动服务器
hexo server # 可简写为: hexo s默认情况下,访问网址为: http://localhost:4000/。
清除缓存文件
hexo clean清除缓存文件 (db.json) 和已生成的静态文件 (public)。
2、博客主题:Next
github:GitHub - next-theme/hexo-theme-next: Elegant and powerful theme for Hexo.
安装
在hexo根目录执行
npm install hexo-theme-next或者克隆仓库
git clone https://github.com/next-theme/hexo-theme-next themes/nextNext版本:8.7.1
设置主题
修改hexo的_config.yml
theme: next修改themes/next/_config.yml
scheme: Gemini博客预览:

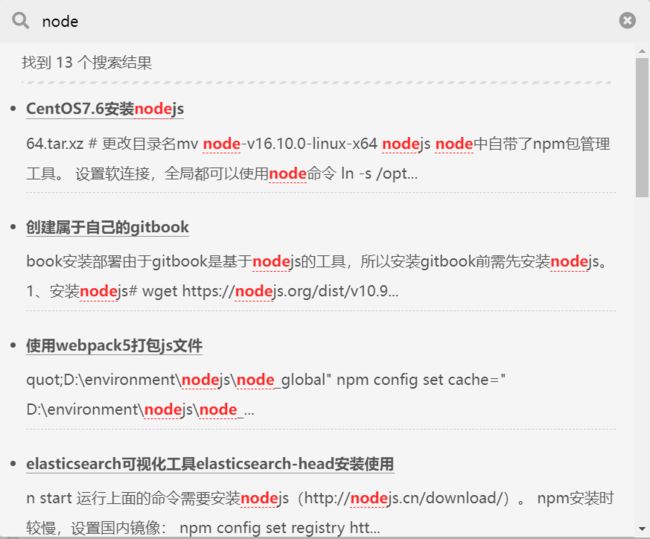
3、添加本地搜索功能
1、安装本地搜索插件 hexo-generator-search
安装插件,用于生成博客索引数据(在博客根目录下执行下列命令):
npm install hexo-generator-search --save安装之后,会在站点目录的 public 文件夹下创建一个 search.xml 文件。
2、修改站点配置文件
在站点配置文件 _config.yml 中添加如下内容:
# Search
search:
  path: ./public/search.xml
  field: post
  format: html
  limit: 10000
path:索引文件的路径,相对于站点根目录
field:搜索范围,默认是 post,还可以选择 page、all,设置成 all 表示搜索所有页面
limit:限制搜索的条目数
3、主题配置文件
在主题配置文件themes/next/_config.yml中找到如下内容:
local_search:
  enable: true
  trigger: auto
  top_n_per_article: 1
确保 enable 设成 true。
top_n_per_article 字段表示在每篇文章中显示的搜索结果数量,设成 -1 会显示每篇文章的所有搜索结果数量。
然后,重新部署网站即可愉快的使用本地搜索功能了。
功能预览:
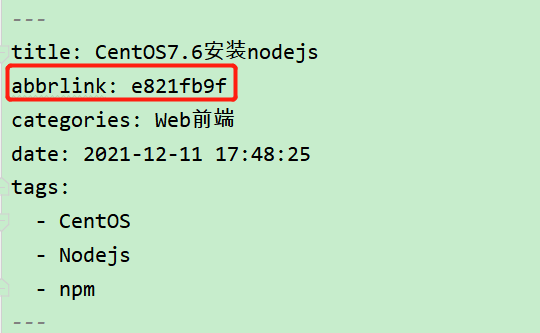
4、生成永久文章链接
1.安装hexo-abbrlink
npm install hexo-abbrlink --save可能会出现依赖,依据提示安装即可。
2.配置
修改博客根目录配置文件_config.yml 的 permalink:
# permalink: :year/:month/:day/:title/
permalink: posts/:abbrlink.html  # posts 是自定义的前缀
abbrlink:
    alg: crc32   #算法: crc16(default) and crc32
    rep: hex     #进制: dec(default) and hex
不同算法和进制生成不同的格式:
crc16 & hex
https://river106.cn/posts/68d9.htmlcrc16 & dec
https://river106.cn/posts/12345.htmlcrc32 & hex
https://river106.cn/posts/8fff20fe.htmlcrc32 & dec
https://river106.cn/posts/1770090790.html
3.验证
先清理下本地的文件
hexo clean然后重新生成
hexo g启动博客
hexo s该插件会在每篇文章的开头增加内容:
abbrlink: e821fb9f
这个字符串就是这篇文章的唯一标识,无论修改标题还是发布文章都不会改变。
功能预览:
浏览器访问 https://river106.cn/posts/e821fb9f.html 查看效果。
5、文章底部标签图标
修改主题配置themes/next/_config.yml
tag_icon: fa-tag
6、开启文章打赏功能
修改主题配置themes/next/_config.yml
# Donate (Sponsor) settings
# Front-matter variable (unsupport animation).
reward_settings:
  # If true, a donate button will be displayed in every article by default.
  enable: true
  animation: true
  comment: 请博主喝咖啡

reward:
  wechatpay: /images/wechatpay.png
  alipay: /images/alipay.png
  #paypal: /images/paypal.png
  #bitcoin: /images/bitcoin.png
按照上述配置调整,然后将个人支付宝和微信的收款码图片放在source/images下即可。

7、阅读全文按钮
文章摘要与剩余内容中间加如下标签即可:
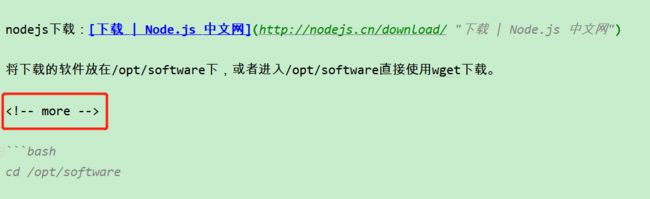
如下图效果:

这样点击阅读全文会自动定位到more所在位置,如果想要从头阅读,
修改themes/next/layout/_macro/post.njk中
为
8、文章目录
修改主题配置themes/next/_config.yml
# Table of Contents in the Sidebar
# Front-matter variable (unsupport wrap expand_all).
toc:
  enable: true
  # Automatically add list number to toc.
  number: false
  # If true, all words will placed on next lines if header width longer then sidebar width.
  wrap: false
  # If true, all level of TOC in a post will be displayed, rather than the activated part of it.
  expand_all: true
  # Maximum heading depth of generated toc.
  max_depth: 6
hexo生成目录根据md中的标题来的,比如#(一级标题), ##(二级标题),###(三级标题)等等,
上面的配置是:
number: false # 不展示目录的行号
wrap: false #目录太长,不换行,会省略超出部分
expand_all: true # 展示全部目录
9、文章访问量
基于 LeanCloud 这家服务提供商,实现 Hexo 博客文章的浏览数统计功能。
参考Hexo + Next 添加文章阅读量统计 | 栾铸显的博客
# Show number of visitors of each article.
# You can visit https://www.leancloud.cn to get AppID and AppKey.
leancloud_visitors:
  enable: true
  app_id: #
  app_key: #
  # Required for apps from CN region
  server_url: #
  # Dependencies: https://github.com/theme-next/hexo-leancloud-counter-security
  # If you don't care about security in leancloud counter and just want to use it directly
  # (without hexo-leancloud-counter-security plugin), set `security` to `false`.
security: false 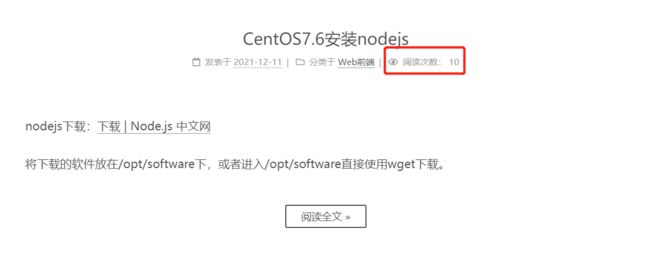
10、添加 gitalk 评论功能
利用github的issue
在github中创建评论项目
在github中创建一个公开项目:hexo-comments
https://github.com/river106/hexo-comments
github认证配置
首先进入github,点击右上角头像【Settings】->【Developer settings】->【OAuth Apps】->【New OAuth App】进行基本配置(或 Sign in to GitHub · GitHub 直接进入配置)
- Application name:应用名称
- Homepage URL:博客的地址
- Application description:应用描述
- Authorization callback URL:评论页面的域名地址, 和博客地址保持一致,请使用https
创建好后,点击右上角头像【Settings】->【Developer settings】->【OAuth Apps】,进入hexo-comments,可以查看Client ID、Client secrets。
安装gitalk
在hexo项目中安装gitalk
npm i gitalk --save修改主题配置themes/next/_config.yml
comments:
  # Available values: tabs | buttons
  style: tabs
  # Choose a comment system to be displayed by default.
  # Available values: disqus | disqusjs | changyan | livere | gitalk | utterances
  active: gitalk
  # Setting `true` means remembering the comment system selected by the visitor.
  storage: true
  # Lazyload all comment systems.
  lazyload: false
  # Modify texts or order for any navs, here are some examples.
  nav:
    #disqus:
    #  text: Load Disqus
    #  order: -1
    gitalk:
      order: -1
# Gitalk
# For more information: https://gitalk.github.io
gitalk:
enable: true
github_id: river106 # GitHub repo owner
repo: hexo-comments # Repository name to store issues
client_id: # GitHub Application Client ID
client_secret: # GitHub Application Client Secret
admin_user: river106 # GitHub repo owner and collaborators, only these guys can initialize gitHub issues
distraction_free_mode: true # Facebook-like distraction free mode
# When the official proxy is not available, you can change it to your own proxy address
proxy: https://cors-anywhere.azm.workers.dev/https://github.com/login/oauth/access_token # This is official proxy adress
# Gitalk's display language depends on user's browser or system environment
# If you want everyone visiting your site to see a uniform language, you can set a force language value
# Available values: en | es-ES | fr | ru | zh-CN | zh-TW
language: zh-CN评论效果图:

11、友情链接页面
使用命令新增页面:
hexo new page links会在source文件夹下新增links文件夹,links文件夹下还有index.md文件
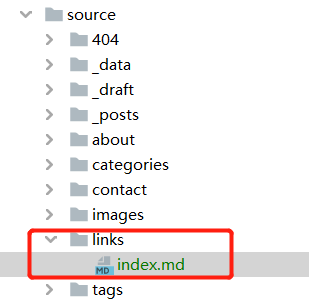
在文件中写入type: "links",如果还想禁止评论的话就再写一个comments: false
---
title: links
date: 2021-11-20 14:45:26
type: links
comments: false
---
创建友链栏
修改主题配置themes/next/_config.yml,找到menu,在其中添加:
links: /links/ || fa fa-linkthemes/next/languages/zh-CN.yml配置的menu中添加中文描述:
links: 友链 
12、将分页的页码调多点
默认的只展示了3个页码,翻页不方便;
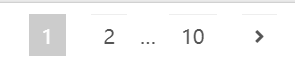
修改themes/next/layout/_partials/pagination.njk
mid_size字段原为1, 现改为4

调整后效果:

13、归档页分页记录数多点
安装hexo-generator-archive
npm install hexo-generator-archive --save修改博客配置_config.yml,添加如下内容:
# 归档页面
archive_generator:
  per_page: 30
  yearly: true
  monthly: true
14、超链接新窗口打开
由于markdown语法目前还不支持这种语法,而hexo的站内域名的超链接默认是页面内跳转,站外域名会新窗口打开。
我们可以使用html语法,来实现markdown超链接由新窗口打开:
river's blog15、博客丝带背景
修改主题配置themes/next/_config.yml,开启丝带背景
# Canvas ribbon
# For more information: https://github.com/hustcc/ribbon.js
canvas_ribbon:
  enable: true
  size: 300 # The width of the ribbon
  alpha: 0.6 # The transparency of the ribbon
  zIndex: -1 # The display level of the ribbon
16、总结
Hexo + Next的个人博客干净清爽,博主感觉不错,推荐给大家!
以上是博主搭建个人博客的记录,有兴趣的可根据个人需求选择配置。