flink高可用集群搭建(Standalone模式)
1. 简介
Apache Flink 是一个在有界数据流和无界数据流上进行有状态计算分布式处理引擎和框架。Flink 设计旨在所有常见的集群环境中运行,以任意规模和内存级速度执行计算
2. 下载解压
搭建环境服务器:
| 服务器ip | hostname |
|---|---|
| 192.168.50.237 | mdw |
| 192.168.50.238 | sdw1 |
| 192.168.50.240 | sdw2 |
注意使用命令hostnamectl set-hostname 主机名,进行修改hostname
使用以下命令进行解压安装
wget https://dlcdn.apache.org/flink/flink-1.16.1/flink-1.16.1-bin-scala_2.12.tgz
tar -zxvf flink-1.16.1-bin-scala_2.12.tgz
当然也可以进行本机下载通过ftp工具上传至服务器,本次采用命令方式,使用tar命令进行解压:

可以使用以下命令上传至目标服务器:
scp -r .\flink-1.16.1-bin-scala_2.12.tgz [email protected]:/home
tar -zxvf flink-1.16.1-bin-scala_2.12.tgz #登录服务器进入home目录
具体操作如下所示:

使用mv命令进行修改文件名
mv flink-1.16.1 flink
3. 修改配置文件
首先需要修改hosts文件,给每个节点服务器进行添加配置如下信息,具体已自己搭建服务器信息为主
192.168.50.237 mdw
192.168.50.238 sdw1
192.168.50.240 sdw2
使用如下命令进行修改flink-conf.yml配置文件,命令如下:
cd /home/flink/conf/ #进入配置文件目录
vim flink-conf.yaml #编辑集群配置信息
操作如下图所示:
![]()
编辑如下信息
################################################################################
#  Licensed to the Apache Software Foundation (ASF) under one
#  or more contributor license agreements.  See the NOTICE file
#  distributed with this work for additional information
#  regarding copyright ownership.  The ASF licenses this file
#  to you under the Apache License, Version 2.0 (the
#  "License"); you may not use this file except in compliance
#  with the License.  You may obtain a copy of the License at
#
#      http://www.apache.org/licenses/LICENSE-2.0
#
#  Unless required by applicable law or agreed to in writing, software
#  distributed under the License is distributed on an "AS IS" BASIS,
#  WITHOUT WARRANTIES OR CONDITIONS OF ANY KIND, either express or implied.
#  See the License for the specific language governing permissions and
# limitations under the License.
################################################################################


#==============================================================================
# Common
#==============================================================================

# The external address of the host on which the JobManager runs and can be
# reached by the TaskManagers and any clients which want to connect. This setting
# is only used in Standalone mode and may be overwritten on the JobManager side
# by specifying the --host  parameter of the bin/jobmanager.sh executable.
# In high availability mode, if you use the bin/start-cluster.sh script and setup
# the conf/masters file, this will be taken care of automatically. Yarn
# automatically configure the host name based on the hostname of the node where the
# JobManager runs.

jobmanager.rpc.address: mdw

# The RPC port where the JobManager is reachable.

jobmanager.rpc.port: 6123

# The host interface the JobManager will bind to. By default, this is localhost, and will prevent
# the JobManager from communicating outside the machine/container it is running on.
# On YARN this setting will be ignored if it is set to 'localhost', defaulting to 0.0.0.0.
# On Kubernetes this setting will be ignored, defaulting to 0.0.0.0.
#
# To enable this, set the bind-host address to one that has access to an outside facing network
# interface, such as 0.0.0.0.

jobmanager.bind-host: 0.0.0.0


# The total process memory size for the JobManager.
#
# Note this accounts for all memory usage within the JobManager process, including JVM metaspace and other overhead.

jobmanager.memory.process.size: 1600m

# The host interface the TaskManager will bind to. By default, this is localhost, and will prevent
# the TaskManager from communicating outside the machine/container it is running on.
# On YARN this setting will be ignored if it is set to 'localhost', defaulting to 0.0.0.0.
# On Kubernetes this setting will be ignored, defaulting to 0.0.0.0.
#
# To enable this, set the bind-host address to one that has access to an outside facing network
# interface, such as 0.0.0.0.

taskmanager.bind-host: 0.0.0.0

# The address of the host on which the TaskManager runs and can be reached by the JobManager and
# other TaskManagers. If not specified, the TaskManager will try different strategies to identify
# the address.
#
# Note this address needs to be reachable by the JobManager and forward traffic to one of
# the interfaces the TaskManager is bound to (see 'taskmanager.bind-host').
#
# Note also that unless all TaskManagers are running on the same machine, this address needs to be
# configured separately for each TaskManager.

taskmanager.host: mdw

# The total process memory size for the TaskManager.
#
# Note this accounts for all memory usage within the TaskManager process, including JVM metaspace and other overhead.

taskmanager.memory.process.size: 1728m

# To exclude JVM metaspace and overhead, please, use total Flink memory size instead of 'taskmanager.memory.process.size'.
# It is not recommended to set both 'taskmanager.memory.process.size' and Flink memory.
#
# taskmanager.memory.flink.size: 1280m

# The number of task slots that each TaskManager offers. Each slot runs one parallel pipeline.

taskmanager.numberOfTaskSlots: 1

# The parallelism used for programs that did not specify and other parallelism.

parallelism.default: 1

# The default file system scheme and authority.
#
# By default file paths without scheme are interpreted relative to the local
# root file system 'file:///'. Use this to override the default and interpret
# relative paths relative to a different file system,
# for example 'hdfs://mynamenode:12345'
#
# fs.default-scheme

#==============================================================================
# High Availability
#==============================================================================

# The high-availability mode. Possible options are 'NONE' or 'zookeeper'.
#
# high-availability: zookeeper

# The path where metadata for master recovery is persisted. While ZooKeeper stores
# the small ground truth for checkpoint and leader election, this location stores
# the larger objects, like persisted dataflow graphs.
#
# Must be a durable file system that is accessible from all nodes
# (like HDFS, S3, Ceph, nfs, ...)
#
# high-availability.storageDir: hdfs:///flink/ha/

# The list of ZooKeeper quorum peers that coordinate the high-availability
# setup. This must be a list of the form:
# "host1:clientPort,host2:clientPort,..." (default clientPort: 2181)
#
# high-availability.zookeeper.quorum: localhost:2181


# ACL options are based on https://zookeeper.apache.org/doc/r3.1.2/zookeeperProgrammers.html#sc_BuiltinACLSchemes
# It can be either "creator" (ZOO_CREATE_ALL_ACL) or "open" (ZOO_OPEN_ACL_UNSAFE)
# The default value is "open" and it can be changed to "creator" if ZK security is enabled
#
# high-availability.zookeeper.client.acl: open

#==============================================================================
# Fault tolerance and checkpointing
#==============================================================================

# The backend that will be used to store operator state checkpoints if
# checkpointing is enabled. Checkpointing is enabled when execution.checkpointing.interval > 0.
#
# Execution checkpointing related parameters. Please refer to CheckpointConfig and ExecutionCheckpointingOptions for more details.
#
# execution.checkpointing.interval: 3min
# execution.checkpointing.externalized-checkpoint-retention: [DELETE_ON_CANCELLATION, RETAIN_ON_CANCELLATION]
# execution.checkpointing.max-concurrent-checkpoints: 1
# execution.checkpointing.min-pause: 0
# execution.checkpointing.mode: [EXACTLY_ONCE, AT_LEAST_ONCE]
# execution.checkpointing.timeout: 10min
# execution.checkpointing.tolerable-failed-checkpoints: 0
# execution.checkpointing.unaligned: false
#
# Supported backends are 'hashmap', 'rocksdb', or the
# .
#
# state.backend: hashmap

# Directory for checkpoints filesystem, when using any of the default bundled
# state backends.
#
# state.checkpoints.dir: hdfs://namenode-host:port/flink-checkpoints

# Default target directory for savepoints, optional.
#
# state.savepoints.dir: hdfs://namenode-host:port/flink-savepoints

# Flag to enable/disable incremental checkpoints for backends that
# support incremental checkpoints (like the RocksDB state backend).
#
# state.backend.incremental: false

# The failover strategy, i.e., how the job computation recovers from task failures.
# Only restart tasks that may have been affected by the task failure, which typically includes
# downstream tasks and potentially upstream tasks if their produced data is no longer available for consumption.

jobmanager.execution.failover-strategy: region

#==============================================================================
# Rest & web frontend
#==============================================================================

# The port to which the REST client connects to. If rest.bind-port has
# not been specified, then the server will bind to this port as well.
#
rest.port: 8081

# The address to which the REST client will connect to
#
rest.address: 0.0.0.0

# Port range for the REST and web server to bind to.
#
#rest.bind-port: 8080-8090

# The address that the REST & web server binds to
# By default, this is localhost, which prevents the REST & web server from
# being able to communicate outside of the machine/container it is running on.
#
# To enable this, set the bind address to one that has access to outside-facing
# network interface, such as 0.0.0.0.
#
rest.bind-address: 0.0.0.0

# Flag to specify whether job submission is enabled from the web-based
# runtime monitor. Uncomment to disable.

#web.submit.enable: false

# Flag to specify whether job cancellation is enabled from the web-based
# runtime monitor. Uncomment to disable.

#web.cancel.enable: false

#==============================================================================
# Advanced
#==============================================================================

# Override the directories for temporary files. If not specified, the
# system-specific Java temporary directory (java.io.tmpdir property) is taken.
#
# For framework setups on Yarn, Flink will automatically pick up the
# containers' temp directories without any need for configuration.
#
# Add a delimited list for multiple directories, using the system directory
# delimiter (colon ':' on unix) or a comma, e.g.:
#     /data1/tmp:/data2/tmp:/data3/tmp
#
# Note: Each directory entry is read from and written to by a different I/O
# thread. You can include the same directory multiple times in order to create
# multiple I/O threads against that directory. This is for example relevant for
# high-throughput RAIDs.
#
# io.tmp.dirs: /tmp

# The classloading resolve order. Possible values are 'child-first' (Flink's default)
# and 'parent-first' (Java's default).
#
# Child first classloading allows users to use different dependency/library
# versions in their application than those in the classpath. Switching back
# to 'parent-first' may help with debugging dependency issues.
#
# classloader.resolve-order: child-first

# The amount of memory going to the network stack. These numbers usually need
# no tuning. Adjusting them may be necessary in case of an "Insufficient number
# of network buffers" error. The default min is 64MB, the default max is 1GB.
#
# taskmanager.memory.network.fraction: 0.1
# taskmanager.memory.network.min: 64mb
# taskmanager.memory.network.max: 1gb

#==============================================================================
# Flink Cluster Security Configuration
#==============================================================================

# Kerberos authentication for various components - Hadoop, ZooKeeper, and connectors -
# may be enabled in four steps:
# 1. configure the local krb5.conf file
# 2. provide Kerberos credentials (either a keytab or a ticket cache w/ kinit)
# 3. make the credentials available to various JAAS login contexts
# 4. configure the connector to use JAAS/SASL

# The below configure how Kerberos credentials are provided. A keytab will be used instead of
# a ticket cache if the keytab path and principal are set.

# security.kerberos.login.use-ticket-cache: true
# security.kerberos.login.keytab: /path/to/kerberos/keytab
# security.kerberos.login.principal: flink-user

# The configuration below defines which JAAS login contexts

# security.kerberos.login.contexts: Client,KafkaClient

#==============================================================================
# ZK Security Configuration
#==============================================================================

# Below configurations are applicable if ZK ensemble is configured for security

# Override below configuration to provide custom ZK service name if configured
# zookeeper.sasl.service-name: zookeeper

# The configuration below must match one of the values set in "security.kerberos.login.contexts"
# zookeeper.sasl.login-context-name: Client

#==============================================================================
# HistoryServer
#==============================================================================

# The HistoryServer is started and stopped via bin/historyserver.sh (start|stop)

# Directory to upload completed jobs to. Add this directory to the list of
# monitored directories of the HistoryServer as well (see below).
#jobmanager.archive.fs.dir: hdfs:///completed-jobs/

# The address under which the web-based HistoryServer listens.
#historyserver.web.address: 0.0.0.0

# The port under which the web-based HistoryServer listens.
#historyserver.web.port: 8082

# Comma separated list of directories to monitor for completed jobs.
#historyserver.archive.fs.dir: hdfs:///completed-jobs/

# Interval in milliseconds for refreshing the monitored directories.
#historyserver.archive.fs.refresh-interval: 10000
使用如下命令进行修改masters和workers配置文件,命令如下:
vim masters
vim workers
masters配置文件修改如下图所示:

workers配置文件修改如下图所示:

至此配置文件修改完毕
4. 验证启动集群
将mdw服务器节点的flink文件分发的其他两台服务器上面,命令如下:
scp -r flink sdw1:/home #输入服务器密码进行传输至sdw1节点
scp -r flink sdw2:/home #输入服务器密码进行传输至sdw2节点
具体操作如下图所示:


操作完毕,进入flink文件目录下,使用以下命令进行启动验证:
./bin/start-cluster.sh
如下图所示
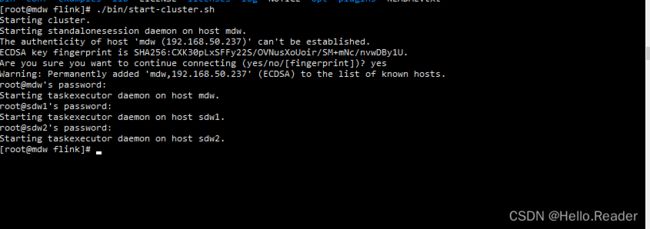
注意:需要输入sdw1和sdw2的密码是因为,此处没有配置免密码登录。如果想学习免密码登录,请查看笔者的 hbase数据库搭建教程。
启动成功后在浏览器器端输入http://192.168.50.237:8081进行验证,如下图所示:

注意: 此处的地址与你具体环境为主,这里只是笔者的内网地址。笔者的本机与内网服务器网络是相通的。
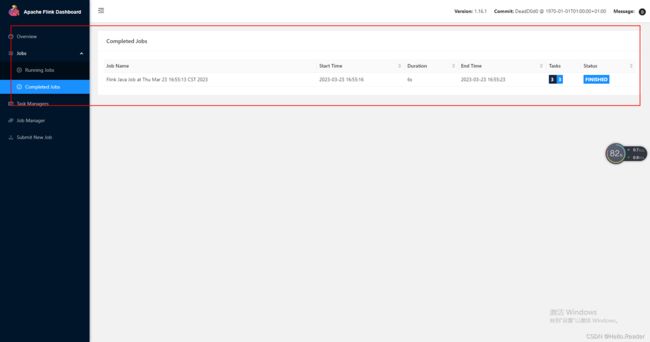
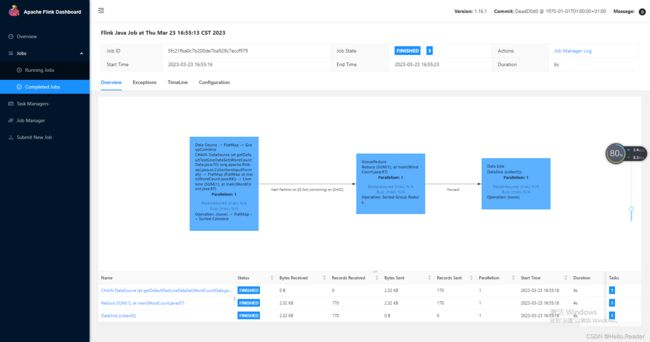
使用flink官方案例进行验证,具体操作如下命令所示
./bin/flink run ./examples/batch/WordCount.jar
具体操作如下图所示:

在web可视化管理界面,Completed Jobs菜单中查看完成job及完成得相应信息详情:
至此Standalone模式搭建教程编成完成,如有不足请大家及时指出。请关注笔者继续更新