安装部署nginx+配置基于端口、域名的虚拟主机
目录
一、 源码安装nginx,并提供服务脚本
1、下载nginx源码包
2、添加nginx用户
3、编译安装
二、配置基于ip的虚拟主机
1、新增ip地址
2、创建站点目录 创建主页文件
3、配置文件添加虚拟主机部分
4、重启服务
5、测试
三、配置基于端口的虚拟主机
四、配置基于域名的虚拟主机
五、配置nginx基于用户和地址的访问控制
六、配置nginx rewrite,要求如果访问不存在的任意网页都重定向到错误页面,错误页面内容自行定义
一、 源码安装nginx,并提供服务脚本
1、下载nginx源码包
curl -o nginx-1.20.1.tar.gz http://nginx.org/download/nginx-1.20.1.tar.gz2、添加nginx用户
useradd nginx -c "Nginx web server" -d /var/lib/nginx -s /sbin/nologin -r

id nginx
3、编译安装
将安装包解压到安装目录
tar xf nginx-1.20.1.tar.gz -C /usr/local/src
cd /usr/local/src/nginx-1.20.1/
添加需要编译的参数和模块
./configure --user=nginx --group=nginx \
--prefix=/usr/local/nginx \
--with-http_ssl_module \
--with-http_auth_request_module \
--with-http_gzip_static_module \
--with-http_gunzip_module \
--with-http_stub_status_module
#
./configure: error: C compiler cc is not found
没有C语言的编译环境
#
yum install -y gcc gcc-c++
继续
#
./configure: error: the HTTP rewrite module requires the PCRE library.
报错缺失一个pcre库
#
yum install pcre-devel -y
继续
#
./configure: error: SSL modules require the OpenSSL library.
缺失一个openssl库
#
yum install openssl-devel -y
继续出现汇总信息
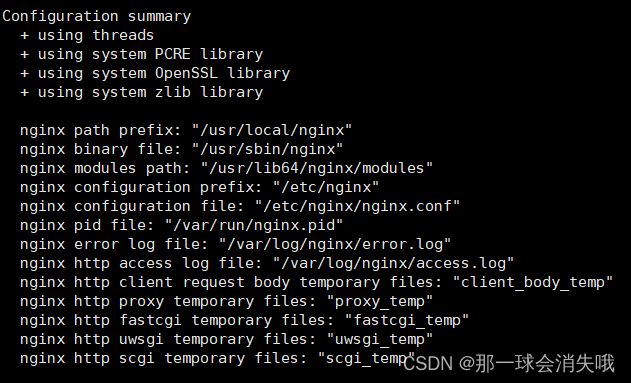
编译
make
安装
make install
编译配置文件
vim /usr/lib/systemd/system/nginx.service


[Unit]
Description=nginx - high performance web server
Documentation=http://nginx.org/en/docs/
After=network.target remote-fs.target nss-lookup.target

[Service]
Type=forking
PIDFile=/var/run/nginx.pid
ExecStartPre=/usr/sbin/nginx -t -c /usr/local/nginx/conf/nginx.conf
ExecStart=/usr/sbin/nginx -c /usr/local/nginx/conf/nginx.conf
ExecReload=/bin/kill -s HUP $MAINPID
ExecStop=/bin/kill -s QUIT $MAINPID
PrivateTmp=true

[Install]
WantedBy=multi-user.target


# ExecStartPre  ExecStart
后面的第一个路径改为汇总信息的里nginx binary file: 的路径
第二个路径改为你指定的目录(--prefix=)里面的conf/nginx.conf路径
重新加载daemon-reload守护进程
systemctl daemon-reload
设置开机自启
systeml enable --now nginx
![]()
启动nginx
systemctl start nginx
查看端口
netstat -lntup | grep 80

测试

二、配置基于ip的虚拟主机
基于rpm下载的nginx
参考http://nginx.org/en/linux_packages.html
1、新增ip地址
[root@localhost ~]# nmcli connection modify ens33 +ipv4.addresses 192.168.10.160/24
[root@localhost ~]# nmcli connection up ens33
[root@localhost ~]# nmcli connection reload
1) 删除指定IP
ip addr del ip地址 dev 接口
2) 清空指定网卡的所有IP
ip addr flush dev 接口
扩展知识:“ip addr”的其他用法
1) 使用“ip addr”查看指定网卡的信息
ip addr show device
比如查看网卡接口的信息,就是ip addr show eth0
2) 增加ip
ip addr add ip/netmask dev 接口3)给网卡起别名,起别名相当于给网卡多绑定了一个ip
用法: 比如给网卡eth0增加别名
ip addr add 172.25.21.1/32 dev eth0 label eth0:1
4) 删除别名
ip addr del ip/netmask dev eth0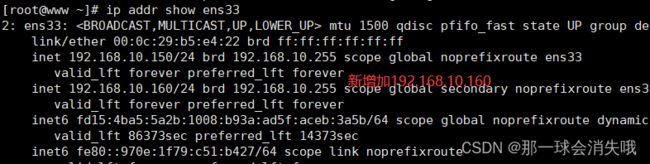
2、创建站点目录 创建主页文件
1)需要先准备环境,创建站点目录
[root@node3 nginx]# for i in blog bbs #使用for语句循环创建站点目录
> do
> mkdir html/$i
> done
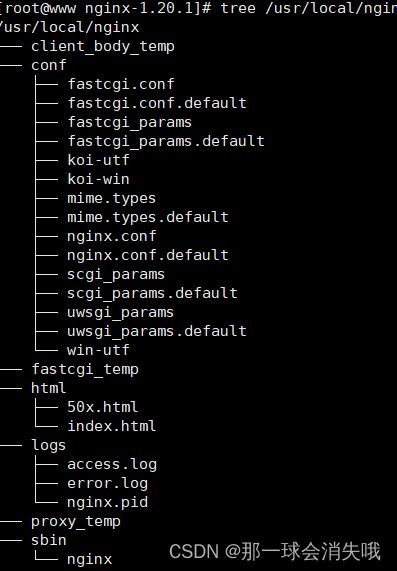
[root@node3 nginx]# ls html #可以查看目录存在
50x.html bbs blog index.html
2)创建主页文件
[root@node3 nginx]# for i in blog bbs
> do
> echo "$i test page." > html/$i/index.html
> done3)添加模块化配置文件include /usr/local/nginx/conf.d/*.conf;
3、配置文件添加虚拟主机部分
[root@localhost ~]# cd /etc/nginx/conf.d/
[root@localhost conf.d]# vim vhost.conf

server{
    listen  192.168.10.150:80;
    server_name localhost;
    location / {
        root /usr/share/nginx/html/bbs/;
        index index.html index.htm;
    }
}

server{
    listen  192.168.10.160:80;
    server_name localhost;
    location / {
        root /usr/share/nginx/html/blog/;
        index index.html index.htm;
    }
}

[root@localhost conf.d]# nginx -t
nginx: the configuration file /etc/nginx/nginx.conf syntax is ok
nginx: configuration file /etc/nginx/nginx.conf test is successful
4、重启服务
systemctl restart nginx5、测试

三、配置基于端口的虚拟主机
[root@localhost conf.d]# vim vhost.conf

server{
    listen  80;
    server_name localhost;
    location / {
        root /usr/share/nginx/html/bbs/;
        index index.html index.htm;
    }
}

server{
    listen  81;
    server_name localhost;
    location / {
        root /usr/share/nginx/html/blog/;
        index index.html index.htm;
    }
}

[root@localhost conf.d]# nginx -t
[root@localhost conf.d]# systemctl restart nginx
四、配置基于域名的虚拟主机
[root@localhost conf.d]# vim vhost.conf

server{
    listen  80;
    server_name bbs.jzz.org;
    location / {
        root /usr/share/nginx/html/bbs/;
        index index.html index.htm;
    }
}

server{
    listen  80;
    server_name blog.jzz.org;
    location / {
        root /usr/share/nginx/html/blog/;
        index index.html index.htm;
    }
}
[root@localhost conf.d]# nginx -t
[root@localhost conf.d]# vim /etc/hosts
172.25.10.100 bbs.jzz.org blog.jzz.org
[root@localhost conf.d]# systemctl restart nginx
五、配置nginx基于用户和地址的访问控制
一)基于地址
1)在虚拟主机中配置基于地址的访问控制
[root@node3 nginx]# vim conf.d/vhost.conf
server {
listen  80;
server_name  bbs.test.com;
location / {
    root   html/bbs;
    index  index.html index.htm;
    deny 192.168.10.160;	#配置需要拒绝访问的地址
    allow 192.168.10.0/24;	 #配置允许地址段
    deny all;				#拒绝所有其他地址
        }
  location /nginx_status {
        stub_status on;
        access_log off;
 }
}
2)在配置拒绝访问的192.168.10.160的主机上访问测试
curl bbs.test.com
3)在允许访问的其他地址段进行测试该网页
curl bbs.test.com
二)基于用户访问控制
1)添加认证指令
在虚拟主机location中添加两条参数
auth_basic  "Restricted";
auth_basic_user_file /usr/local/nginx/webpass;
如虚拟主机 bbs.test.com中的配置
[root@node3 nginx]# vim conf.d/vhost.conf
server {
listen  80;
server_name  bbs.test.com;
location / {
    root   html/bbs;
    index  index.html index.htm;
        }
  location /nginx_status {
        stub_status on;
        access_log off;
        auth_basic  "Restricted";
        auth_basic_user_file /usr/local/nginx/webpass;
 }
}
2)创建账号密码, 此账号密码就是用户访问网站时需要输入的。
需要安装创建用户工具:
yum install httpd-tools
创建用户tom并配置密码
[root@node3 nginx]# htpasswd -cm /usr/local/nginx/webpass tom
New password:
Re-type new password:
Adding password for user tom
[root@node3 nginx]# more /usr/local/nginx/webpass
tom:$apr1$UoHoNkgY$qAh73D31vskaCTGHL55m01
配置完成可以在另一条机器上访问,最好是安装文本浏览器来访问elinks
[root@node2 ~]# yum install elinks -y
通过elinks访问成功时出现需要账号和密码进行用户认证
[root@node2 ~]# elinks http://bbs.test.com/nginx_status六、配置nginx rewrite,要求如果访问不存在的任意网页都重定向到错误页面,错误页面内容自行定义
①定义错误页面内容:echo "the require failed" > /usr/share/nginx/html/test1/err.html
②编辑配置文件:
[root@localhost ~]# vim /etc/nginx/conf.d/vhost.conf
修改内容如下:
server {
        listen  80;
        server_name www.test1.com;
        location / {
            root   /usr/share/nginx/html/test1/;
            index  index.html index.htm;
            if (!-f $request_filename) {
                rewrite /.* err.html permanent;}
        }
}
③重启服务systemctl restart nginx