WebSphere9+IHS+Plugins安装部署
*Was、Plugins、IHS安装*
Was6安装方法参考:https://www.cnblogs.com/lsdb/p/6835684.html
搭建单机环境指定server名字的方法,在manageprofiles.sh -create时新增参数-serverName server2
安装使用的安装包
下载地址链接:链接:https://pan.baidu.com/s/12c7AwgGoyDqmj8XRSnVTjg
提取码:8hxe(包含Was7、was8.5、was9、IHS、Plugins)根据需求下载;
说明:was在8.0后安装依托于InstallManager,安装简便操作简单,Installmanger分系统,was使用的统用版本,有需要的请根据需要下载,Plugins是IHS和web Sphere之间的传播插件主要作用是将IHS与WebSphere关联起来,IHS为Web服务,WebSphere为应用服务,下面说下具体的安装步骤,以供参考。
上传文件到服务器上,一般上传到tmp文件夹下。
上述文件包可在IBM官网下载安装包,或到网盘直接获取。解压
*InstallManager安装过程*
1)InstallManager解压到指定文件
unzip agent.installer.linux.x86_64_1.89.zip -d /opt/IBM/InstallManager/
2)创建InstallManager安装路径
mkdir /opt/IBM/InstallManager/eclipse/
3)安装
./userinstc -installationDirectory /opt/IBM/InstallManager/eclipse/ -acceptLicense
说明:在root用户下安装使用“install”,在其他用户下安装使用“userinstc”。
安装成功后在eclipse下会产生如下文件
WebSphere安装过程(集群版)
注意:在安装was****时需要与sdk一同安装,否则会报错:缺少sdk文件。
进入到InstallManager的安装路径/opt/IBM/InstallManager/eclipse/tools下:
1)查询安装包的小版本号
./imcl listAvailablePackages -repositories /home/wasadmin/Package/WAS_ND
查询结果:com.ibm.websphere.ND.v90_9.0.0.20160526_1854,com.ibm.java.jdk.v8_8.0.3000.20160526_1317
2)安装:(-nl zh 指定安装的语言为中文)
./imcl install com.ibm.websphere.ND.v90_9.0.0.20160526_1854 com.ibm.java.jdk.v8_8.0.3000.20160526_1317 -repositories /home/wasadmin/Package/WAS_ND/repository.config,/home/wasadmin/Package/JAVA/repository.config -installationDirectory /opt/IBM/WebSphere/AppServer -sharedResourcesDirectory /opt/IBM/IMShared -acceptLicense

说明:install参数代表安装,后接的是小版本号,多个小版本号之间用空格分割,repositories 后接的是安装包路径,多个安装包之间用逗号分隔,installationDirectory后接的是实际的安装路径,sharedResourcesDirectory跟的是记录的安装信息,参数acceptLicense显示安装过程。
3)补丁更新:
./imcl updateAll -repositories /home/wasadmin/Package/Patch/was_update/repository.config -installationDirectory /opt/IBM/WebSphere/AppServer -acceptLicense
说明:updateAll参数代表更新,repositories后跟的是补丁包路径,installationDirectory后是was的安装路径。
4)创建管理节点Dmgr
/opt/IBM/WebSphere/AppServer/bin/manageprofiles.sh -create -profileName dmgr -profilePath /opt/IBM/WebSphere/AppServer/profiles/Dmgr -templatePath /opt/IBM/WebSphere/AppServer/profileTemplates/dmgr -enableAdminSecurity true -adminUserName was9admin -adminPassword was9admin
说明:创建node使用命令为manageprofiles.sh,profileName后跟的是dmgr的名字,profilePath指的是创建的dmgr保存的位置,templatePath后接启动服务的名字,enableAdminSecurity代表的是控制台的安全性,adminUserName登入控制台的用户名,adminPassword登入用户名对应的密码。
5)创建被管节点AppSrv01
/opt/IBM/WebSphere/AppServer/bin/manageprofiles.sh -create -profileName AppSrv01 -profilePath /opt/IBM/WebSphere/AppServer/profiles/AppSrv01 -templatePath /opt/IBM/WebSphere/AppServer/profileTemplates/default -enableAdminSecurity false
说明:创建node使用命令为manageprofiles.sh,profileName后跟的是节点的名字,profilePath指的是创建的节点保存的位置,templatePath后接启动服务的名字default表示默认(server1),enableAdminSecurity代表的是控制台的安全性
6)启动was的管理节点dmgr
/opt/IBM/WebSphere/AppServer/profiles/Dmgr/bin/startManager.sh
7)将被管节点添加到管理节点中
/opt/IBM/WebSphere/AppServer/profiles/AppSrv01/bin/addNode.sh 127.0.0.1 8879 -username was9admin -password was9admin
说明:进入被管节点安装路径下使用addNode.sh命令,命令格式:addNode.sh IP 8879 [-username 用户ID -password 用户密码],8879是默认端口,无特使要求,不建议更改,在添加之前一定要启动管理节点Dmgr服务。否则找不到管理端口。
8)启动被管节点
/opt/IBM/WebSphere/AppServer/profiles/AppSrv01/bin/startNode.sh
9)补充查询版本号
在实际使用中用可能需要查看使用was的版本号和SDK的小版本号,was版本号也可通过登入控制台在欢迎界面中查看
was版本号
/opt/IBM/WebSphere/AppServer/bin/versionInfo.sh
SDK小版本号
/opt/IBM/WebSphere/AppServer/java/8.0/bin/java -version
*Plugins安装:*
安装与was步骤基本相同
1)查询Plugins安装包的小版本号,SDK安装包的小版本号
com.ibm.websphere.PLG.v90_9.0.0.20160526_1854,com.ibm.java.jdk.v8_8.0.3000.20160526_1317
2)安装
./imcl install com.ibm.websphere.PLG.v90_9.0.0.20160526_1854 com.ibm.java.jdk.v8_8.0.3000.20160526_1317 -repositories /home/wasadmin/Package/plugins/repository.config,/home/wasadmin/Package/JAVA/repository.config -installationDirectory /opt/IBM/WebSphere/Plugins -sharedResourcesDirectory /opt/IBM/IMShared -acceptLicense
3)Plugins打补丁
./imcl updateAll -repositories /home/wasadmin/Package/Patch/IHSPLGupdate/repository.config -installationDirectory /opt/IBM/WebSphere/Plugins -acceptLicense
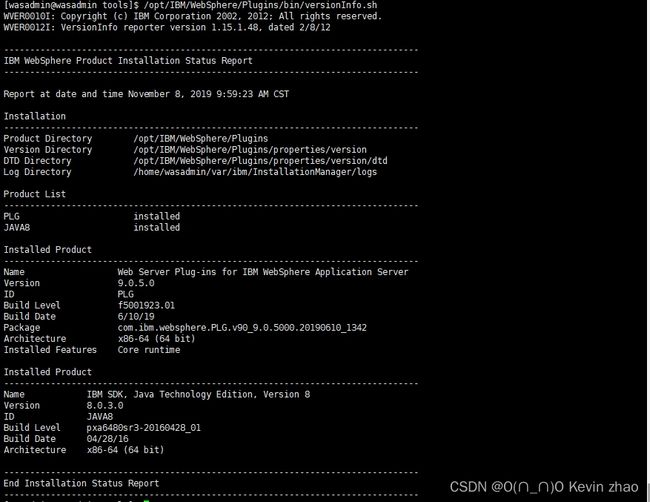
4)Plugins查询版本
/opt/IBM/WebSphere/Plugins/bin/versionInfo.sh
SDK小版本:
/opt/IBM/WebSphere/Plugins/java/8.0/bin/java -version
IHS安装(IBM HTTP SERVER):
安装与was步骤基本相同
1)查询IHS安装包的小版本号,SDK安装包的小版本号
com.ibm.websphere.IHS.v90_9.0.0.20160526_1854,com.ibm.java.jdk.v8_8.0.3000.20160526_1317
2)IHS安装:
./imcl install com.ibm.websphere.IHS.v90_9.0.0.20160526_1854 com.ibm.java.jdk.v8_8.0.3000.20160526_1317 -repositories /home/wasadmin/Package/IHS/repository.config,/home/wasadmin/Package/JAVA/repository.config -installationDirectory /opt/IBM/HttpServer -sharedResourcesDirectory /opt/IBM/IMShared -acceptLicense
3)IHS打补丁
./imcl updateAll -repositories /home/wasadmin/Package/Patch/IHSPLGupdate/repository.config -installationDirectory /opt/IBM/HttpServer -acceptLicense
4)IHS版本和SDK小版本
/opt/IBM/HttpServer/bin/versionInfo.sh
/opt/IBM/HttpServer/java/8.0/bin/java -version
Absible自动化安装脚本:
#Linux一件安装(WebSphere,AppSrv,Puingin) For Ansible
- hosts: 192.168.142.146
  remote_user: root
  vars:
      #创建服务器登入和登入控制台用户组、用户、密码
    - user: "was9admin"
    - group: "was9admin"
    - passwd: "was9admin"
      #安装包路径
    - WebSpherePackage: /websphere/
      #IBM相关安装路径
    - Path: /IBM/
      #InstallManager安装路径
    - InstallManager: "{{ Path }}InstallManager/"
      #WebSphere安装路径
    - WebSphere: "{{ Path }}WebSphere/AppServer/"
      #Plugins安装路径
    - Plugins: "{{ Path }}WebSphere/Plugins/"
      # sdk安装包
    - file_1: ibm-java-sdk-8.0-3.0-linux-x64-installmgr.zip
      # InstallManager安装包
    - file_2: agent.installer.linux.x86_64_1.89.zip
      # WebSphere安装包
    - file_3: WAS_ND_V9.0_MP_ML.zip
      # Plugins安装包
    - file_4: was.repo.9000.plugins.zip
      #WebSphere补丁包
    - file_5: 9.0.0-WS-WAS-FP009.zip
      #Plugins补丁包
    - file_6: 9.0.0-WS-IHSPLG-FP009.zip
  tasks:
    - name: 创建安装介质存放包
      file: path={{ WebSpherePackage }} state=directory mode=0777
    - name: 拷贝jdk安装包到目标主机
      copy: src={{ file_1 }} dest={{ WebSpherePackage }}
    - name: 拷贝InstallManager安装包到目标主机
      copy: src={{ file_2 }} dest={{ WebSpherePackage }}
    - name: 拷贝WasSphere9ND安装包到目标主机
      copy: src={{ file_3 }} dest={{ WebSpherePackage }}
    - name: 拷贝Plunging安装包到目标主机
      copy: src={{ file_4 }} dest={{ WebSpherePackage }}
      ignore_errors: True
    - name: 拷贝WebSphere补丁包到目标主机
      copy: src={{ file_5 }} dest={{ WebSpherePackage }}
      tags: cppkg
      ignore_errors: True
    - name: 拷贝Plings补丁包到目标主机
      copy: src={{ file_6 }} dest={{ WebSpherePackage }}
      ignore_errors: True
    - name: 修改拷贝文件的执行权限
      shell: chmod -R 777 {{ WebSpherePackage }} warn=False
    - name: 添加用户组ID=10001
      group: gid=10001 name={{ group }} system=no
    - name: 添加启动用户UID=10001
      user: uid=10001 name={{ user }} group={{ group }} system=no
      ignore_errors: True
    - name: 为新增用户设置密码
      shell: echo {{ user }}:{{ passwd }} |chpasswd
    - name: 拷贝系统文件 防止登入新用户没有权限
      shell: cp -a /etc/skel/. /home/{{ user }}
    - name: 防止出现Counld not update ICEauthority file/home/user/.ICEanthority报警
      shell: chown {{ user }} -R /home/{{ user }} warn=False
    - name: 创建InstallManager安装路径
      file: path={{ InstallManager }}eclipse state=directory mode=0777
    - name: 解压InstallManager安装包
      raw: unzip -o -d {{ InstallManager }} {{ WebSpherePackage }}{{ file_2 }}
    - name: 安装InstallManager
      shell: "{{ InstallManager }}userinstc -installationDirectory {{ InstallManager }}eclipse -acceptLicense"
      ignore_errors: True
    - name: 解压java安装包
      raw: unzip -o -d {{ WebSpherePackage }}Java {{ WebSpherePackage }}{{ file_1 }}
    - name: 解压WasSphere安装包
      raw: unzip -o -d {{ WebSpherePackage }}wassource {{ WebSpherePackage }}{{ file_3 }}
    - name: 安装websphere服务器
      shell: "{{ InstallManager }}eclipse/tools/imcl install $({{ InstallManager }}eclipse/tools/imcl listAvailablePackages -repositories {{ WebSpherePackage }}wassource) $({{ InstallManager }}eclipse/tools/imcl listAvailablePackages -repositories {{ WebSpherePackage }}Java) -repositories {{ WebSpherePackage }}wassource/repository.config,{{ WebSpherePackage }}Java/repository.config -installationDirectory {{ WebSphere }} -sharedResourcesDirectory {{ Path }}IMShared -acceptLicense"
    - name: 解压WebSphere补丁包
      raw: unzip -o -d {{ WebSpherePackage }}wasupdate {{ WebSpherePackage }}{{ file_5 }}
      ignore_errors: True
    - name: 安装WebSphere补丁包
      shell: "{{ InstallManager }}eclipse/tools/imcl updateAll -repositories {{ WebSpherePackage }}wasupdate/repository.config -installationDirectory {{  WebSphere }} -acceptLicense  -showVerboseProgress"
      ignore_errors: True
    - name: 查看安装的WebSphere版本
      shell: "{{  WebSphere }}bin/versionInfo.sh"
    - name: 创建Dmgr管理概要文件
      shell: "{{  WebSphere }}bin/manageprofiles.sh -create  -profileName dmgr -profilePath {{  WebSphere }}profiles/Dmgr -templatePath {{  WebSphere }}profileTemplates/dmgr -enableAdminSecurity true -adminUserName {{ user }} -adminPassword {{ passwd }}"
    - name: 创建AppServer应用概要文件
      shell: "{{  WebSphere }}bin/manageprofiles.sh -create  -profileName AppSrv01 -profilePath {{  WebSphere }}profiles/AppSrv01 -templatePath {{  WebSphere }}profileTemplates/default -enableAdminSecurity false"
    - name: 解压Plungin安装包
      raw: unzip -o -d {{ WebSpherePackage }}PlugPage {{ WebSpherePackage }}{{ file_4 }}
      ignore_errors: True
    - name: 安装Plungin
      shell: "{{ InstallManager }}eclipse/tools/imcl install $({{ InstallManager }}eclipse/tools/imcl listAvailablePackages -repositories {{ WebSpherePackage }}PlugPage) $({{ InstallManager }}eclipse/tools/imcl listAvailablePackages -repositories {{ WebSpherePackage }}Java) -repositories {{ WebSpherePackage }}PlugPage/repository.config,{{ WebSpherePackage }}Java/repository.config -installationDirectory {{ Plugins }} -sharedResourcesDirectory {{ Path }}IMShared -acceptLicense"
      ignore_errors: True
    - name: 解压Plugins补丁包
      raw: unzip -o -d {{ WebSpherePackage }}PlugInUpdate {{ WebSpherePackage }}{{ file_6 }}
      ignore_errors: True
    - name: 为Plungin打补丁
      shell: "{{ InstallManager }}eclipse/tools/imcl updateAll -repositories {{ WebSpherePackage }}PlugInUpdate/repository.config -installationDirectory {{ Plugins }} -acceptLicense  -showVerboseProgress"
      ignore_errors: True
    - name: 查询Plugins版本
      shell: "{{ Plugins }}bin/versionInfo.sh"
      ignore_errors: True
    - name: 删除安装包
      shell: rm -rf {{ WebSpherePackage }} warn=False
#    - name: 切换到启动用户
#      ping:
#      become: yes
#      become_user: "{{ user }}"
    - name: 更改IBM插件所属用户、所属组
      shell: chown -R {{ group }}:{{ user }} {{ Path }} warn=False
    - name: 创建启动Dmgr服务脚本
      file: path=/home/{{ user }}/startDmgr.sh state=touch mode=0755 owner={{ user }} group={{ group }}
    - shell: echo " su - {{ user }} -c {{ WebSphere }}profiles/Dmgr/bin/startManager.sh" > /home/{{ user }}/startDmgr.sh
    - name: 启动web Sphere的Dmgr服务
      shell: /home/{{ user }}/startDmgr.sh
    - name: 创建addNode.sh为Dmgr添加节点
      file: path=/home/{{ user }}/addNode.sh state=touch mode=0755 owner={{ user }} group={{ group }}
    - shell: echo "su - {{ user }} -c '{{ WebSphere }}profiles/AppSrv01/bin/addNode.sh 127.0.0.1 8879 -username {{ user }} -password {{ passwd }}'" >/home/{{ user }}/addNode.sh
    - name: 运行addNode.sh为Dmgr添加节点
      shell: /home/{{ user }}/addNode.sh
      ignore_errors: True
    - name: 创建startAdmin.sh启动节点服务
      file: path=/home/{{ user }}/startAdmin.sh state=touch mode=0755 owner={{ user }} group={{ group }}
    - shell: echo " su - {{ user }} -c {{WebSphere}}profiles/AppSrv01/bin/startNode.sh" >/home/{{ user }}/startAdmin.sh
    - name: 启动服务Node
      shell: /home/{{ user }}/startAdmin.sh
      ignore_errors: True
    - name: 查看WebSphere启动进程
      shell: ps -ef|grep WebSphere
*配置*
*创建集群*
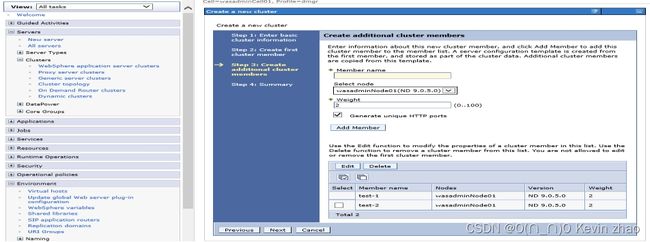
Servers–》Clusters》WebSphere application server clusters–》>new
增加node节点
*配置JVM参数大小*
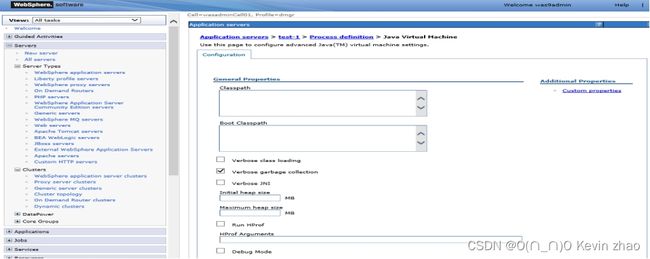
Servers–》Server Types–》WebSphere application servers–》node–》Server Infrastructure–》Java and Process Management–》Process definition–》Java Virtual Machine
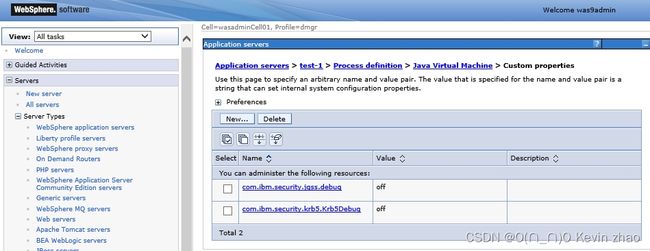
Custom properties下是自定义属性
说明:常用参数(日志出现乱码)
client.encoding.override/UTF-8|GBK
File.encoding/UTF-8|GBK
*数据源配置*
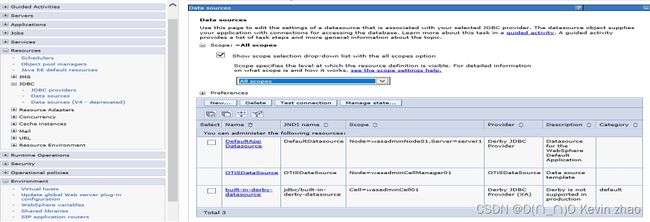
Resources–》JDBC–》Data sources
说明:一般数据源都挂载在集群中,但根据实际需求也有挂载在节点、cells上的。在建立数据源时可以新建数据源类型,连接的是什么类型的数据库,或在JDBC providers直接新建需要的数据库类型,以供创建数据源时选择。在创建数据源时注意数据源的自定义属性(数据库名称、数据库地址、端口等特殊属性)
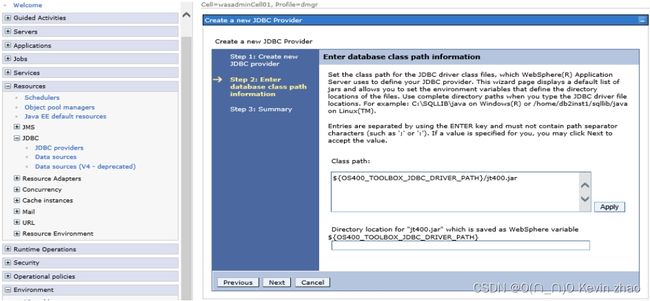
Resources–》JDBC–》JDBC providers

Class path–引用的驱动包,要在服务器上有对应的文件信息,集群要在每台服务器上有相同的文件。
*共享库配置*
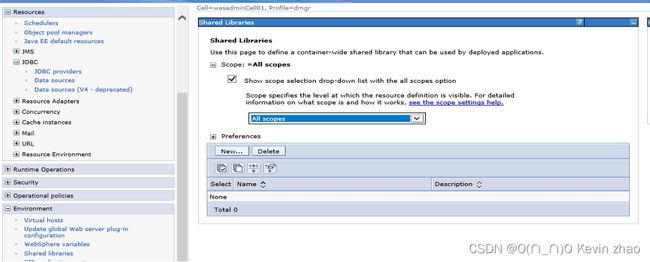
Environment–》Shared libraries
说明:共享库即多个应用公用的jar包储存位置。建议配置在集群中。
*应用部署*
Applications–》Application Types–》WebSphere enterprise applications–》install
在配置可以选择快速安装然后配置数据源、共享库信息,也可以选择详细安装,在部署过程中直接选择对应的参数。
*生成plugins.xml*
生成plugins.xml两种方法:
(1)直接生成
***Environment–》Update global Web server plug-in ***
点击OK,然后根据提示路径到服务器中获取即可。
注意:需要特别注意plugins.key,plugins的路径信息,若不正确需要手动修改。
(2)创建web服务生成
Servers–》Web servers–》new
使用该方法时若was控制台和IHS在同一台设备上可以直接传递Plugins.xml文件,若不在同一台设备上,直接拷贝到IHS服务器上即可,注意was控制台和IHS服务器是否为同系统,若不同注意plugins.xml文件中的文件路径是否正确。
*JMS设置*
针对使用MQ对列的服务,需要设置JMS信息,主要设置队列管理工厂(Queue connection factories)和队列(Queues)
在创建对列管理工厂和队列的时候,需要注意RHF2头,在创建队列管理工厂的时候默认不勾选,在创建队列的时候默认是勾选的,这个RHF头可以通过代码来去除,若没有在配置的时候就要特别注意,不然可能出现调用的时候出现数据错位而造成乱码数据混乱,无法使用。
*新增控制台管理用户*
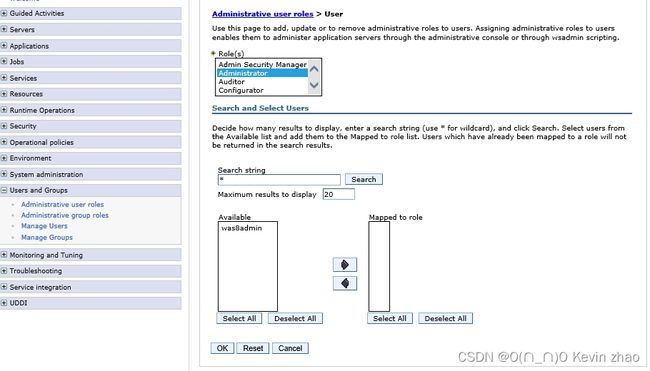
Users and Groups–》Manage Users–》creat
说明:该步骤是创建用户
Administrative user roles–》add
以上为WebSphere的搭建部署过程,如还有疑问请留言,针对WebSphere的用户权限问题请查看本人关于用户说明的另一篇文章。
