Ansible部署lamp架构
Ansible部署lamp架构
- LAMP与LNMP架构的区别及其具体的选择说明
- 1.ansible安装
- 2.安装httpd服务
- 3.安装mysql
- 4.安装php服务
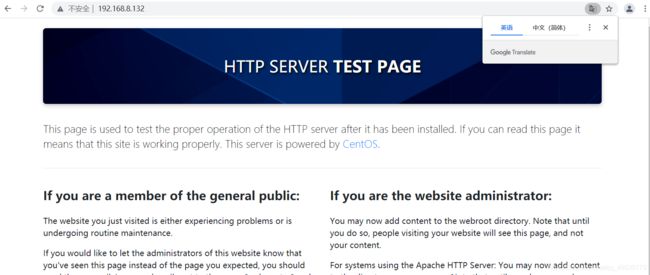
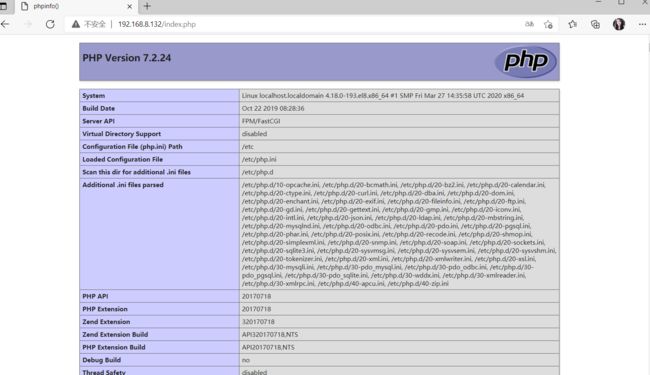
- 5.验证效果,如果出现以下界面就恭喜你部署成功了,如果没有请检查配置文件!
LAMP与LNMP架构的区别及其具体的选择说明
LAMP==Linux+Apache+Mysql+PHP
LNMP==Linux+Nginx+Mysql+PHP

以上两只架构是目前网站的主流架构
LAMP和LNMP最主要的区别在于:
一个使用的是Apache,一个使用的是Nginx。

我们就来说说Apache
Apache是世界是用排名第一的Web服务器软件,其几乎可以在所有广泛使用的计算机平台上运营,由于其跨平台和安全性被广泛使用,是最流行的Web服务端软件之一。

相比于nginx,apache有些臃肿,内存和CPU开销较大,性能上有损耗,nginx对于静态文件的响应能力远高apache。

Apache是负载PHP的最佳选择,如果流量很大的话,可以使用nginx来负载非PHP的Web请求。在整个IT界而言,70%的流量访问均来源于Apache。
LNMP是Linux+Nginx+Mysql+PHP的组合方式,其特点是利用Nginx的快速与轻量级,替代以前的LAMP(Linux+Apache+Mysql+PHP)的方式。由于安装方便,并且安装脚本也随时更新。

综上所述:
基于 LAMP 架构设计具有成本低廉、部署灵活、快速开发、安全稳定等特点,是 Web 网络应用和环境的优秀组合。若是服务器配置比较低的个人网站,当然首选 LNMP 架构。
准备四台服务器,一台安装ansible,进行管理与控制;一台安装apache(httpd);一台安装mysql,存放数据;最后安装php。
lamp平台软件安装次序:
httpd --> mysql --> php
| Redhat8.2 | IP | 运用 |
|---|---|---|
| master | 192.168.8.129 | ansible运维工具 |
| node1 | 192.168.8.132 | apache(httpd) |
| node2 | 192.168.8.133 | mysql数据库 |
| node3 | 192.168.8.134 | php |
1.ansible安装
//yum源安装
[root@master ~]# curl -o /etc/yum.repos.d/CentOS-Base.repo http://mirrors.aliyun.com/repo/Centos-8.repo
  % Total    % Received % Xferd  Average Speed   Time    Time     Time  Current
                                 Dload  Upload   Total   Spent    Left  Speed
100  2595  100  2595    0     0  22964      0 --:--:-- --:--:-- --:--:-- 22964

[root@master ~]# dnf -y install epel-release

//安装ansible
[root@master ~]# dnf -y install ansible

//查看ansible版本
[root@master ~]#  ansible --version
ansible 2.9.23
  config file = /etc/ansible/ansible.cfg
  configured module search path = ['/root/.ansible/plugins/modules', '/usr/share/ansible/plugins/modules']
  ansible python module location = /usr/lib/python3.6/site-packages/ansible
  executable location = /usr/bin/ansible
  python version = 3.6.8 (default, Dec  5 2019, 15:45:45) [GCC 8.3.1 20191121 (Red Hat 8.3.1-5)]
[root@master ~]#
- 构建 一个清单文件,移动到 /opt/project目录下方便管理
[root@master project]# ls
ansible.cfg  inventory
- 将要配置httpd、mysql、php的被控主机的IP添加到ansible主机清单
[root@master project]# cat inventory
[httpd]
192.168.8.132 ansible_user=root ansible_password=1

[mysql]
192.168.8.133 ansible_user=root ansible_password=1

[php]
192.168.8.134 ansible_user=root ansible_password=1

[root@master project]#
- 运用ping模块检查指定节点机器是否连接
[root@master project]# ansible all -m ping
192.168.8.134 | SUCCESS => {
    "ansible_facts": {
        "discovered_interpreter_python": "/usr/libexec/platform-python"
    },
    "changed": false,
    "ping": "pong"
}
192.168.8.132 | SUCCESS => {
    "ansible_facts": {
        "discovered_interpreter_python": "/usr/libexec/platform-python"
    },
    "changed": false,
    "ping": "pong"
}
192.168.8.133 | SUCCESS => {
    "ansible_facts": {
        "discovered_interpreter_python": "/usr/libexec/platform-python"
    },
    "changed": false,
    "ping": "pong"
}
[root@master project]#
- 关闭所有受控机上的防火墙
[root@master project]# ansible all -m service -a 'name=firewalld state=stopped'
192.168.8.132 | CHANGED => {
    "ansible_facts": {
        "discovered_interpreter_python": "/usr/libexec/platform-python"
    },
    "changed": true,
    "name": "firewalld",
    "state": "stopped",
    "status": {
- 将本机的网络仓库传送到所有的受控机上
[root@master project]# ansible all -m template -a 'src=/etc/yum.repos.d/CentOS-Base.repo dest=/etc/yum.repos.d/CentOS-Base.repo'
192.168.8.132 | CHANGED => {
    "ansible_facts": {
        "discovered_interpreter_python": "/usr/libexec/platform-python"
    },
    "changed": true,
    "checksum": "4966466ad015ef3d2a3cc0b8252d43efbdcf2c94",
    "dest": "/etc/yum.repos.d/CentOS-Base.repo",
2.安装httpd服务
[root@master project]# ansible httpd -m yum -a 'name=httpd state=present'
......
- 设置httpd服务启动并开机自启
[root@master project]# ansible httpd -m service -a 'name=httpd state=restarted enabled=yes'
192.168.8.132 | CHANGED => {
    "ansible_facts": {
        "discovered_interpreter_python": "/usr/libexec/platform-python"
    },
    "changed": true,
    "enabled": true,
    "name": "httpd",
    "state": "started",
    "status": {
- 查看httpd受控机上80端口
[root@master project]# ansible httpd -m shell -a 'ss -antl'
192.168.8.132 | CHANGED | rc=0 >>
State     Recv-Q    Send-Q       Local Address:Port        Peer Address:Port
LISTEN    0         5                127.0.0.1:631              0.0.0.0:*
LISTEN    0         128              127.0.0.1:6010             0.0.0.0:*
LISTEN    0         128                0.0.0.0:111              0.0.0.0:*
LISTEN    0         32           192.168.122.1:53               0.0.0.0:*
LISTEN    0         128                0.0.0.0:22               0.0.0.0:*
LISTEN    0         5                    [::1]:631                 [::]:*
LISTEN    0         128                  [::1]:6010                [::]:*
LISTEN    0         128                   [::]:111                 [::]:*
LISTEN    0         128                      *:80                     *:*
LISTEN    0         128                   [::]:22                  [::]:*
[root@master project]#
- 修改httpd配置文件
//在ansible主机上将 192.168.8.132 的httpd的配置文件/etc/httpd/conf/httpd.conf cp到ansible主机上,进行修改,再传回去

[root@master project]# scp 192.168.8.132:/etc/httpd/conf/httpd.conf .
[email protected]'s password:
httpd.conf                                                                               100%   12KB   7.6MB/s   00:00
[root@master project]#

167     DirectoryIndex index.php index.html   //添加index.php
168 </IfModule>


286     AddType application/x-compress .Z
287     AddType application/x-gzip .gz .tgz
288     AddType application/x-httpd-php .php     //添加这一行
289     AddType application/x-httpd-php-source .phps   //以及这一行


//最后一行添加以下内容

355 # Load config files in the "/etc/httpd/conf.d" directory, if any.
356 IncludeOptional conf.d/*.conf
357 <VirtualHost *:80>
358     DocumentRoot "/usr/local/apache/htdocs"  //这里指定的是本机访问的路径
359     ServerName www.pyd.com
360     ProxyRequests Off
361     ProxyPassMatch ^/(.*\.php)$ fcgi://192.168.8.134:9000/var/www/$1   //指定phpip以及要访问的路径
362     <Directory "/var/www">  //php访问的路径
363         Options none
364         AllowOverride none
365         Require all granted
366     </Directory>
367 </VirtualHost>
//改完后从ansible主机上回传到httpd主机上/etc/httpd/conf/httpd.conf,会自动覆盖之前的文件内容

[root@master project]# ansible httpd -m copy -a 'src="/opt/project/httpd.conf" dest="/etc/httpd/conf/httpd.conf"'
192.168.8.132 | CHANGED => {
    "ansible_facts": {
        "discovered_interpreter_python": "/usr/libexec/platform-python"
    },
    "changed": true,
    "checksum": "aceded022d6a6b5cede5f0bd14d5d60293ba8738",
3.安装mysql
[root@master project]# ansible mysql -m yum -a 'name=mariadb* state=present'
192.168.8.133 | CHANGED => {
    "ansible_facts": {
        "discovered_interpreter_python": "/usr/libexec/platform-python"
    },
    "changed": true,
    "msg": "",
    "rc": 0,
    "results": [
        "Installed: perl-Memoize-1.03-419.el8.noarch",
        "Installed: perl-Test-Simple-1:1.302135-1.el8.noarch",
        "Installed: mariadb-3:10.3.28-1.module_el8.3.0+757+d382997d.x86_64",
        "Installed: mariadb-backup-3:10.3.28-1.module_el8.3.0+757+d382997d.x86_64",
        "Installed: zlib-1.2.11-17.el8.x86_64",
- 启动并开机自启myql
[root@master project]# ansible mysql -m service -a 'name=mariadb state=started enabled=yes'
192.168.8.133 | CHANGED => {
    "ansible_facts": {
        "discovered_interpreter_python": "/usr/libexec/platform-python"
    },
    "changed": true,
    "enabled": true,
    "name": "mariadb",
    "state": "started",
    "status": {
        "ActiveEnterTimestampMonotonic": "0",
- 查看3306端口
[root@master project]# ansible mysql -m shell -a 'ss -antl'
192.168.8.133 | CHANGED | rc=0 >>
State     Recv-Q    Send-Q       Local Address:Port        Peer Address:Port
LISTEN    0         128                0.0.0.0:111              0.0.0.0:*
LISTEN    0         32           192.168.122.1:53               0.0.0.0:*
LISTEN    0         128                0.0.0.0:22               0.0.0.0:*
LISTEN    0         5                127.0.0.1:631              0.0.0.0:*
LISTEN    0         128              127.0.0.1:6010             0.0.0.0:*
LISTEN    0         80                 0.0.0.0:3306             0.0.0.0:*
LISTEN    0         128                   [::]:111                 [::]:*
LISTEN    0         128                   [::]:22                  [::]:*
LISTEN    0         5                    [::1]:631                 [::]:*
LISTEN    0         128                  [::1]:6010                [::]:*
[root@master project]#
4.安装php服务
[root@master project]# ansible php -m yum -a 'name=php* state=present'
192.168.8.134 | CHANGED => {
    "ansible_facts": {
        "discovered_interpreter_python": "/usr/libexec/platform-python"
    },
    "changed": true,
    "msg": "",
    "rc": 0,
    "results": [
        "Installed: net-snmp-1:5.8-20.el8.x86_64",
        "Installed: autoconf-2.69-27.el8.noarch",
        "Installed: net-snmp-agent-libs-1:5.8-20.el8.x86_64",
        "Installed: php-7.2.24-1.module_el8.2.0+313+b04d0a66.x86_64",
- 修改php的配置文件
//复制php服务主机上的php文件到ansible主机上,进行修改,再传回php服务主机

[root@master project]# scp 192.168.8.134:/etc/php-fpm.d/www.conf .
[email protected]'s password:
www.conf                                                                                 100%   19KB   7.9MB/s   00:00
[root@master project]#

37 ; Note: This value is mandatory.
38 listen = 192.168.8.134:9000         //修改此行(php)

64 listen.allowed_clients = 192.168.8.132   //修改此行 (httpd)
65
//改完后从ansible主机上传回php服务主机,会自动覆盖之前的内容

[root@master project]# ansible php -m copy -a 'src="/opt/project/www.conf" dest="/etc/php-fpm.d/www.conf"'
192.168.8.134 | CHANGED => {
    "ansible_facts": {
        "discovered_interpreter_python": "/usr/libexec/platform-python"
    },
    "changed": true,
    "checksum": "f80c82233b4d20a75e0a5d8e849c8ebb918d534a",
    "dest": "/etc/php-fpm.d/www.conf",
    "gid": 0,
    "group": "root",
    "md5sum": "b7f694c7749f80b1b72bb4b69e1ac11b",
    "mode": "0644",
//在ansible主机上创建文件index.php 写好配置传到php服务主机的/var/www/目录下

[root@master project]# vim index.php
[root@master project]# cat index.php
<?php
phpinfo();
?>
[root@master project]#


//传到php服务主机的/var/www/目录下
[root@master project]# ansible php -m copy -a 'src="/opt/project/index.php" dest="/var/www/"'
192.168.8.134 | CHANGED => {
    "ansible_facts": {
        "discovered_interpreter_python": "/usr/libexec/platform-python"
    },
    "changed": true,
    "checksum": "ac638cc38f011b74a8d9a4e7d3d60358e472166c",
- 重启服务
//重启httpd服务

[root@master project]# ansible httpd -m service -a 'name=httpd state=restarted'
192.168.8.132 | CHANGED => {
    "ansible_facts": {
        "discovered_interpreter_python": "/usr/libexec/platform-python"
    },
    "changed": true,
    "name": "httpd",
    "state": "started",

//重启php服务

[root@master project]# ansible php -m service -a 'name=php-fpm state=restarted'
192.168.8.134 | CHANGED => {
    "ansible_facts": {
        "discovered_interpreter_python": "/usr/libexec/platform-python"
    },
    "changed": true,
    "name": "php-fpm",

