微服务实战:数据同步、ES搜索引擎、过滤器
搭建环境
- 前端部署到nginx中
   server {
        listen 9001;
        server_name localhost;
        location / {
            root   html/hm-mall-admin;
        }
    }
    server {
        listen 9002;
        server_name localhost;
        location / {
            root    html/hm-mall-portal;
        }
    }
- 启动nacos,创建gatway模块设置端口为10010的网关,将模块统一部署到nacos台中
  server:
      port: 10010 # 网关端口
    spring:
      application:
        name: gateway # 服务名称
      cloud:
        nacos:
          server-addr: localhost:8848 # nacos地址
        gateway:
          routes: # 网关路由配置
            - id: user-service # 路由id,自定义,只要唯一即可
             #  uri: http://127.0.0.1:8081 # 路由的目标地址 http就是固定地址
              uri: lb://userservice # 路由的目标地址 lb就是负载均衡,后面跟服务名称
              predicates: # 路由断言,也就是判断请求是否符合路由规则的条件
                - Path=/user/**  # 这个是按照路径匹配,只要以/user/开头就符合要求
                - Path=/address/**
            - id: order-service
              uri: lb://orderservice
              predicates:
                - Path=/order/**
                - Path=/pay/**
            - id: item-service
              uri: lb://itemservice
              predicates:
                - Path=/item/**
            - id: search-service
              uri: lb://searchservice
              predicates:
                - Path=/search/**
          default-filters: # 默认过滤项
            - AddRequestHeader=Truth, Itcast is freaking awesome!
          globalcors: # 全局的跨域处理
            add-to-simple-url-handler-mapping: true # 解决options请求被拦截问题
            corsConfigurations:
              '[/**]':
                allowedOrigins: # 允许哪些网站的跨域请求
                  - "http://localhost:9001"
                  - "http://localhost:9002"
                  - "http://127.0.0.1:9001"
                  - "http://127.0.0.1:9002"
                allowedMethods: # 允许的跨域ajax的请求方式
                  - "GET"
                  - "POST"
                  - "DELETE"
                  - "PUT"
                  - "OPTIONS"
                allowedHeaders: "*" # 允许在请求中携带的头信息
                allowCredentials: true # 是否允许携带cookie
                maxAge: 360000 # 这次跨域检测的有效期
商品业务(CRUD)
分页查询
根据MP提供的分页进行查询
1)在MP的官网查询分页插件,将最新版的cv到刚创建的config配置类中
2)在pageDTO封装类中定义两个属性:list和total
3)由于mp底层已经自动注入好Mapper和service层之间的关联,无需自动注入@Autowired,但是在每一个方法中都需要重写getBaseMapper(获取Mapper),但我目前使用的是自动注入Mapper
4)习惯分三层去写就没写到一块,所以在controller定义参数和返回参数类型的接口(GET)
5)路径为"/list",参数是前端给出的加注解@RequestParam,从request里面拿取值(http://localhost:8080/list?page=1&size=10),page和size就需要加@RequestParam
6)service层分实现类和接口类(解耦),实现层实现page(MP自带的),然后获取page提供的total(getTotal)和list(getRecords),将获取的结果封装到pageDTO
根据ID查询
1)创建参数为id、返回类型为实体类的接口(GET),路径为"/{id}"
http://localhost:8080/id,id就需要使用@PathVariable,相当于uri路径的占位符
2)去service层实现,调用Mapper层的方法selectById(id)
基于mp的其他查询(符合分类一致、价格范围的商品)
1)创建参数为category、minPrice、maxPrice(@RequestParam),返回类型为实体类的接口(GET)
2)去service层实现,调用条件查询方法query
- 根据id查询使用getById(id)
- 根据id查询多个listByIds(List)
- 根据复杂条件查询一个或者多个以及分页
- 一个:query().eq().ge().one()
- 多个:query().eq().ge().list()
- 分页:query().eq().ge().page(new Page(page,size))
新增商品
1)创建参数为实体类(@RequestBody)、返回类型为int或boolean的接口(请求头为POST)
@RequestBody:是用于前端传给后端的JSON格式的参数
2)service层调用Mapper层的方法insert(item)
商品的上架和下架
对商品进行修改或者删除,需要先对商品进行下架,修改完毕之后在对其下架
1)对商品上架、下架,只需要改变商品的状态
2)创建参数是id和status、返回类型是int或布尔的接口(PUT),路径:“/status/{id}/{status}”
3)service层调用Mapper层的方法updateById(item)
4)由于接收的是item实体类,需要封装对象先对其创建new,然后将前端改变的id和状态赋予对象
修改商品
1)创建参数为实体类、返回类型为int或boolean的接口(请求头为PUT)
2)service层调用Mapper层的方法updateById(item)
3)修改前需要回显数据,调用根据id查询信息的方法即可
删除商品
此处做的不是逻辑删除(没有真正意义上的删除,而是改变状态为不可用),而是从数据库直接删除一条数据
1)创建参数id、返回类型为int或boolean的接口(请求头为DELETE)
2)service层调用Mapper层的方法deleteById(id)
搜索业务(ES搜索引擎实现)
创建搜索微服务search-service,添加elasticsearch依赖、elasticsearch配置信息、注册elasticsearch的HighLevelRestClient对象,前面已经将search由网关管理
        <!-- elasticsearch依赖 -->

            org.elasticsearch.client
            elasticsearch-rest-high-level-client


            org.springframework.boot
            spring-boot-starter-web


            com.alibaba.cloud
            spring-cloud-starter-alibaba-nacos-discovery


            org.springframework.boot
            spring-boot-starter-amqp


#elasticsearch配置信息
server:
  port: 8084
spring:
  application:
    name: searchservice
  cloud:
    nacos:
      server-addr: localhost:8848
  rabbitmq:
    host: localhost
    port: 5672
    virtual-host: /
    username: itcast
    password: 123321
logging:
  level:
    com.hmall: debug
  pattern:
    dateformat: HH:mm:ss:SSS

/**  注册elasticsearch的HighLevelRestClient对象  **/
@Configuration
public class ElasticsearchConfig {
    @Bean
    public RestHighLevelClient restHighLevelClient() {
        return new RestHighLevelClient(RestClient.builder(
                HttpHost.create("http://localhost:9200")
        ));
    }
}
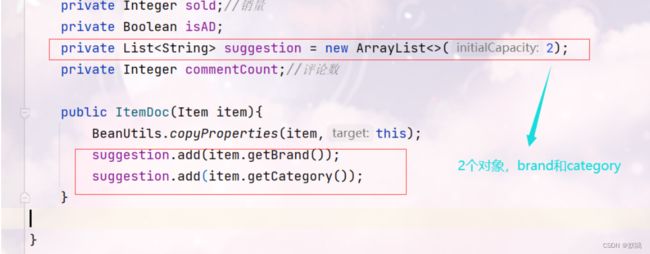
设计索引库数据结构
基本字段包括:
- 用于关键字全文检索的字段,比如All,里面包含name、brand、category信息
- 用于自动补全(suggestion)的字段,包括brand、category信息
- 分类、品牌、价格、销量、id、name、评价数量、图片
  #创建数据索引库
  PUT /hmall
  {
    "settings": {
      "analysis": {
        "analyzer": {
          "text_anlyzer": {
            "tokenizer": "ik_max_word",
            "filter": "py"
          },
          "completion_analyzer": {
            "tokenizer": "keyword",
            "filter": "py"
          }
        },
        "filter": {
          "py": {
            "type": "pinyin",
            "keep_full_pinyin": false,
            "keep_joined_full_pinyin": true,
            "keep_original": true,
            "limit_first_letter_length": 16,
            "remove_duplicated_term": true,
            "none_chinese_pinyin_tokenize": false
          }
        }
      }
    },
    "mappings": {
      "properties": {
        "id":{
          "type": "keyword"
        },
        "name":{
          "type": "text",
          "analyzer": "text_anlyzer",
          "search_analyzer": "ik_smart",
          "copy_to": "all"
        },
        "image":{
          "type": "keyword",
          "index": false
        },
        "price":{
          "type": "integer"
        },
        "category":{
          "type": "keyword",
          "copy_to": "{all}"
        },
        "brand":{
          "type": "keyword",
          "copy_to": "all"
        },
        "sold":{
          "type": "integer"
        },
        "commentCount":{
          "type": "integer"
        },
        "isAD":{
          "type": "boolean"
        },
        "all":{
          "type": "text",
          "analyzer": "text_anlyzer",
          "search_analyzer": "ik_smart"
        },
        "suggestion":{
            "type": "completion",
            "analyzer": "completion_analyzer"
        }
      }
    }
  }
完成数据批量导入
1)将商品微服务中的分页查询商品接口定义为一个FeignClient,放到feign-api模块中,此项目只暴露了分页查询接口和查询根据id查询(数据同步中的上架监听)
2)搜索服务编写一个业务,实现下面功能:
- 调用item-service提供的FeignClient(itemClient),分页查询商品 PageDTO,itemClient.list
- 将查询到的商品封装为一个ItemDoc对象,放入ItemDoc集合
- 将ItemDoc集合批量导入elasticsearch中
多线程实现批量导入,由于数据库中的数据过多,采用分页批量导入
@SpringBootTest
@RunWith(SpringRunner.class)
@Slf4j
public class InjectData {
    @Autowired
    private RestHighLevelClient esClient;
    @Autowired
    private ItemClient itemClient;

    //多线程导入es
    @Test
    public void injectDataByThread() throws IOException {
        //创建线程池
        ThreadPoolExecutor threadPool = new ThreadPoolExecutor(5, 10, 60,
                TimeUnit.SECONDS, new ArrayBlockingQueue<>(3),
                new ThreadPoolExecutor.DiscardOldestPolicy());
        //查询总条数

        Integer total = itemClient.list(1,20).getTotal().intValue();
        //计算总页数
        int pages = (int) Math.ceil((double) total / 5500);
        //分页导入数据
        for (int page = 1; page <= pages; page++) {
            PageDTO> itemPageDTO = itemClient.list(page, 3000);
            if (itemPageDTO.getList() != null && itemPageDTO.getList().size() > 0) {
                threadPool.execute(new Runnable() {
                    @Override
                    public void run() { //加入到线程池任务
                        try {
//                            List> list = userService.list();

                            // 1.创建Request
                            BulkRequest request = new BulkRequest();
                            // 2.准备参数,添加多个新增的Request
                            for (Item user : itemPageDTO.getList()) {
                                // 2.1.转换为文档类型HotelDoc
                                ItemDoc userDoc = new ItemDoc(user);
                                // 2.2.创建新增文档的Request对象
                                request.add(new IndexRequest("hmall")
                                        .id(userDoc.getId().toString())
                                        .source(JSON.toJSONString(userDoc), XContentType.JSON));
                            }
                            // 3.发送请求
                            esClient.bulk(request, RequestOptions.DEFAULT);
                            log.info("【es】thread:{},msg:本次同步 {} 条数据",
                                    Thread.currentThread().getName(), itemPageDTO.getList().size());
                        } catch (IOException e) {
                            e.printStackTrace();
                        }
                    }
                });
            }
            try {
                //延迟3秒等elasticsearch完成写入数据
                Thread.sleep(3000L);
            } catch (InterruptedException e) {
                throw new RuntimeException(e);
            }
        }
    }
}
实现搜索栏自动补全功能(suggestion)
1)创建参数为 key: 用户输入的词条前缀、返回值List:自动补全的词条集合的接口(GET),路径:/search/suggestion
2)service层实现自动补全功能,suggestion是在实体类中拼接brand和category,source是查询商品的信息

  @Override
    public List> getSuggestions(String prefix) {
        try {
            // 1.准备Request
            SearchRequest request = new SearchRequest("hmall");
            // 2.准备DSL
            request.source().suggest(new SuggestBuilder().addSuggestion(
                    "suggestions", SuggestBuilders.completionSuggestion("suggestion")
                            .prefix(prefix)
                            .skipDuplicates(true)
                            .size(10)
            ));
            // 3.发起请求
            SearchResponse response = client.search(request, RequestOptions.DEFAULT);
            // 4.解析结果
            Suggest suggest = response.getSuggest();
            // 4.1.根据补全查询名称,获取补全结果
            CompletionSuggestion suggestion = suggest.getSuggestion("suggestions");
            // 4.2.获取options
            List> options = suggestion.getOptions();
            // 4.3.遍历
            List> list = new ArrayList<>(options.size());
            for (CompletionSuggestion.Entry.Option option : options) {
                String text = option.getText().string();
                list.add(text);
            }
            return list;
        } catch (IOException e) {
            throw new RuntimeException(e);
        }
    }
实现过滤项聚合功能
分类、品牌这些过滤项目前都是写死的
1)创建参数为 RequestParams对象、返回值Map
  public class RequestParams {
        private String key;
        private Integer page;
        private Integer size;
        private String sortBy;
        //过滤条件
        private String category;
        private String brand;
        private Integer minPrice;
        private Integer maxPrice;
    }
2)service层实现过滤功能
  public Map<String, List<String>> filters(RequestParams requestParam) {
        try {
            // 1.准备请求
            SearchRequest request = new SearchRequest("hmall");
            // 2.请求参数
            // 2.1.query
            buildBasicQuery(requestParam, request);
            // 2.2.size
            request.source().size(0);
            // 2.3.聚合
            buildAggregation(request);
            // 3.发出请求
            SearchResponse response = client.search(request, RequestOptions.DEFAULT);
            // 4.解析结果
            Aggregations aggregations = response.getAggregations();
            Map<String, List<String>> filters = new HashMap<>(2);
            // 4.1.解析品牌
            List<String> brandList = getAggByName(aggregations, "brandAgg");
            filters.put("brand", brandList);
            // 4.1.解析品牌
            List<String> categoryList = getAggByName(aggregations, "categoryAgg");
            filters.put("category", categoryList);
            return filters;
        } catch (IOException e) {
            throw new RuntimeException(e);
        }
    }

     private void buildAggregation(SearchRequest request) {
            request.source().aggregation(
                    AggregationBuilders.terms("brandAgg").field("brand").size(100));
            request.source().aggregation(
                    AggregationBuilders.terms("categoryAgg").field("category").size(100));
        }

        private List<String> getAggByName(Aggregations aggregations, String aggName) {
            // 4.1.根据聚合名称,获取聚合结果
            Terms terms = aggregations.get(aggName);
            // 4.2.获取buckets
            List<? extends Terms.Bucket> buckets = terms.getBuckets();
            // 4.3.遍历
            List<String> list = new ArrayList<>(buckets.size());
            for (Terms.Bucket bucket : buckets) {
                String brandName = bucket.getKeyAsString();
                list.add(brandName);
            }
            return list;
        }

        public void buildBasicQuery(RequestParams params,SearchRequest request) {


            // 1.准备DSL
            // 2.1.准备BooleanQuery
            BoolQueryBuilder boolQuery = QueryBuilders.boolQuery();
            // 2.关键字搜索
            String key = params.getKey();
            if (key == null || "".equals(key)) {
                boolQuery.must(QueryBuilders.matchAllQuery());
            } else {
                boolQuery.must(QueryBuilders.matchQuery("all", key));
            }
            // 3.城市条件
            if (params.getCategory() != null && !params.getCategory().equals("")) {
                boolQuery.filter(QueryBuilders.termQuery("category", params.getCategory()));
            }
            // 4.品牌条件
            if (params.getBrand() != null && !params.getBrand().equals("")) {
                boolQuery.filter(QueryBuilders.termQuery("brand", params.getBrand()));
            }

            // 6.价格
            if (params.getMinPrice() != null && params.getMaxPrice() != null) {
                boolQuery.filter(QueryBuilders
                        .rangeQuery("price")
                        .gte(params.getMinPrice())
                        .lte(params.getMaxPrice())
                );
            }

            FunctionScoreQueryBuilder functionScoreQuery = QueryBuilders.functionScoreQuery(        // 原始查询,相关性算分的查询
                    boolQuery,
                    // function score的数组
                    new FunctionScoreQueryBuilder.FilterFunctionBuilder[]{
                            // 其中的一个function score 元素
                            new FunctionScoreQueryBuilder.FilterFunctionBuilder(
                                    // 过滤条件
                                    QueryBuilders.termQuery("isAD", true),
                                    // 算分函数
                                    ScoreFunctionBuilders.weightFactorFunction(10)
                            )}
            );
            // 7.放入source
            request.source().query(functionScoreQuery);

        }
        //解析结果
        private PageDTO<ItemDoc> handleResponse(SearchResponse response) {
            // 4.解析响应
            SearchHits searchHits = response.getHits();
            // 4.1.获取总条数
            long total = searchHits.getTotalHits().value;
            // 4.2.文档数组
            SearchHit[] hits = searchHits.getHits();
            // 4.3.遍历
            List<ItemDoc> list = new ArrayList<>(hits.length);
            for (SearchHit hit : hits) {
                // 获取文档source
                String json = hit.getSourceAsString();
                // 反序列化
                ItemDoc itemDoc = JSON.parseObject(json, ItemDoc.class);
                //高亮
                Map<String, HighlightField> highlightFields = hit.getHighlightFields();
                if (!CollectionUtils.isEmpty(highlightFields)) {
                    // 根据字段名获取高亮结果
                    HighlightField highlightField = highlightFields.get("name");
                    if (highlightField != null) {
                        // 获取高亮值
                        String name = highlightField.getFragments()[0].string();
                        // 覆盖非高亮结果
                        itemDoc.setName(name);
                    }
                }

                // 放入集合
                list.add(itemDoc);

            }
            // 4.4.封装返回
            return new PageDTO<>(total, list);
        }
实现基本搜索功能
需要实现的功能包括:关键字搜索,分类、品牌、价格过滤,排序,分页,高亮,竞价排名
1)创建参数为 RequestParams对象、返回值PageDTO分页结果。({ “total”: 200, “list”: [{} , {}]})的接口( POST),路径: /search/list
2)service层实现根据搜索条件搜索文档
  public PageDTO<ItemDoc> search(RequestParams requestParam) {
        try {
            //1.创建一个hotel库
            SearchRequest request = new SearchRequest("hmall");

            //3.判断给出的值是否存在,若不存在则创建为"all":"";存在则"all":"key"
            buildBasicQuery(requestParam,request);
            //高亮
            request.source().highlighter(new HighlightBuilder().field("name").requireFieldMatch(false));
            //4.分页
            int page = requestParam.getPage();
            int size = requestParam.getSize();
            request.source().from((page - 1) * size).size(size);

            String sortBy = requestParam.getSortBy();
            if ("sold".equals(sortBy)) {
                request.source().sort(sortBy, SortOrder.DESC);
            } else if ("price".equals(sortBy)) {
                request.source().sort(sortBy, SortOrder.ASC);
            }
            //发送请求
            SearchResponse response = client.search(request, RequestOptions.DEFAULT);
            //解析结果
            return handleResponse(response);
        } catch (IOException e) {
            throw new RuntimeException(e);
        }
    }
数据同步
分析流程:
将管理端和客户端的数据同步修改,管理员无意识状态下实现。基于RabbitMQ实现数据库mysql和非关系型数据库elasticsearch的数据同步,当数据管理端对商品进行修改,需要对商品进行下架,这时候商品就不能够在客户端是可以展示的状态,这个时候就需要采用监听数据才完成。
ES数据库是对商品进行查询搜索以及商品上下架的管理,当mysql数据库对商品下架,mysql中还是存有这条数据的,但是es数据库随着SQL的下架而根据id删除此数据,sql上架商品需要先查询该id是否存在,在对es添加数据。
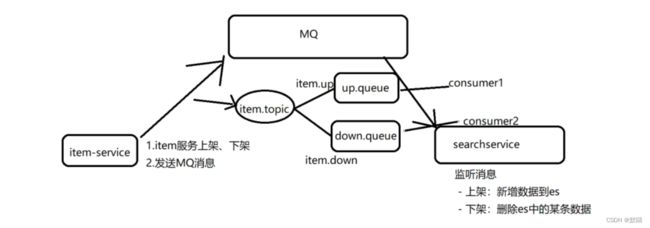
1)导入MQ的依赖和MQ的地址端口用户名和密码以及虚拟主机(前面已导入),商品的上下架在item模块已写好(改变状态:1为上架,2为下架),但是需要使用MQ同步数据,将做改动
2)声明队列和交换机以及绑定队列和交换机
/**  封装为不可变的常量  **/
public class MqConstants {
    /**
     * 交换机
     */
    public final static String HOTEL_EXCHANGE = "item.topic";
    /**
     * 监听新增和修改的队列
     */
    public final static String HOTEL_INSERT_QUEUE = "item.insert.queue";
    /**
     * 监听删除的队列
     */
    public final static String HOTEL_DELETE_QUEUE = "item.delete.queue";
    /**
     * 新增或修改的RoutingKey
     */
    public final static String HOTEL_INSERT_KEY = "item.insert";
    /**
     * 删除的RoutingKey
     */
    public final static String HOTEL_DELETE_KEY = "item.delete";
}

@Configuration
public class MqConfig {
    @Bean
    public TopicExchange topicExchange(){
        return new TopicExchange(MqConstants.HOTEL_EXCHANGE, true, false);
    }

    @Bean
    public Queue insertQueue(){
        return new Queue(MqConstants.HOTEL_INSERT_QUEUE, true);
    }

    @Bean
    public Queue deleteQueue(){
        return new Queue(MqConstants.HOTEL_DELETE_QUEUE, true);
    }

    @Bean
    public Binding insertQueueBinding(){
        return BindingBuilder.bind(insertQueue()).to(topicExchange()).with(MqConstants.HOTEL_INSERT_KEY);
    }

    @Bean
    public Binding deleteQueueBinding(){
        return BindingBuilder.bind(deleteQueue()).to(topicExchange()).with(MqConstants.HOTEL_DELETE_KEY);
    }
}
3)发送数据是在item模块进行,若是路由关键字是1则访问上架队列反之访问下架队列,采用convertAndSend向队列发送异步消息
 @Transactional
    @Override
    public void status(Long id, Integer status) {
        // update tb_item set status = ? where id = ?
        this.update().set("status", status).eq("id", id).update();

        // 根据上下架判断RoutingKey
        String routingKey = status == 1 ? "item.insert" : "item.delete";
        // 发送消息
        rabbitTemplate.convertAndSend("item.topic", routingKey, id);
    }
4)通过mq交换机中的队列监听信息
   @Component
    @Slf4j
    public class ItemListener {

        @Autowired
        private SearchServiceImpl searchService;

        @RabbitListener(bindings = @QueueBinding(
                value = @Queue(name = "item.insert.queue"),
                exchange = @Exchange(name = "item.topic", type = ExchangeTypes.TOPIC),
                key = "item.insert"
        ))
        public void listenItemUp(Long id){
            log.info("监听到新增数据");
            searchService.insertById(id);
        }

        @RabbitListener(bindings = @QueueBinding(
                value = @Queue(name = "item.delete.queue"),
                exchange = @Exchange(name = "item.topic", type = ExchangeTypes.TOPIC),
                key = "item.delete"
        ))
        public void listenItemDown(Long id){
            log.info("监听到删除数据");
            System.out.println("id = " + id);
            searchService.deleteById(id);
        }
    }
5)mq监听消息对es库中的数据进行修改
@Override
public void insertById(Long id) {
    try {
        Item item = itemClient.search(id);
        //es里面数据的id ;id(item.getId().toString()),默认是String类型
        IndexRequest request = new IndexRequest("hmall").id(item.getId().toString());
       //改为JSON格式的对象
        request.source(JSON.toJSONString(new ItemDoc(item)), XContentType.JSON);
        //提交数据
        client.index(request, RequestOptions.DEFAULT);
    } catch (IOException e) {
        throw new RuntimeException(e);
    }
}

@Override
public void deleteById(Long id) {
    try {
        DeleteRequest request = new DeleteRequest("hmall").id(id.toString());
        client.delete(request, RequestOptions.DEFAULT);
    } catch (IOException e) {
        throw new RuntimeException(e);
    }
}
注:对mq的数据进行消息转换器(序列化),存储和接收数据是一串加密的乱码,使用JSON方式来做序列化和反序列化
在publisher和consumer两个服务中都引入依赖:
<dependency>
    <groupId>com.fasterxml.jackson.dataformatgroupId>
    <artifactId>jackson-dataformat-xmlartifactId>
    <version>2.9.10version>
dependency>
配置消息转换器,在两个启动类中添加一个Bean即可:
@Bean
public MessageConverter jsonMessageConverter(){
    return new Jackson2JsonMessageConverter();
}
接收的数据就是JSON格式的
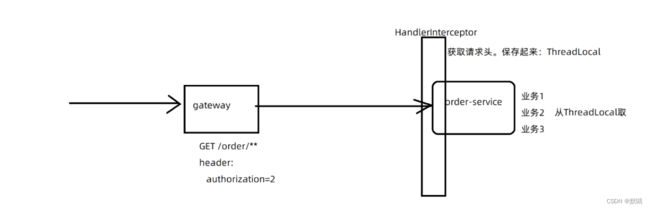
登录用户信息获取
分析:给所有请求添加用户身份(authorization = 2),由于我们这个没有实现登录登出功能,实现用户默认是id为2的用户登录,由于网关才有全局过滤器,在网关的全局配置中添加默认过滤器,不符合的将会被拦截显示503,对当前发起请求的用户进行角色区分。采用ThreadLocal保证线程安全数据共享
      default-filters: # 默认过滤项
        - AddRequestHeader=authorization, 2
由于只有网关有全局配置器配置,每一个微服务都需要获取这个请求头,这里提供一个思路:
- 在每个微服务都编写一个SpringMVC的拦截器:HandlerInterceptor
- 在拦截器中获取请求头中的authorization信息,也就是userId,并保存到ThreadLocal中
- 在后续的业务中,可以直接从ThreadLocal中获取userId
//1、从ThreadLocal中获取userId
//ThreadLocal的工具类,封装了set、get、remove方法

public class UserHolder {

    //静态常量----把tl暴露出去
    private static final ThreadLocal<Long> tl = new ThreadLocal<>();

    //静态调取,别人调用时就不需要new对象了
    public static void setUserId(Long userId){
        tl.set(userId);
    }

    //在当前线程中,get不需要传key,谁执行这行代码在线程中取就行
    public static Long getUserId(){
        return tl.get();
    }

    //清理线程中数据信息,避免哦造成内存泄漏
    public static void remove(){
        tl.remove();
    }

}

//2、在拦截器中获取请求头中的authorization信息
@Component
public class UserInterceptor implements HandlerInterceptor {
    //前置拦截:登陆用户获取
    @Override
    public boolean preHandle(HttpServletRequest request, HttpServletResponse response, Object handler) throws Exception {
        //1、获取请求头
        String header = request.getHeader("authorization");
        //判断
        if(StringUtils.isBlank(header)){
            //未登陆,抛个403
            log.warn("非法用户访问!请求路径:{}", request.getRequestURI() );
            response.setStatus(403);
            return false;
        /*    throw new RuntimeException("用户未登录");*/
        }
        //转换用户id
        //2、存入ThreadLocal
        UserHolder.setUserId(Long.valueOf(header));
        //3、放行
        return true;
    }

    //后置拦截
    @Override
    public void postHandle(HttpServletRequest request, HttpServletResponse response, Object handler, ModelAndView modelAndView) throws Exception {
        HandlerInterceptor.super.postHandle(request, response, handler, modelAndView);
    }

    //最终拦截-----最后,调个方法,做个清理
    @Override
    public void afterCompletion(HttpServletRequest request, HttpServletResponse response, Object handler, Exception ex) throws Exception {
        UserHolder.remove();
    }
}

//3、设置拦截器
@Configuration
public class MvcConfig implements WebMvcConfigurer {
    //添加拦截器——我们自己定义的拦截器
    @Override
    public void addInterceptors(InterceptorRegistry registry) {
        registry.addInterceptor(new UserInterceptor()).addPathPatterns("/**");
    }
}
当微服务之间调用时,也会被上述拦截器拦截,而Feign的调用没有经过网关,所以不会有authorization=2这个头信息。因此,我们需要给所有由Feign发起的请求都添加请求头。
//1、设置拦截器:请求头为2放行
public class MyFeignInterceptor implements RequestInterceptor {
    @Override
    public void apply(RequestTemplate requestTemplate) {
        requestTemplate.header("authorization","2");
    }
}

//2、@Bean去实现拦截器,顺便设置日志级别
@Configuration
public class FeignConfig {
    @Bean
    public RequestInterceptor requestInterceptor(){
        return new MyFeignInterceptor();
    }
    @Bean
    public Logger.Level level(){
        return Logger.Level.BASIC;
    }
}

//3、调用配置类,不必每一个模块都扫描feign,
//resources包下设置META-INF目录
org.springframework.boot.autoconfigure.EnableAutoConfiguration=com.hmall.common.config.FeignConfig
下单业务
下订单有三个表(订单表、订单详情表、订单物流表),根据用户id查询地址列表、根据addressId查询地址
创建订单接口说明:
| 请求方式 | POST |
|---|---|
| 请求路径 | /order |
| 请求方式 | POST |
| 请求参数 | { “num”: 1, # 代表购买数量 “paymentType”: 3, # 代表付款方式 “addressId”: 61, # 代表收货人地址id “itemId”: 100000003145 # 代表商品id } |
| 返回值类型 | Long,订单id |
| 接口说明 | 创建订单 |
流程如下:
- 1)根据雪花算法生成订单id(工具类)
- 2)商品微服务提供FeignClient,实现根据id查询商品的接口
- 3)根据itemId查询商品信息
- 4)基于商品价格、购买数量计算商品总价:totalFee
- 5)封装Order对象,初识status为未支付(1)
- 6)将Order写入数据库tb_order表中
- 7)将商品信息、orderId信息封装为OrderDetail对象,写入tb_order_detail表
- 8)将user-service的根据id查询地址接口封装为FeignClient
- 9)根据addressId查询user-service服务,获取地址信息
- 10)将地址封装为OrderLogistics对象,写入tb_order_logistics表
- 11)在item-service提供减库存接口,并编写FeignClient
- 12)调用item-service的减库存接口
 @Override
    public Long getOrder(OrderDto orderDto) {
        //工具类雪花算法生成订单ID
        IdWorker idWorker = new IdWorker(1,1);
        long orderId = idWorker.nextId();
        //根据itemId查询商品信息
        Long itemId = orderDto.getItemId();
        Item item = itemClient.search(itemId);
        //获取价格、购买数量
        Long price = item.getPrice();
        Integer num = orderDto.getNum();
        //计算商品总价
        long totalFee = price * num;
        //将数据封装到order对象中
        Order order = new Order();
        //支付状态为未支付、总价、支付类型、支付人(threadLocal得到的用户id)
        order.setId(orderId);
        order.setStatus(1);
        order.setTotalFee(totalFee);
        order.setPaymentType(orderDto.getPaymentType());
        order.setUserId(UserHolder.getUserId());
        //将order写入到order数据库
        save(order);

        //将orderDetail写入到orderDetail数据库
        OrderDetail orderDetail = new OrderDetail();
        BeanUtils.copyProperties(item,orderDetail);
        orderDetail.setOrderId(orderId);
        orderDetail.setId(null);
        orderDetail.setItemId(itemId);
        orderDetail.setNum(num);
        orderDetailService.save(orderDetail);

        //将orderLogistics写入到orderLogistics数据库
        Long addressId = orderDto.getAddressId();
        Address address = userClient.findAddressById(addressId);
        OrderLogistics orderLogistics = new OrderLogistics();
        BeanUtils.copyProperties(address,orderLogistics);
        orderLogistics.setOrderId(order.getId());
        orderLogisticsService.save(orderLogistics);
        //调用减库存方法
        itemClient.stock(itemId,-num);

        String message = String.valueOf(orderId);
        // 消息ID,需要封装到CorrelationData中
        CorrelationData correlationData = new CorrelationData(UUID.randomUUID().toString());
        // 发送消息
        rabbitTemplate.convertAndSend("ttl.direct", "ttl", message, correlationData);
        redisTemplate.opsForValue().set("orderId",orderId,8, TimeUnit.MINUTES);
        // 记录日志
        log.debug("发送消息成功");

        return orderId;
    }
服务端实现超时取消订单【生产者(创建订单)和消费者(支付成功或取消)】
这里可以使用延迟队列来实现,基本思路如下:
- 声明mq的队列和交换机并绑定,将消息序列化
  @Configuration
  public class MqConfig {
      @Bean
      public Queue ttlQueue(){
          return QueueBuilder.durable("ttl.queue") // 指定队列名称,并持久化
                  .ttl(1800000) // 设置队列的超时时间,1小时
                  .deadLetterExchange("dl.ttl.direct") // 指定死信交换机
                  .build();
      }

      @Bean
      public DirectExchange ttlExchange(){
          return new DirectExchange("ttl.direct");
      }

      @Bean
      public Binding ttlBinding(){
          return BindingBuilder.bind(ttlQueue()).to(ttlExchange()).with("ttl");
      }
      @Bean
      public MessageConverter jsonMessageConverter(){
          return new Jackson2JsonMessageConverter();
      }
  }
- 创建订单后,立即发送一条延迟消息(携带订单id),延迟时间(TTL)为30分钟
 // 创建消息
  String message = String.valueOf(orderId);
  // 消息ID,需要封装到CorrelationData中
  CorrelationData correlationData = new CorrelationData(UUID.randomUUID().toString());
  // 发送消息
  rabbitTemplate.convertAndSend("ttl.direct", "ttl", message, correlationData);
 //将orderId存放在redis中
 redisTemplate.opsForValue().set("orderId",orderId,30, TimeUnit.MINUTES);
  // 记录日志
  log.debug("发送消息成功");
- 编写监听者,监听延迟队列
  @Component
  @Slf4j
  public class OrderListener {
      @Autowired
      private IOrderService orderService;
      @RabbitListener(bindings = @QueueBinding(
              value = @Queue(name = "dl.ttl.queue", durable = "true"),
              exchange = @Exchange(name = "dl.ttl.direct"),
              key = "ttl"
      ))
      public void listenDlQueue(String msg){
          orderService.status(Long.valueOf(msg));
          log.info("接收到 dl.ttl.queue的延迟消息:{}", msg );
      }
  }
监听到超时信息后,业务的流程包括:
- 根据orderId查询订单
- 判断订单status是否为1
- 不为1(已支付)则丢弃
- 为1(未支付)则继续
- 根据orderId查询订单详情,得到商品购买数量
- 根据orderId修改订单status为5(取消),注意幂等判断,避免重复消息
- 调用item-service,根据商品id、商品数量恢复库存
   @Override
        public void status(Long id){
            Order order = getById(id);
            Integer status = order.getStatus();
            if(status == 1){
                LambdaQueryWrapper<OrderDetail> wrapper = new LambdaQueryWrapper<>();
                wrapper.eq(OrderDetail::getOrderId,id);
                OrderDetail orderDetail = orderDetailService.getOne(wrapper);
                Integer num = orderDetail.getNum();
                //获取redis存储的orderId
                Long redisOrderId = (Long) redisTemplate.opsForValue().get("orderId");
                if(redisOrderId != null){
                    order.setStatus(5);
                    updateById(order);
                    //将redis中的orderId删除,消费完就删除订单详情的id,保证天然幂等,避免重复消费
                    redisTemplate.delete("orderId");
                    //恢复库存数量
        itemClient.stock(orderDetail.getItemId(),num);
                    log.info("库存数量:{}",num);
                }
            }
        }

    //减库存的方法
        public void getStock(Long itemId, Integer num) {
            Item item = selectById(itemId);
            Integer stock = item.getStock();
            stock += num;
            Item item1 = new Item();
            item1.setStock(stock);
            item1.setId(itemId);
            updateById(item1);
        }
注:
前端给出的订单号和通过雪花算法的订单号长度不一致,会出现精度丢失,我采用的是使用配置类解决
@Configuration
//全局配置序列化返回 JSON 处理
public class JacksonConfig
{
    @Bean
    public MappingJackson2HttpMessageConverter jackson2HttpMessageConverter()
    {
        final Jackson2ObjectMapperBuilder builder = new Jackson2ObjectMapperBuilder();
        builder.serializationInclusion(JsonInclude.Include.NON_NULL);
        final ObjectMapper objectMapper = builder.build();
        SimpleModule simpleModule = new SimpleModule();
        // Long 转为 String 防止 js 丢失精度
        simpleModule.addSerializer(Long.class, ToStringSerializer.instance);
        objectMapper.registerModule(simpleModule);
        // 忽略 transient 关键词属性
        objectMapper.configure(MapperFeature.PROPAGATE_TRANSIENT_MARKER, true);
        return new MappingJackson2HttpMessageConverter(objectMapper);
    }
}