SpringSecurity安全框架学习、微服务处理方案
完整代码已放到Github 需要的自取
https://github.com/coder-msc/SpringSecrityDemo
创建工程案列
创建简单web工程基于Spring boot
测试案列
引入安全框架依赖

            org.springframework.boot
            spring-boot-starter-security
@RestController
@RequestMapping("/test")
public class TestController {
    @GetMapping("hello")
    public String hello(){

        return "hello Spring Security";
    }
}
启动项目访问

说明安全框架起作用了
初始化账号是user 密码是启动时控制台那一串


原理分析
就是一个过滤器链

安全框架自带得没有查数据库
自己查数据库验证的步骤如下
1、用UserDetailService接口继承UsernamePasswordAuthenticationFilter方法,重写attemptAuthentication,得到用户名密码,认证成功调用重写successfulAuthentication 不成功重写调用unsuccessfulAuthentication方法
2、PasswirdEncoder接口,数据加密接口,用于密码加密
Web项目中认证和授权
认证三种基本实现方式
(重点看第三种)
1、设置的用户名和密码
(1)配置文件
spring.security.user.name=atguigu
spring.security.user.password=atguigu

(2)配置类
创建config类
@Configuration
public class SecurityConfig  extends WebSecurityConfigurerAdapter {
    @Override
    protected void configure(AuthenticationManagerBuilder auth) throws Exception {
         //加密器 new了对象 所以需要对这个对象动手创建一下
        BCryptPasswordEncoder passwordEncoder = new BCryptPasswordEncoder();
        String password=passwordEncoder.encode("123");
        auth.inMemoryAuthentication().withUser("Lucy").password(password).roles("admin");
    }
    // new了对象 所以需要对这个对象动手创建一下
 @Bean
    PasswordEncoder passwoed(){
        return  new BCryptPasswordEncoder();
    }
}
(3)自定义编写实现类
第一步 创建配置类,设置使用那个userDetailsService实现类
第二步:编写实现类,返回User对象,User对象有用户名密码和操作权限
第一步
@Configuration
public class SecurityConfigTest extends WebSecurityConfigurerAdapter {
    @Autowired
    private UserDetailsService userdetailsService;

    @Override
    protected void configure(AuthenticationManagerBuilder auth) throws Exception {
    auth.userDetailsService(userdetailsService).passwordEncoder(password());
    }

    @Bean
    PasswordEncoder password(){
        return  new BCryptPasswordEncoder();
    }
}
第二步
//@Autowired
//    private UserDetailsService userdetailsService;
//将上面配置类中的对象注入service
@Service("userdetailsService")
public class MyUserDetailSevice implements UserDetailsService {
    @Override
    public UserDetails loadUserByUsername(String s) throws UsernameNotFoundException {
        List auths= AuthorityUtils.commaSeparatedStringToAuthorityList("roles");
        return  new User("marry",new BCryptPasswordEncoder().encode("123"),auths);
    }
}
启动项目 mary 123
整合MybatisPuls使用查询数据库方式实现
1、引入依赖

           com.baomidou
           mybatis-plus-boot-starter
           3.0.5


           mysql
           mysql-connector-java


           org.projectlombok
           lombok
创建表

创建实体类

查数据库验证
 @Autowired
    private UserMapper usermapper;

    @Override //这个username就是用户名
    public UserDetails loadUserByUsername(String username) throws UsernameNotFoundException {
    //mybatis-plus工具
        QueryWrapper wrapper=new QueryWrapper<>();
        wrapper.eq("user_name",username);
        Users users = usermapper.selectOne(wrapper);
        if(users==null){
            throw new UsernameNotFoundException("用户名不存在");
        }

        List auths= AuthorityUtils.commaSeparatedStringToAuthorityList("roles");
        return  new User(users.getUsername(),new BCryptPasswordEncoder().encode(users.getPassword()
        ),auths);
    }
完善
自定义设置登录页面
不需要认证可以访问
自定义登录页面
@Configuration
public class SecurityConfigTest extends WebSecurityConfigurerAdapter {
    @Autowired
    private UserDetailsService userdetailsService;

    @Override
    protected void configure(AuthenticationManagerBuilder auth) throws Exception {
    auth.userDetailsService(userdetailsService).passwordEncoder(password());
    }

    @Bean
    PasswordEncoder password(){
        return  new BCryptPasswordEncoder();
    }

    @Override
    protected void configure(HttpSecurity http)throws Exception{
        http.formLogin() //自定义登录页面
        .loginPage("/login/html") //登录页面设置
        .loginProcessingUrl("/user/login")// 登录访问路径
        .defaultSuccessUrl("/test/index").permitAll()//登录成功之后跳转路径
        .and()
        .authorizeRequests().antMatchers("/user/login","/","/test/hello").permitAll()//哪些路径不需要认证可直接访问
        .anyRequest().authenticated()
        .and().csrf().disable(); //关闭csrf防护
    }

}
注意: html表单必须设置成username 和password否则安全框架不识别
controller
hello不需要认证
index需要登录验证才能跳转

@RestController
@RequestMapping("/test")
public class TestController {
    @GetMapping("hello")
    public String hello(){

        return "hello Spring Security";
    }
    @GetMapping("index")
    public String index(){

        return "hello Spring index";
    }
角色访问控制(授权)
四个方法解释
1、hasAuthority方法:如果当前主体有指定权限返回true 否则返回false

   @Override
    protected void configure(HttpSecurity http)throws Exception{
        http.formLogin() //自定义登录页面
        .loginPage("/login.html") //登录页面设置
        .loginProcessingUrl("/user/login")// 登录访问路径
        .defaultSuccessUrl("/test/index").permitAll()//登录成功之后跳转路径
        .and()
        .authorizeRequests().antMatchers("/user/login","/","/test/hello").permitAll()//哪些路径不需要认证可直接访问
  //当前登录用户,只有具有admins权限才可以访问这个路径
        .antMatchers("/test/index").hasAuthority("admins")
        .anyRequest().authenticated()
        .and().csrf().disable(); //关闭csrf防护
    }

//在service中设置权限信息
 List auths=
                //手动设置这个用户的权限为admins
                AuthorityUtils.commaSeparatedStringToAuthorityList("admins");
        return  new User(users.getUserName(),
                new BCryptPasswordEncoder().encode(users.getPassword()
        ),auths);

2、hasAnyAuthority 多个角色都可访问的路径
  //当前登录用户,只有具有admins权限才可以访问这个路径
          //hasAuthority方法
//        .antMatchers("/test/index").hasAuthority("admins")
         //该路径可以被多个角色访问时 使用这个
        .antMatchers("/test/index").hasAnyAuthority("admins,manage")

3、hasRole 如果当前主体具有指定角色 返回true
注意地层源码中会给角色加前缀,因此设置角色权限时,需加上ROLE_


 List auths=
 //手动设置这个用户的权限为admins
AuthorityUtils.commaSeparatedStringToAuthorityList("admins,ROLE_sale");
 return  new User(users.getUserName(),
    new BCryptPasswordEncoder().encode(users.getPassword()
        ),auths);


4、hasAnyRole 同上 多个角色 用逗号隔开写法一样
自定义403页面
 @Override
    protected void configure(HttpSecurity http)throws Exception{
      //403自定义页面
       http.exceptionHandling().accessDeniedPage("/unauth.html");//403自定义页面
        http.formLogin() //自定义登录页面
        .loginPage("/login.html") //登录页面设置
        .loginProcessingUrl("/user/login")// 登录访问路径
        .defaultSuccessUrl("/test/index").permitAll()//登录成功之后跳转路径
        .and()
        .authorizeRequests().antMatchers("/user/login","/","/test/hello").permitAll()//哪些路径不需要认证可直接访问
         //当前登录用户,只有具有admins权限才可以访问这个路径
          //hasAuthority方法
//        .antMatchers("/test/index").hasAuthority("admins")
         //该路径可以被多个角色访问时 使用这个
        .antMatchers("/test/index").hasAnyAuthority("admins,manage")

        .anyRequest().authenticated()
        .and().csrf().disable(); //关闭csrf防护
    }
认证授权中注解的使用
在启动类上开启注解
@EnableGlobalMethodSecuriity(securedEnabled=true)

Secured注解
在controller中使用
@GetMapping("update")
   @Secured({"ROLE_sale","ROLE_manager"})
   public String update(){

       return "hello Spring update";
   }

//在userDetail中设置角色
    List auths=
               //手动设置这个用户的权限为admins
               AuthorityUtils.commaSeparatedStringToAuthorityList("admins,ROLE_sale");
       return  new User(users.getUserName(),
               new BCryptPasswordEncoder().encode(users.getPassword()
       ),auths);
   }

2、@PreAuthorize 方法访问前验证
1、在启动类上加prePostEnabled= true
@EnableGlobalMethodSecurity(securedEnabled = true,prePostEnabled = true)

2、在controller上使用 注意双引号 单引号
 @GetMapping("update")
  //  @Secured({"ROLE_sale","ROLE_manager"})
    @PreAuthorize("hasAnyAuthority('admins')")
    public String update(){
        return "hello Spring update";
    }
}
3、@PostAuthorized
方法执行之后才执行校验权限 与第二个使用相同 (单权限)
4、@PostFilter
对返回对象数据进行过滤
5、@PreFilter
对传入参数进行过滤
用户注销
1、在配置类中设置退出地址 跳转的地址
 //退出的地址   //退出跳转到的地址
http.logout().logoutUrl("/logout").logoutSuccessUrl("/test/hello").permitAll();

创建html

登录成功
退出

// 登录后可以访问别的接口

//退出登录后 不能访问接口 需要重新登录才能访问
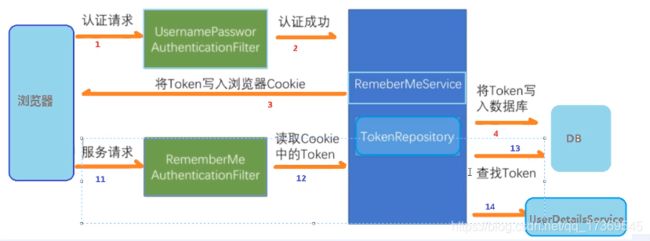
基于数据库记住我,免登录
1、自动登录
1、cookie
2、安全框架实现自动登录

//注入数据源
@Autowired
private DataSource dataSource;
//配置对象
@Bean
public PersistentTokenRepository persistentTokenRepository(){
JdbcTokenRepositoryImpl jdbcTokenRepository=new JdbcTokenRepositoryImpl();
jdbcTokenRepository.setDataSource(dataSource);
jdbcTokenRepository.setCreateTableOnStartup(true);//自动创建表
return jdbcTokenRepository;
}
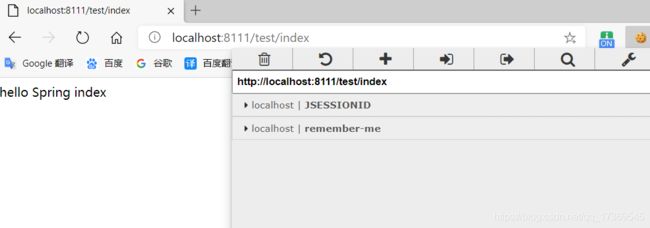
//设置记住我 必须设置成remember才能识别到
自动登录
自动建表

启动验证

关闭浏览器 在重新打开 可以访问接口
CSRF跨站请求伪造
跨站请求伪造原理 每次请求将token存储到session中,访问带着token,每次访问做比对,如果一致才能进行访问;


这个默认打开 但是GET方法不能防止
还有HEAD TRACE OPTIONS 也不能防护
只防护UPDATE DELETE SET
 .and().csrf().disable(); //关闭csrf防护
案例分析
创建controller
   @GetMapping("/toupdate")
    public String test(Model model){
        return "csrfTest.html";
    }
    @PostMapping("/update_token")
    public String getToken(){
        return "cssrf_token.html";
    }
配置类打开CSRF防护
设置登录放行路径 登录页面指定
//.and().csrf().disable(); //关闭csrf防护,默认开启的
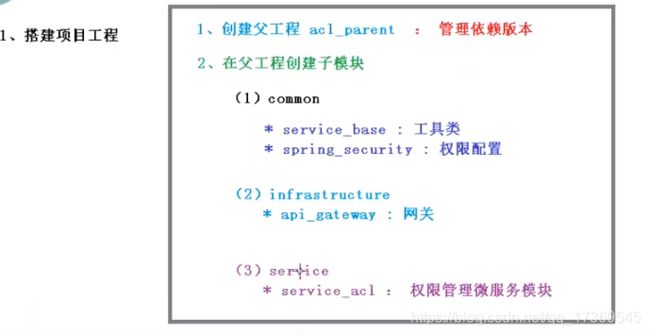
分布式项目中的安全框架用法
1、什么是微服务
微服务架构风格是一种使用一套小服务来开发单个应用的
方式途径,每个服务运行在自己的进程中,并使用轻量级
机制同学,通常是http API,这些服务基于业务能力构建,
并且能够通过自动化部署机制独立部署

优势:
微服务每个模块相当于一个单独的项目,代码量明显减少,
遇到问题相对来说比较好解决
2、微服务认证和授权实现过程
单点登录 SSO


授权
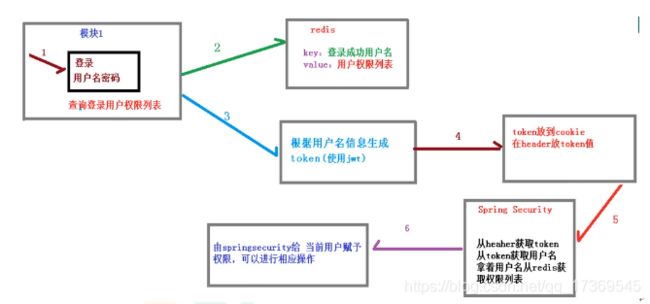
3、完成案列
微服务处理方案