NetCore微服务入门---Consul搭建
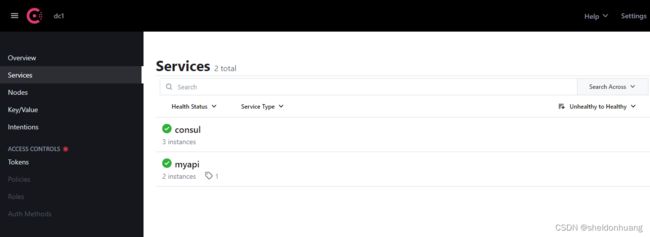
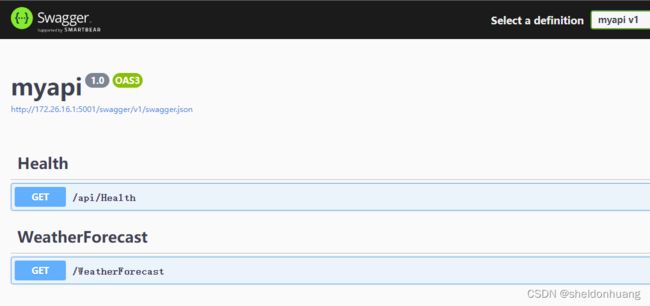
0、项目效果图
--创建后项目的网址
--172.26.16是你自己的本机IP,查看==> cmd ==>ipconfig/all
http://172.26.16.1:8500/ui/dc1/services
http://172.26.16.1:8501/ui/dc1/services
http://172.26.16.1:8502/ui/dc1/services
--需要显示swagger需要在Program.cs把swagger移除if (app.Environment.IsDevelopment())
--app.Environment.IsDevelopment()在开发模式下开启
http://172.26.16.1:5001/swagger/index.html
http://172.26.16.1:5002/swagger/index.html
1、关于Consul
作用:Consul发现注册服务,把相应的项目注册
1.1、Consul创建
--拉取镜像

Docker pull consul

--1、Start创建Service容器 创建(-bootstrap-expect 3)3个consul群组

docker run --name consulServe1 -d -p 8500:8500  consul agent -server -bootstrap-expect 3 -ui -bind=0.0.0.0 -client=0.0.0.0 -node=consulServe1

--查看容器的IP
docker inspect --format "{{ .NetworkSettings.IPAddress }}" consulServe1
--查看得172.17.0.2,创建群组需要知道第一次创建Consul的IP,以便后续同一个群组的容器创建

docker run --name consulServe2 -d -p 8501:8500  consul agent -server -bootstrap-expect 3 -ui -bind=0.0.0.0 -client=0.0.0.0 -node=consulServe2 -join=172.17.0.2

docker run --name consulServe3 -d -p 8502:8500  consul agent -server -bootstrap-expect 3 -ui -bind=0.0.0.0 -client=0.0.0.0 -node=consulServe3 -join=172.17.0.2

--1、Ended创建Service容器 创建(-bootstrap-expect 3)3个consul群组


--2、Start创建Client容器

docker run --name consulClient1 -d -p 8505:8500 consul agent -client=0.0.0.0 -bind=0.0.0.0 -node=consulClient1 -retry-join=172.17.0.2

docker run --name consulClient2 -d -p 8506:8500 consul agent -client=0.0.0.0 -bind=0.0.0.0 -node=consulClient2 -retry-join=172.17.0.2


--2、End创建Client容器
1.2、Consul命令参数说明
1.2.1、命令说明
-net=host docker参数, 使得docker容器越过了net namespace的隔离,免去手动指定端口映射的步骤
-server consul支持以server或client的模式运行, server是服务发现模块的核心, client主要用于转发请求
-advertise 将本机私有IP传递到consul
-retry-join 指定要加入的consul节点地址,失败后会重试, 可多次指定不同的地址
-client 指定consul绑定在哪个client地址上,这个地址可提供HTTP、DNS、RPC等服务,默认是>127.0.0.1
-bind 绑定服务器的ip地址;该地址用来在集群内部的通讯,集群内的所有节点到地址必须是可达的,>默认是0.0.0.0
allow_stale 设置为true则表明可从consul集群的任一server节点获取dns信息, false则表明每次请求都会>经过consul的server leader
-bootstrap-expect 数据中心中预期的服务器数。指定后,Consul将等待指定数量的服务器可用,然后>启动群集。允许自动选举leader,但不能与传统-bootstrap标志一起使用, 需要在server模式下运行。
-data-dir 数据存放的位置,用于持久化保存集群状态
-node 群集中此节点的名称,这在群集中必须是唯一的,默认情况下是节点的主机名。
-config-dir 指定配置文件,当这个目录下有 .json 结尾的文件就会被加载
-enable-script-checks 检查服务是否处于活动状态,类似开启心跳
-datacenter 数据中心名称
-ui 开启ui界面
-join 指定ip, 加入到已有的集群中
1.2.2、端口说明
8500 : http 端口,用于 http 接口和 web ui访问;
8300 : server rpc 端口,同一数据中心 consul server 之间通过该端口通信;
8301 : serf lan 端口,同一数据中心 consul client 通过该端口通信; 用于处理当前datacenter中LAN的gossip通信;
8302 : serf wan 端口,不同数据中心 consul server 通过该端口通信; agent Server使用,处理与其他datacenter的gossip通信;
8600 : dns 端口,用于已注册的服务发现;
2、项目生成(基于Asp net core 6.0创建)
2.1、创建WebApi项目,需勾选Docker选项
2.2、引入Consul包
2.3、appsettings.json配置,加入
 "ConsulSetting": {
    "consulAddress": "http://host.docker.internal:8500/", //注意,docker容器内部无法使用localhost访问宿主机器,如果是控制台启动的话就用localhost
    "serviceName": "myapi", //服务名
    "ServiceHealthApi": "/api/health", //心跳检查api
    "ServiceHealthInterval": "10", //心跳检查频率
    "ServiceHealthTimeout": "5" //心跳检查超时时间
    //"currentIp": "172.18.16.1",
    //"currentPort": "8500"
  }
2.4、新建RegisterToConsul.cs,用户标示注册的Consul信息
using Consul;

public static class RegisterToConsul
{
    ///
    /// 把本服务注册到Consul
    ///
    /// 参数配置
    /// 程序生命周期
    public static void RegToConsul(this IConfiguration configuration)
    {
        //本地IP
        //string localIP = "172.18.16.1"; // configuration["ip"];// ip 命令行参数必须传入
        本地服务端口
        //int localPort = 5011;// int.Parse(configuration["port"]);//命令行参数必须传入


        //本地IP 创建启动WebApi容器时,需要设定“IP”、“port”两个参数
        string localIP = configuration["ip"];// ip 命令行参数必须传入
        //本地服务端口
        int localPort = int.Parse(configuration["port"]);//命令行参数必须传入


        int weight = string.IsNullOrWhiteSpace(configuration["weight"]) ? 1 : int.Parse(configuration["weight"]);

        //服务名(这里通过命令行参数传入不同的服务名,模拟我们有不同的服务[其实只是同一个接口项目的不同运行实例])
        var serviceName = configuration["ConsulSetting:serviceName"];
        //心跳检查地址,本服务提供的地址
        var serviceHealthApi = configuration["ConsulSetting:ServiceHealthApi"];
        //间隔10s一次
        var serviceHealthInterval = string.IsNullOrWhiteSpace(configuration["ConsulSetting:ServiceHealthInterval"]) ? 60 : int.Parse(configuration["ConsulSetting:ServiceHealthInterval"]);
        //检测等待时间
        var serviceHealthTimeout = string.IsNullOrWhiteSpace(configuration["ConsulSetting:ServiceHealthTimeout"]) ? 10 : int.Parse(configuration["ConsulSetting:ServiceHealthTimeout"]);
        //consul地址
        //创建启动WebApi容器时,需要设定“consulhost”、“consulport”两个参数,设定注册到那个Consul
        var consulhost = configuration["consulhost"];//configuration["ConsulSetting:ConsulAddress"];
        var consulport = configuration["consulport"];
        var consulAddress = $"http://{consulhost}:{consulport}/";

        //设定从appsettings.json获取
        //var consulAddress = configuration["ConsulSetting:consulAddress"];

        var consulClient = new ConsulClient(p => { p.Address = new Uri(consulAddress); });


        //心跳检测设置
        var httpCheck = new AgentServiceCheck()
        {
            DeregisterCriticalServiceAfter = TimeSpan.FromSeconds(60), //心跳检测失败多久后注销

            Interval = TimeSpan.FromSeconds(serviceHealthInterval), //间隔多久心跳检测一次
            HTTP = $"http://{localIP}:{localPort}{serviceHealthApi}", //心跳检查地址,本服务提供的地址
            Timeout = TimeSpan.FromSeconds(serviceHealthTimeout)  //心跳检测超时时间
        };


        //注册信息
        var registration = new AgentServiceRegistration()
        {
            ID = $"{localIP}:{localPort}", //服务ID,唯一   // Guid.NewGuid().ToString(),
            Name = serviceName, //服务名(如果服务搭集群,它们的服务名应该是一样的,但是ID不一样)
            Address = $"{localIP}", //服务地址
            Port = localPort, //服务端口
            Tags = new string[] { weight.ToString() }, //服务标签,一般可以用来设置权重等本地服务特有信息
            Checks = new[] { httpCheck }, //心跳检测设置
        };

        //向Consul注册服务
        consulClient.Agent.ServiceRegister(registration).Wait();

    }
}
2.5、创建HealthController.cs
using Microsoft.AspNetCore.Mvc;
namespace myapi.Controllers
{
[ApiController]
[Route("api/[controller]")]
public class HealthController : ControllerBase
{
///
/// 健康检查接口
///
/// 2.6、Program.cs文件加入app.Configuration.RegToConsul();
......
app.UseSwagger();
app.UseSwaggerUI();

app.UseAuthorization();

//加入Consul
app.Configuration.RegToConsul();

app.MapControllers();

app.Run();
2.7、生成项目Docker
--myapi镜像名称
--此语句在项目的根目录下执行
-命令最后的“.”必须带上,否则执行失败
docker build -t myapi -f ./myapi/Dockerfile .
2.8、生成项目Dockers容器
--创建启动WebApi容器时,需要设定4个参数
--“IP”、“port”两个参数:设定自身
--“consulhost”、“consulport”两个参数:设定注册到那个Consul
docker run -d -p 5001:80 --name myservice1 myapi --ip=172.26.16.1 --port=5001 --consulhost=172.26.16.1 --consulport=8505
docker run -d -p 5002:80 --name myservice2 myapi --ip=172.26.16.1 --port=5002 --consulhost=172.26.16.1 --consulport=8506

