博客系统开发总结(一)
Preview
这个暑假本来好好地实习来着,没成想疫情突然在南京出现了,进一步的学习了下相关的知识,在小破站跟着大神学习,费了一番波折,做出了一个一般般的demo,不过能够成功的部署到阿里云这件事情真的很让我开心,嘴角疯狂上扬,还发了一个链接给朋友,难得的喜悦分享.下面相对这些学的一知半解的知识做一下稍微系统的梳理,也算是为自己以后再做相关的额项目打一个基础.
技术工具采用
-
SpringBoot
-
Thymeleaf
-
JPA
-
Semantic UI
-
html \ css \ js
-
jquery
-
三方插件(css效果,md编辑显示)
-
阿里云ECS
-
maven
-
log4j
-
final shell
-
宝塔面板
Springboot
springboot 是目前主流的java技术框架,有很强大的生态圈.借助它官网的话来讲
Spring Boot makes it easy to create stand-alone, production-grade Spring based Applications that you can "just run".
确实如此,在很大程度上开发一个demo不是自己技术有多牛逼到哪儿去,而是站在了巨人的肩膀上,要是让自己把编译好字节码再分门别类错落有致的放到服务器对应的文件,工作量确实很大.比起jsp那种前后端耦合程度稍高,接口提供麻烦的方式,还是springboot这个东西比较好,方便了开发者去做自己的demo,但是同样也加剧了行业的竞争和学生的内卷程度,哪天是个头.
Springboot 小知识点
这边看过一些分析,但是感觉各有差别,而且版本更新很快,很多东西都在做变化,我是看着2.5.3的版本,下载源码看了一下作者的注解,有再加上其他相关的资料有了下面的一些了解.其中有一些很重要的类,下面列举几个,技术有限只能做单简单的讲讲.
SpringApplication
This Class that can be used to bootstrap and launch a Spring application from a Java main method. By default class will perform the following steps to bootstrap your application
通过它我们可以来启动一个程序,调用它的静态run方法(其实是内部new出一个实例再使用)是一种方式,还有一些其他的方式也能够让我们的demo跑起来.
BeanFactory
Spring bean容器的根接口,提供获取bean,是否包含bean,是否单例与原型,获取bean类型,bean 别名的方法 。它最主要的方法就是getBean(String beanName)。
ApplicationContext
BeanFactory和ApplicationContext是Spring的两大核心接口,ApplicationContext是BeanFactory的子接口,它能提供更多的服务
Springboot启动流程
它的启动流程很复杂,能够干这么多事儿,一是有了@SpringApplication这个注解,另外就是上面提到的SpringApplication类,
1.根据类路径创建一个ApplicationContext实例它的,构造器还带有一个primarySources的参数,这个实例里包括监听器、初始化器,项目应用类型,启动类集合,类加载器
Create an appropriate ApplicationContext instance (depending on your classpath)
断言primarySources不能为null,如果为null,抛出异常提示
传入启动类的Class
判断当前项目类型,有三种:NONE、SERVLET、REACTIVE
设置ApplicationContextInitializer
设置监听器
判断主类,初始化入口类
2.实例调用run方法 这个方法可真是太复杂了
    public ConfigurableApplicationContext run(String... args) {
    //创建计时器
    StopWatch stopWatch = new StopWatch();
    //计时开始
    stopWatch.start();
    //定义上下文对象
    DefaultBootstrapContext bootstrapContext = createBootstrapContext();
    ConfigurableApplicationContext context = null;
    //Headless模式设置
    configureHeadlessProperty();
     //加载SpringApplicationRunListeners监听器
    SpringApplicationRunListeners listeners = getRunListeners(args);
    //发送ApplicationStartingEvent事件
    listeners.starting(bootstrapContext, this.mainApplicationClass);
    try {
        //封装ApplicationArguments对象
        ApplicationArguments applicationArguments = new DefaultApplicationArguments(args);
        //配置环境模块
        ConfigurableEnvironment environment = prepareEnvironment(listeners, bootstrapContext, applicationArguments);
        //根据环境信息配置要忽略的bean信息
        configureIgnoreBeanInfo(environment);
        //打印Banner标志 这边还能自定义banner
        Banner printedBanner = printBanner(environment);
        //创建ApplicationContext应用上下文
        context = createApplicationContext();
        context.setApplicationStartup(this.applicationStartup);
         //ApplicationContext基本属性配置
        prepareContext(bootstrapContext, context, environment, listeners, applicationArguments, printedBanner);
        //刷新上下文
        refreshContext(context);
        //刷新后的操作,由子类去扩展
        afterRefresh(context, applicationArguments);
        //计时结束
        stopWatch.stop();
        //打印日志
        if (this.logStartupInfo) {
            new StartupInfoLogger(this.mainApplicationClass).logStarted(getApplicationLog(), stopWatch);
        }
        //发送ApplicationStartedEvent事件,标志spring容器已经刷新,此时所有的bean实例都已经加载完毕
        listeners.started(context);
        //查找容器中注册有CommandLineRunner或者ApplicationRunner的bean,遍历并执行run方法
        callRunners(context, applicationArguments);
    }
    catch (Throwable ex) {
        //发送ApplicationFailedEvent事件,标志SpringBoot启动失
        handleRunFailure(context, ex, listeners);
        throw new IllegalStateException(ex);
    }

    try {
        //发送ApplicationReadyEvent事件,标志SpringApplication已经正在运行,即已经成功启动,可以接收服务请求。
        listeners.running(context);
    }
    catch (Throwable ex) {
        //报告异常,但是不发送任何事件
        handleRunFailure(context, ex, null);
        throw new IllegalStateException(ex);
    }
    return context;
}
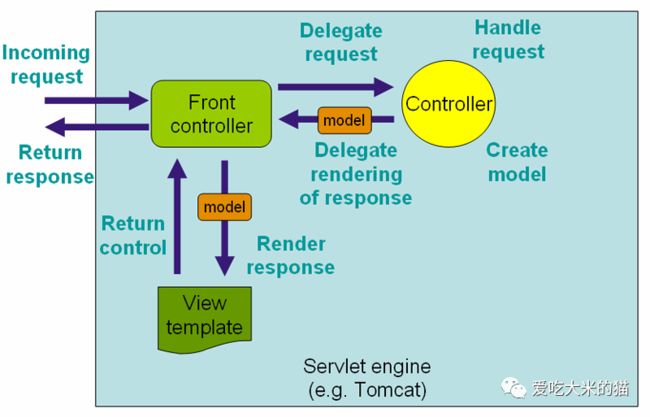
springboot处理请求
这块儿其实挺头大的,简化的使用底层是真的很复杂,这边帖一个官网的图示来稍微讲下自己的理解
-
DispatcherServlet(前端控制器)接收拦截用户请求
用户请求的url 其实被分成了 服务器域名 项目名 controller三个部分 可能还携带一些参数之类的
-
DispatcherServlet 自动调用 HandlerMapping 处理器 映射 找到对应的Handler 并将 HandlerExecution 返回
-
HandlerExecution 表示具体的 Handler
-
DispatcherServlet 调用 HandlerAdapter去执行Handler
-
Handler让具体的Controller执行一些service操作 添加一些数据到dao 的CRUD model对象的装载啥的
-
再通过HandlerAdapter把model信息啥的返回给HandlerAdapter
-
HandlerAdapter调用ViewResolver 解析视图 像thymeleaf
-
HandlerAdapter 返回View给浏览器 浏览器解析view呈现给用户
其实也就是通过一个前端控制器做公司的销售代理一样,进出都得走它这个地方,也是一种设计思想的提现吧.
欢迎关注公众号:爱吃大米的猫


