01. 开发博客项目之项目介绍
开发博客项目之项目初步开发
1. 项目介绍
1.1 目标
- 开发一个博客系统,具有博客的基本功能
- 只开发 server 端,不关心前端
1.2 需求
- 首页,作者主页,博客详情页
- 登录页
- 管理中心,新建页,编辑页
1.3 技术方案
2. 开发接口
2.1 http 请求概述
- DNS 解析,简历 TCP 连接,发送 http 请求(http 默认端口 80,https 默认端口 443)
- server 接收到 http 请求,处理,并返回
- 客户端接收到返回数据,处理数据(如渲染页面,执行 js)
2.2 处理 get 请求
- get 请求,即客户端要向 server 端获取数据,如查询博客列表
- 通过 querystring 来传递数据,如 a.html?a=100&b=200
- 浏览器直接访问,就发送 get 请求
示例代码
const http = require("http");
const { emitWarning } = require("process");
const qs = require("qs");

const server = http.createServer((req, res) => {
  console.log(req.method); // GET
  const url = req.url; // 获取请求的完整 url
  console.log(url);
  req.query = qs.parse(url.split("?")[1]); // qs 解析 query 为 JS 对象
  res.end(JSON.stringify(req.query)); // 消息发送已完成
});

server.listen(8000, () => {
  console.log("listen on 8000");
});
运行输入 http://localhost:8000/?a=100&b=erere 后,后台输出:
listen on 8000
GET
/?a=100&b=erere
GET
/favicon.ico
/favicon.ico 是浏览器自动会发送的 GET 请求。
浏览器显示结果:
2.3 处理 post 请求
- post 请求,即客户端要向服务器端传递数据,如新建博客
- 通过 post data 传递数据
- 浏览器无法直接模拟,需要手写 js,或者使用 postman
示例代码
const http = require("http");

const server = http.createServer((req, res) => {
  if (req.method === "POST") {
    // 请求的数据格式
    console.log("content-type", req.headers["content-type"]);
    // 接收数据
    let postData = "";
    // 接收数据流,req 发送数据时触发
    req.on("data", (chunk) => {
      postData += chunk.toString();
    });
    // req 传输完成时触发
    req.on("end", () => {
      console.log(postData);
      res.end("hello world"); // 在这里返回,因为是异步
    });
  }
});

server.listen(8000, () => {
  console.log("listen on port 8000");
});
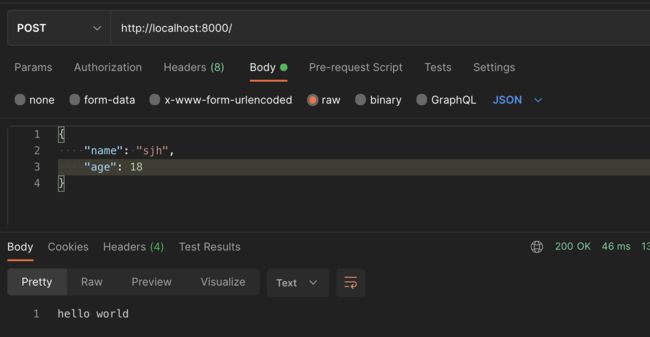
用 postman 发送请求结果:
2.4 综合案例
const http = require("http");
const qs = require("qs");

const server = http.createServer((req, res) => {
  const method = req.method;
  const url = req.url;
  const path = url.split("?")[0];
  const query = qs.parse(url.split("?")[1]);

  // 设置返回格式为 JSON
  res.setHeader("content-type", "application/json");

  // 返回的数据
  const resData = {
    method,
    url,
    path,
    query,
  };

  // 返回
  if (method === "GET") {
    // 返回 JSON 格式的字符串
    res.end(JSON.stringify(resData));
  }
  if (method === "POST") {
    let postData = "";
    req.on("data", (chunk) => {
      postData += chunk.toString();
    });
    req.on("end", () => {
      resData.postData = postData;
      res.end(JSON.stringify(resData));
    });
  }
});

server.listen(8000, () => {
  console.log("listen on port 8000");
});
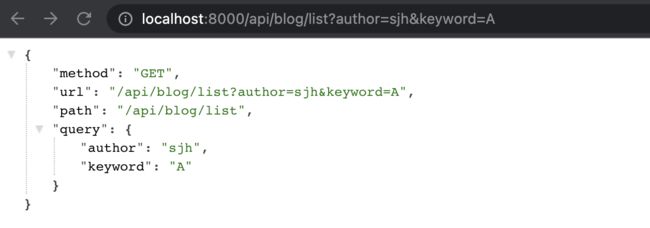
GET 返回结果:
POST 返回结果:
3. 搭建开发环境
- 从 0 开始搭建,不使用任何框架
- 使用 nodemon 监测文件变化,自动重启 node
- 使用 cross-env 设置环境变量
3.1 搭建
-
yarn init -ynode 项目初始化 -
git init初始化 Git 仓库 -
安装所需第三方库
yarn add nodemon cross-env --dev -
在
package.json里编写 scripts,简化输入的命令行指令"scripts": { "dev": "cross-env NODE_ENV=dev nodemon ./bin/www.js" },这样写完后,在命令行里
yarn dev或者npm run dev就可以代执行上面的命令。cross-env NODE_ENV=dev当前的环境为开发环境,并且有一个变量为 NODE_ENV 值为 dev。js 文件可以通过process.env.NODE_ENV来获取到 dev。nodemon ./bin/www.jsnodemon 监听 www.js 的变化,每次变化就重新自动执行。(因为自己自定义了主入口为 www.js)
3.2 代码测试搭建效果
-
在 ./bin/www.js 里写如下代码:
const http = require("http"); const { serverHandle } = require("../app"); const PORT = 8000; // 创建服务器后的回调放在 app.js 文件里 const server = http.createServer(serverHandle); // 在 8000 端口上监听 server.listen(PORT); -
在 app.js 文件里写创建服务器的回调,app.js 专注于业务代码。
const serverHandle = (req, res) => { // 设置返回格式 JSON res.setHeader("Content-type", "application/json"); const resData = { name: "sjh", site: "ssjjhh.com", env: process.env.NODE_ENV, }; res.end(JSON.stringify(resData)); }; module.exports = { serverHandle, }; -
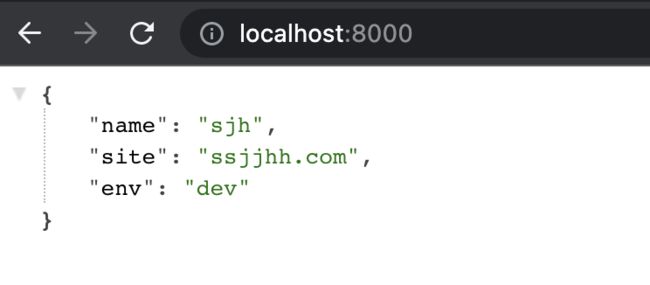
执行
yarn dev,访问本地的 8000 端口,可以得到服务器返回的 JSON 数据。
4. 初始化路由
4.1 开发接口
- 初始化路由:根据之前计数法方案的设计,做出路由
- 返回假数据:将路由和数据处理分离,已符合设计原则
通过查看路由,可以发现接口分成两大类:blog 和 user。可以通过两个文件实现六个接口。
blog 路由
先跑通是最重要的,把每个接口先写一下,返回的内容先不管。
const handleBlogRouter = (req, res) => {
  const method = req.method;

  // 获取博客列表
  if (method === "GET" && req.path === "/api/blog/list") {
    return {
      msg: "这是获取博客列表的接口",
    };
  }

  // 获取博客详情
  if (method === "GET" && req.path === "/api/blog/detail") {
    return {
      msg: "这是获取博客详情的接口",
    };
  }

  // 新建一篇博客
  if (method === "POST" && req.path === "/api/blog/new") {
    return {
      msg: "这是新建博客的接口",
    };
  }

  // 更新一篇博客
  if (method === "POST" && req.path === "/api/blog/update") {
    return {
      msg: "这是更新博客的接口",
    };
  }

  // 删除一篇博客
  if (method === "POST" && req.path === "/api/blog/del") {
    return {
      msg: "这是删除博客的接口",
    };
  }
};

module.exports = {
  handleBlogRouter,
};
user 路由
user 路由同理
const handleUserRouter = (req, res) => {
  const method = req.method;

  // 登录
  if (method === "POST" && req.path === "/api/user/login") {
    return {
      msg: "这是用户登录接口",
    };
  }
};

module.exports = {
  handleUserRouter,
};
app.js 引入路由
将两个路由引入 app.js,并经过解析得到 path 和 query 后,传递给路由。如果请求的路径路由能匹配上的话,就会返回数据,否则不返回。
意义在于,将业务功能分离,提高可维护性。
根据这个原理,如果路由都没匹配上,就是 404 未找到了。在 serverHandle 末尾进行 404 的处理。
const qs = require("qs");
const { handleBlogRouter } = require("./src/router/blog");
const { handleUserRouter } = require("./src/router/user");

const serverHandle = (req, res) => {
  // 设置返回格式 JSON
  res.setHeader("Content-type", "application/json");

  // 获取 path
  const url = req.url;
  req.path = url.split("?")[0];

  // 解析 query
  req.query = qs.parse(req.path)

  // 处理 blog 路由
  const blogData = handleBlogRouter(req, res);
  if (blogData) {
    res.end(JSON.stringify(blogData));
    // 需 return,否则会继续往下执行
    return;
  }

  // 处理 user 路由
  const userData = handleUserRouter(req, res);
  if (userData) {
    res.end(JSON.stringify(userData));
    return;
  }

  // 未命中路由:纯文本返回 404 信息
  res.writeHead(404, { "content-type": "text/plain" });
  res.write("404 not found");
  res.end();
};

module.exports = {
  serverHandle,
};
统一成功和失败的返回信息
创建 model 文件夹,创建成功和失败模型:
// src/model/resModel.js
class BaseModel {
  constructor(data, message) {
    // data 可以是对象,也可以是字符串
    if (typeof data === "string") {
      this.message = data;
      data = null;
      message = null;
    }
    if (data) {
      this.data = data;
    }
    if (message) {
      this.message = message;
    }
  }
}

/**
 * 成功信息的模型
 */
class SuccessModel extends BaseModel {
  constructor(data, message) {
    super(data, message);
    this.errno = 0;
  }
}

/**
 * 失败信息的模型
 */
class ErrorModel extends BaseModel {
  constructor(data, message) {
    super(data, message);
    this.errno = -1;
  }
}

module.exports = {
  SuccessModel,
  ErrorModel,
};
以后要返回信息,就经过模型的加工,返回的 json 结构预期如下:
{
    "errno": 0,
    "data": {...},
    "message": "xxx"
}
4.2 博客列表路由开发
现在建一个 controller 层,里边写相关的业务。因为还没连接数据库,因此先暂时返回自己造的数据。下面是获取博客列表数据的相关代码:
// src/controller/blog.js
const getList = (author, keyword) => {
  // 返回 Mock 数据(格式是正确的)
  return [
    {
      id: 1,
      title: "标题A",
      content: "内容A",
      createTime: 1654087871762,
      author: "zhangsan",
    },
    {
      id: 2,
      title: "标题B",
      content: "内容B",
      createTime: 1654087879762,
      author: "lisi",
    },
  ];
};
controller 将数据剥离后,router 里只专注数据。下面是博客列表路由的相关代码:
// src/router/blog.js
  // 获取博客列表
  if (method === "GET" && req.path === "/api/blog/list") {
    const author = req.query.author || "";
    const keyword = req.query.keyword || "";
    const listData = getList(author, keyword);
    return new SuccessModel(listData);
  }
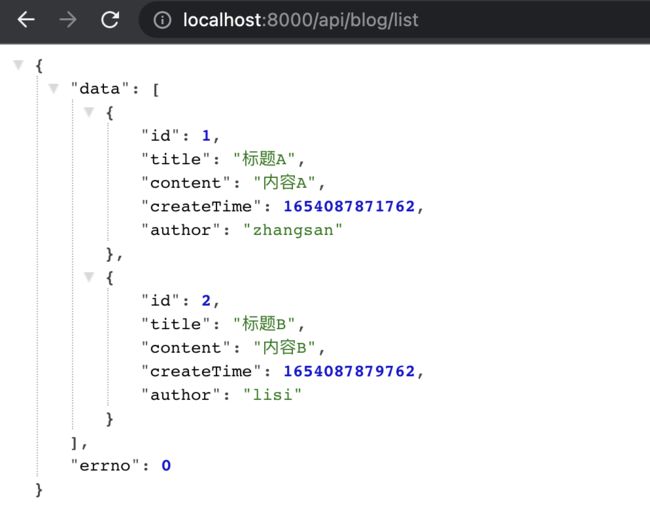
返回结果:
4.3 博客详情路由开发
// src/router/blog.js
  // 获取博客详情
  if (method === "GET" && req.path === "/api/blog/detail") {
    const id = req.query.id;
    const data = getDetail(id);
    return new SuccessModel(data);
  }
controller 和返回结果略。
4.4 路由开发之处理 POST data
app.js 里现在只有解析 path 和 query,POST data 并没有。POST 数据传输是异步的,要特意等 POST 数据传输结束后,路由的相关代码才能运行,确保拿到 POST data。
因为了方便,单独创建一个 处理 POST data 的函数。异步的方法返回 promise 后,可以使用 then/catch 会标或者 await 语法糖来处理异步请求后,才跑下面的代码。
// app.js
const getPostData = (req) => {
  return new Promise((resolve, reject) => {
    // 非 POST 请求不存在 POST data 的问题
    if (req.method !== "POST") {
      resolve({});
      return;
    }
    // 如果 POST data 不是 JSON 格式的数据,直接忽略(本项目的 POST data 都是 JSON 格式)
    if (req.headers["content-type"] !== "application/json") {
      resolve({});
      return;
    }
    let postData = "";
    req.on("data", (chunk) => {
      postData += chunk.toString();
    });
    req.on("end", () => {
      if (!postData) {
        resolve({});
        return;
      }
      resolve(JSON.parse(postData));
    });
  });
};

const serverHandle = async (req, res) => {
  // 设置返回格式 JSON
  res.setHeader("Content-type", "application/json");

  // 获取 path
  const url = req.url;
  req.path = url.split("?")[0];

  // 解析 query
  req.query = qs.parse(req.path);

  // 解析 POST data 后放在 req.body 内
  const postData = await getPostData(req);
  req.body = postData;

  // 处理 blog 路由
  const blogData = handleBlogRouter(req, res);
  if (blogData) {
    res.end(JSON.stringify(blogData));
    // 需 return,否则会继续往下执行
    return;
  }

  // 处理 user 路由
  const userData = handleUserRouter(req, res);
  if (userData) {
    res.end(JSON.stringify(userData));
    return;
  }

  // 未命中路由:纯文本返回 404 信息
  res.writeHead(404, { "content-type": "text/plain" });
  res.write("404 not found");
  res.end();
};
4.5 新建博客路由开发
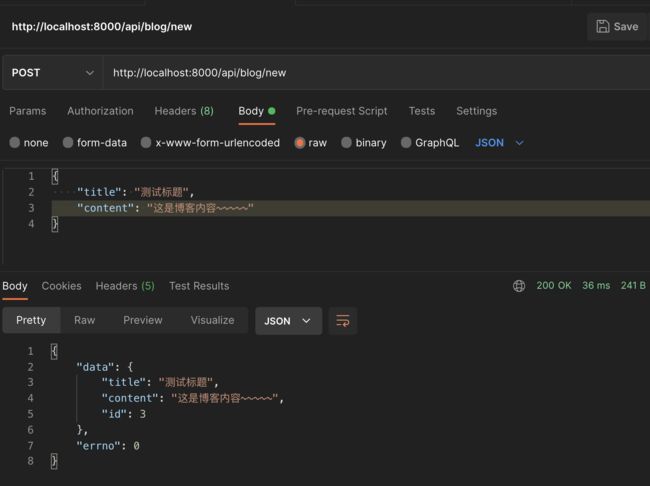
有了上面的 postData 处理后,路由可以通过 req.body 获取到 post 传递过来的数据了。
// router/blog.js
  // 新建一篇博客
  if (method === "POST" && req.path === "/api/blog/new") {
    const data = newBlog(req.body);
    return new SuccessModel(data);
  }
// controller/blog.js
const newBlog = (blogData = {}) => {
  // blogData 是一个博客对象,包含 title、content 属性
  return {
    ...blogData, // 只是演示 POST data 成功获取了
    id: 3, // 表示新建博客,插入到数据表里面的 id
  };
};
在 postman 发送 post 请求以及响应结果:
4.6 更新博客路由开发
更新路由也是用 post 方法,但是和新建博客不一样的地方是,更新博客时需要携带 id 参数才能进行修改。
// controller/blog.js
/**
 * 更新指定 id 的博客内容
 * @param {number} id 要更新博客的对应 id
 * @param {object} blogData 博客对象,包含 title、content 属性
 */
const updateBlog = (id, blogData = {}) => {
  console.log("update blog", blogData);
  return true;
};
// router/blog.js
  // 更新一篇博客
  if (method === "POST" && req.path === "/api/blog/update") {
    const result = updateBlog(id, req.body);
    if (result) {
      return new SuccessModel();
    } else {
      return new ErrorModel("更新失败");
    }
  }
4.7 删除博客路由
// controller/blog.js
const delBlog = (id) => {
  return true;
};
// router/blog.js
  // 删除一篇博客
  if (method === "POST" && req.path === "/api/blog/del") {
    const result = delBlog(id);
    if (result) {
      return new SuccessModel();
    } else {
      return new ErrorModel("删除博客失败");
    }
  }
4.8 登录路由完成
// controller/user.js
const loginCheck = (username, password) => {
  // 先使用假数据
  if (username === "admin" && password === "123456") {
    return true;
  }
  return false;
};

module.exports = {
  loginCheck
};
// router/user.js
const { loginCheck } = require("../controller/user");
const { SuccessModel, ErrorModel } = require("../model/resModel");

const handleUserRouter = (req, res) => {
  const method = req.method;

  // 登录
  if (method === "POST" && req.path === "/api/user/login") {
    const { username, password } = req.body;
    const result = loginCheck(username, password);
    if (result) {
      return new SuccessModel();
    }
    return new ErrorModel("登录失败");
  }
};

module.exports = {
  handleUserRouter,
};
4.9 路由和 API 的区别
- API:前端和后盾,不同端之间对接的一个术语
- url (路由),输入,输出
- 路由:
- API 的一部分,接口地址
- 后端系统内部的一个定义


