Spring Cloud Alibaba之集成seata1.4.2+nacos(docker部署)
一、前提版本说明:
1、springboot版本pom
        org.springframework.boot
        spring-boot-starter-parent
        2.2.4.RELEASE
2、nacos版本
2.1、server版本:1.4.0 ps:我用的比较老 反正没有出现什么问题
2.2、client项目引入:
<--项目从nacos动态读取配置需要引入-->

            com.alibaba.cloud
           spring-cloud-starter-alibaba-nacos-config
           2.2.6.RELEASE

<--项目注册到nacos需要引入-->

            com.alibaba.cloud
            spring-cloud-starter-alibaba-nacos-discovery
            2.2.6.RELEASE
3、seata版本
3.1、seata 服务端版本:1.4.2
3.2、client项目引入:
            com.alibaba.cloud
            spring-cloud-starter-alibaba-seata
            2.2.6.RELEASE
4、spring-cloud-alibaba 版本 各个对应版本 https://github.com/alibaba/spring-cloud-alibaba/wiki/%E7%89%88%E6%9C%AC%E8%AF%B4%E6%98%8E
二、进入正文
安装nacos
进入服务器 使用 :docker安装 seata
安装步骤:
1、使用docker 拉取 seata 镜像
docker pull seataio/seata-server:1.4.2 2、启动镜像:
docker run -d --name seata-server -e SEATA_IP=39.xx.xx.xx -e SEATA_PORT=8091 -p 8091:8091 seataio/seata-server:1.4.2ps:
--name seata-server 注册到nacos的话,服务名称就是seata-server,个人理解相当于springboot 配置中的(spring.application.name=product)欢迎指正。
SEATA_IP=39.xx.xx.xx 服务器的外网ip
-e SEATA_PORT=8091 seata的服务端口
-p 8091:8091 宿主机与容器的端口映射
3、查看运行容器
docker ps
红色框内 container id 后面拷贝会用到
ps:如果出现seata-server 代表启动成功
4、修改seata配置文件
4.1、拷贝容器内文件file.conf到容器外的/usr/local/seata径下
docker cp 2177b74a2b84:/seata-server/resources/file.conf /usr/local/seata/file.conf 4.2、拷贝容器内文件registry.conf到容器外的/usr/local/seata径下
docker cp 2177b74a2b84:/seata-server/resources/registry.conf /usr/local/seata/registry.confps:将 seata的两个配置文件复制到宿主机文件里面-便于更改
4.3、进入 /usr/local/seata文件夹
cd /usr/local/seata
5、更改 registry.conf 重点!!!是1.4.2版本更新的新东西(下面有需要修改的内容以及,各个属性的说明。我真是贴心.....)
5.1、registry.conf文件全部内容:
registry {
  # file 、nacos 、eureka、redis、zk、consul、etcd3、sofa
  type = "nacos"

  nacos {
    application = "seata-server"
    serverAddr = "xx.xx.xx.xx:8848"
    group = "test"
    namespace = "57b60655-ab37-48dd-9ab7-xx3c28aa8ab4"
    cluster = "default"
    username = "nacos"
    password = "nacos"
  }
  eureka {
    serviceUrl = "http://localhost:8761/eureka"
    application = "default"
    weight = "1"
  }
  redis {
    serverAddr = "localhost:6379"
    db = 0
    password = ""
    cluster = "default"
    timeout = 0
  }
  zk {
    cluster = "default"
    serverAddr = "127.0.0.1:2181"
    sessionTimeout = 6000
    connectTimeout = 2000
    username = ""
    password = ""
  }
  consul {
    cluster = "default"
    serverAddr = "127.0.0.1:8500"
    aclToken = ""
  }
  etcd3 {
    cluster = "default"
    serverAddr = "http://localhost:2379"
  }
  sofa {
    serverAddr = "127.0.0.1:9603"
    application = "default"
    region = "DEFAULT_ZONE"
    datacenter = "DefaultDataCenter"
    cluster = "default"
    group = "SEATA_GROUP"
    addressWaitTime = "3000"
  }
  file {
    name = "file.conf"
  }
}

config {
  # file、nacos 、apollo、zk、consul、etcd3
  type = "nacos"

  nacos {
    serverAddr = "xx.xx.xx.xx:8848"
    namespace = "57b60655-ab37-48dd-9ab7-xx3c28aa8ab4"
    group = "test"
    username = "nacos"
    password = "nacos"
    dataId = "seataServer.properties"
  }
  consul {
    serverAddr = "127.0.0.1:8500"
    aclToken = ""
  }
  apollo {
    appId = "seata-server"
    ## apolloConfigService will cover apolloMeta
    apolloMeta = "http://192.168.1.204:8801"
    apolloConfigService = "http://192.168.1.204:8080"
    namespace = "application"
    apolloAccesskeySecret = ""
    cluster = "seata"
  }
  zk {
    serverAddr = "127.0.0.1:2181"
    sessionTimeout = 6000
    connectTimeout = 2000
    username = ""
    password = ""
    nodePath = "/seata/seata.properties"
  }
  etcd3 {
    serverAddr = "http://localhost:2379"
  }
  file {
    name = "file.conf"
  }
}
registry.conf文件第一部分修改内容 registry.nacos属性说明:
registry.type =nacos 意思是将服务注册到nacos(registry.type指定nacos后就只设置registry.nacos中的属性就好了)
registry.nacos.application= "seata-server" seata在nacos中的服务名称
registry.nacos.serverAddr= ""xx.xx.xx.xx:8848" nacos的访问地址|端口
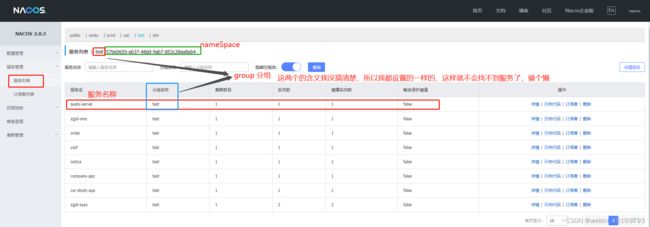
registry.nacos.group= "test" 下面有图
registry.nacos. namespace = "57b60655-ab37-48dd-9ab7-xxxc28aa8ab4" 下面有图
registry.nacos. cluster = "default" 默认就好了
registry.nacos.username = "nacos" nacos的登录账号
registry.nacos. password = "nacos" nacos的登录密码
---------------------------------------------------------------------------------------------------------------------
registry.conf文件第二部分修改内容 属性说明
config.type ="nacos" seata的配置从nacos读取,config.type ="nacos" 那就只设置config.nacos中的属性就好了
其他 参考registry.nacos (步骤5.1) 中的nacos配置
group = "test"
namespace = "57b60655-ab37-48dd-9ab7-853c28aa8ab4"
dataId = "seataServer.properties" 这个很重要
上面所有配置总结意思为:从nacos中 分组group = "test" ; 命名空间namespace = "57b60655-ab37-48dd-9ab7-853c28aa8ab4" seataServer.properties 文件中读取配置
6、
-----------------------------------------------------------
7、将修改好的文件复制回docker容器内
docker cp file.conf   2177b74a2b84:/seata-server/resources/file.conf
docker cp registry.conf  2177b74a2b84:/seata-server/resources/registry.conf
8、上传seata配置文件到nacos上传配置
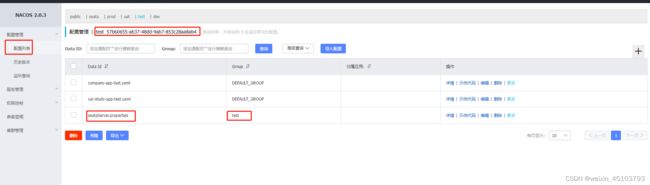
这一步的目的说明:
docker中运行的 seata-server 会从nacos中读取配置 ,如果想修改seata的配置就从nacos修改,为了方便
创建配置时要与registry.conf文件中的
----------重点-------------
registry.conf.group = "test";
registry.conf.namespace = ""57b60655-ab37-48dd-9ab7-xx3c28aa8ab4"";
dataId = "seataServer.properties"
值一定要 一 一对应起来
----------重点-------------
8.1、nacos和seata配置文件说明
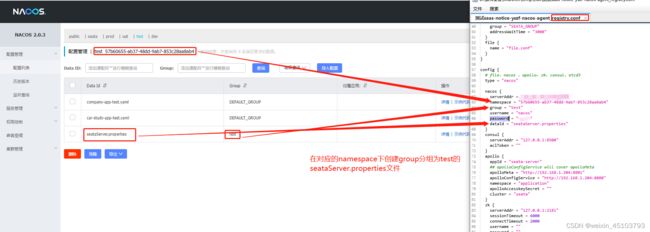
8.2、seataServer.properties配置
1、打开nacos界面新建配置文件

2、创建 seataServer.properties
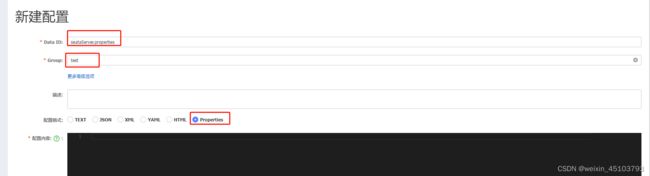
8.3、 配置内容
client.tm.defaultGlobalTransactionTimeout=60000
client.tm.degradeCheck=false
client.tm.degradeCheckAllowTimes=10
client.tm.degradeCheckPeriod=2000
client.tm.interceptorOrder=-2147482648
store.mode=db
store.lock.mode=db
store.session.mode=file
store.publicKey=
store.file.dir=file_store/data
store.file.maxBranchSessionSize=16384
store.file.maxGlobalSessionSize=512
store.file.fileWriteBufferCacheSize=16384
store.file.flushDiskMode=async
store.file.sessionReloadReadSize=100
store.db.datasource=druid
store.db.dbType=mysql
store.db.driverClassName=com.mysql.cj.jdbc.Driver
store.db.url=jdbc:mysql://xx.xx.xx.xx.com:3306/seata?useSSL=true&serverTimezone=GMT
store.db.user=seata
store.db.password=seata
store.db.minConn=5
store.db.maxConn=30
store.db.globalTable=global_table
store.db.branchTable=branch_table
store.db.distributedLockTable=distributed_lock
store.db.queryLimit=100
store.db.lockTable=lock_table
store.db.maxWait=5000
store.redis.mode=single
store.redis.single.host=127.0.0.1
store.redis.single.port=6379
store.redis.sentinel.masterName=
store.redis.sentinel.sentinelHosts=
store.redis.maxConn=10
store.redis.minConn=1
store.redis.maxTotal=100
store.redis.database=0
store.redis.password=
store.redis.queryLimit=100
server.recovery.committingRetryPeriod=1000
server.recovery.asynCommittingRetryPeriod=1000
server.recovery.rollbackingRetryPeriod=1000
server.recovery.timeoutRetryPeriod=1000
server.maxCommitRetryTimeout=-1
server.maxRollbackRetryTimeout=-1
server.rollbackRetryTimeoutUnlockEnable=false
server.distributedLockExpireTime=10000
client.undo.dataValidation=true
client.undo.logSerialization=jackson
client.undo.onlyCareUpdateColumns=true
server.undo.logSaveDays=7
server.undo.logDeletePeriod=86400000
client.undo.logTable=undo_log
client.undo.compress.enable=true
client.undo.compress.type=zip
client.undo.compress.threshold=64k
log.exceptionRate=100
transport.serialization=seata
transport.compressor=none
metrics.enabled=false
metrics.registryType=compact
metrics.exporterList=prometheus
metrics.exporterPrometheusPort=9898
tcc.fence.logTableName=tcc_fence_log
tcc.fence.cleanPeriod=1h
server.session.branchAsyncQueueSize=5000
server.session.enableBranchAsyncRemove=true
service.vgroupMapping.default_tx_group=default
service.vgroupMapping.uat_tx_group=default
service.vgroupMapping.test_tx_group=default
service.vgroupMapping.prod_tx_group=default
说明:
service.vgroupMapping.default_tx_group=default
service.vgroupMapping.uat_tx_group=default
service.vgroupMapping.test_tx_group=default
service.vgroupMapping.prod_tx_group=default
这几个配置分别对应不同的项目环境使用的事务组;配置内容很重要
---------------------------------------------其他字段说明------------------------------------------------------------
store.mode=db 意思是 seata在使用过程中开启事务时会产生临时数据以及回滚数据 使用数据库保存( 设置了 store.mode=db之后 只设置store.db的属性就可以了)
store.db.datasource = "druid"
store.db.dbType = "mysql"
store.db. driverClassName = "com.mysql.cj.jdbc.Driver"
store.db.url = "jdbc:mysql://xx.xx.xx.xx:3306/seata?useSSL=true&serverTimezone=GMT"
xx.xx.xx.xx:3306/seata 替换成自己的数据库路径
store.db.user = "seata" 数据库账号
store.db. password = "seata" 数据库密码
其他的根据需要更改.......
注意:
我使用的数据库是mysql8如果使用mysql5的话 改成的对应的
mysql8: store.db. driverClassName = "com.mysql.cj.jdbc.Driver"
mysql5: store.db. driverClassName = "com.mysql.jdbc.Driver"
事务组说明链接
9、重启 seata
docker restart 2177b74a2b8410、创建表
10.1、将你在file.conf的中设置的数据库中创建3张表
CREATE TABLE `lock_table`  (
  `row_key` varchar(128) CHARACTER SET utf8 COLLATE utf8_general_ci NOT NULL,
  `xid` varchar(96) CHARACTER SET utf8 COLLATE utf8_general_ci NULL DEFAULT NULL,
  `transaction_id` mediumtext CHARACTER SET utf8 COLLATE utf8_general_ci NULL,
  `branch_id` mediumtext CHARACTER SET utf8 COLLATE utf8_general_ci NULL,
  `resource_id` varchar(256) CHARACTER SET utf8 COLLATE utf8_general_ci NULL DEFAULT NULL,
  `table_name` varchar(32) CHARACTER SET utf8 COLLATE utf8_general_ci NULL DEFAULT NULL,
  `pk` varchar(36) CHARACTER SET utf8 COLLATE utf8_general_ci NULL DEFAULT NULL,
  `gmt_create` datetime(0) NULL DEFAULT NULL,
  `gmt_modified` datetime(0) NULL DEFAULT NULL,
  PRIMARY KEY (`row_key`) USING BTREE
) ENGINE = InnoDB CHARACTER SET = utf8 COLLATE = utf8_general_ci COMMENT = '存储锁表' ROW_FORMAT = Dynamic;

CREATE TABLE `global_table`  (
  `xid` varchar(128) CHARACTER SET utf8 COLLATE utf8_general_ci NOT NULL,
  `transaction_id` bigint(20) NULL DEFAULT NULL,
  `status` tinyint(4) NOT NULL,
  `application_id` varchar(32) CHARACTER SET utf8 COLLATE utf8_general_ci NULL DEFAULT NULL,
  `transaction_service_group` varchar(32) CHARACTER SET utf8 COLLATE utf8_general_ci NULL DEFAULT NULL,
  `transaction_name` varchar(128) CHARACTER SET utf8 COLLATE utf8_general_ci NULL DEFAULT NULL,
  `timeout` int(11) NULL DEFAULT NULL,
  `begin_time` bigint(20) NULL DEFAULT NULL,
  `application_data` varchar(2000) CHARACTER SET utf8 COLLATE utf8_general_ci NULL DEFAULT NULL,
  `gmt_create` datetime(0) NULL DEFAULT NULL,
  `gmt_modified` datetime(0) NULL DEFAULT NULL,
  PRIMARY KEY (`xid`) USING BTREE,
  INDEX `idx_gmt_modified_status`(`gmt_modified`, `status`) USING BTREE,
  INDEX `idx_transaction_id`(`transaction_id`) USING BTREE
) ENGINE = InnoDB CHARACTER SET = utf8 COLLATE = utf8_general_ci COMMENT = '分支事务表' ROW_FORMAT = Dynamic;
CREATE TABLE `branch_table`  (
  `branch_id` bigint(20) NOT NULL,
  `xid` varchar(128) CHARACTER SET utf8 COLLATE utf8_general_ci NOT NULL,
  `transaction_id` bigint(20) NULL DEFAULT NULL,
  `resource_group_id` varchar(32) CHARACTER SET utf8 COLLATE utf8_general_ci NULL DEFAULT NULL,
  `resource_id` varchar(256) CHARACTER SET utf8 COLLATE utf8_general_ci NULL DEFAULT NULL,
  `lock_key` varchar(128) CHARACTER SET utf8 COLLATE utf8_general_ci NULL DEFAULT NULL,
  `branch_type` varchar(8) CHARACTER SET utf8 COLLATE utf8_general_ci NULL DEFAULT NULL,
  `status` tinyint(4) NULL DEFAULT NULL,
  `client_id` varchar(64) CHARACTER SET utf8 COLLATE utf8_general_ci NULL DEFAULT NULL,
  `application_data` varchar(2000) CHARACTER SET utf8 COLLATE utf8_general_ci NULL DEFAULT NULL,
  `gmt_create` datetime(0) NULL DEFAULT NULL,
  `gmt_modified` datetime(0) NULL DEFAULT NULL,
  PRIMARY KEY (`branch_id`) USING BTREE,
  INDEX `idx_xid`(`xid`) USING BTREE
) ENGINE = InnoDB CHARACTER SET = utf8 COLLATE = utf8_general_ci COMMENT = '全局事务表' ROW_FORMAT = Dynamic;
10.2在你项目里连接的数据库中创建一张表
CREATE TABLE `undo_log`  (
  `id` bigint(20) NOT NULL AUTO_INCREMENT,
  `branch_id` bigint(20) NOT NULL,
  `xid` varchar(100) CHARACTER SET utf8 COLLATE utf8_general_ci NOT NULL,
  `context` varchar(128) CHARACTER SET utf8 COLLATE utf8_general_ci NOT NULL,
  `rollback_info` longblob NOT NULL,
  `log_status` int(11) NOT NULL,
  `log_created` datetime(0) NOT NULL,
  `log_modified` datetime(0) NOT NULL,
  `ext` varchar(100) CHARACTER SET utf8 COLLATE utf8_general_ci NULL DEFAULT NULL,
  PRIMARY KEY (`id`) USING BTREE,
  UNIQUE INDEX `ux_undo_log`(`xid`, `branch_id`) USING BTREE
) ENGINE = InnoDB AUTO_INCREMENT = 5 CHARACTER SET = utf8 COLLATE = utf8_general_ci ROW_FORMAT = Dynamic;
三、项目内配置文件:
1、yml配置
这是application-dev.yml
seata.service.vgroupMapping.default_tx_group: default
seata.tx-service-group: default_tx_group
必须是一个值

如果uat环境可以更改值--前提必须 seataServer.properties 文件内有这个值(8.3步骤后面红色说明!)
seata.service.vgroupMapping.uat_tx_group: default
seata.tx-service-group: uat_tx_group
#分布式事务 seata 配置
seata:
  service:
    vgroupMapping:
      default_tx_group: default  #default_tx_group分组名称必须要跟tx-service-group的值一样
  #指定事务分组 分组必须在 nacos seataServer.properties配置中有
  tx-service-group: default_tx_group
  config:
    type: nacos
    nacos:
      #nacos地址
      serverAddr: xx.xx.xx.xx:8848
      group: test
      namespace: 57b60655-ab37-48dd-9ab7-853c28aa8ab4
      userName: nacos
      password: nacos
      #读取配置文件的 dataId 重要!!!!
      dataId: "seataServer.properties"
  registry:
    type: nacos
    nacos:
      application: seata-server
      server-addr: xx.xx.xx.xx:8848
      group: test
      namespace: 57b60655-ab37-48dd-9ab7-853c28aa8ab4
      userName: nacos
      password: nacos
2、@GlobalTransactional 添加注解开启事务
@RestController
@RequestMapping("/locationTest")
public class LocationTest {


    @RequestMapping("/testEmail")
    @UnLogin
    @GlobalTransactional
    public int testEmail() {
        System.out.println(1);
        return 1;
    }

}
3、测试事务开启

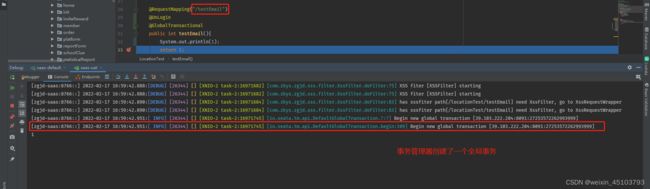
4、docker内seata日志文件打印正常
查看日志命令:docker logs 2177b74a2b84(容器id-container Id)
5、数据库配置的全局事务id保存
作者说明:
当做笔记写的,如有不对的地方,欢迎批评指正
项目路径:alibaba-cloud-demo: 微服务demo