SpringBoot+Vue+Security旧系统改造OAuth2统一认证方案
文章目录
- 前言
- 一、单点登录是什么?
- 二、使用步骤
-
- 1.申请第三方AppId和AppKey
- 2.引入maven库
- 2.yml配置
- 3.后台接口
-
- 1.新的登录接口
- 2.单点回调接口
- 3.工具类
- 4.修改Security的配置
- 4.前端登录逻辑
-
- 1.Router拦截配置(访问页面路由时会被拦截)
- 2.Axios拦截配置(请求接口时会被拦截)
- 总结
前言
很老的独立系统突然说要改造接入三方登录方式,一脸懵逼。阿巴阿巴阿吧
一、单点登录是什么?
鬼大爷晓得!!!阿巴阿巴阿吧
二、使用步骤
1.申请第三方AppId和AppKey
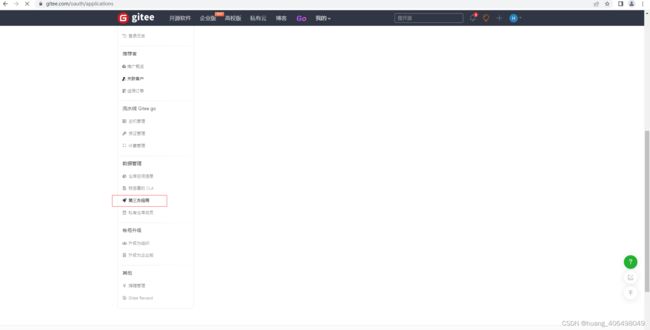
举个码云的例子:

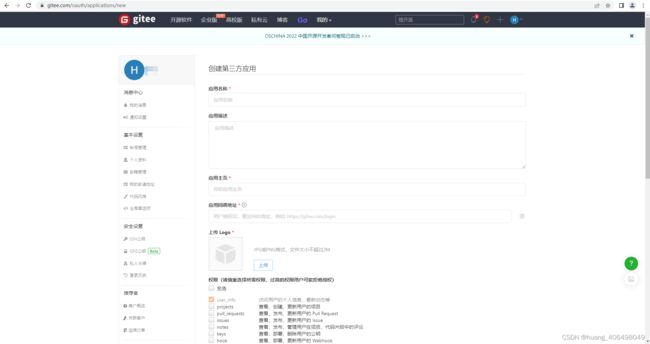
找到设置中的这个功能,点击创建应用就行了。

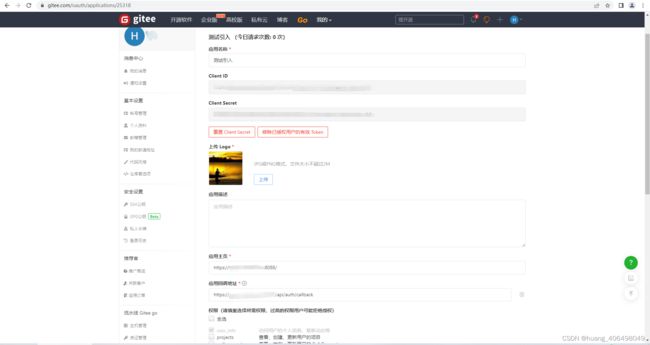
回调地址需要注意不要写错了,要跟系统部署后的真实访问地址一致。

就这个鸟样。
2.引入maven库
后台需要用到的工具包,直接搞到pom.xml里头,版本随意调整:
<!--httpclient-->
<dependency>
  <groupId>org.apache.httpcomponents</groupId>
  <artifactId>httpclient</artifactId>
  <version>4.5.13</version>
</dependency>

<dependency>
	<groupId>org.apache.httpcomponents</groupId>
	<artifactId>httpmime</artifactId>
	<version>4.5.13</version>
</dependency>

<!--阿里 JSON-->
<dependency>
  <groupId>com.alibaba</groupId>
  <artifactId>fastjson</artifactId>
  <version>1.2.47</version>
</dependency>
2.yml配置
增加配置如下(示例):
sso:
  oauth:
    clientId: 'appid'
    clientSecret: 'appkey'
    callbackUrl: '老系统回调地址(例:http://127.0.0.1:8080/home)'
    codeUrl: '单点获取授权的接口(例:http://x.x.x.x:xx/oauth/authorize?client_id={clientId}&redirect_uri={callbackUrl}&response_type=code&state={state}&scope=read)'
    tokenUrl: '单点获取token的接口 (例:http://x.x.x.x:xx/oauth/token?grant_type=authorization_code&client_id={clientId}&client_secret={clientSecret}&code={code}&redirect_uri={callbackUrl})'
    userInfoUrl: '单点获取用户信息的接口(例:http://x.x.x.x:xx/api/user/v2/userinfo?access_token={accessToken})'
3.后台接口
1.新的登录接口
import java.io.IOException;
import java.net.URLEncoder;
import java.security.Principal;
import java.util.UUID;

import javax.servlet.http.Cookie;
import javax.servlet.http.HttpServletRequest;
import javax.servlet.http.HttpServletResponse;
import javax.servlet.http.HttpSession;

import org.springframework.beans.factory.annotation.Autowired;
import org.springframework.beans.factory.annotation.Value;
import org.springframework.security.authentication.UsernamePasswordAuthenticationToken;
import org.springframework.security.core.context.SecurityContextHolder;
import org.springframework.security.core.userdetails.UserDetails;
import org.springframework.security.web.authentication.WebAuthenticationDetailsSource;
import org.springframework.stereotype.Controller;
import org.springframework.util.ObjectUtils;
import org.springframework.web.bind.annotation.GetMapping;
import org.springframework.web.bind.annotation.RequestMapping;
import org.springframework.web.bind.annotation.ResponseBody;

import com.alibaba.fastjson.JSON;
import com.alibaba.fastjson.JSONObject;
/**
    * 请求授权页面
    */
@GetMapping(value = "/auth/login")
public void authLogin(HttpSession session, HttpServletResponse response) throws IOException {
    // 用于第三方应用防止CSRF攻击
    String uuid = UUID.randomUUID().toString().replaceAll("-", "");
    session.setAttribute("state", uuid);

    // 获取Authorization Code
    String url = ssoProp.codeUrl.replace("{clientId}", ssoProp.clientId)
            .replace("{callbackUrl}", URLEncoder.encode(ssoProp.callbackUrl, "utf-8"))
            .replace("{state}", uuid);
	// 重定向到统一认证授权页面
    response.sendRedirect(url);
}
2.单点回调接口
import java.io.IOException;
import java.net.URLEncoder;
import java.security.Principal;
import java.util.UUID;

import javax.servlet.http.Cookie;
import javax.servlet.http.HttpServletRequest;
import javax.servlet.http.HttpServletResponse;
import javax.servlet.http.HttpSession;

import org.springframework.beans.factory.annotation.Autowired;
import org.springframework.beans.factory.annotation.Value;
import org.springframework.security.authentication.UsernamePasswordAuthenticationToken;
import org.springframework.security.core.context.SecurityContextHolder;
import org.springframework.security.core.userdetails.UserDetails;
import org.springframework.security.web.authentication.WebAuthenticationDetailsSource;
import org.springframework.stereotype.Controller;
import org.springframework.util.ObjectUtils;
import org.springframework.web.bind.annotation.GetMapping;
import org.springframework.web.bind.annotation.RequestMapping;
import org.springframework.web.bind.annotation.ResponseBody;

import com.alibaba.fastjson.JSON;
import com.alibaba.fastjson.JSONObject;
/**
* 授权回调
*/
@GetMapping(value = "/auth/callback")
public void authCallback(HttpServletRequest request, HttpServletResponse response) throws Exception {
    HttpSession session = request.getSession();
    // 得到Authorization Code
    String code = request.getParameter("code");
    // 我们放在地址中的状态码
    String state = request.getParameter("state");
    String uuid = (String) session.getAttribute("state");

    // 验证信息我们发送的状态码
    if (null != uuid && uuid.equals(state)) {
        // 状态码不正确,直接返回登录页面
    }

    // 通过Authorization Code获取Access Token
    String url = ssoProp.tokenUrl.replace("{clientId}", ssoProp.clientId)
            .replace("{clientSecret}", ssoProp.clientSecret)
            .replace("{code}", code)
            .replace("{callbackUrl}", ssoProp.callbackUrl);
    JSONObject accessTokenJson = SsoHttpClient.getAccessToken(url);

    if (ObjectUtils.isEmpty(accessTokenJson)) {
        throw new RuntimeException();
    }

    // 获取用户信息
    url = ssoProp.userInfoUrl.replace("{accessToken}", (String)accessTokenJson.get("access_token"));
    JSONObject jsonObject = SsoHttpClient.getUserInfo(url);
	System.out.println(JSON.toJSONString(jsonObject));
    /**
     * 获取到用户信息之后,就该写你自己的业务逻辑了
     */
	// 这里随便模拟一下admin账号登录,我用的 spring security 其他权限框架的写法自己百度
	// import org.springframework.security.core.userdetails.UserDetails;
	UserDetails userDetails = userDetailsService.loadUserByUsername("admin");
	UsernamePasswordAuthenticationToken authentication =
			new UsernamePasswordAuthenticationToken(userDetails, null, userDetails.getAuthorities());
	SecurityContextHolder.getContext().setAuthentication(authentication);
	// 登录完成随便重定向到自己的前端首页地址
	response.sendRedirect("http://127.0.0.1:8080/home");
}
3.工具类
import java.io.IOException;

import org.apache.http.HttpEntity;
import org.apache.http.HttpResponse;
import org.apache.http.client.HttpClient;
import org.apache.http.client.methods.HttpGet;
import org.apache.http.client.methods.HttpPost;
import org.apache.http.impl.client.CloseableHttpClient;
import org.apache.http.impl.client.HttpClients;
import org.apache.http.util.EntityUtils;

import com.alibaba.fastjson.JSONObject;


public class SsoHttpClient {

    /**
     * 获取Access Token
     * post
     */
    public static JSONObject getAccessToken(String url) throws IOException {
        HttpClient client = HttpClients.createDefault();
        HttpPost httpPost = new HttpPost(url);
        httpPost.setHeader("User-Agent", "Mozilla/5.0 (Windows NT 10.0; Win64; x64) AppleWebKit/537.36 (KHTML, like Gecko) Chrome/58.0.3029.110 Safari/537.36");
        HttpResponse response = client.execute(httpPost);
        HttpEntity entity = response.getEntity();
        if (null != entity) {
            String result = EntityUtils.toString(entity, "UTF-8");
            return JSONObject.parseObject(result);
        }
        httpPost.releaseConnection();
        return null;
    }

    /**
     * 获取用户信息
     * get
     */
    public static JSONObject getUserInfo(String url) throws IOException {
        JSONObject jsonObject = null;
        CloseableHttpClient client = HttpClients.createDefault();

        HttpGet httpGet = new HttpGet(url);
        httpGet.setHeader("User-Agent", "Mozilla/5.0 (Windows NT 10.0; Win64; x64) AppleWebKit/537.36 (KHTML, like Gecko) Chrome/58.0.3029.110 Safari/537.36");
        HttpResponse response = client.execute(httpGet);
        HttpEntity entity = response.getEntity();

        if (entity != null) {
            String result = EntityUtils.toString(entity, "UTF-8");
            jsonObject = JSONObject.parseObject(result);
        }

        httpGet.releaseConnection();

        return jsonObject;
    }
}
import org.springframework.beans.factory.annotation.Value;
import org.springframework.stereotype.Component;

@Component
public class SsoProp {

    @Value("${sso.oauth.clientId}")
    public String clientId;

    @Value("${sso.oauth.clientSecret}")
    public String clientSecret;

    @Value("${sso.oauth.callbackUrl}")
    public String callbackUrl;

    @Value("${sso.oauth.codeUrl}")
    public String codeUrl;

    @Value("${sso.oauth.tokenUrl}")
    public String tokenUrl;

    @Value("${sso.oauth.userInfoUrl}")
    public String userInfoUrl;

}
4.修改Security的配置
增加配置:
@Override
protected void configure(HttpSecurity http) throws Exception {
	http.antMatcher("/**").authorizeRequests()
	// 放开新写的两个接口免登录
	.antMatchers("/auth/login","/auth/callback").permitAll()
	.anyRequest().authenticated();
}
4.前端登录逻辑
1.Router拦截配置(访问页面路由时会被拦截)
import axios from 'axios'
router.beforeEach((to, from, next) => {
	// 可以尝试获取用户信息
	axios.get('api/user').then((res) => {
		if (!res) {
			// 没获取到用户信息 就反手跳转到新的登录接口。
			window.location.href = 'api/auth/login';
		} else {
			// 有用户信息就说明登录过了,直接放行。
			next()
		}
	}
}
2.Axios拦截配置(请求接口时会被拦截)
axios拦截配置(请求接口时会被拦截)
const service = axios.create({
  baseURL:  process.env.VUE_APP_BASE_API, // url = base url + request url
  timeout: 60000 // request timeout
})

// response interceptor
service.interceptors.response.use(
  response => {
    const res = response.data
    if (res.code !== 200) {
      Message({
        message: res.message || 'Error',
        type: 'error',
        duration: 5 * 1000
      })
    } else {
      return res
    }
  },
  function(error) {
  	// 未登录时访问未加入白名单的接口会进入这里
    if (!error.response.data.code) {
   	  // 随便抛的个异常提示
      Message({
        message: error.response.statusText,
        type: 'error',
        duration: 5 * 1000
      })
    } else if (error.response.data.code === 403) {
    // 返回的code自己定义的 我这里未登录返回的403,一旦接口返回403 就跳转到新的登录接口,登录接口会自动重定向到统一认证页面。
      window.location.href = 'api/auth/login';
    }
    return Promise.reject(error)
  }
)
总结
有些地方可能写错,毕竟复制过来要手动改的,自己看着改改,别直接复制,至于账号怎么同步自己写,仅供参考。