2.SpringCloud:Nacos注册中心+OpenFeign+Loadbalancer
目录
概述
源代码工程结构
工程全局pom.xml
payment模块(即一个支付服务)
order模块(即一个订单服务)
启动与验证
启动payment服务
启动order服务
查看Nacos
调用验证
附1:Nacos隔离三层概念
附2:显式与Nacos注册中心交互
概述
- 服务提供方:payment
- 服务消费方:order服务(需要调用payment服务)
- 以上均在一个project工程,但分属不同的模块module
- nacos服务端已经安装完毕并启动。
源代码工程结构
---- Project
∟ payment [module]
∟ order [module]
∟ pom.xml [全局pom文件]
工程全局pom.xml
通过全局pom.xml配置各模块需要的依赖的信息
    4.0.0


        org.springframework.boot
        spring-boot-starter-parent
        2.6.6


        payment
        order


    com.example
    myproject-global-pom
    0.0.1-DEFAULT
    pom
    This is my project global pom config

        1.8
        3.1.5
        2021.0.4.0


            org.springframework.boot
            spring-boot-starter


            org.springframework.boot
            spring-boot-starter-web


            com.alibaba.cloud
            spring-cloud-starter-alibaba-nacos-discovery
            ${springcloudalibaba.version}


                    com.alibaba.nacos
                    nacos-client


            com.alibaba.nacos
            nacos-client
            1.4.5


            org.springframework.cloud
            spring-cloud-starter-openfeign
            ${springcloud.version}


            org.springframework.cloud
            spring-cloud-starter-loadbalancer
            ${springcloud.version}


                org.springframework.boot
                spring-boot-maven-plugin
payment模块(即一个支付服务)
该payment模块的pom.xml文件如下:
        myproject-global-pom
        com.example
        0.0.1-DEFAULT
        ../pom.xml

    4.0.0
    payment
    0.2.2-SNAPSHOT
该payment模块的application.properties配置文件
#本服务的默认监听端口
server.port=8080

spring.application.name=payment

#Nacos注册中心服务端的地址和端口(形式ip:port,ip:port,...) 在启动时,会向多个地址都发起注册
spring.cloud.nacos.discovery.server-addr=39.100.80.168:8848

#如定义了此属性,则nacos取此名作为服务名,否则取spring.application.name作为默认服务名
spring.cloud.nacos.discovery.service=paymentService
关于springcloud中nacos客户端更多的配置项可参加nacos官网(关于 Nacos Starter 更多的配置项信息):https://github.com/alibaba/spring-cloud-alibaba/wiki/Nacos-discovery
在package=com.example.payment下,SpringBoot 主类PaymentApplication.class中增加一个@EnableDiscoveryClient注解:开启服务注册发现机制
@SpringBootApplication
@EnableDiscoveryClient
public class PaymentApplication {
    public static void main(String[] args) {
        SpringApplication.run(PaymentApplication.class, args);
    }
}
新建一个controller用于模拟资金支付逻辑。 在package=com.example.payment.contronller下新增一个类如下:
@RestController
public class PaymentController {
    @Value("${server.port}")
    private int myport;

    @GetMapping("/dopay/{orderid}")
    public ResponseEntity paylogic(@PathVariable("orderid") Long orderid) {
        return ResponseEntity.ok("支付服务successful! orderid=" + orderid + ", 支付成功。 支付服务的端口为port=" + myport );
    }
}
order模块(即一个订单服务)
该order模块的pom.xml文件如下:
        myproject-global-pom
        com.example
        0.0.1-DEFAULT
        ../pom.xml

    4.0.0
    order
    1.0-SNAPSHOT
该order模块的application.properties配置文件
#本服务的默认监听端口
server.port=4444

spring.application.name=customerOrder

#Nacos服务端的地址和端口(形式ip:port,ip:port,...)
spring.cloud.nacos.discovery.server-addr=39.100.80.168:8848

#如定义了此属性,则nacos取此名作为服务名,否则取spring.application.name作为默认服务名
spring.cloud.nacos.discovery.service=orderService

#向Nacos注册时,本服务对外暴露的IP地址 (若不配置,则从本机上的网卡自动选择作为对外暴露的IP)
#spring.cloud.nacos.discovery.ip=x.x.x.x
关于springcloud中nacos客户端更多的配置项可参加nacos官网(关于 Nacos Starter 更多的配置项信息):https://github.com/alibaba/spring-cloud-alibaba/wiki/Nacos-discovery
在package=com.example.order下,SpringBoot 主类OrderApplication.class中增加两个注解,分别开启服务注册发现机制,OpenFeign客户端
@SpringBootApplication
@EnableDiscoveryClient
@EnableFeignClients
public class OrderApplication {
    public static void main(String[] args) {
        SpringApplication.run(OrderApplication.class, args);
    }
}
定义openFeign客户端接口(package=com.example.order.feignclients)。只需要定义interface即可,无需手动实现。
@FeignClient(value = "paymentService")    // Feign客户端制定目标服务的名字(根据此名字从注册中心订阅具体的服务实例信息)
public interface IPaymentServiceClient {

    @GetMapping("/dopay/{payid}")  // 目标服务(服务提供方)的内具体的调用URL路径
    public ResponseEntity dodopay(@PathVariable("payid") Long payid);
}
新建一个controller用于模拟订单处理。 在package=com.example.order.contronller下新增一个类如下:
@RestController
public class OrderController {

    @Autowired
    private IPaymentServiceClient paymentServiceClient;

    @GetMapping("/consumer/{orderid}")
    public ResponseEntity consumerFeign( @PathVariable("orderid") Long orderid) {
        return ResponseEntity.ok ("调用订单模拟服务完成。 订单orderid:" + orderid + ",   调用返回的Body:" + paymentServiceClient.dodopay(orderid).getBody() );
    }
}
启动与验证
在maven中分别对payment和order模块分别进行package打包,然后启动。
启动payment服务
对payment启动两个实例,服务端口分别为8888和9999.
 java -jar payment-0.2.2-SNAPSHOT.jar --server.port=8888

 java -jar payment-0.2.2-SNAPSHOT.jar --server.port=9999
启动order服务
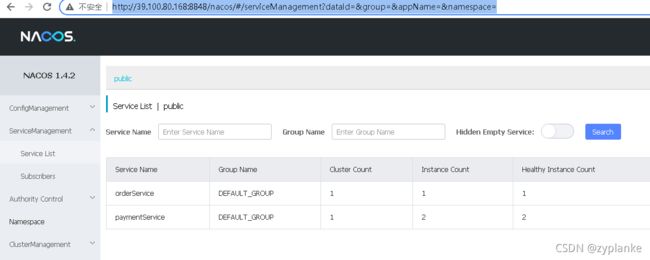
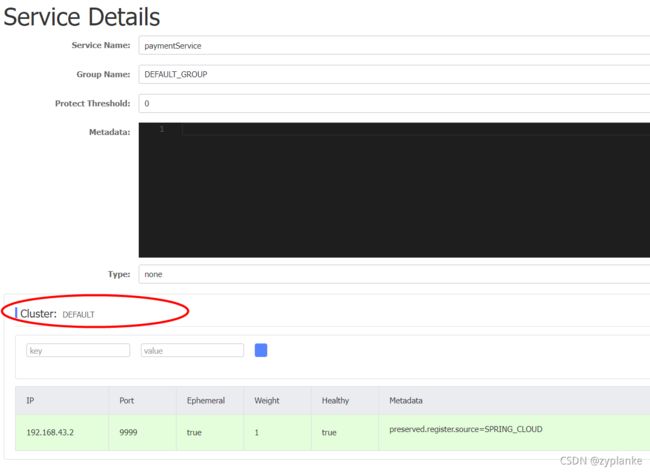
java -jar order-1.0-SNAPSHOT.jar查看Nacos
这是从Nacos可以看到paymentService和orderService有两个服务。其中paymentService有两个实例
调用验证
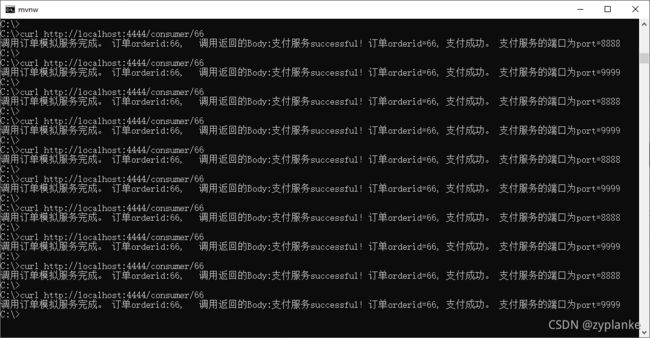
curl http://localhost:4444/consumer/66调用结果如下,可以看到paymentService两个实例轮训交替提供服务。这是应为openFeign使用spring could loadbalance组件,该组件默认是使用RR轮训算法。
另外:如果在springboot启动时,配置了--logging.level.root=DEBUG属性开启debug日志,可以发现openfeign调用时在http协议具体属性,比如可观察到开启了keep-alive。
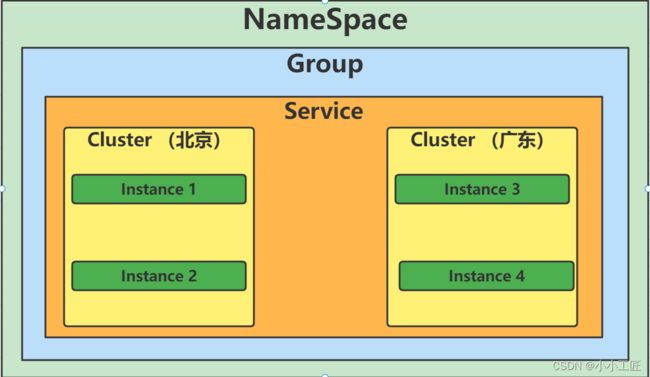
附1:Nacos隔离三层概念
如下图:
- namespace:可用于资源完全隔离,不同namespace下的config配置资源不共享,服务不互通(无法发现找到)。可通过namespace实现多租户隔离
- group:可用于资源分组。在同一namespace下,不同group的config配置资源不共享,服务不互通(无法无法发现找到)。可通过group实现不同环境隔离
- cluster_name:区分服务实例所在集群。在同一namespace下,同一group下,不同cluster的服务是互通的(可相互访问)。可通过不同cluster识别服务运行的不同集群或数据中心。服务注册发现存在此概念,config配置不存在此概念。
注意1:注册中心和配置中心的Group两者是不同的,各自管各自。
注意2:以上层的设置,对于同一服务实例可以在Nacos注册中心、配置中心分别配置不同group。既同一个服务在向Nacos向Nacos获取配置时申明的group=A,而向Nacos注册服务时申明的group=B,这是允许的。
附2:显式与Nacos注册中心交互
a、 不使用Springboot Bean方式,通过以下方式直接访问Nacos服务端
NamingService namingService = NacosFactory.createNamingService(serverAddrList);

namingService.getAllInstances("serviceName");
namingService.getAllInstances("serviceName", "groupName");
namingService.getAllInstances(......);
namingService.shutDown();


...... ConfigService 类似,省略 ......
b、 若在Springboot Bean中,通过自动注入获得namingService对象:
    @Autowired
    NacosServiceManager nacosServiceManager;

    @Autowired
    NacosConfigManager nacosConfigManager;


...... 省略 ......
     NamingService namingService = nacosServiceManager.getNamingService();
     ConfigService configService = nacosConfigManager.getConfigService();
...... 然后使用该对象操作(省略)......