基于Spring Security的前后端分离认证授权模块
实现一个基于Spring Security的前后端分离认证授权模块
- 一、前言
- 二、模块实现原理
- 三、组件的实现和Spring Security部分源码分析
-
- 1. CommonAuthentication
- 2. AuthenticationProcessor
- 3. ProviderManager
- 4. AuthenticationProvider
- 5. UserAuthenticationService
- 6. CommonAuthenticationFilter
- 7. RolePermissionEvaluator
- 8. 异常处理入口
-
- (1)JsonAccessDeniedHandler
- (2)JsonAuthenticationEntryPoint
- (3)JsonAuthenticationFailureHandler
- (4)JsonAuthenticationSuccessHandler
- 9. 小总结
- 四、Spring Security的配置
- 五、总结
一、前言
最近抽空看了下Spring Security,并实现了一个简单的认证授权模块。在这里我会提供一个实现的思路流程。这里不会非常深入地讲解每一个细节,所以最好在阅读前能有一点基础。不过,没有基础也没有太大问题。
二、模块实现原理
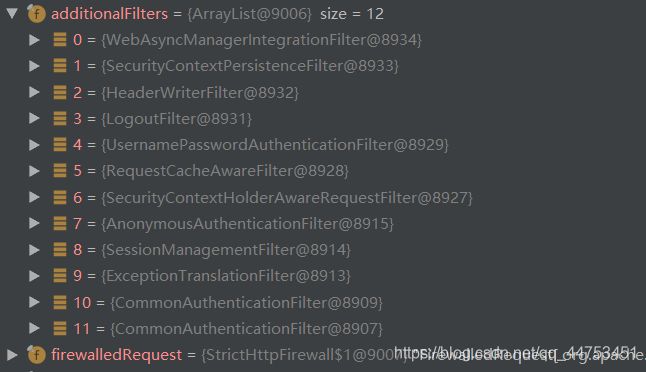
首先,我们需要知道的是,Spring Security的认证授权都是通过一个拦截器链实现的。通过对指定url的请求进行拦截并处理来实现认证和授权。

如上图,我们的认证授权功能主要是通过那12个过滤器实现的。不同的过滤器实现不同的功能,有的过滤器提供认证(登录)服务、有的过滤器提供匿名用户的信息构建、有的过滤器会对无授权的访问进行异常处理…
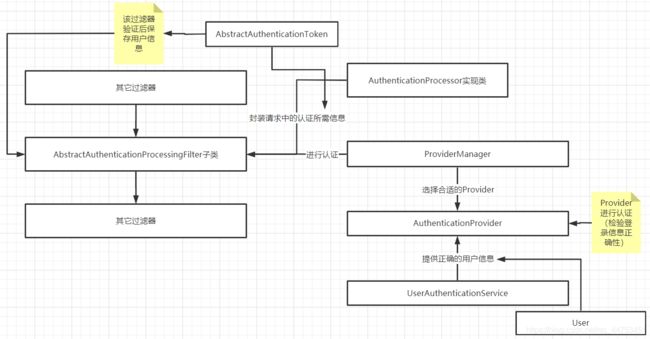
这里我们使用如下的架构来实现我们的模块设计。

在这里说明一下大体流程,当Filter指定url的认证(登录)请求到达后:
- 我们实现的
AbstractAuthenticationProcessingFilter子类CommonAuthenticationFilter拦截该请求,然后通过事先设置的AuthenticationProcessor实现类解析请求,获取该认证方法所需的登录信息AbstractAuthenticationToken; - 然后
Filter将该登录信息Token传给ProviderManager选择的AuthenticationProvider; AuthenticationProvider调用UserAuthenticationService中的方法获取该用户认证所用的正确信息User,并将Token和User进行验证。若验证通过,封装一个新的Token返回;否则抛出认证异常;Filter收到AuthenticationProvider返回的Token后将其保存到Spring Security容器中;Filter通过AuthenticationProcessor实现类进行后处理;- 拦截器链继续执行。
三、组件的实现和Spring Security部分源码分析
1. CommonAuthentication
首先我们要知道,在业务流程的执行过程中,我们可以使用SecurityContextHolder.getContext().getAuthentication()来获取当前的用户信息,如进行当前请求的用户的用户名和id等。而该方法返回的是Authentication接口,该接口定义了许多用户信息的获取方法。
public interface Authentication extends Principal, Serializable {

	Collection<? extends GrantedAuthority> getAuthorities();

	Object getCredentials();

	Object getDetails();

	Object getPrincipal();

	boolean isAuthenticated();

	void setAuthenticated(boolean isAuthenticated) throws IllegalArgumentException;
}
而AbstractAuthenticationToken实现了Authentication接口并做了简单的扩展,比如包括了权限列表。
public abstract class AbstractAuthenticationToken implements Authentication, CredentialsContainer {
	private final Collection<GrantedAuthority> authorities;
	private Object details;
	private boolean authenticated = false;

	...
}
这就意味着,我们实现的CommonAuthenticationFilter会将AuthenticationProvider返回的AbstractAuthenticationToken子类保存到当前上下文中。所以我们实现的AbstractAuthenticationToken子类需要包含我们可能在业务流程中所需的当前用户的所有信息,这里我们实现CommonAuthentication。
public class CommonAuthentication extends AbstractAuthenticationToken {
    // 用户id
    private String userId;

    // 用户名
    private Object principal;

    // 密码
    private Object credentials;

    // 附加属性(如微信小程序后端对应的 openId)
    private Map<String, Object> extraMap;

    public CommonAuthentication(Collection<? extends GrantedAuthority> authorities) {
        super(authorities);
        extraMap = new HashMap<>();
    }

    // 不验证权限
    public CommonAuthentication(Object principal, Object credentials, String userId) {
        super(null);
        this.principal = principal;
        this.credentials = credentials;
        this.userId = userId;
        this.setAuthenticated(false);
        extraMap = new HashMap<>();
    }

    // 验证权限
    public CommonAuthentication(Object principal, Object credentials, String userId, Collection<? extends GrantedAuthority> authorities) {
        super(authorities);
        this.principal = principal;
        this.credentials = credentials;
        this.userId = userId;
        super.setAuthenticated(true);
        extraMap = new HashMap<>();
    }

    @Override
    public Object getCredentials() {
        return credentials;
    }

    @Override
    public Object getPrincipal() {
        return principal;
    }

    public String getUserId(){
        return this.userId;
    }

    // 添加附加属性
    public void setExtra(String key, Object extra){
        extraMap.put(key, extra);
    }

    // 获取附加属性
    public Object getExtra(String key){
        return extraMap.get(key);
    }

    // 移除附加属性
    public void removeExtra(String key){
        extraMap.remove(key);
    }
}
CommonAuthentication中扩展了userId和extraMap,其中后者可以额外地设置一些用户属性,提高了扩展性。
这时,我们在业务流程中便可以通过
CommonAuthentication user = (CommonAuthentication)SecurityContextHolder.getContext().getAuthentication();
来获取当前用户信息。
需要注意的是,为了满足多种认证方式的需要,我们还需要继续继承一层以便ProviderManager选择合适的AuthenticationProvider进行认证,我们将在之后进行讲解。如微信登录我们将会使用到WechatAuthentication。
public class WechatAuthentication extends CommonAuthentication {
    public WechatAuthentication() {
        super(null, null, null);
    }

    public WechatAuthentication(Collection<? extends GrantedAuthority> authorities) {
        super(authorities);
    }

    public WechatAuthentication(Object principal, Object credentials, String userId) {
        super(principal, credentials, userId);
    }

    public WechatAuthentication(Object principal, Object credentials, String userId, Collection<? extends GrantedAuthority> authorities) {
        super(principal, credentials, userId, authorities);
    }
}
2. AuthenticationProcessor
首先我们需要知道,ProviderManager是通过选择不同的AuthenticationProvider来进行认证,而选择的方式便是看AuthenticationProvider是否支持某一类型的Authentication,如果支持,便用该AuthenticationProvider进行认证。
所以决定当前使用什么方法认证(微信、短信等)取决于使用哪个AuthenticationProvider进行认证,也就取决于我们传给ProviderManager的Authentication的类型。如果我们传给ProviderManager的是WechatAuthentication,那便是微信登录;如果传给ProviderManager的是VerificationAuthentication,那便是验证码登录。
为了能够对指定url返回指定类型Authentication,我们可以设计一个接口AuthenticationProcessor,每一种认证方式对应一个它的实现类。
public interface AuthenticationProcessor {

    /**
     * 预处理:获取认证所需信息
     * @param request
     * @param response
     * @return
     * @throws AuthenticationException
     * @throws IOException
     * @throws ServletException
     */
    Authentication preAuthentication(HttpServletRequest request, HttpServletResponse response) throws AuthenticationException, IOException, ServletException;

    /**
     * 后处理
     * @param request
     * @param response
     * @throws AuthenticationException
     * @throws IOException
     * @throws ServletException
     */
    void postAuthentication(HttpServletRequest request, HttpServletResponse response) throws AuthenticationException, IOException, ServletException;
}
我们通过preAuthentication方法对请求中附带的参数进行封装,返回对应类型的Authentication。比如微信登录对应的AuthenticationProcessor实现类WechatAuthenticationProcessor。
public class WechatAuthenticationProcessor implements AuthenticationProcessor {
    private final String CODE = "code";
    private final String OPEN_ID = "openId";

    public WechatAuthenticationProcessor(){}

    @Override
    public Authentication preAuthentication(HttpServletRequest request, HttpServletResponse response) throws AuthenticationException, IOException, ServletException {
        String code = this.obtainCode(request);
        // 获取用户的 openId
        String openId = this.obtainOpenId(code);

        // 这个只做登录信息使用
        WechatAuthentication authentication = new WechatAuthentication();
        // 保存 openId 为附加属性
        authentication.setExtra(OPEN_ID, openId);

        return authentication;
    }

    @Override
    public void postAuthentication(HttpServletRequest request, HttpServletResponse response) throws AuthenticationException, IOException, ServletException {
        // do nothing
    }

    private String obtainCode(HttpServletRequest request) {
        return request.getParameter(CODE);
    }

    /**
     * 访问微信接口,获取 openId
     * @param code
     * @return
     */
    private String obtainOpenId(String code){
        // 访问微信接口,获取 openId
        return "lol";
    }

}
我们获取请求中微信登录所需的code,并使用code通过微信提供的接口获取该code对应微信用户在该小程序中对应的openId,而在我们的平台中微信登录只需要这个openId,所以我们将openId保存到WechatAuthentication中并返回。之后我们实现的过滤器CommonAuthenticationFilter便会将这个WechatAuthentication发送给ProviderManager,而ProviderManager发现WechatAuthenticationProvider支持WechatAuthentication,所以选择该AuthenticationProvider进行登录验证,我们便实现了微信登录。
我们这里可以总结一下AuthenticationProcessor的用途:
- 不同的
AuthenticationProcessor实现类获取请求中不同认证类型所需的数据。如WechatAuthenticationProcessor只需从请求中获取code;而VerificationAuthenticationProcessor则需要在请求中获取用户名、密码和验证码,并检验验证码是否正确; - 不同的
AuthenticationProcessor实现类创建返回不同类型的Authentication以帮助ProviderManager选择合适的AuthenticationProvider进行验证。如WechatAuthenticationProcessor将openId保存到WechatAuthentication并返回;VerificationAuthenticationProcessor将用户名和密码保存到VerificationAuthentication中并返回; - 实现用户信息缓存后的后处理,对应方法
postAuthentication。一般来说用不到,但可以提高模块的扩展性。
3. ProviderManager
首先我们需要知道,ProviderManager是接口AuthenticationManager的实现类,而接口AuthenticationManager为我们的Filter提供了认证入口方法authenticate。
public interface AuthenticationManager {

	Authentication authenticate(Authentication authentication) throws AuthenticationException;
}
我们不对其进行深究,继续讨论ProviderManager。
先前我们说过ProviderManager是通过传入的Authentication选择合适的AuthenticationProvider进行认证,这里我们从源码角度来分析。
public class ProviderManager implements AuthenticationManager, MessageSourceAware,
		InitializingBean {

	...

	public Authentication authenticate(Authentication authentication)
			throws AuthenticationException {
		Class<? extends Authentication> toTest = authentication.getClass();
		AuthenticationException lastException = null;
		Authentication result = null;
		boolean debug = logger.isDebugEnabled();

		for (AuthenticationProvider provider : getProviders()) {
			// 遍历 AuthenticationProvider,通过 supports() 方法看某一 provider 是否支持传入类型的 Authentication
			if (!provider.supports(toTest)) {
				continue;
			}

			...

			try {
				// 如果支持就调用 AuthenticationProvider 的 authenticate() 方法
				result = provider.authenticate(authentication);

				if (result != null) {
					copyDetails(authentication, result);
					break;
				}
			}
			catch (AccountStatusException e) {
				prepareException(e, authentication);
				throw e;
			}
			catch (InternalAuthenticationServiceException e) {
				prepareException(e, authentication);
				throw e;
			}
			catch (AuthenticationException e) {
				lastException = e;
			}
		}

		...
	}
}
通过源码我们可以清楚地发现,ProviderManager先获取Spring Security容器中所有的AuthenticationProvider,并遍历它们,通过AuthenticationProvider的supports方法检验是否能对传入类型的Authentication进行认证。
4. AuthenticationProvider
先前我们已经知道,不同AuthenticationProvider的实现类将执行不同的认证流程,我们可以直接看源码。
public interface AuthenticationProvider {

	Authentication authenticate(Authentication authentication)
			throws AuthenticationException;

	boolean supports(Class<?> authentication);
}
其中方法authenticate是具体的认证入口,而方法supports则是检验该AuthenticationProvider是否支持目标类型Authentication的认证,结合上面ProviderManager的源码便很容易理解,这里我们直接放出验证码登录对应AuthenticationProvider的实现。
@Component
public class VerificationAuthenticationProvider implements AuthenticationProvider {

    private final UserAuthenticationService userAuthenticationService;

    private final String PASSWORD_ERROR = "用户名或密码错误";

    @Autowired
    public VerificationAuthenticationProvider(UserAuthenticationService userAuthenticationService) {
        this.userAuthenticationService = userAuthenticationService;
    }

    @Override
    public Authentication authenticate(Authentication authentication) throws AuthenticationException {
        String username = authentication.getName();
        String password = authentication.getCredentials().toString();

        CommonUser user = (CommonUser)userAuthenticationService.loadUserUnderVerification(username);

        // 判断密码正误在这里
        if(!user.getPassword().equals(MD5Util.getMD5String(password + "{" + user.getSalt() + "}"))){
            throw new BadCredentialsException(PASSWORD_ERROR);
        }

        return new VerificationAuthentication(username, password, user.getUserId(), user.getAuthorities());
    }

    @Override
    public boolean supports(Class<?> aClass) {
        // 该 Provider 支持验证 VerificationAuthentication 和 UsernamePasswordAuthenticationToken
        return VerificationAuthentication.class.isAssignableFrom(aClass) || UsernamePasswordAuthenticationToken.class.isAssignableFrom(aClass);
    }
}
综上,AuthenticationProvider的功能便是从UserAuthenticationService获取用户正确的登录信息,并检验登录信息是否正确。
5. UserAuthenticationService
UserAuthenticationService主要是获取不同认证方式下用户的正确登录信息和需要存到上下文环境中的用户信息的,没什么难度,主要是需要融合自己项目的权限结构,直接给出代码。
@Component
public class UserAuthenticationService {

    private final UserDAO userDAO;

    private final RoleDAO roleDAO;

    private final PermissionDAO permissionDAO;

    private final String USER_NOT_EXIST = "用户名或密码错误";

    @Autowired
    public UserAuthenticationService(UserDAO userDAO, RoleDAO roleDAO, PermissionDAO permissionDAO) {
        this.userDAO = userDAO;
        this.roleDAO = roleDAO;
        this.permissionDAO = permissionDAO;
    }

    /**
     * 在验证码认证环境下获取用户信息
     * @param username :用户名
     * @return
     * @throws UsernameNotFoundException
     */
    public UserDetails loadUserUnderVerification(String username) throws UsernameNotFoundException {
        // 先获取用户
        User user = userDAO.findByUsername(username);
        if(user == null){
            throw new UsernameNotFoundException(USER_NOT_EXIST);
        }
        // 获取权限
        Set<GrantedAuthority> authorities = new HashSet<>();
        //Set permissions = permissionDAO.findByUsername(user.getUsername());
        List<PermissionBean> rp = permissionDAO.findRoleAndPermissionByUsername(user.getUsername());
        List<PermissionUnit> permissions = new ArrayList<>();
        PermissionGrantedAuthority role = null;
        String roleName = "";
        for(PermissionBean temp : rp){
            if(!temp.getRoleName().equals(roleName)){
                roleName = temp.getRoleName();
                if(role != null){
                    authorities.add(role);
                }
                permissions = new ArrayList<>();
                role = new PermissionGrantedAuthority(temp.getRoleName(), permissions);
            }
            permissions.add(new PermissionUnit(temp.getPermissionName(), temp.getUrl()));
        }
        authorities.add(role);
        return new CommonUser(user.getUsername(), user.getPassword(), user.getId(), authorities, user.getSalt(), user.getToken());
    }

    /**
     * 在微信登录环境下获取用户信息
     * @param openId :用户 openId
     * @return
     * @throws UsernameNotFoundException
     */
    public UserDetails loadUserUnderWechat(String openId) throws UsernameNotFoundException {
        //
        // 通过 openId 来获取该微信绑定的本平台账号
        // 如果没有绑定的话,注册一个
        //

        return new CommonUser("admin", "123456","1", new HashSet<PermissionGrantedAuthority>(), null, null);
    }
}
需要注意的是这里我实现了一个CommonUser,用来保存用户认证所需要的正确信息和需要存到上下文环境中的用户信息,继承了Spring Security中的User,也没什么难度。当然需要存到上下文环境中的用户信息也可以在认证成功后再获取,这个影响不大。
public class CommonUser extends User {
    private String userId;
    private String salt;
    private String token;

    public CommonUser(String username, String password, Collection<? extends GrantedAuthority> authorities, String salt, String token) {
        super(username, password, authorities);
        this.salt = salt;
        this.token = token;
    }

    public CommonUser(String username, String password, Collection<? extends GrantedAuthority> authorities) {
        super(username, password, authorities);
    }

    public CommonUser(String username, String password, boolean enabled, boolean accountNonExpired, boolean credentialsNonExpired, boolean accountNonLocked, Collection<? extends GrantedAuthority> authorities) {
        super(username, password, enabled, accountNonExpired, credentialsNonExpired, accountNonLocked, authorities);
    }

    public CommonUser(String username, String password, String userId, Collection<? extends GrantedAuthority> authorities, String salt, String token) {
        super(username, password, authorities);
        this.salt = salt;
        this.token = token;
        this.userId = userId;
    }

    // 省略 getter 和 setter
}
6. CommonAuthenticationFilter
接下来便来到了模块的关键CommonAuthenticationFilter。它主要是拦截目标url的认证请求,并控制认证流程。CommonAuthenticationFilter继承了AbstractAuthenticationProcessingFilter。
public abstract class AbstractAuthenticationProcessingFilter extends GenericFilterBean implements ApplicationEventPublisherAware, MessageSourceAware {

	...

	public void doFilter(ServletRequest req, ServletResponse res, FilterChain chain)
			throws IOException, ServletException {

		HttpServletRequest request = (HttpServletRequest) req;
		HttpServletResponse response = (HttpServletResponse) res;

		if (!requiresAuthentication(request, response)) {
			chain.doFilter(request, response);

			return;
		}

		...

		Authentication authResult;

		try {
			// 调用子类实现的 attemptAuthentication 方法尝试获取认证成功后需要存到上下文中的用户信息
			authResult = attemptAuthentication(request, response);
			if (authResult == null) {
				return;
			}
			sessionStrategy.onAuthentication(authResult, request, response);
		} catch (InternalAuthenticationServiceException failed) {

			unsuccessfulAuthentication(request, response, failed);

			return;
		} catch (AuthenticationException failed) {

			unsuccessfulAuthentication(request, response, failed);

			return;
		}

		// continueChainBeforeSuccessfulAuthentication 为 false 就中断拦截器链的执行
		if (continueChainBeforeSuccessfulAuthentication) {
			chain.doFilter(request, response);
		}

		successfulAuthentication(request, response, chain, authResult);
	}

	// 这里是我们需要在子类中实现的主要方法
	public abstract Authentication attemptAuthentication(HttpServletRequest request,
			HttpServletResponse response) throws AuthenticationException, IOException,
			ServletException;

	// 认证成功后的处理入口
	protected void successfulAuthentication(HttpServletRequest request,
			HttpServletResponse response, FilterChain chain, Authentication authResult)
			throws IOException, ServletException {

		...

		// 在这里会保存一次用户信息
		SecurityContextHolder.getContext().setAuthentication(authResult);

		...

 		// 调用 successHandler 的 onAuthenticationSuccess 方法
		successHandler.onAuthenticationSuccess(request, response, authResult);
	}

	// 认证失败后的处理入口
	protected void unsuccessfulAuthentication(HttpServletRequest request,
			HttpServletResponse response, AuthenticationException failed)
			throws IOException, ServletException {

		...

		// 调用 failureHandler 的 onAuthenticationFailure 方法
		failureHandler.onAuthenticationFailure(request, response, failed);
	}

}
拦截器作用在代码中已经很明显了,通过调用子类的attemptAuthentication方法尝试获取成功登陆后需要存到上下文中的用户信息,要是认证失败就处理掉抛出的认证异常。认证成功和失败分别会进入到successHandler 的 onAuthenticationSuccess 方法和failureHandler 的 onAuthenticationFailure方法,这里之后会讲到。
所以我们要在我们的CommonAuthenticationFilter中重载attemptAuthentication方法。
public class CommonAuthenticationFilter extends AbstractAuthenticationProcessingFilter {
    // 认证处理器
    private AuthenticationProcessor processor;

    private boolean postOnly = true;

    public CommonAuthenticationFilter(String url, AuthenticationProcessor processor) {
        // 设置拦截url
        super(new AntPathRequestMatcher(url, "POST"));
        // 设置认证处理器
        this.processor = processor;
        // 这里继续执行拦截器链
        super.setContinueChainBeforeSuccessfulAuthentication(true);
        // 这两个也可以在loginForm()后设置
        // 设置认证失败处理入口
        setAuthenticationFailureHandler(new JsonAuthenticationFailureHandler());
        // 设置认证成功处理入口
        setAuthenticationSuccessHandler(new JsonAuthenticationSuccessHandler());
    }

    @Override
    public Authentication attemptAuthentication(HttpServletRequest request, HttpServletResponse response) throws AuthenticationException, IOException, ServletException {
        if (this.postOnly && !request.getMethod().equals("POST")) {
            throw new AuthenticationServiceException("请确认请求方式");
        }
        // 认证前置处理
        Authentication authRequest = processor.preAuthentication(request, response);
        // 认证
        Authentication authenticate = this.getAuthenticationManager().authenticate(authRequest);
        // 先将用户信息存到 session 中,虽然之后 security 会再存一次,但不影响
        SecurityContextHolder.getContext().setAuthentication(authenticate);
        // 认证后置处理
        processor.postAuthentication(request, response);

        return authenticate;
    }

}
需要注意的是,将continueChainBeforeSuccessfulAuthentication设为true是为了让拦截器链继续执行,直到调用你对应url指定的对应接口(controller中),当然也可以设为false,或是直接在对应接口中封装返回给前端的信息。并设置认证成功和失败对应的处理入口。
剩下的就很简单了,只要看了上面的部分,便很容易理解。
至此,认证服务的主体结构就结束了。
7. RolePermissionEvaluator
认证服务结束后就该是授权服务了,这里我们采取的检验权限的方式是认证时将用户的权限信息保存到上下文中,当访问到需要一定权限才能访问的资源时,进行权限验证。
为了将权限检验粒度细化到方法,我们使用Spring Security提供的注解来进行权限检验,如:
	@ResponseBody
    @RequestMapping(value = "/test")
    @PreAuthorize("hasPermission('/user/test', 'test')")
    public BaseResult<String> kan(HttpServletRequest request){
        BaseResult<String> result = new BaseResult<>();
        result.construct("test access", true, null);
        return result;
    }
我们通过注解@PreAuthorize("hasPermission()")进行权限检验。但Spring Security自带的权限检验模块很明显不能符合我们平台的权限设计,所以我们需要实现接口PermissionEvaluator来进行自定义的权限检验。
@Component
public class RolePermissionEvaluator implements PermissionEvaluator {

    /**
     * @PreAuthorize("hasPermission('/user/listUser', 'listUser')")
     * @param authentication 用户信息,包括权限列表
     * @param url 对应注解中的 /user/listUser
     * @param permission 对应注解中的 listUser
     * @return
     */
    @Override
    public boolean hasPermission(Authentication authentication, Object url, Object permission) {
        //AtomicBoolean hasPermission = new AtomicBoolean(false);
        // 先获取权限
        Set<GrantedAuthority> roles = new HashSet<>(authentication.getAuthorities());
        // 判断是否有权限
        for(GrantedAuthority r : roles){
            // 如果 r 不是 PermissionGrantedAuthority 的实例,就说明现在没有登录,
            // 用户信息是 Spring Security 添加的匿名用户(AnonymousAuthenticationFilter)
            if (r instanceof PermissionGrantedAuthority) {
                PermissionGrantedAuthority rn = (PermissionGrantedAuthority) r;
                for(PermissionUnit p : rn.getPermissions()){
                    if (p.getPermission().equals(permission) && p.getUrl().equals(url)) {
                        return true;
                    }
                }
            }
        }

        return false;
    }

    @Override
    public boolean hasPermission(Authentication authentication, Serializable serializable, String s, Object o) {
        return false;
    }
}
这里注释已经很明白了,需要注意的只有需要融合自己系统的权限设计。
8. 异常处理入口
由于我们要设计的是前后端分离的认证授权模块,所以使用重定向和转发等方式是不合适的。
public class SimpleUrlAuthenticationFailureHandler implements AuthenticationFailureHandler {

	...

	public void onAuthenticationFailure(HttpServletRequest request,
			HttpServletResponse response, AuthenticationException exception)
			throws IOException, ServletException {

		if (defaultFailureUrl == null) {
			logger.debug("No failure URL set, sending 401 Unauthorized error");

			// 如果没设置转发或重定向的url,就会封装 401 的响应
			response.sendError(HttpStatus.UNAUTHORIZED.value(),
				HttpStatus.UNAUTHORIZED.getReasonPhrase());
		} else {
			saveException(request, exception);

			if (forwardToDestination) {
				logger.debug("Forwarding to " + defaultFailureUrl);

				request.getRequestDispatcher(defaultFailureUrl)
						.forward(request, response);
			} else {
				logger.debug("Redirecting to " + defaultFailureUrl);
				redirectStrategy.sendRedirect(request, response, defaultFailureUrl);
			}
		}
	}

	...
}
如默认的认证失败处理入口SimpleUrlAuthenticationFailureHandler是对转发和重定向进行特化的,明显不符合我们的设计。所以我们需要将其改成Json形式的自定义响应体。
(1)JsonAccessDeniedHandler
JsonAccessDeniedHandler是登录用户访问到无权限的资源时的处理入口。
@Component
public class JsonAccessDeniedHandler implements AccessDeniedHandler {
    private final String NO_PERMISSION = "无权限";

    @Override
    public void handle(HttpServletRequest httpServletRequest, HttpServletResponse httpServletResponse, AccessDeniedException e) throws IOException, ServletException {
        httpServletResponse.setCharacterEncoding("utf-8");
        httpServletResponse.setContentType("application/json;charset=utf-8");
        httpServletResponse.getWriter().print(JSONObject.toJSONString(new BaseResult<String>(NO_PERMISSION, false, null)));
    }
}
很简单,没什么好讲的。
(2)JsonAuthenticationEntryPoint
JsonAuthenticationEntryPoint是对未登录(匿名)用户访问到无权限的资源时的处理入口。
@Component
public class JsonAuthenticationEntryPoint implements AuthenticationEntryPoint {

    // spring security 匿名用户访问无权限信息被认定为无认证,所以这里要做个判断
    private final String NEED_LOGIN_PREFIX = "Full authentication is required";

    private final String NEED_LOGIN = "请先登录";

    @Override
    public void commence(HttpServletRequest httpServletRequest, HttpServletResponse httpServletResponse, AuthenticationException e) throws IOException, ServletException {
        String message = e.getMessage();
        if(message.contains(NEED_LOGIN_PREFIX)){
            message = NEED_LOGIN;
        }
        httpServletResponse.setCharacterEncoding("utf-8");
        httpServletResponse.setContentType("application/json;charset=utf-8");
        httpServletResponse.getWriter().print(JSONObject.toJSONString(new BaseResult<String>(message, false, null)));
    }
}
很简单,没什么好讲的。
(3)JsonAuthenticationFailureHandler
JsonAuthenticationFailureHandler是认证失败后的处理入口。
public class JsonAuthenticationFailureHandler implements AuthenticationFailureHandler {

    @Override
    public void onAuthenticationFailure(HttpServletRequest request, HttpServletResponse response, AuthenticationException exception) throws IOException, ServletException {
        response.setCharacterEncoding("utf-8");
        response.setContentType("application/json;charset=utf-8");
        response.getWriter().print(JSONObject.toJSONString(new BaseResult<String>(exception.getMessage(), false, null)));
    }
}
很简单,没什么好讲的。
(4)JsonAuthenticationSuccessHandler
JsonAuthenticationSuccessHandler是认证成功后的处理入口。
public class JsonAuthenticationSuccessHandler implements AuthenticationSuccessHandler {

    private final String LOGIN_SUCCESS = "登陆成功";

    @Override
    public void onAuthenticationSuccess(HttpServletRequest request, HttpServletResponse response, Authentication authentication) throws IOException, ServletException {
        // 如果输出流没有关闭,统一返回 登陆成功
        if(!response.isCommitted()){
            response.setCharacterEncoding("utf-8");
            response.setContentType("application/json;charset=utf-8");
            response.getWriter().print(JSONObject.toJSONString(new BaseResult<String>(LOGIN_SUCCESS, false, null)));
        }
    }
}
这个也很简单,但需要注意的是如果Filter那里设置了不中断拦截器链的话,这个方法是在你url对应的接口执行完之后才调用的,所以要看下响应的输出流是否关闭。
9. 小总结
我们的模块由认证和授权两部分组成,而授权难度不大。
认证服务的扩展性设计虽然看似复杂,实际上核心思想就是如下:
- 不同的登录方式对应不同的url;
- 这些url被不同的拦截器所拦截;
- 不同的拦截器设置了不同的
AuthenticationProcessor; - 不同的
AuthenticationProcessor获取不同认证方式所需的请求中的数据并返回不同类型的Authentication; - 不同的
Authentication决定了处理它们的不同的AuthenticationProvider; - 不同的
AuthenticationProvider实现了不同的认证方式。
这样就更加容易理解了。
四、Spring Security的配置
我们可以设置两种配置域:Spring Security全局配置和不同认证方式的配置。我们可以在Spring Security全局配置中通过方法apply来加载不同认证方式的配置。
这个没什么难度,直接给代码吧。
微信登录配置:
/**
 * @Author chongyahhh
 * 微信登录配置
 */
@Component
public class WechatLoginConfig extends SecurityConfigurerAdapter<DefaultSecurityFilterChain, HttpSecurity> {

    private final WechatAuthenticationProvider wechatAuthenticationProvider;

    private final String WECHAT_LOGIN_URL = "/user/wechatLogin";

    @Autowired
    public WechatLoginConfig(WechatAuthenticationProvider wechatAuthenticationProvider) {
        this.wechatAuthenticationProvider = wechatAuthenticationProvider;
    }

    @Override
    public void configure(HttpSecurity http) throws Exception {
        CommonAuthenticationFilter commonAuthenticationFilter = new CommonAuthenticationFilter(WECHAT_LOGIN_URL, new WechatAuthenticationProcessor());
        // 使自定义的 Filter 可以获取到 ProviderManager
        commonAuthenticationFilter.setAuthenticationManager(http.getSharedObject((AuthenticationManager.class)));

        http
                .authenticationProvider(wechatAuthenticationProvider)
                // 注意自定义 Filter 插入的位置
                .addFilterAfter(commonAuthenticationFilter, ExceptionTranslationFilter.class);
    }
}
验证码登录配置:
/**
 * @Author chongyahhh
 * 验证码登录配置
 */
@Component
public class VerificationLoginConfig extends SecurityConfigurerAdapter<DefaultSecurityFilterChain, HttpSecurity> {

    private final VerificationAuthenticationProvider verificationAuthenticationProvider;

    private final String VERIFICATION_LOGIN_URL = "/user/login";

    @Autowired
    public VerificationLoginConfig(VerificationAuthenticationProvider verificationAuthenticationProvider) {
        this.verificationAuthenticationProvider = verificationAuthenticationProvider;
    }

    @Override
    public void configure(HttpSecurity http) throws Exception {
        CommonAuthenticationFilter commonAuthenticationFilter = new CommonAuthenticationFilter(VERIFICATION_LOGIN_URL, new VerificationAuthenticationProcessor());
        // 使自定义的 Filter 可以获取到 ProviderManager
        commonAuthenticationFilter.setAuthenticationManager(http.getSharedObject((AuthenticationManager.class)));

        http
                .authenticationProvider(verificationAuthenticationProvider)
                // 注意自定义 Filter 插入的位置
                .addFilterAfter(commonAuthenticationFilter, ExceptionTranslationFilter.class);
    }
}
Spring Security全局配置:
/**
 * @Author chongyahhh
 * Spring Security 配置
 */
@Configuration
@EnableWebSecurity
@EnableGlobalMethodSecurity(prePostEnabled = true)
public class SecurityConfig extends WebSecurityConfigurerAdapter {
    // 匿名用户无权限异常处理入口
    private final AuthenticationEntryPoint jsonAuthenticationEntryPoint;
    // 会员用户无权限异常处理入口
    private final AccessDeniedHandler jsonAccessDeniedHandler;
    // 验证码登录配置
    private final VerificationLoginConfig verificationLoginConfig;
    // 微信登录配置
    private final WechatLoginConfig wechatLoginConfig;

    @Autowired
    public SecurityConfig(AuthenticationEntryPoint jsonAuthenticationEntryPoint, AccessDeniedHandler jsonAccessDeniedHandler, VerificationLoginConfig verificationLoginConfig, WechatLoginConfig wechatLoginConfig) {
        this.jsonAuthenticationEntryPoint = jsonAuthenticationEntryPoint;
        this.jsonAccessDeniedHandler = jsonAccessDeniedHandler;
        this.verificationLoginConfig = verificationLoginConfig;
        this.wechatLoginConfig = wechatLoginConfig;
    }

    @Override
    protected void configure(HttpSecurity http) throws Exception {
        http
                    .apply(verificationLoginConfig) // 用户名密码验证码登录配置导入
                .and()
                    .apply(wechatLoginConfig) // 微信登录配置导入
                .and()
                    .exceptionHandling()
                    .authenticationEntryPoint(jsonAuthenticationEntryPoint)
                    .accessDeniedHandler(jsonAccessDeniedHandler)
                .and()
                    .anonymous()
                .and()
                    .formLogin()
                    //.failureHandler(new JsonAuthenticationFailureHandler())
                .and()
                    .csrf().disable(); // 关闭 csrf,防止首次的 POST 请求被拦截
    }

	// 自定义权限检验
    @Bean("customSecurityExpressionHandler")
    public DefaultWebSecurityExpressionHandler webSecurityExpressionHandler(RolePermissionEvaluator rolePermissionEvaluator){
        DefaultWebSecurityExpressionHandler handler = new DefaultWebSecurityExpressionHandler();
        handler.setPermissionEvaluator(rolePermissionEvaluator);
        return handler;
    }

}
五、总结
至此,所有的内容便结束了,但实际上Spring Security的功能还有非常多这里没有涉及,比如Session管理、RemeberMe等等。所以我这里实现的模块个人感觉在开发时用处没有特别大,但在学习的过程中比较有意义,可以快速入门下Spring Security。但实际上,看再多的博客和demo,还是不如自己打断点走一遍,只有这样才能有最大的收获。最后谢谢大家的观看,希望能对你们有所帮助!
最后附上码云仓库地址,可以自取:
基于Spring Security的前后端分离认证授权模块demo