RabbitMQ消息中间件使用详解
RabbitMQ官网:https://www.rabbitmq.com
一、引言
Message Queue(消息 队列),从字⾯上理解:⾸先它是⼀个队列。FIFO先进先出的数据结构——队列。消息队列就是所谓的存放消息的队列。 消息队列解决的不是存放消息的队列的⽬的,解决的是通信问题。
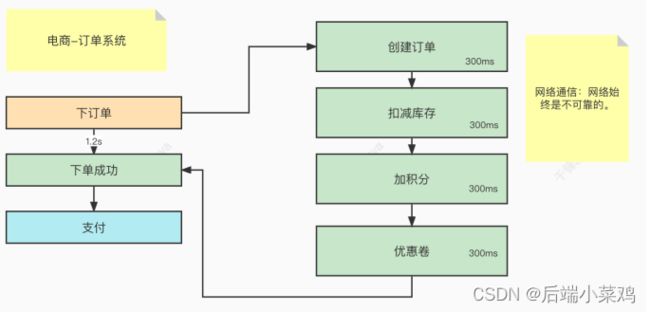
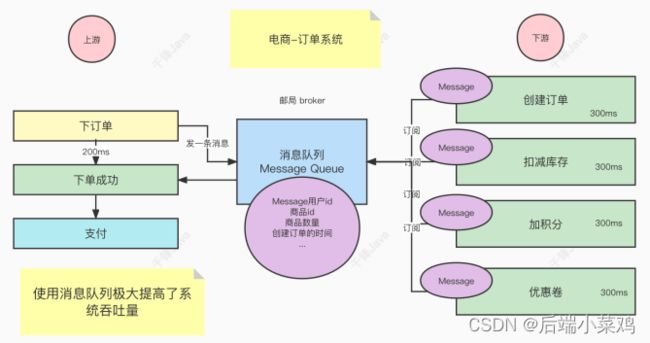
⽐如以电商订单系统为例,如果各服务之间使⽤同步通信,不仅耗时较久,且过程中受到⽹络波动的影响,不能保证⾼成功率。因此,使⽤异步的通信⽅式对架构进⾏改造。
使⽤异步通信⽅式对模块间的调⽤进⾏解耦,可以快速的提升系统的吞吐量。上游执⾏完消息的发送业务后⽴即获得结果,下游多个服务订阅到消息后各⾃消费。 通过消息队列,屏蔽底层的通信协议,使得解藕和并⾏消费得以实现。
二、RabbitMQ介绍
市⾯上⽐较⽕爆的⼏款MQ:
ActiveMQ,RocketMQ,Kafka,RabbitMQ。
- 语⾔的⽀持:ActiveMQ,RocketMQ只⽀持Java语⾔,Kafka可以⽀持多们语⾔,RabbitMQ⽀持多种语⾔。
- 效率⽅⾯:ActiveMQ,RocketMQ,Kafka效率都是毫秒级别,RabbitMQ是微 秒级别的。
- 消息丢失,消息重复问题: RabbitMQ针对消息的持久化,和重复问题都有 ⽐较成熟的解决⽅案。
- 学习成本:RabbitMQ⾮常简单。 RabbitMQ是由Rabbit
RabbitMQ是由Rabbit公司去研发和维护的,最终是在Pivotal。
RabbitMQ严格的遵循AMQP协议,⾼级消息队列协议,帮助我们在进程之间传 递异步消息。
三.RabbitMQ安装(Docker安装)
1、启动容器
docker run -d -p 15672:15672 -p 5672:5672 \
    -e RABBITMQ_DEFAULT_VHOST=rabbitmq \
    -e RABBITMQ_DEFAULT_USER=admin \
    -e RABBITMQ_DEFAULT_PASS=admin \
    --hostname myRabbit --name rabbitmq \
    rabbitmq
参数说明:
- -d:表示在后台运行容器;
- -p:将容器的端口 5672(通行端口)和 15672 (后台管理端口)映射到主机中;
- -e:指定环境变量:
- RABBITMQ_DEFAULT_VHOST:默认虚拟机名;
- RABBITMQ_DEFAULT_USER:默认的用户名;
- RABBITMQ_DEFAULT_PASS:默认的用户密码;
- --hostname :指定主机名(RabbitMQ 的一个重要注意事项是它根据所谓的 节点名称 存储数据,默认为主机名);
- --name rabbitmq :设置容器名称;
- rabbitmq :容器使用的镜像名称;
2、启动 rabbitmq_management
docker exec -it rabbitmq rabbitmq-plugins enable rabbitmq_management
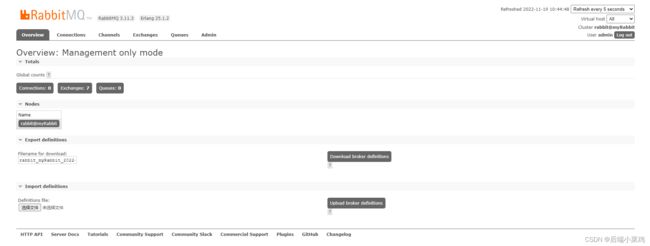
3、访问 RabbitMQ 后台管理
- 浏览器输入地址:
http://虚拟机IP地址:15672即可访问后台管理页面 - 默认的用户名和密码都是
admin(容器创建的时候指定用户名密码);
注意:如果是云服务器记得开放相关端口。
四、RabbitMQ架构
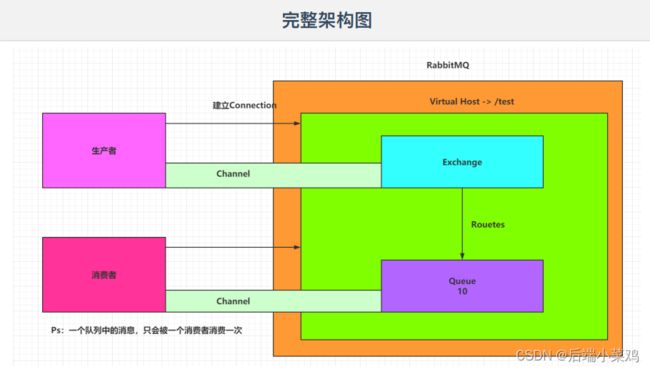
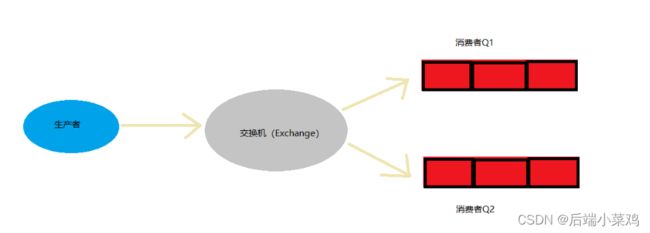
- Publisher - ⽣产者:发布消息到RabbitMQ中的Exchange
- Consumer - 消费者:监听RabbitMQ中的Queue中的消息
- Exchange - 交换机:和⽣产者建⽴连接并接收⽣产者的消息
- Queue - 队列:Exchange会将消息分发到指定的Queue,Queue和消费者进⾏交互
- Routes - 路由:交换机以什么样的策略将消息发布到Queue
1、简单架构
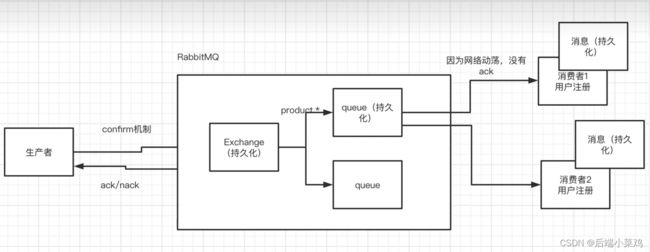
2、RabbitMQ的完整架构图
3.查看图形化界⾯并创建⼀个Virtual Host
虚拟主机就是⽤来将⼀个rabbitmq内部划分成多个主机,给不同的⽤户来使 ⽤,⽽不会冲突。
 创建一个新的测试用户,添加 /test Virtual Host ,并将测试用户设置为可操作 /test 的权限。
 五、RabbitMQ的队列模式
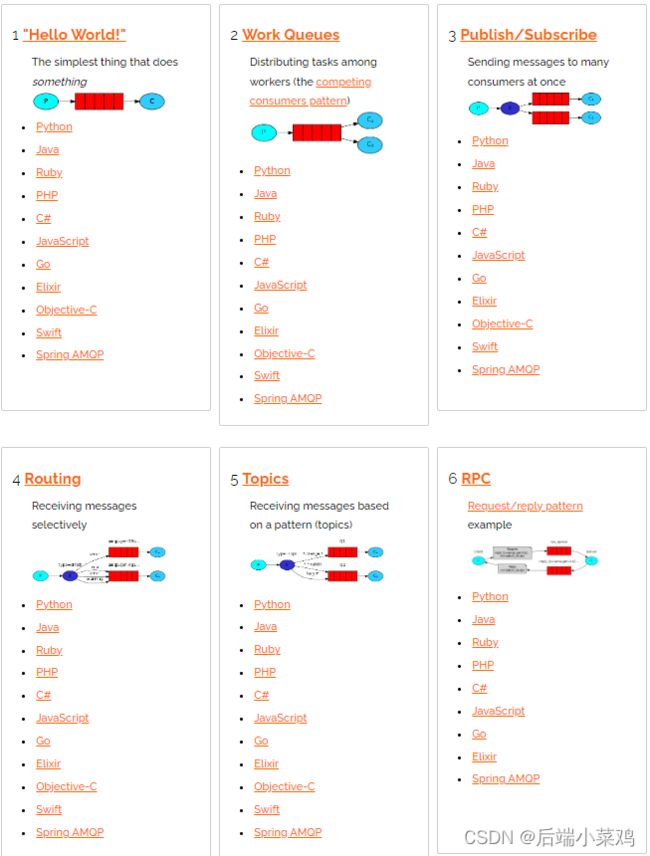
1.RabbitMQ的通讯⽅式
2.HelloWorld模式-简单队列模式
1)新建一个Maven项目,用于方便管理生产者和消费者。
2) 创建消息的生产者(发送消息)
步骤:
- 创建一个SpringBoot项目,命名为my-priduer-demo
- 引入依赖
    com.rabbitmq
    amqp-client
    >5.10.0
- 编写生产者
import com.rabbitmq.client.Channel;
import com.rabbitmq.client.Connection;
import com.rabbitmq.client.ConnectionFactory;
import java.io.IOException;
import java.nio.charset.StandardCharsets;
import java.util.concurrent.TimeoutException;

public class MyProducerDemoApplication {
    public static final String QUEUE_NAME = "my_queue";

    public static void main(String[] args) throws IOException, TimeoutException {
        // 1.连接Broker
        // 1.1 获得连接工厂
        ConnectionFactory factory = new ConnectionFactory();
        factory.setHost("虚拟机地址");
        factory.setPort(5672);
        factory.setUsername("test_user");
        factory.setPassword("test");
        factory.setVirtualHost("/test"); //设置连接的虚拟主机
        factory.setHandshakeTimeout(3000000);
        // 1.2 从连接工厂获得连接对象
        Connection connection = factory.newConnection();
        // 1.3 获取chanel,用于之后发送消息的对象
        Channel channel = connection.createChannel();
        // 1.4 声明队列 (队列不存在则创建,存在则使用)
        /*
         * queue – 队列的名称 the name of the queue
         * durable – 是否开启持久化 true if we are declaring a durable queue (the queue will survive a server restart)
         * exclusive – 是否独占连接(只允许当前客户端连接) true if we are declaring an exclusive queue (restricted to this connection)
         * autoDelete – 是否自动删除(长时间空闲未使用) true if we are declaring an autodelete queue (server will delete it when no longer in use)
         * arguments – 用于封装描述队列中的其他数据 other properties (construction arguments) for the queue
         */
        channel.queueDeclare(QUEUE_NAME,false,false,false,null);
        // 1.5 定义消息
        String message = "hello,rabbitmq!";
        // 1.6 发送消息
        /*
         * exchange – 交换机(Hello world模式下,一定是空串,不能为Null) the exchange to publish the message to
         * routingKey – 路由键(当exchange为空串时,路由键为队列名称) the routing key
         * immediate – 立即的 true if the 'immediate' flag is to be set. Note that the RabbitMQ server does not support this flag.
         * mandatory – 强制的 true if the 'mandatory' flag is to be set
         * props – 封装描述消息的数据 other properties for the message - routing headers etc
         * body – 消息体 the message body
         */
        channel.basicPublish("",QUEUE_NAME,null,message.getBytes(StandardCharsets.UTF_8));
        System.out.println("发送完毕!");
        // 1.7 断开连接
        channel.close();
        connection.close();

    }

}
在客户端查看:
3) 创建消息的消费者
- 引入依赖
- 编写消费者
import java.nio.charset.StandardCharsets;
import com.rabbitmq.client.*;
import java.io.IOException;
import java.nio.charset.StandardCharsets;
import java.util.concurrent.TimeoutException;
public class MyConsumer {
    public static final String QUEUE_NAME = "my_queue";

    public static void main(String[] args) throws IOException, TimeoutException {
        // 1.连接Broker
        // 1.1 获得连接工厂
        ConnectionFactory factory = new ConnectionFactory();
        factory.setHost("虚拟机ip");
        factory.setPort(5672);
        factory.setUsername("test_user");
        factory.setPassword("test");
        factory.setVirtualHost("/test"); //设置连接的虚拟主机
        factory.setHandshakeTimeout(3000000);
        // 1.2 从连接工厂获得连接对象
        Connection connection = factory.newConnection();
        // 1.3 获取chanel,用于之后发送消息的对象
        Channel channel = connection.createChannel();
        // 1.4 创建一个Consumer对象,来处理消息----打印消息
        Consumer consumer = new DefaultConsumer(channel) {
            @Override
            public void handleDelivery(String consumerTag,
                                       Envelope envelope,
                                       AMQP.BasicProperties properties,
                                       byte[] body) throws IOException {

                System.out.println(new String(body));

            }
        };

        // 设置消费者监听某个队列
        channel.basicConsume(QUEUE_NAME,consumer);

    }
}
- 启动并查看控制台
- 打开管理页面发现消息并没有被确认消费,当我们重启消费者还是会接收到这条消息
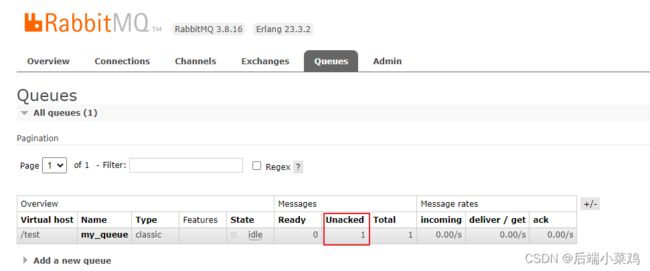 只需要在消费者监听队列时,将AutoAck置为 true 即可
// 设置消费者监听某个队列
channel.basicConsume(QUEUE_NAME,true,consumer);
简单队列的问题:
当多个消费者消费同⼀个队列时。这个时候rabbitmq的公平调度机制就开启了, 于是,⽆论消费者的消费能⼒如何,每个消费者都能公平均分到相同数量的消息, ⽽不能出现能者多劳的情况。
手动ACK存在的问题:
不管消费者是否消费完毕,都会马上发送ACK告知Broker消费完成,意味着Broker马上会推送下一条消息给消费者,如果此消费者消费能力较弱,则会造成消息堆积,或影响整个消息队列的消费能力。
解决方法:手动ACK
3. work 队列模式: 能者多劳模式
将⾃动ack 改成⼿动ack
- 消费者1
public class MyConsumer2 {
    public static final String QUEUE_NAME = "my_work_queue";

    public static void main(String[] args) throws Exception {
        // 1.连接Broker
        // 1.1 获得连接工厂
        ConnectionFactory factory = new ConnectionFactory();
        factory.setHost("虚拟机ip");
        factory.setPort(5672);
        factory.setUsername("test_user");
        factory.setPassword("test");
        factory.setVirtualHost("/test"); //设置连接的虚拟主机
        factory.setHandshakeTimeout(3000000);
        // 1.2 从连接工厂获得连接对象
        Connection connection = factory.newConnection();
        // 1.3 获取chanel,用于之后发送消息的对象
        Channel channel = connection.createChannel();
        // 声明队列
        channel.queueDeclare(QUEUE_NAME,false,false,false,null);
        // 声明一次只能消费一条消息
        channel.basicQos(1);
        // 1.4 创建一个Consumer对象,来处理消息----打印消息
        Consumer consumer = new DefaultConsumer(channel) {
            @Override
            public void handleDelivery(String consumerTag,
                                       Envelope envelope,
                                       AMQP.BasicProperties properties,
                                       byte[] body) throws IOException {
                System.out.println(new String(body));
                // 手动ASC,告诉Broker这条消息已经被消费,可以被移除队列,并且不需要批量确认消费
                channel.basicAck(envelope.getDeliveryTag(),false);
            }
        };

        // 设置消费者监听某个队列,并修改ASC模式为手动
        channel.basicConsume(QUEUE_NAME,false,consumer);

    }
}- 消费者2
在消费者1的基础上将当前线程睡眠3秒,来体现消费者2消费能力弱于消费者1
channel.basicQos(1) :声明一次只能消费一条消息
channel.basicAck(envelope.getDeliveryTag(),false) :手动ASC,告诉Broker这条消息已经被消费,可以被移除消息队列,并且不需要批量确认消费
- 生产者(向队列发送100条消息)
public class MyProducerDemoApplication {
    public static final String QUEUE_NAME = "my_work_queue";

    public static void main(String[] args) throws IOException, TimeoutException {
        ConnectionFactory factory = new ConnectionFactory();
        factory.setHost("虚拟机ip地址");
        factory.setPort(5672);
        factory.setUsername("test_user");
        factory.setPassword("test");
        factory.setVirtualHost("/test"); //设置连接的虚拟主机
        factory.setHandshakeTimeout(3000000);
        // 1.2 从连接工厂获得连接对象
        Connection connection = factory.newConnection();
        // 1.3 获取chanel,用于之后发送消息的对象
        Channel channel = connection.createChannel();
        channel.queueDeclare(QUEUE_NAME,false,false,false,null);
        for (int i = 0;i<=99;i++) {
            // 1.5 定义消息
            String message = "hello,rabbitmq!"+i;
            channel.basicPublish("",QUEUE_NAME,null,message.getBytes(StandardCharsets.UTF_8));
        }
        System.out.println("发送完毕!");
        // 1.7 断开连接
        channel.close();
        connection.close();

    }

}结果:消费者1(消费能力正常) 消费了97条消息,消费者2(消费能力较弱) 消费了3条消息,体现出了Work模式下的“能者多劳”。
4. 发布订阅模式-fanout
对于之前的队列模式,是没有办法解决⼀条消息同时被多个消费者消费。于是使⽤ 发布订阅模式来实现。
步骤:
生产者声明交换机,并向交换机发送消息(不再向队列发送消息)
-->
消费者声明队列与交换机,并将队列与交换机进行绑定
- 编写生产者
public class MyProducer {

    // 定义交换机名称
    public static final String EXCHANGE_NAME = "my_fanout_exchange";

    public static void main(String[] args) throws IOException, TimeoutException {

        // 获取连接对象
        Connection connection = RabbitUtil.getConnection();
        // 获取channel通道
        Channel channel = connection.createChannel();
        // 1、声明交换机
        channel.exchangeDeclare(EXCHANGE_NAME,"fanout");
        // 2、生产消息,发送给交换机
        for (int i = 0; i < 10; i++) {
            String message = "message:"+i;
            channel.basicPublish(EXCHANGE_NAME,"",null,message.getBytes(StandardCharsets.UTF_8));
        }
        System.out.println("消息已全部发送!");
    }
}- 编写消费者1
关键动作:
创建队列
创建交换机
把队列绑定在交换机上
让消费者监听队列
public class MyConsumer1 {

    private static  String EXCHANGE_NAME = "my_fanout_exchange";
    private static  String QUEUE_NAME = "my_fanout_queue_1";

    public static void main(String[] args) throws Exception {
        Connection connection = RabbitUtil.getConnection();
        Channel channel = connection.createChannel();
        // 1、声明交换机
        channel.exchangeDeclare(EXCHANGE_NAME,"fanout");
        // 2、声明队列
        channel.queueDeclare(QUEUE_NAME,false,false,false,null);
        // 3、将队列与交换机进行绑定
        channel.queueBind(QUEUE_NAME,EXCHANGE_NAME,"");
        // 4、创建消费者
        Consumer consumer = new DefaultConsumer(channel){
            @Override
            public void handleDelivery(String consumerTag,
                                       Envelope envelope,
                                       AMQP.BasicProperties properties,
                                       byte[] body) throws IOException {
                // 消费消息
                System.out.println("消费者1:"+new String(body));
            }
        };
        // 5、让消费者监听队列
        channel.basicConsume(QUEUE_NAME,true,consumer);
    }

}- 编写消费者2
public class MyConsumer2 {

    private static  String EXCHANGE_NAME = "my_fanout_exchange";
    private static  String QUEUE_NAME = "my_fanout_queue_2";

    public static void main(String[] args) throws Exception {
        Connection connection = RabbitUtil.getConnection();
        Channel channel = connection.createChannel();
        // 1、声明交换机
        channel.exchangeDeclare(EXCHANGE_NAME,"fanout");
        // 2、声明队列
        channel.queueDeclare(QUEUE_NAME,false,false,false,null);
        // 3、将队列与交换机进行绑定
        channel.queueBind(QUEUE_NAME,EXCHANGE_NAME,"");
        // 4、创建消费者
        Consumer consumer = new DefaultConsumer(channel){
            @Override
            public void handleDelivery(String consumerTag,
                                       Envelope envelope,
                                       AMQP.BasicProperties properties,
                                       byte[] body) throws IOException {
                // 消费消息
                System.out.println("消费者2:"+new String(body));
            }
        };
        // 5、让消费者监听队列
        channel.basicConsume(QUEUE_NAME,true,consumer);
    }

}
分别启动两个消费者和一个生产者,发现两个消费者都接收到了所有的消息。
5.routing模式-direct
关键动作:
在⽣产者发送消息时指明routing-key
在消费者声明队列和交换机的绑定关系时,指明routing-key
- 编写⽣产者
对交换机发送消息时,指定 routing-key 为 apple ,
public class MyProducer {
    // 定义交换机名称
    public static final String EXCHANGE_NAME = "my_routing_exchange";

    public static void main(String[] args) throws IOException, TimeoutException {
        // 获取连接对象
        Connection connection = RabbitUtil.getConnection();
        // 获取channel通道
        Channel channel = connection.createChannel();
        // 1、声明路由模式的交换机
        channel.exchangeDeclare(EXCHANGE_NAME,"direct");
        // 2、生产消息,发送给交换机
        String message = "apple-message:";
channel.basicPublish(EXCHANGE_NAME,"apple",null,message.getBytes(StandardCharsets.UTF_8));
        System.out.println("消息已全部发送!");
        // 3、关闭连接
        channel.close();
        connection.close();
    }
}- 编写消费者1
绑定交换机与队列时,指定 routing-key 为 apple
public class MyConsumer1 {
    private static  String EXCHANGE_NAME = "my_routing_exchange";
    private static  String QUEUE_NAME = "my_routing_queue_1";
    private static  String ROUTING_KEY = "apple";

    public static void main(String[] args) throws Exception {
        Connection connection = RabbitUtil.getConnection();
        Channel channel = connection.createChannel();
        // 1、声明交换机
        channel.exchangeDeclare(EXCHANGE_NAME,"direct");
        // 2、声明队列
        channel.queueDeclare(QUEUE_NAME,false,false,false,null);
        // 3、将队列与交换机进行绑定,并指定routingKey
        channel.queueBind(QUEUE_NAME,EXCHANGE_NAME,ROUTING_KEY);
        // 4、创建消费者
        Consumer consumer = new DefaultConsumer(channel){
            @Override
            public void handleDelivery(String consumerTag,
                                       Envelope envelope,
                                       AMQP.BasicProperties properties,
                                       byte[] body) throws IOException {
                // 消费消息
                System.out.println(ROUTING_KEY+":"+new String(body));
            }
        };
        // 5、让消费者监听队列
        channel.basicConsume(QUEUE_NAME,true,consumer);
    }
}- 编写消费者2
绑定交换机与队列时,指定 routing-key 为 banana
public class MyConsumer2 {
    private static  String EXCHANGE_NAME = "my_routing_exchange";
    private static  String QUEUE_NAME = "my_routing_queue_2";
    private static  String ROUTING_KEY = "banana";

    public static void main(String[] args) throws Exception {
        Connection connection = RabbitUtil.getConnection();
        Channel channel = connection.createChannel();
        // 1、声明交换机
        channel.exchangeDeclare(EXCHANGE_NAME,"direct");
        // 2、声明队列
        channel.queueDeclare(QUEUE_NAME,false,false,false,null);
        // 3、将队列与交换机进行绑定,并指定routingKey
        channel.queueBind(QUEUE_NAME,EXCHANGE_NAME,ROUTING_KEY);
        // 4、创建消费者
        Consumer consumer = new DefaultConsumer(channel){
            @Override
            public void handleDelivery(String consumerTag,
                                       Envelope envelope,
                                       AMQP.BasicProperties properties,
                                       byte[] body) throws IOException {
                // 消费消息
                System.out.println(ROUTING_KEY+":"+new String(body));
            }
        };
        // 5、让消费者监听队列
        channel.basicConsume(QUEUE_NAME,true,consumer);
    }
}分别启动两个消费者和一个生产者,发现只有队列绑定的routing-key为apple的消费者才接收到了消息,则实现了给指定队列发送消息。
6.topics模式
在routing模式的基础上,对routing-key使⽤了通配符,提⾼了匹配的范围,增加了可玩性。
- *.orange.*
- *.*.rabbit 只⽀持单层级
- lazy.# 可以⽀持多层级的routing-key
绑定关系中如果使⽤了product.* ,那么在发送消息时:
- product.add ok product.del ok
- product.add.one 不ok
绑定关系中如果使⽤了product.#,那么在发送消息时:
- product.add ok
- product.add.one ok
编写生产者:
用 topic模式,并设置routing-key为多层级
public class MyProducer {

    public static final String EXCHANGE_NAME = "my_topic_exchange";

    public static void main(String[] args) throws Exception {
        // 获得连接对象与通道
        Connection connection = RabbitUtil.getConnection();
        Channel channel = connection.createChannel();
        // 声明交换机
        channel.exchangeDeclare(EXCHANGE_NAME,"topic");
        // 发送消息
        channel.basicPublish(EXCHANGE_NAME,"product.add.one",false,false,null,"hello,topic".getBytes(StandardCharsets.UTF_8));
        // 关闭连接
        channel.close();
        connection.close();
    }
}
编写消费者1:
用 topic模式,并设置routing-key为 product.* (单层级)
public class MyConsumer1 {
    // 交换机名称
    private static  String EXCHANGE_NAME = "my_topic_exchange";
    // 队列名称
    private static  String QUEUE_NAME = "my_topic_queue_1";
    public static void main(String[] args) throws Exception {
        Connection connection = RabbitUtil.getConnection();
        Channel channel = connection.createChannel();
        // 1、声明交换机
        channel.exchangeDeclare(EXCHANGE_NAME,"topic");
        // 2、声明队列
        channel.queueDeclare(QUEUE_NAME,false,false,false,null);
        // 3、将队列与交换机进行绑定,并指定routingKey,为 product.任意字符 都能接收
        channel.queueBind(QUEUE_NAME,EXCHANGE_NAME,"product.*");
        // 4、创建消费者
        Consumer consumer = new DefaultConsumer(channel){
            @Override
            public void handleDelivery(String consumerTag,
                                       Envelope envelope,
                                       AMQP.BasicProperties properties,
                                       byte[] body) throws IOException {
                // 消费消息
                System.out.println("product.*消费者:"+":"+new String(body));
            }
        };
        // 5、让消费者监听队列
        channel.basicConsume(QUEUE_NAME,true,consumer);
    }
}
编写消费者2:
用 topic模式,并设置routing-key为 product.# (多层级)
public class MyConsumer2 {
    // 交换机名称
    private static  String EXCHANGE_NAME = "my_topic_exchange";
    // 队列名称
    private static  String QUEUE_NAME = "my_topic_queue_2";
    public static void main(String[] args) throws Exception {
        Connection connection = RabbitUtil.getConnection();
        Channel channel = connection.createChannel();
        // 1、声明交换机
        channel.exchangeDeclare(EXCHANGE_NAME,"topic");
        // 2、声明队列
        channel.queueDeclare(QUEUE_NAME,false,false,false,null);
        // 3、将队列与交换机进行绑定,并指定routingKey,为 product.任意字符 都能接收
        channel.queueBind(QUEUE_NAME,EXCHANGE_NAME,"product.#");
        // 4、创建消费者
        Consumer consumer = new DefaultConsumer(channel){
            @Override
            public void handleDelivery(String consumerTag,
                                       Envelope envelope,
                                       AMQP.BasicProperties properties,
                                       byte[] body) throws IOException {
                // 消费消息
                System.out.println("product.*消费者:"+":"+new String(body));
            }
        };
        // 5、让消费者监听队列
        channel.basicConsume(QUEUE_NAME,true,consumer);
    }
}
分别启动两个消费者和一个生产者,发现只有队列绑定的routing-key为product.#的消费者才接收到了消息。
六、在Springboot中使⽤RabbitMQ
1.引⼊依赖
            org.springframework.boot
            spring-boot-starter-amqp
2.编写配置⽂件
server.port=8091
spring.rabbitmq.addresses=虚拟机ip地址
spring.rabbitmq.port=5672
spring.rabbitmq.username=test_user
spring.rabbitmq.password=test
spring.rabbitmq.virtual-host=/test #虚拟主机名
3.使⽤发布订阅模式
发布订阅回顾:
消费者定义交换机与队列,将两者绑定;
生产者向交换机发送消息;
1)编写消费者
- 编写配置类
定义交换机与队列,将交换机与队列进行绑定
/**
 * RabbitMQ消费者配置类
 * springBoot实现消息订阅模式
 */
@Configuration
public class MyRabbitConfig {

    public static final String EXCHANGE_NAME = "my_boot_fanout_exchange";
    public static final String QUEUE_NAME = "my_boot_fanout_queue1";

    /**
     * 声明交换机
     */
    @Bean
    public FanoutExchange exchange(){
        return new FanoutExchange(EXCHANGE_NAME,true,false);
    }

    /**
     * 声明队列
     */
    @Bean
    public Queue queue(){
      return   new Queue(QUEUE_NAME,true,false,false);
    }

    /**
     * 绑定交换机与队列
     */
    @Bean
    public Binding queueBinding(Queue queue,FanoutExchange exchange){
        return BindingBuilder.bind(queue).to(exchange);
    }

}- 编写消费消息的⽅法
关键:使⽤该注解来指定监听的队列@RabbitListener(queues = "要监听的队列名称")
@Component
public class MyConsumer {

    /**
     * 监听队列:当队列中有消息,则监听器工作,处理接收到的消息
     * @param message 消息体
     */
    @RabbitListener(queues = "my_boot_fanout_queue1")
    public void process(Message message){
        byte[] messageBody = message.getBody();
        System.out.println(new String(messageBody));
    }

}
2)编写⽣产者
- 编写配置类
因为生产者只需要给交换机发送消息,所以只需要声明交换机即可
@Configuration
public class MyProducerConfig {
    public static final String EXCHANGE_NAME = "my_boot_fanout_exchange";
    /**
     * 声明交换机
     */
    @Bean
    public FanoutExchange exchange(){
        return new FanoutExchange(EXCHANGE_NAME,true,false);
    }
}- 使⽤RabbitTemplate发送消息
    @Autowired
    RabbitTemplate rabbitTemplate;

    public static final String EXCHANGE_NAME = "my_boot_fanout_exchange";

    @Test
    void testSendMsg(){
        String msg = "Hello,SpringBootRabbitMQ!";
        rabbitTemplate.convertAndSend(EXCHANGE_NAME,"",msg);
        System.out.println("消息发送成功!");
    }
4.使⽤topic模式
topic模式相⽐发布订阅模式,多了routing-key的使⽤
1)调整消费者配置类 (要指定Routing-key)
/**
 * RabbitMQ消费者配置类
 * springBoot实现Topic模式
 */
@Configuration
public class MyRabbitTopicConfig {

    public static final String TOPIC_EXCHANGE_NAME = "my_boot_topic_exchange";
    public static final String TOPIC_QUEUE_NAME = "my_boot_topic_queue";

    /**
     * 声明交换机
     */
    @Bean
    public TopicExchange exchange(){
        return new TopicExchange(TOPIC_EXCHANGE_NAME,true,false);
    }

    /**
     * 声明队列
     */
    @Bean
    public Queue queue(){
      return   new Queue(TOPIC_QUEUE_NAME,true,false,false);
    }

    /**
     * 绑定交换机与队列
     */
    @Bean
    public Binding queueBinding(Queue queue,TopicExchange exchange){
        return BindingBuilder.bind(queue).to(exchange).with("product.*"); // 能接受到routing-key为product.任意字符的消息(*单层 #多层)
    }

}
还需修改消费者监听的队列为这里声明的队列名
2)编写⽣产者
- 调整⽣产者的配置类
public class MyTopicProducerConfig {
    public static final String TOPIC_EXCHANGE_NAME = "my_boot_topic_queue";

    /**
     * 声明交换机
     */
    @Bean
    public TopicExchange exchange(){
        return new TopicExchange(TOPIC_EXCHANGE_NAME,true,false);
    }
}- 发消息时携带routing-key
    @Autowired
    RabbitTemplate rabbitTemplate;

    public static final String TOPIC_EXCHANGE_NAME = "my_boot_fanout_exchange";

    @Test
    void testSendMsg(){
        String msg = "Hello,SpringBootRabbitMQ!";
        rabbitTemplate.convertAndSend(TOPIC_EXCHANGE_NAME,"product.add",msg); //指定routing-key
        System.out.println("消息发送成功!");
    }
5.⼿动ack的实现
- 在配置⽂件中添加⼿动ack的配置
spring.rabbitmq.listener.direct.acknowledge-mode=manual- 在消费者中消费完后进⾏⼿动ack
    @RabbitListener(queues = "my_boot_topic_queue")
    public void process(Message message, Channel channel) throws IOException {

        System.out.println("接收到的消息"+message.toString());

        // 手动ACK,告知Broker确认已被消费的消息id(DeliveryTag)
        channel.basicAck(message.getMessageProperties().getDeliveryTag(),false);

    }
其中,message的请求头中的这两个键值对分别为:
- spring_listener_return_correlation:该属性是⽤来确定消息被退回时调⽤哪个监听器
- spring_returned_message_correlation:该属性是指退回待确认消息的唯⼀标识
七、消息的可靠性投递
消息的可靠性的三个保障:
1.生产者将消息准确的投递给交换机(使用Confirm机制)
2.交换机将消息准确的投递给队列(使用Return机制)
3.队列将消息准确的推送给消费者(消费者手动ACK)
1.通过confirm机制保证⽣产者消息能够投递到 MQ
- 在spring项⽬中为生产者发送消息时使用confirm
public class MyProducer {

    public static final String EXCHANGE_NAME = "my_topic_exchange";

    public static void main(String[] args) throws Exception {
        // 获得连接对象与通道
        Connection connection = RabbitUtil.getConnection();
        Channel channel = connection.createChannel();
        // 声明交换机
        channel.exchangeDeclare(EXCHANGE_NAME,"topic");
        // 开启confirm机制
        channel.confirmSelect();
        // 设置confirm监听器
        channel.addConfirmListener(new ConfirmListener() {
            // 消息被Broker确认接收了,将会回调此方法
            @Override
            public void handleAck(long l, boolean b) throws IOException {
                // 消息发送成功
                System.out.println("消息被成功投递!");
            }
            // 消息被Broker接收失败了,将会回调此方法
            @Override
            public void handleNack(long l, boolean b) throws IOException {
                //开启重试机制,重试达到阈值,则考虑人工介入
                System.out.println("消息投递失败!");
            }
        });
        byte[] msg = "hello,confirm message".getBytes(StandardCharsets.UTF_8);
        // 发送消息
        channel.basicPublish(EXCHANGE_NAME,"product.add",false,false,null,msg);
    }
}
在发送消息前 使用 channel.confirmSelect() 以开启confirm机制;
使用 channel.addConfirmListener 来设置confirm监听器
其中 handleAck 为消息成功投递给交换机的回调函数
handleNack 为消息未成功投递给交换机的回调函数
- 在SpringBoot中使用Confirm
步骤⼀:修改⽣产者的配置:
server.port=8091
spring.rabbitmq.addresses=虚拟机ip地址
spring.rabbitmq.port=5672
spring.rabbitmq.username=test_user
spring.rabbitmq.password=test
spring.rabbitmq.virtual-host=/test
spring.rabbitmq.publisher-confirm-type: correlated
publisher-confirm-type:有三种配置:
- simple:简单的执⾏ack的判断;在发布消息成功后使⽤rabbitTemplate调⽤ waitForConfirms或waitForConfirmsOrDie⽅法等待broker节点返回发送结果,根据返回结果来判断下⼀步的逻辑。但是要注意的是当waitForConfirmsOrDie⽅法 如果返回false则会关闭channel。
- correlated: 执⾏ack的时候还会携带数据(消息的元数据);
- none: 禁⽤发布确认模式, 默认的
步骤⼆:编写⼀个ConfirmCallback的实现类(监听器),并注⼊到RabbitTemplate
@Component
public class MyConfirmCallfack implements RabbitTemplate.ConfirmCallback {

    @Autowired
    private RabbitTemplate rabbitTemplate;

    // 将监听器注入到RabbitTemplate中
    @PostConstruct
    public void init(){
        rabbitTemplate.setConfirmCallback(this);
    }


    /**
     * @param correlationData 消息元数据(消息id,消息内容)
     * @param ack 布尔值,Broker是否成功接收到消息
     * @param cause 投递失败的原因
     */
    @Override
    public void confirm(CorrelationData correlationData, boolean ack, String cause) {
        // 消息的id
        String id = correlationData.getId();
        if (ack){
            // 消息投递成功
            System.out.println("消息投递成功,id为:"+id);
        }else{
            // 消息投递失败,可对失败的消息进行定时重试
            System.out.println("消息投递失败,原因为:"+cause);
        }
    }
}
我们发现当把交换机改成一个不存在的交换机,会得到消息失败的反馈,但如果修改了错误的routing-key而导致消息未成功投递,则不会收到消息投递失败的反馈,这是因为Confirm只会关注生产者与交换机的消息投递情况。
2.通过return机制保证消息在rabbitmq中能够成功的投递到队列⾥
⽣产者将消息投递到mq的交换机上——Confirm机制来保证的。
如果交换机没办法将消息投递到队列上,就可以通过Return机制来进⾏重试。
步骤⼀:修改配置⽂件
开启return机制的话。需要把mandatory设置成true。
server.port=8091
spring.rabbitmq.addresses=虚拟机IP地址
spring.rabbitmq.port=5672
spring.rabbitmq.username=test_user
spring.rabbitmq.password=test
spring.rabbitmq.virtual-host=/test
spring.rabbitmq.publisher-confirm-type: correlated
spring.rabbitmq.publisher-returns: true
步骤⼆:在监听类中实现RabbitTemplate.ReturnCallback接⼝
import org.springframework.amqp.core.Message;
import org.springframework.amqp.rabbit.connection.CorrelationData;
import org.springframework.amqp.rabbit.core.RabbitTemplate;
import org.springframework.beans.factory.annotation.Autowired;
import org.springframework.stereotype.Component;

import javax.annotation.PostConstruct;

@Component
public class MyConfirmCallfack implements RabbitTemplate.ConfirmCallback,RabbitTemplate.ReturnCallback {


    @Autowired
    private RabbitTemplate rabbitTemplate;

    // 将监听器注入到RabbitTemplate中
    @PostConstruct
    public void init(){
        rabbitTemplate.setConfirmCallback(this);
        rabbitTemplate.setReturnCallback(this);
    }


    /**
     * @param correlationData 消息元数据(消息id,消息内容)
     * @param ack 布尔值,Broker是否成功接收到消息
     * @param cause 投递失败的原因
     */
    @Override
    public void confirm(CorrelationData correlationData, boolean ack, String cause) {
        // 消息的id
        String id = correlationData.getId();
        if (ack){
            // 消息投递成功
            System.out.println("消息投递成功,id为:"+id);
        }else{
            // 消息投递失败,可对失败的消息进行定时重试
            System.out.println("消息投递失败,原因为:"+cause);
        }
    }

    /**
        当消息未成功被投递到队列,调用此方法
     */
    @Override
    public void returnedMessage(Message message, int i, String s, String s1, String s2) {
        System.out.println("消息"+new String(message.getBody()+"没有被成功投递到队列"));
    }
}
3.⼿动ack、nack、reject的区别
1) 不做任何的ack
RabbitMQ会把消息标记成unacked,此时mq是在等待消费者进⾏ack,如果消费者失去了会话,此时消息会重新回到ready状态,被其他消费者消费。
2)ack
确认签收,之后消息会从队列中剔除。
3)reject
reject就是拒绝此条消息。
reject⼀次只⽀持处理⼀条消息。消息被拒绝掉之后,并且requeue设置成了false, 将会进⼊到死信队列中。如果requeue设置成true,将会重回队列,但是这种情况很少使⽤。
4)nack
public class MyConsumer1 {
    // 交换机名称
    private static  String EXCHANGE_NAME = "my_topic_exchange";
    // 队列名称
    private static  String QUEUE_NAME = "my_topic_queue_1";
    public static void main(String[] args) throws Exception {
        Connection connection = RabbitUtil.getConnection();
        Channel channel = connection.createChannel();
        // 1、声明交换机
        channel.exchangeDeclare(EXCHANGE_NAME,"topic");
        // 2、声明队列
        channel.queueDeclare(QUEUE_NAME,false,false,false,null);
        // 3、将队列与交换机进行绑定,并指定routingKey,为 product.任意字符 都能接收
        channel.queueBind(QUEUE_NAME,EXCHANGE_NAME,"product.*");
        // 4、创建消费者
        Consumer consumer = new DefaultConsumer(channel){
            @Override
            public void handleDelivery(String consumerTag,
                                       Envelope envelope,
                                       AMQP.BasicProperties properties,
                                       byte[] body) throws IOException {
                // 消费消息
                System.out.println("product.*消费者:"+":"+new String(body));
                  //⼿动ack
//                channel.basicAck(envelope.getDeliveryTag(),false);
                  //reject拒签消息 ⼀次只⽀持处理⼀条消息
//                channel.basicReject(envelope.getDeliveryTag(),false);
                //nack 拒签消息 ⽀持批处理多条消息
                channel.basicNack(envelope.getDeliveryTag(), true,false);
            }
        };
        // 5、让消费者监听队列
        channel.basicConsume(QUEUE_NAME,true,consumer);
    }
}
5)消息元数据的封装
在生产者发送消息前,可构建消息的元数据,例如消息是否持久化,消息过期时间,消息的ID及自定义的Map数据。
⽣产者端:
public class MyProducer {

    public static final String EXCHANGE_NAME = "my_topic_exchange";

    public static void main(String[] args) throws Exception {
        // 获得连接对象与通道
        Connection connection = RabbitUtil.getConnection();
        Channel channel = connection.createChannel();
        // 声明交换机
        channel.exchangeDeclare(EXCHANGE_NAME,"topic");

        // 创建消息的元数据
        HashMap map = new HashMap<>();
        map.put("name","zhangsan");
        map.put("age","18");
        AMQP.BasicProperties properties = new AMQP.BasicProperties.Builder()
                .deliveryMode(2) //消息是否支持持久化:1不支持2支付
                .messageId(UUID.randomUUID().toString()) //定义消息的业务id
                .expiration("100000000") // 定义消息的过期时间
                .headers(map) // 头信息
                .build();
        // 发送消息
        channel.basicPublish(EXCHANGE_NAME,"product.#",false,false,properties,"hello,topic".getBytes(StandardCharsets.UTF_8));
        // 关闭连接
        channel.close();
        connection.close();
    }
} 通过new AMQP.BasicProperties.Builder构造消息元数据
消费者端:
public class MyConsumer1 {
    // 交换机名称
    private static  String EXCHANGE_NAME = "my_topic_exchange";
    // 队列名称
    private static  String QUEUE_NAME = "my_topic_queue_1";
    public static void main(String[] args) throws Exception {
        Connection connection = RabbitUtil.getConnection();
        Channel channel = connection.createChannel();
        // 1、声明交换机
        channel.exchangeDeclare(EXCHANGE_NAME,"topic");
        // 2、声明队列
        channel.queueDeclare(QUEUE_NAME,false,false,false,null);
        // 3、将队列与交换机进行绑定,并指定routingKey,为 product.任意字符 都能接收
        channel.queueBind(QUEUE_NAME,EXCHANGE_NAME,"product.add");
        // 4、创建消费者
        Consumer consumer = new DefaultConsumer(channel){
            @Override
            public void handleDelivery(String consumerTag,
                                       Envelope envelope,
                                       AMQP.BasicProperties properties,
                                       byte[] body) throws IOException {
                // 消费消息
                Map map = properties.getHeaders();//获取消息元数据
                System.out.println(map);
                //⼿动ack
                channel.basicAck(envelope.getDeliveryTag(),false);
            }
        };
        // 5、让消费者监听队列
        channel.basicConsume(QUEUE_NAME,false,consumer);
    }
} 通过AMQP.BasicProperties获取消息元数据
⼋、消息的重复消费问题
1.什么幂等性
幂等性:多次操作造成的结果是⼀致的。对于⾮幂等的操作,幂等性如何保证? ——使⽤分布式锁。
使用分布式锁解决因网络抖动造成消费者成功消费后没有手动ACK而消息重复消费思路:为消息生成全局唯一ID,生产者发送消息时携带此ID,消费者成功消费后将这条消息的ID通过Redis的setnx缓存,当准备重复消费时从redis中去判断是否有该ID。
九、死信队列——“延迟”队列
1.死信队列的介绍
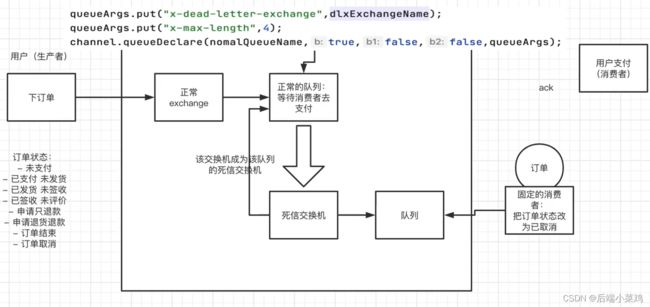
死信队列 ,让⼀条消息,在满⾜⼀定的条件下,成为死信,会被发送到另⼀个交换机上,再被消费。 这个过程就是死信队列的作⽤。 死信队列就可以做出“延迟”队列的效果。⽐如,在订单超时未⽀付 ,将订单状态改 成“已取消”,这个操作就可以使⽤死信队列来完成。设置消息的超时时间,当消息超时则消息成为死信,于是通过监听死信队列的消费者来做取消订单的动作。
要掌握两个知识:
- 消息如何成为死信? 成为死信的条件
- 怎样创建死信队列,完成死信队列的效果
2.消息成为死信的条件
- 消息被拒签,并且没有重回队列,消息将成为死信。(nack、reject且requeue为false)
- 消息过期了,消息将成为死信。
- 队列⻓度有限,存不下消息了,存不下的消息将会成为死信。
3.创建死信队列
关键点:让正常的队列,绑定上死信交换机即可。注意:这个死信交换机实际上也是⼀个正常交换机。
消费者):
        Connection connection = RabbitUtil.getConnection();
        Channel channel = connection.createChannel();

        // 声明普通交换机、普通队列 声明死信交换机、死信队列 建立他们的关系
        String normalExchangeName = "normal.exchange";
        String exchangeType = "topic";
        String normalQueueName = "normal.queue";
        String routingKey = "dlx.#";
        // 声明死信队列
        String dlxExchangeName = "dlx.exchange";
        String dlxQueueName = "dlx.queue";
        // 声明普通交换机
        channel.exchangeDeclare(normalExchangeName,exchangeType,true,false,null);

        // 为队列绑定死信交换机
        Map queueArgs = new HashMap<>();
        queueArgs.put("x-dead-letter-exchange",dlxExchangeName);//正常队列绑定⼀个交换机,让该交换机是死信交换机
        queueArgs.put("x-max-length",4);   //设置队列的⻓度是4
        // 声明普通队列,并将带有死信交换机的消息元数据
        channel.queueDeclare(normalQueueName,true,false,false,queueArgs);
        channel.queueBind(normalQueueName,normalExchangeName,routingKey);
        //创建死信队列
        channel.exchangeDeclare(dlxExchangeName,exchangeType,true,false,null);
        channel.queueDeclare(dlxQueueName,true,false,false,null);
        channel.queueBind(dlxQueueName,dlxExchangeName,"#");
4.延迟队列
创建一个监听死信队列的消费者,当有消息进入死信队列时,取出消息的元数据进行业务处理(例如超时取消订单),成功消费死信队列的消息后手动ACK。
